Best Synthesia Alternatives for Creating AI Videos

Green image of Synthesia logo.

Have you seen the amazing life-like AI avatars of Synthesia and considered using them to level up your videos? Synthesia is a popular AI video generator that allows users to create professional videos with AI avatars and text-to-speech capabilities.

However, the value of the feature set, pricing, or different use cases in content creation and marketing can leave some video creators like yourself, looking for other video creation platforms.  

If you are creating videos for work, you find yourself wearing a few different hats. Generally, you are not a full-time video editor, but using the medium of videos to inform, train, and show what you know to others.

While Synthesia is powerful for narrator-focused training, it often misses out on the other types of videos you will need to create, even if you are simply doing internal training.

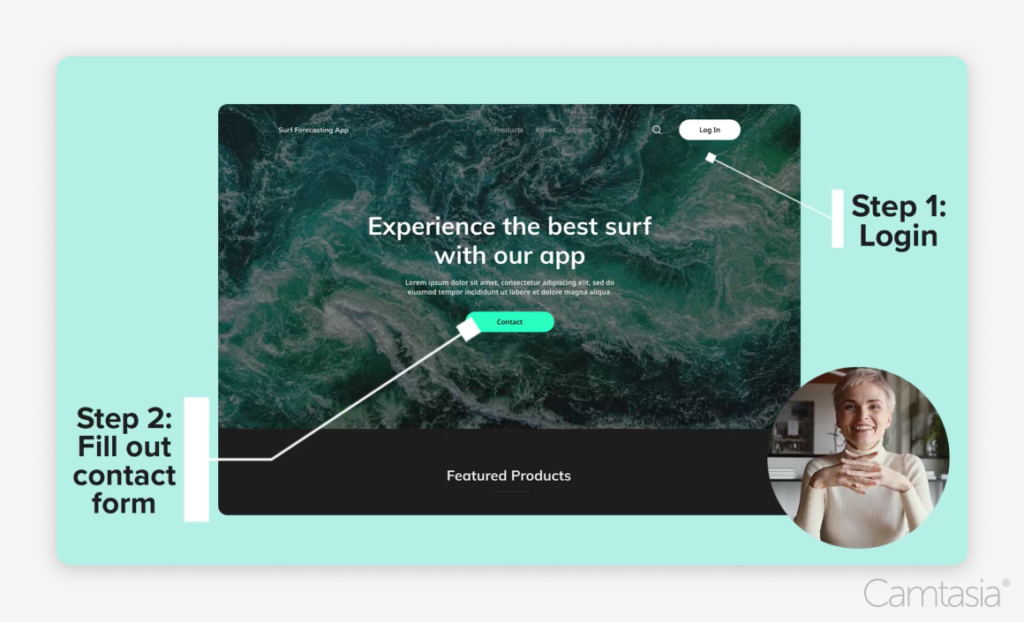
For example, say you are in Human Resources or IT–for your curriculum to be effective, it requires you to create several types of video, such as promotional content, demonstrations, presentations, training content, and tutorials.

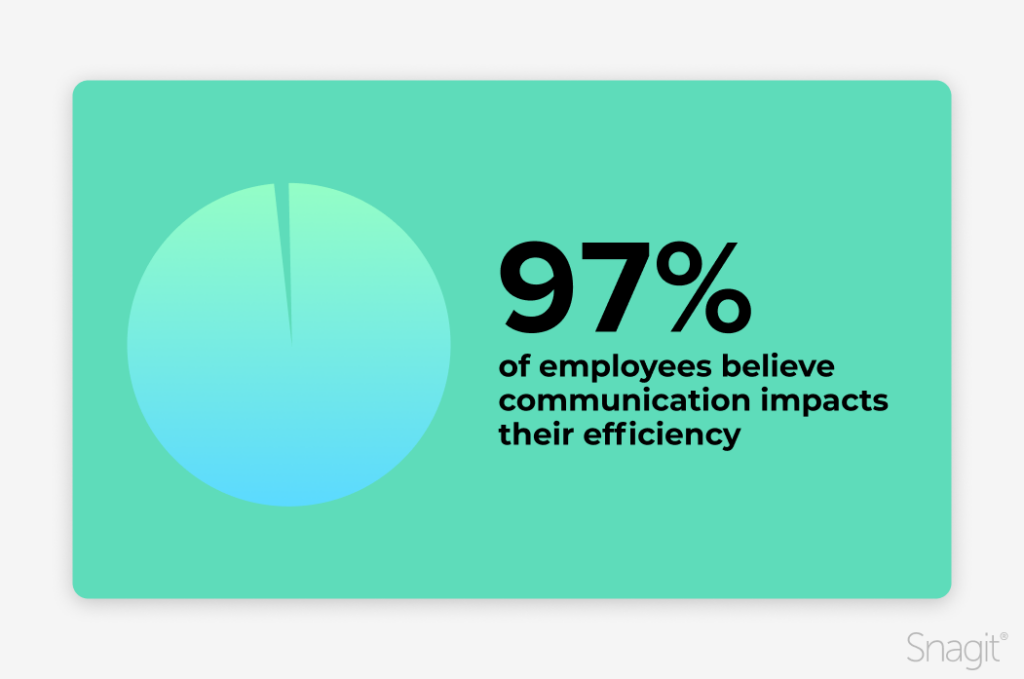
The Training video type might seem obvious to you. It’s probably why you found Synthesia. But a promo video? A quick sizzle reel to get a person hyped? With any type of video you are creating, you need to keep your audience engaged. They need to know “what’s in it for me?” right away.

It doesn’t matter how many different styles of talking heads you use, if your audience does not watch it. The secret to the best content in the workplace is to recycle your content into multiple types of videos. You will become the best marketer of learning within your organization. 

For some this looks like creating your presentation for live training first, then recreating this as a long form training curriculum, then taking that long form training into short and sweet microlearning videos, and then finally–beating the loud drum to rally your audience to participate in your curriculum with a promotional video that acts as the hype or commercial for a small taste of what and why your audience should be excited to engage with your videos. 

Camtasia: The best alternative for creating high-quality, engaging videos

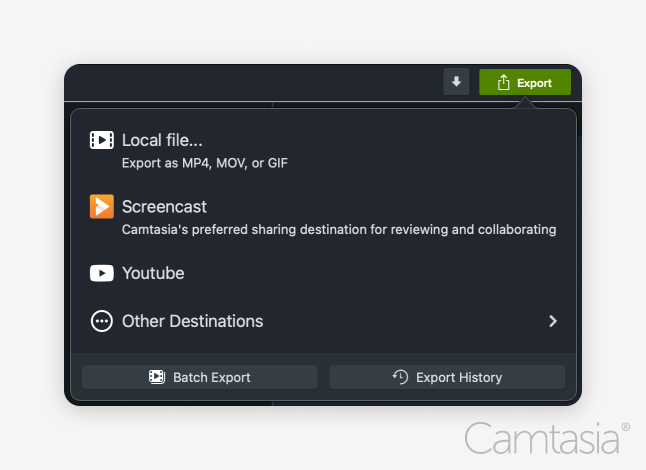
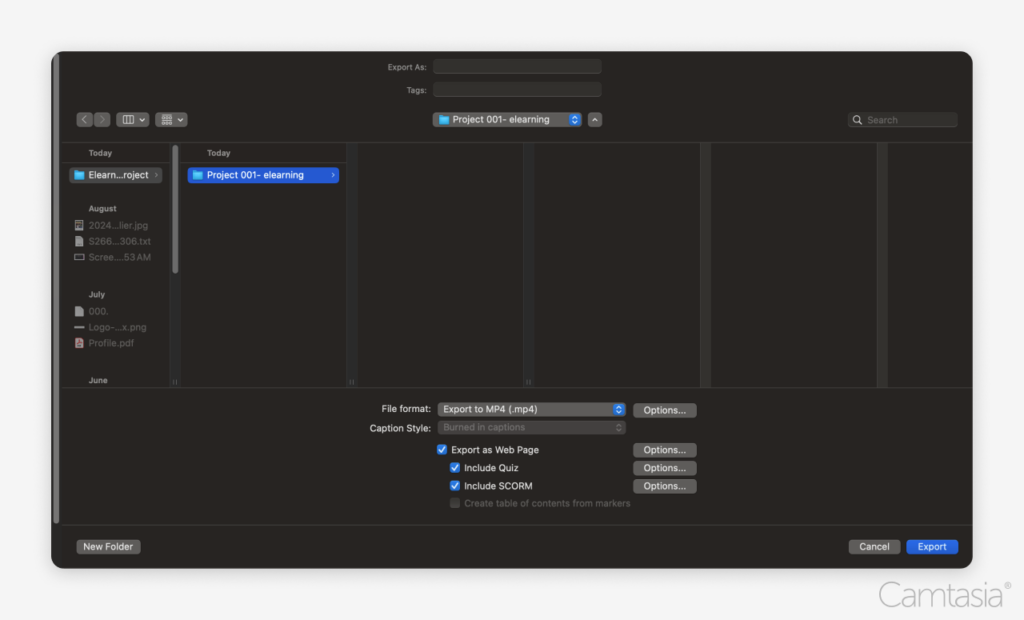
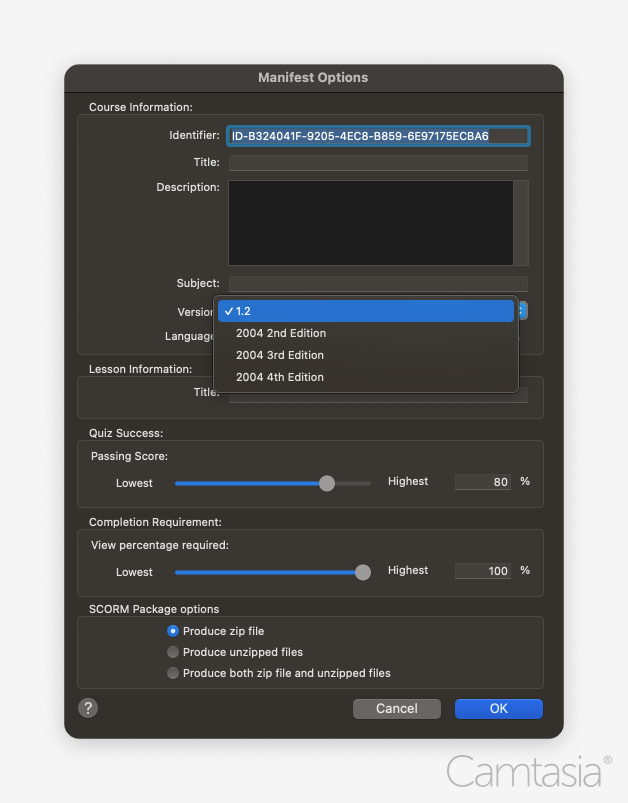
Camtasia is a powerful alternative to Synthesia, designed for users who want full control over the video creation process. Unlike most AI-based tools, Camtasia offers extensive editing features, templates, and screen recording for creating high-quality, customized video. It’s time to create more types of videos than just sprinkling AI on PowerPoint. 

Key features of Camtasia

Camtasia offers many features that make it stand out as a Synthesia alternative.

Easy-to-use Precision Editing

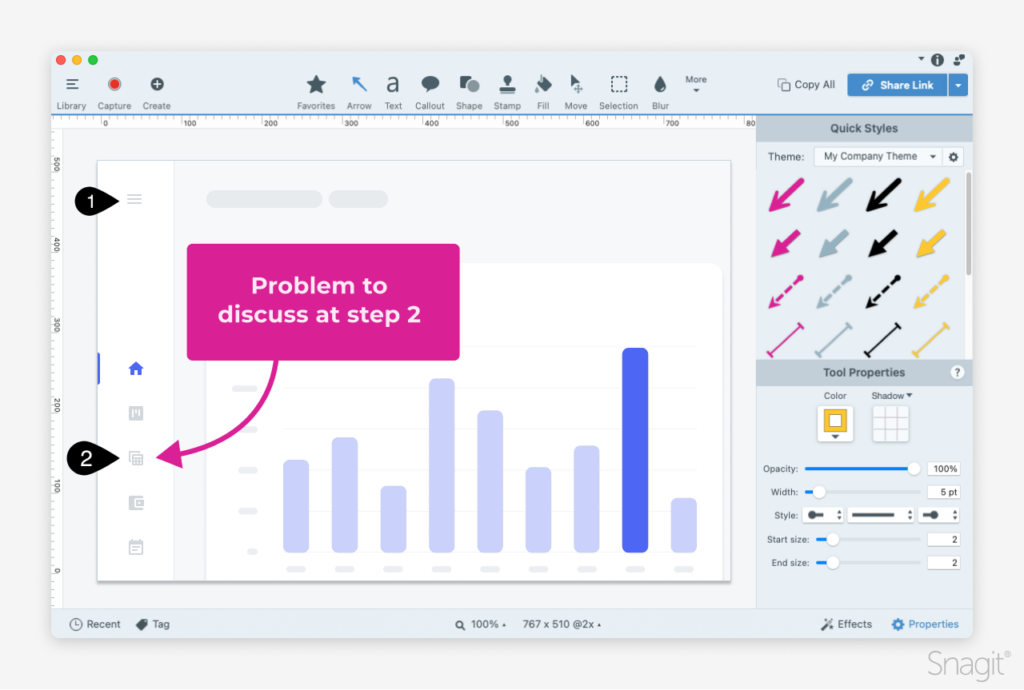
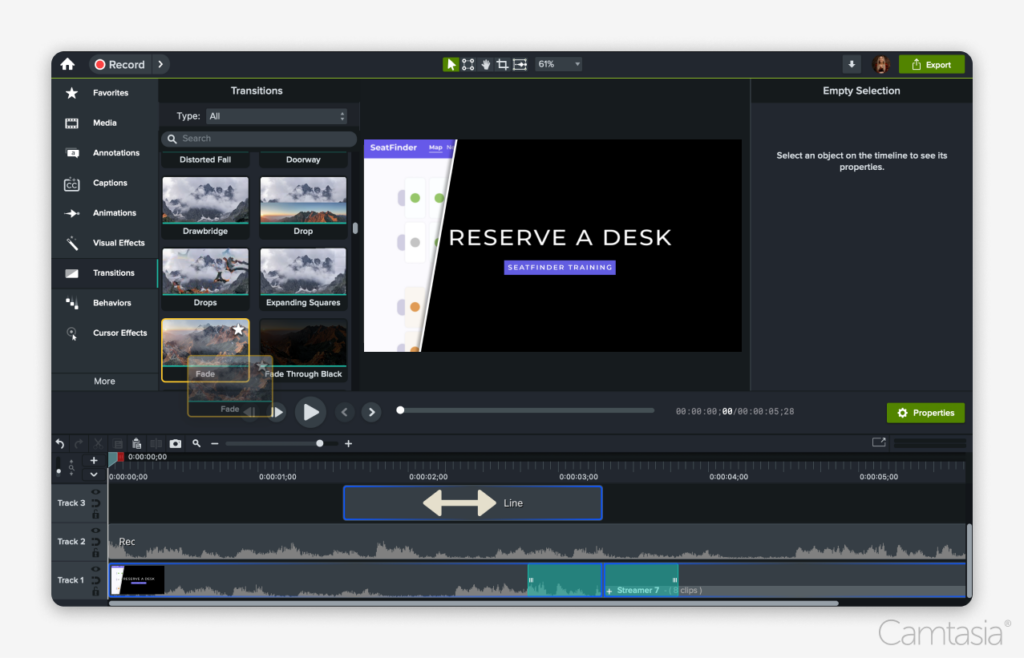
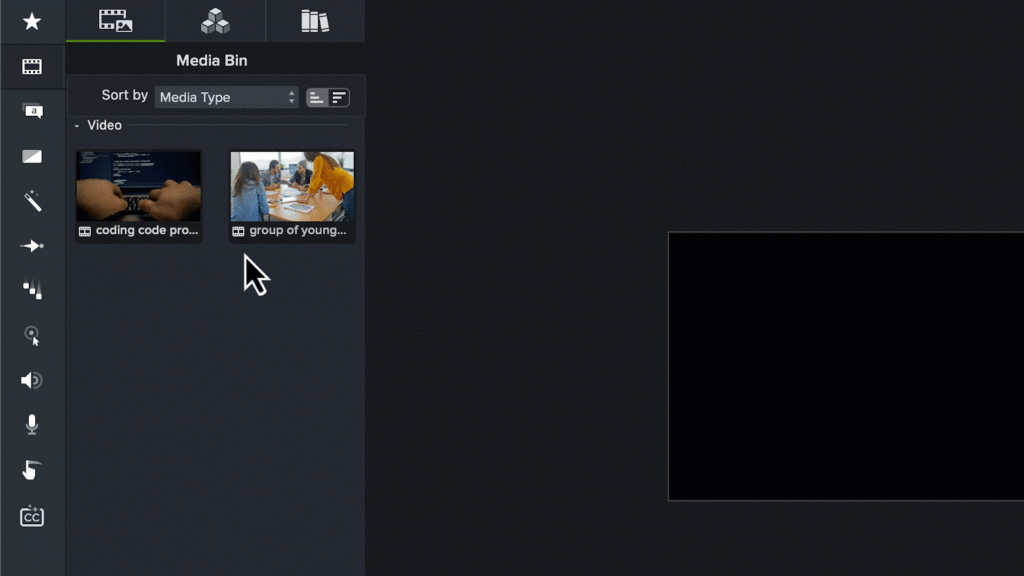
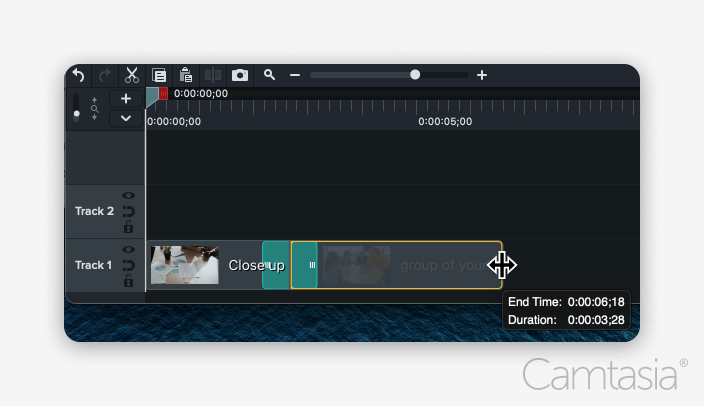
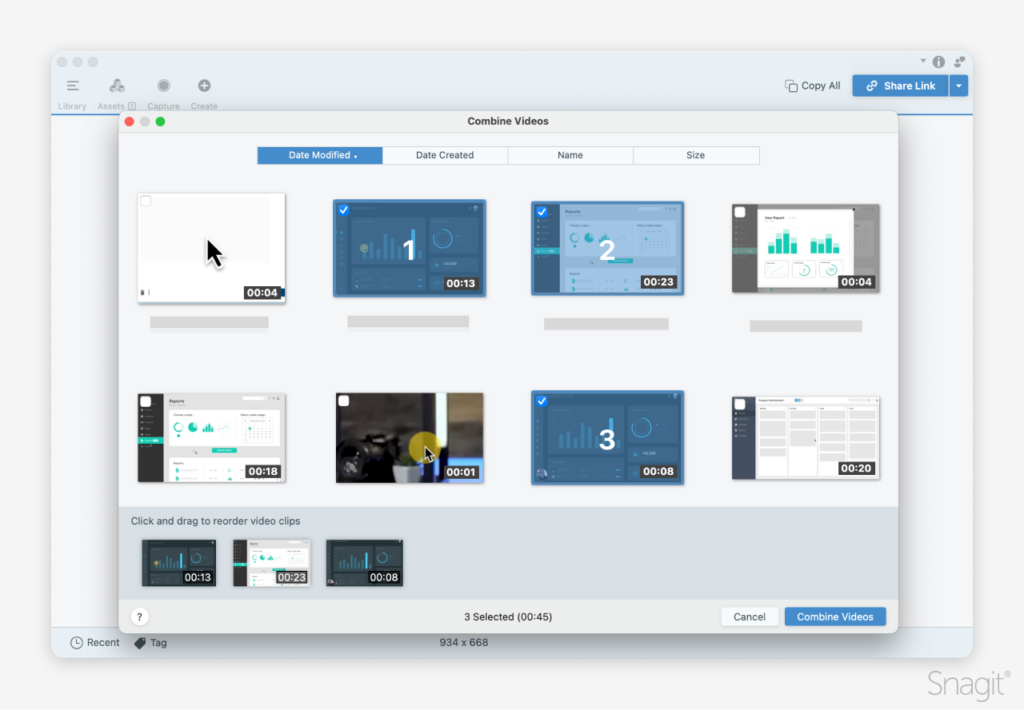
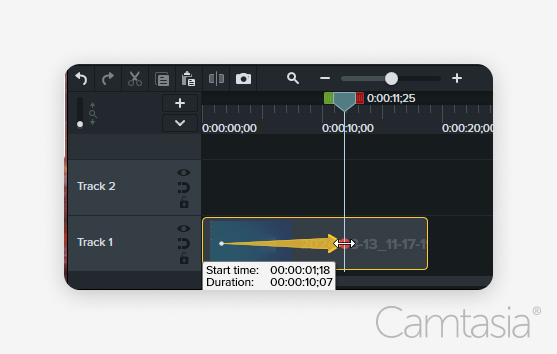
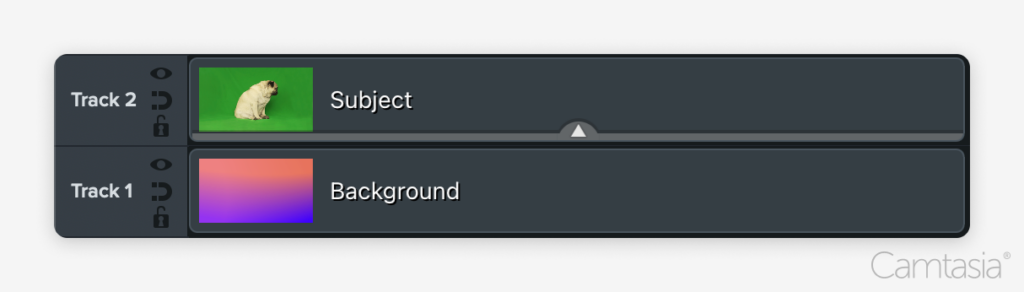
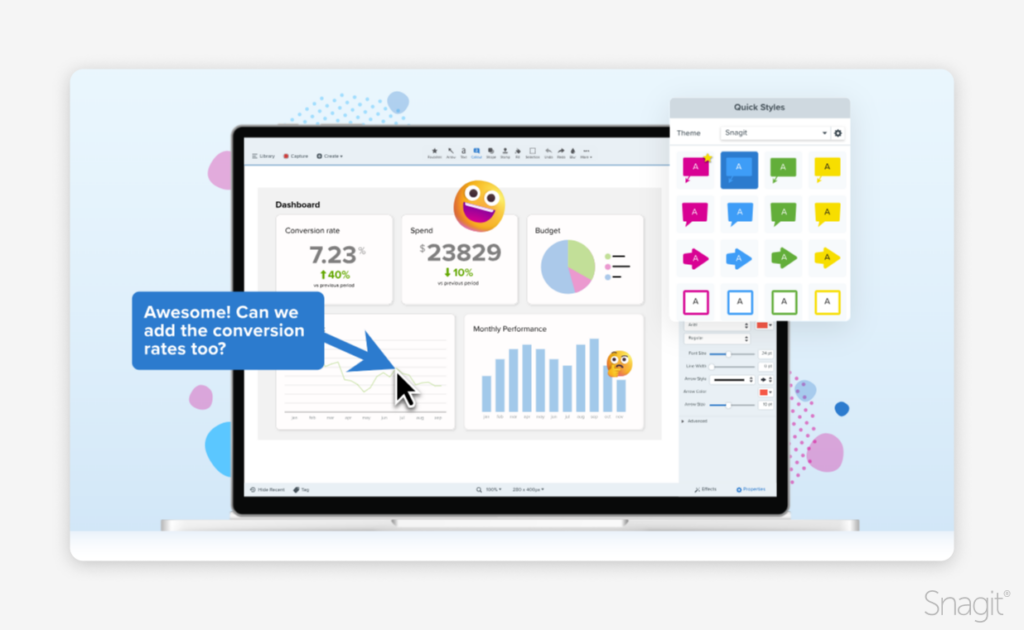
For more complex editing projects, having multi-track editing with the ability to “lock” a track so you can’t accidentally trim or to be able to select all to keep audio and the visuals in sync is going to save you from pulling out your hair using a basic tool editing tools. Hide or group items on your timeline as well to keep things organized and keep you rolling on making a video.

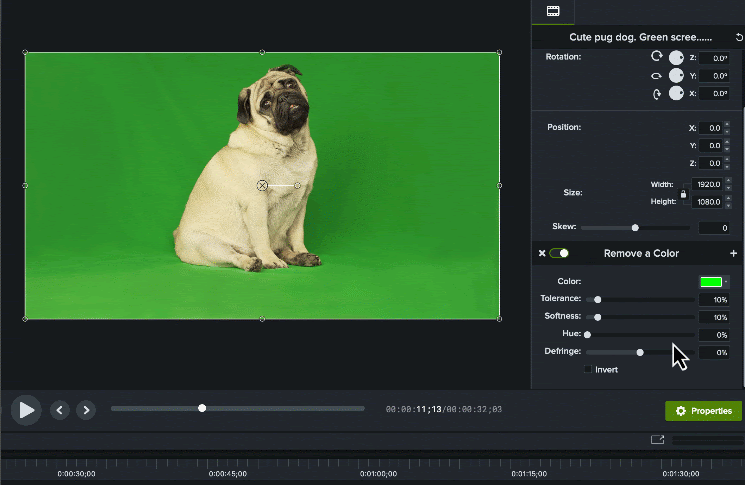
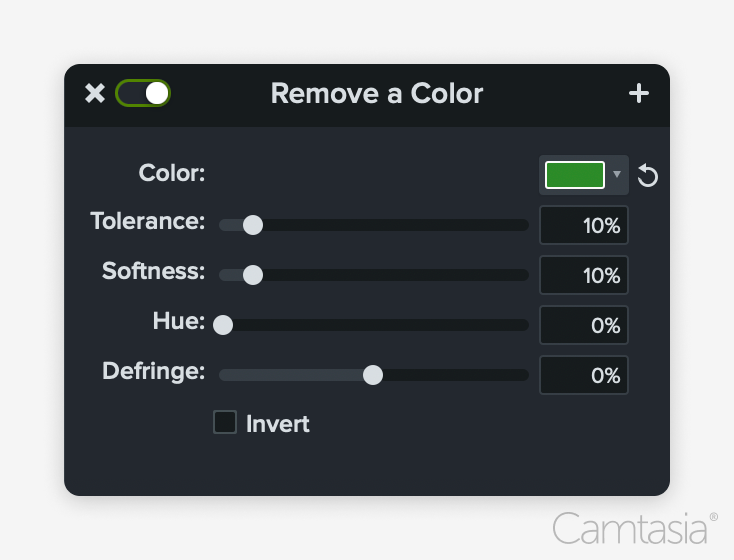
Make boring screen content exciting

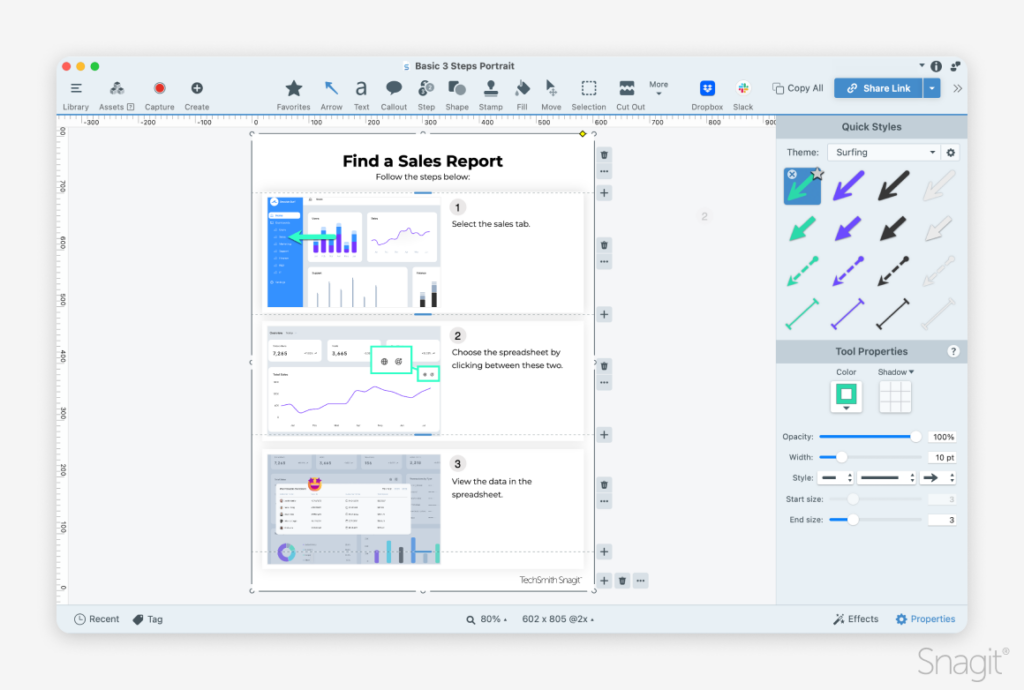
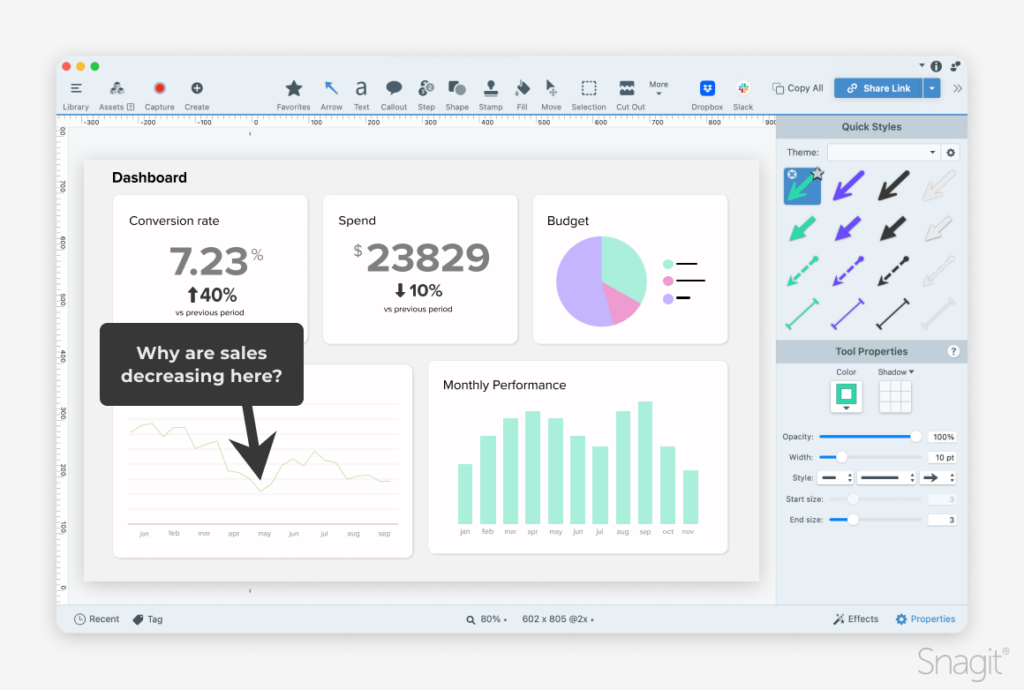
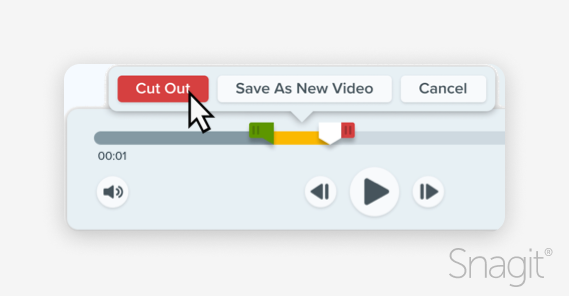
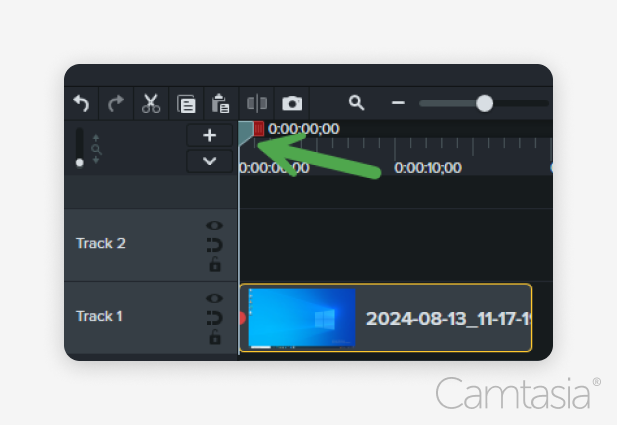
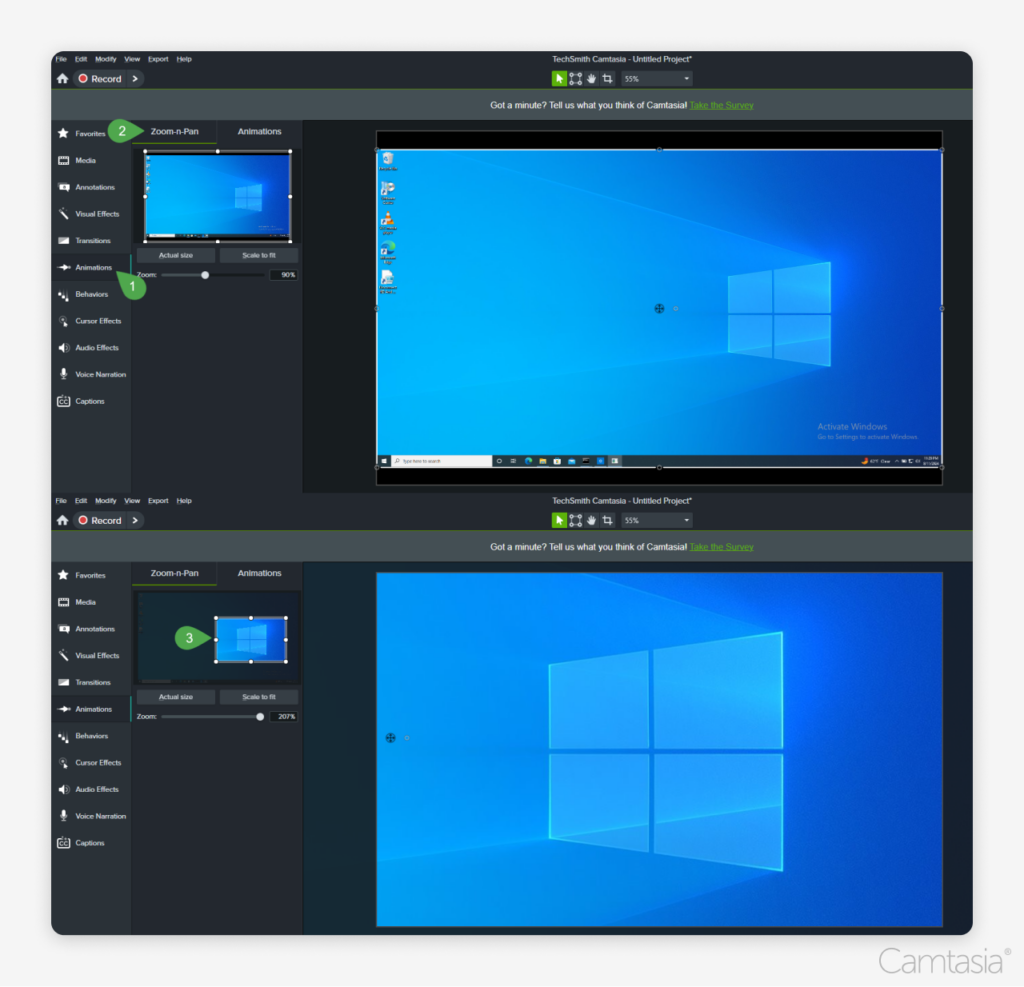
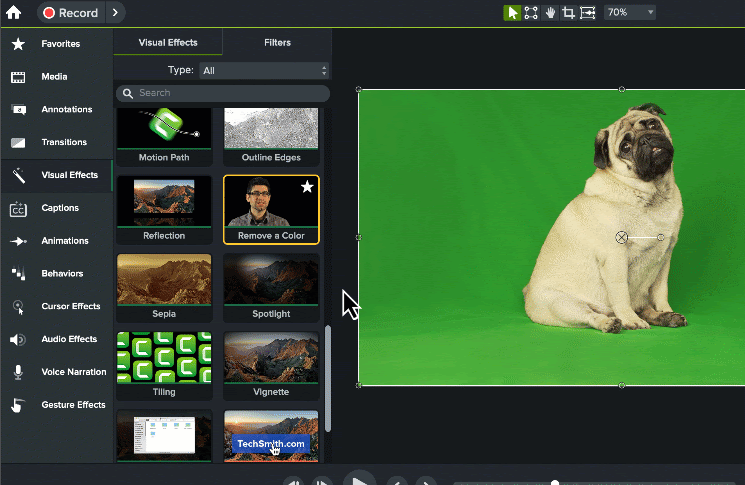
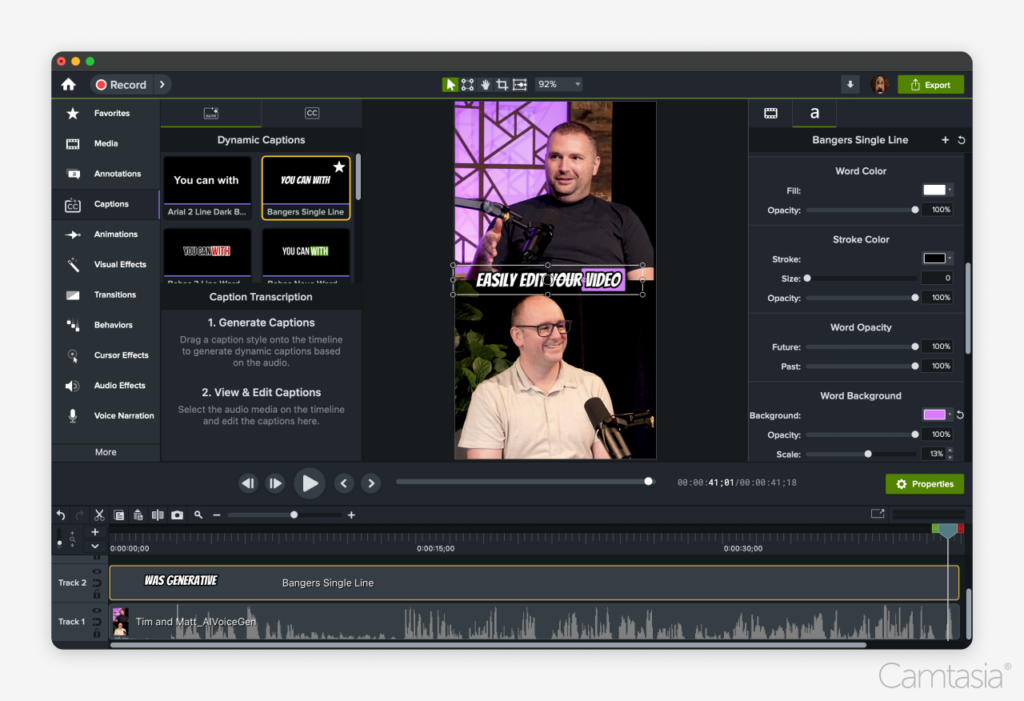
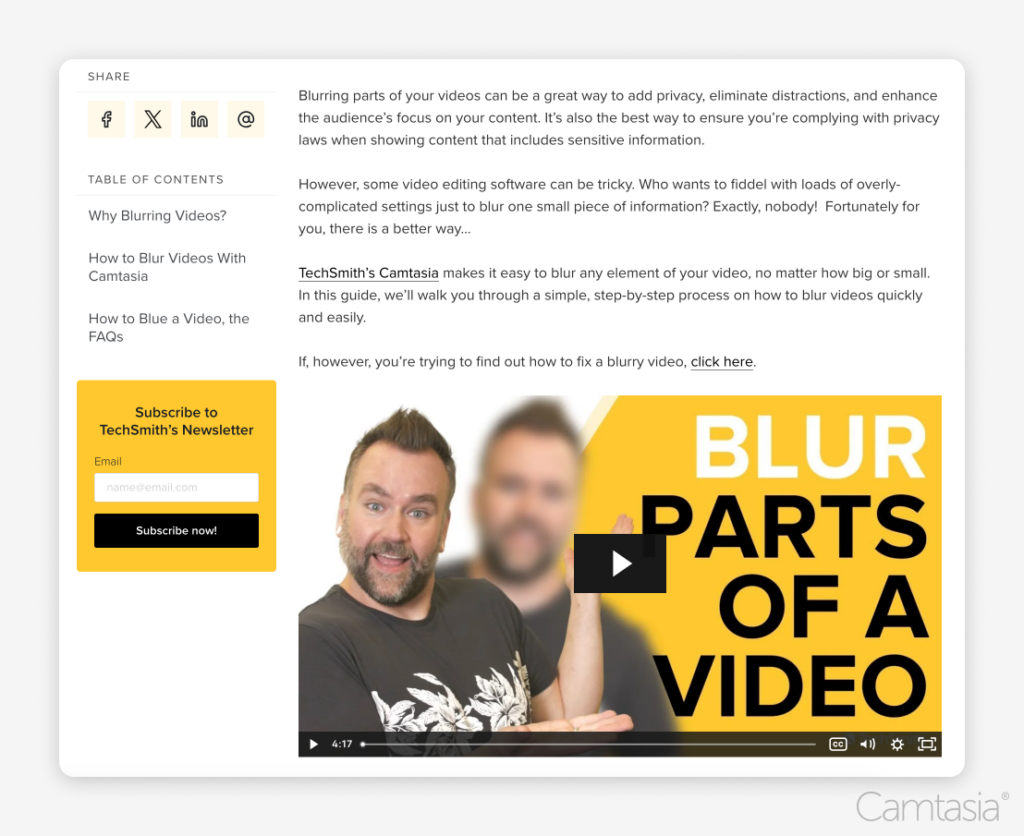
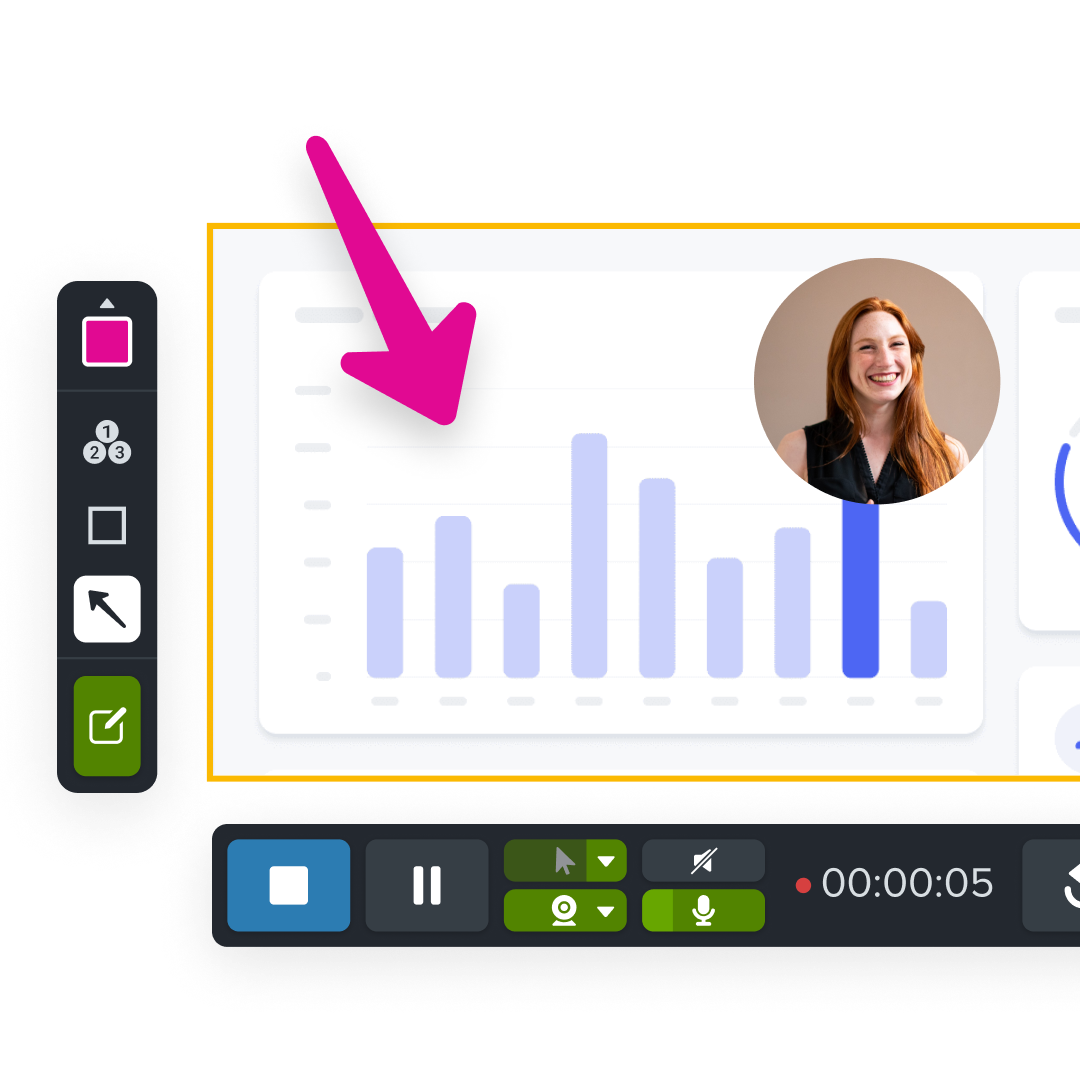
If you use screen recording in your content, you should be using Camtasia. Seriously, ask any trainer you know, and they’ve heard of it. Zoom and pan with ease, add a blur on top of your screen recordings, or annotate your content with customizable arrows and callouts. Highlight your mouse, enlarge or change the mouse shape with automatic smoothing (or edit the path!). Dream what you could add to a screen recording and they got you.

Library and templates

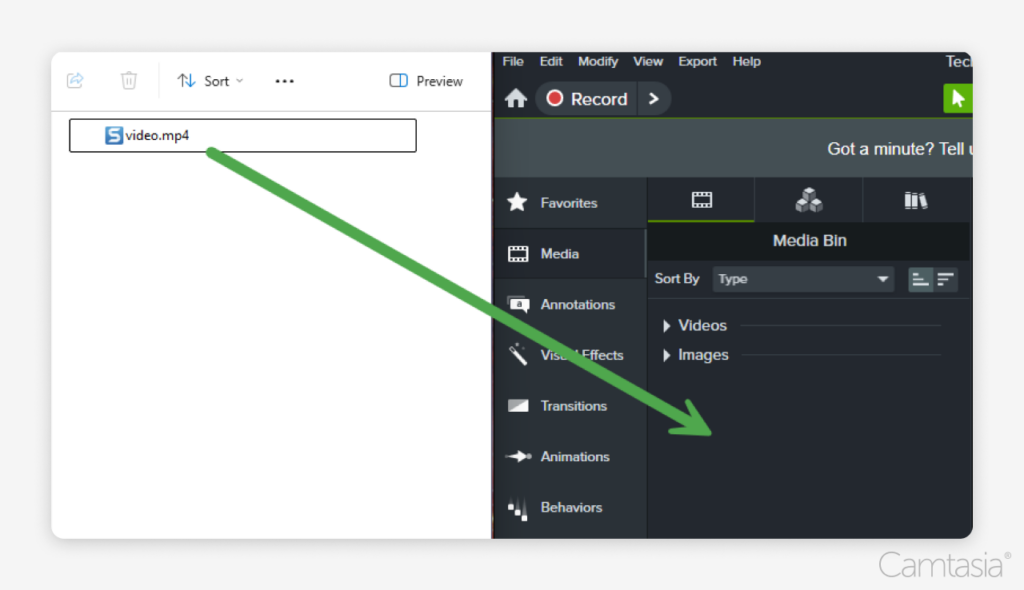
Who really likes repeating the same work over and over again? As you grow in your video editing journey, you are going to want to take some shortcuts. Editing videos already takes enough time! With Camtasia, you can save your video as a template to easily drag and drop new video content in. Or, save your intro and outros to your library for easy use again. Do you find yourself making the same tutorial videos again and again? Or do you clean up a webinar before posting it to YouTube? Save yourself time by utilizing templates and the Camtasia library. 

Bonus! Synthesia integration

Camtasia does integrate seamlessly with Synthesia if you are still not willing to give up on the amazing talking heads of Synthesia. Keep in mind that under the Camtasia Create Plan, you will have all the power of a video editor plus the talking head avatars that you need with the addition of Audiate, an AI-powered text-based audio editor (talking avatars coming Fall 2024). 

Best suited for beginners and jack-of-all-trades

A simple user interface with an extensive training library and live webinars helps ease the sharp learning curve to most video editors that allow you to customize as much as this tool does.

Remember, Camtasia is the tool to help you create all types of high quality and mixed medium videos with the options of screen recordings, stock footage, with professional camera input, your webcam, PowerPoint integration, and more. 

Pricing and plans

Camtasia Essentials Plan: $179.88/ a year (no AI audio features)

Camtasia Create Plan: $249/ a year

Camtasia Pro Plan: $499/ a year (includes 100+M premium and customizable assets like stock footage, background music, and AI generator)

Want to try Camtasia for free? You can use the free trial forever, just know without purchasing, your video will have a watermark on it at export. 

The easiest way to edit videos

Stop wasting time and discover how Camtasia makes creating incredible videos easier than ever.

Free Download
An image of a laptop showing the camtasia drag-and-drop editing feature

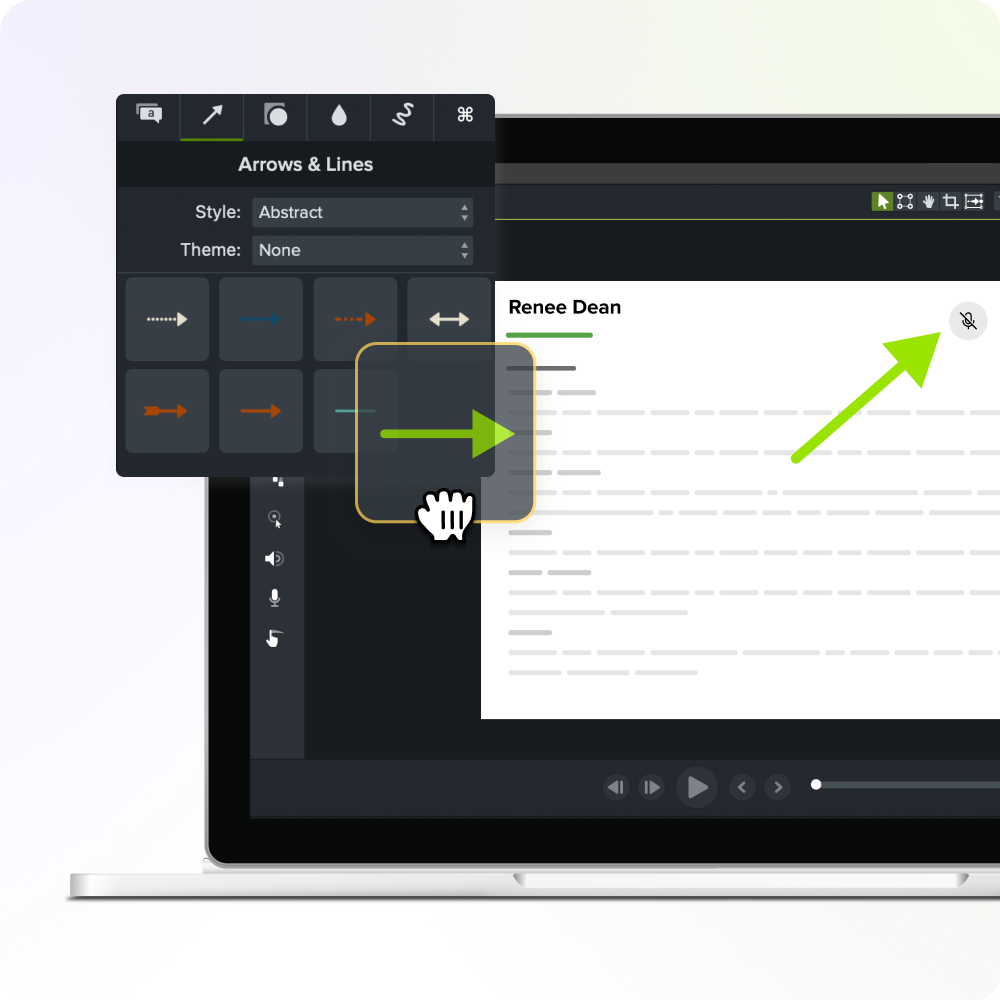
Lumen5: Best for AI-powered video creation for social media

Lumen5 is an AI-based video creation platform that automatically generates videos from blog posts, articles, or text content, making it a great alternative for users looking to quickly produce social media content. Its AI-driven video creation process simplifies video production by converting written content into engaging video presentations.

Key features of Lumen5 

AI Avatars

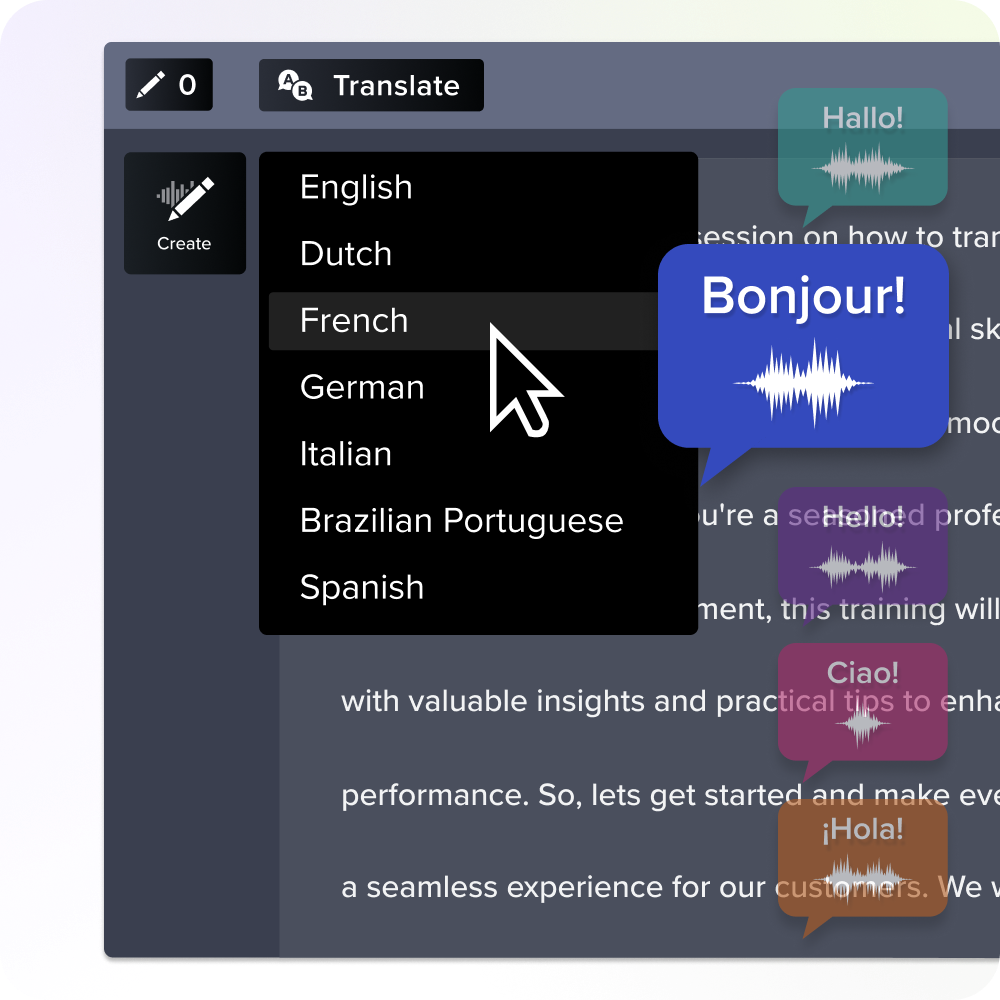
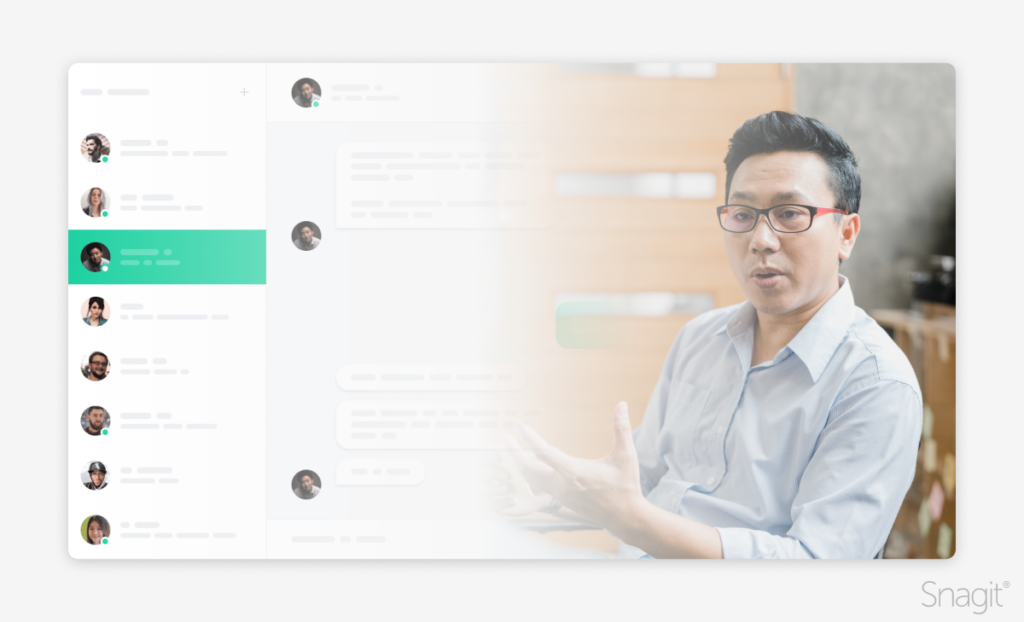
I mean, it’s why you are reading this article, right? Check out their 80+ realistic human avatars with 80+ languages. They also have “conversational AI avatars” which can be used in customer support in kiosks and on the web, mobile devices and the metaverse.

Team & Workspaces

Create a shared cloud based space for your team to collaborate on videos, sync video projects, or comment ideas and feedback.

Best suited for global audiences

Judging by the case studies, Lumen5 customers are part of large multinational corporations spanning IT, pharmaceutical, telecommunications, and banking. 

As media companies expand their footprint, it’s crucial not only to translate captions, but have multilingual speakers. While Lumen5’s case studies follow journalism and AI avatars used as news anchors, this would be beneficial for any video content or video marketing.

Pricing and plans

While there is no free plan, Lumen5 offers 3 different premium plans. 

  • Personal Plan: $288/ a year
  • Team Plan: $864/ a year for 3 seats
  • Enterprise: Custom pricing with unlimited seats

InVideo: Best for creating professional videos with AI and customization

InVideo is a cloud-based video creation platform that combines AI video generation with extensive customization options, making it a solid alternative to Synthesia. InVideo allows users to create high-quality videos for marketing, social media, and presentations, offering over 5,000 video templates.

Key features of InVideo

Create video from text prompts

InVideo’s use of AI to automate the video creation process, while still offering robust editing tools is perfect for users who want more control. Just remember that AI is only as good as you prompt it, so you might need multiple tries before you get what you are looking for. 

Customizable Video Templates

InVideo has a large library of templates, transitions, and animations, which allow users to create professional, branded videos quickly. One review mentioned that you can “optimize your content marketing with little effort and just have to be creative.”

AI Voice Overs

Users have raved about the voiceover effects speeding up their video creation process. 

Best suited for marketers and storytellers

This tool is ideal for marketers, entrepreneurs, and content creators who need a flexible video creation tool that balances AI automation with customization. Keep in mind that some users have complained that even the highest premium plan will only allow you to use one brand asset in videos, so if you are a consultant or agency, this would not be the right tool for you.

If you already know what you want your video to look like and you are comfortable with storyboarding, scripting, and tweaking the visuals, InVideo’s fast creation process will work for you. 

Pricing and plans

InVideo has a free, watermarked version and premium plans. 

  • Free Version: A generous 10 minutes a week of AI generation with 4 watermarked exports a week
  • Plus Plan: $240/ a year for one user
  • Max Plan: $576/ a year for 1 user

Doodly: Best for animated explainer videos 

Doodly as a video creation tool focused on producing whiteboard-style animated explainer videos. Doodly is perfect for users looking to create training videos, product demos, and marketing content using animated drawings and text.

Key features of Doodly

Easy to use

Doodly’s drag-and-drop interface for creating fun animated videos, including a library of pre-drawn characters, objects, and backgrounds. You can even upload your own images and then convert these to custom draw paths to match Doodly’s hand drawn characters.

Voiceover

Doodly has a voiceover feature on their main plans, but their text-to-speech integration would be an additional cost. 

Best suited for artists and educators

If you are an animator or sketch artist, you will be able to customize your doodles as needed for engaging content.

With the multiple blackboard options and realistic hands, this is ideal for educators or trainers who need to create explainer videos without extensive video editing experience.

Pricing and plans

Doodly does not have a free plan, but they are on a perpetual software model, which means a one-time cost allows you to continually use the software. 

  • Perpetual Plan: $67
  • Add-On plans: $67+ for at least 6 other plans including non-black and white animations, the text-to-speech app, premium templates, etc.
    • The worst reviews of Doodly are because the add-on plans are either pushed constantly on them or you need to spend around $67 for each single plan. 

Pictory: Best for AI-powered video summaries

Pictory is an AI-powered video creation tool that automatically generates video summaries from long-form content, such as webinars, articles, or training materials. Pictory focuses on creating concise, engaging videos quickly, making it a useful tool for repurposing content into short, shareable clips.

Key features of Pictory

Long Form Content to Short Form Content

Pictory’s AI-driven video creation analyzes long content and generates short, engaging videos with automatic captions and text overlays.

Additional Editing Capabilities

Pictory has additional editing tools for trimming videos, adding background music, and incorporating transitions for that extra layer of polish.

Best suited for marketers and content creators

Have an awesome webinar or a customer event that you want to turn into a highlight reel? Repurpose long-form content into short with visually appealing video clips for social media or marketing purposes.

Have a long form podcast or YouTube show that you need to turn into bite-size chunks on social? Pictory will work great for you!

Pricing and plans 

Pictory does not have a free plan, but they do offer a free trial without a credit card needed for 14 days and limited access to all features. You can view their premium plans below. 

  • Starter Plan: $228/ a year for one user
  • Professional Plan: $468/ a year for one user
  • Team Plan: $1,188/ a year for 3 users
  • Enterprise Plan: Custom pricing for 5+ or more users

Audiate: Best for seamless audio-video synchronization

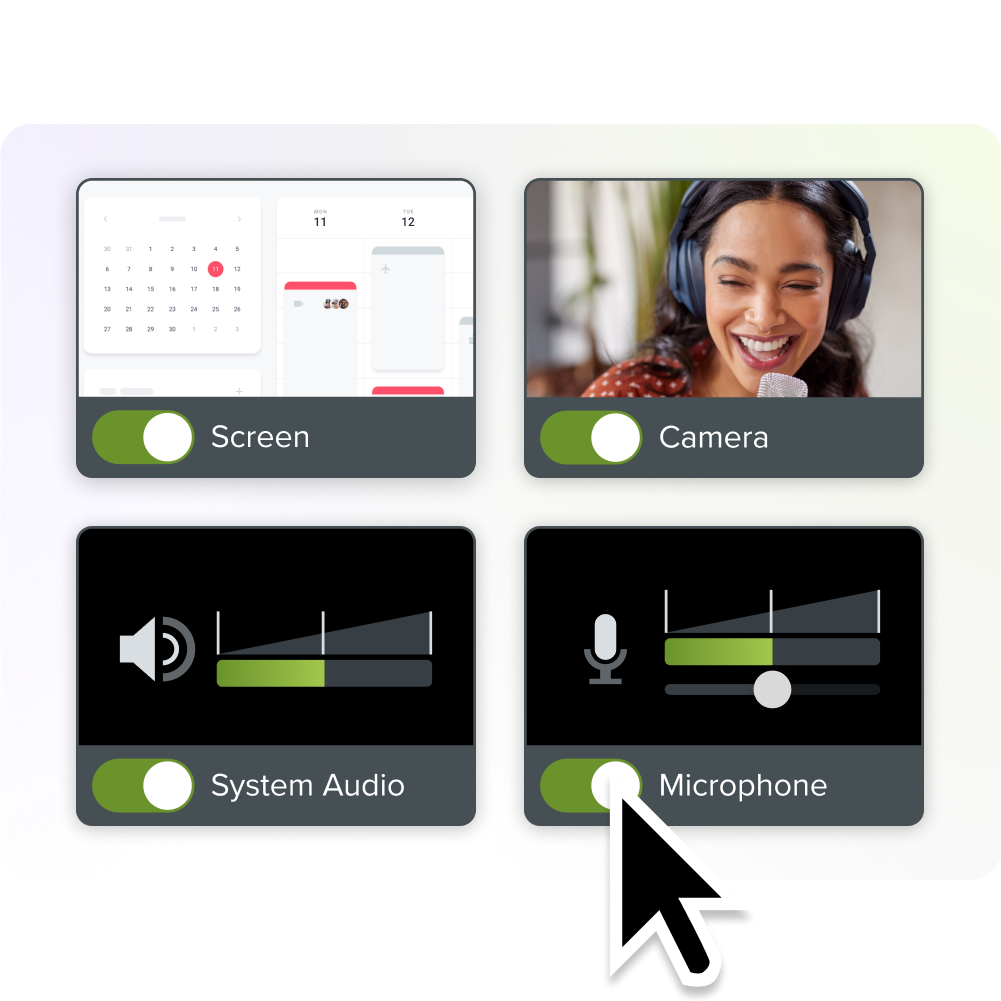
Audiate is a specialized tool for users looking to enhance their audio and video projects with advanced text-to-speech editing capabilities. Audiate syncs audio and video, making it easy to edit and polish video content with clear, professional audio tracks when in conjunction with its sister product, Camtasia. In the fall of 2024, Audiate will also have Synthesia-like AI Avatars. You can still enjoy the AI script generation, text-based editing and audio translation now.

Key features of Audiate

Text to Speech

Audiate’s text-to-speech editing tool allows users to generate audio instantly choosing from a variety of voices and languages

Text Based Video Editing

Remember how we mentioned needing to create more types of videos from above? With Camtasia, the sister product, you will be able to edit audio and video in real-time. Remove um’s and ah’s from your videos in one click!

Professional Audio

Audiate has some of the best audio improvement tools allowing you to enhance audio quality and noise removal. 


Best suited for, honestly, everyone

If you are a video creator who prioritizes audio clarity and synchronization, especially for tutorial and training videos, this would be a great fit. Because of it synchronizing with Camtasia, you will be able to create every type of video you need with crystal clear audio.

Trimming down long form content to short form can be as easy as editing a Google doc thanks to the text based editing of Audiate. Plus, you can quickly transform and edit your visual podcast videos and enhance your audio quality. 

Edit audio like text

You don’t have to be a professional to record and edit audio. Audiate makes it as easy as editing a text document.

Get Audiate
An image showing text being deleted in a doc and a corresponding timeline being cut

Pricing and plans

Audiate has a free trial available that lasts seven days and doesn’t require a credit card. To purchase, you will also receive Camtasia, a video editing software alongside your audio editing software, Audiate.

  • Camtasia Create Plan: $249/ a year
  • Camtasia Pro Plan: $499/ a year (includes 100+M premium and customizable assets like stock footage, background music, and AI generator)

Conclusion

In conclusion, the need for creating high quality videos with a globalized audience is a must. Synthesia will help you accomplish this, but might not fit your need for every type of video you need to create. 

Top Pick: Camtasia is the best overall choice for users seeking a versatile, professional video editor, and Audiate for users focused on improving audio quality and synchronization. And with a fully-functioning free trial available, you can try it out, risk-free.

The easiest way to edit videos

Stop wasting time and discover how Camtasia makes creating incredible videos easier than ever.

Free Download
An image of a laptop showing the camtasia drag-and-drop editing feature

TechSmith

TechSmith is the market leader in screen capture software and productivity solutions for daily in-person, remote, or hybrid workplace communication and customer-facing image and video content. Our award-winning flagship products, Snagit, Camtasia, and Audiate, empower anyone to create remarkable videos and images that share knowledge for better training, tutorials, and everyday communication.

How to Take a Screenshot on a Single Monitor

A single monitor displaying an open document with a dashed selection box around it on the screen.

Have you ever needed to communicate an important topic and it would have been easier to show someone instead?

Taking a screenshot of what’s on your monitor is a great way to communicate and share information effectively. There are many different use cases for capturing a specific area of your screen, such as creating documentation, presentations, or providing technical support.

Snagit is an easy-to-use tool that offers enhanced screenshot capabilities beyond what the Windows snipping tool is capable of.

This blog will take you through how to take a screenshot on a single monitor, as well as add annotations, enhancements, and other basic edits.

Methods for taking a screenshot on a single monitor

Screenshots come in many forms. You can capture the entire area of your monitor, which is a full-screen screenshot.

Programs like Snagit also allow you to capture a specific window you have open. Or it can capture a screenshot showing only a specific area that you select. 

It is important to choose the right type of screenshot. It saves time and helps make sure that only the most relevant information is captured. Or you can choose that all of the information is captured to help provide context to the person you’re sharing the image with.

How to take a screenshot on a single monitor

Option 1: Using built-in tools (Windows/Mac)

No matter if you are on Windows or Mac, you can use the built-in operating system tools to capture screenshots. These screenshots will capture all monitors if you have dual monitor setups.

On Windows, you can hit PrtScn on your keyboard. Then you can paste (Ctrl + V) that screenshot in Word, Paint, or in an email.

You can also use the ALT + Print Screen to screenshot your active monitor. This is always helpful when working with a dual-screen setup.

On Mac, you can hit Shift + Command + 4 to take a screenshot and then paste (Command + V) into a program of your choice.

Option 2: Taking screenshots with Snagit

If you need more flexibility in the screenshots you are taking, Snagit offers control over how you capture your screen by offering options like full screen, region, and scrolling capture.

Start by opening the program and selecting which type of image capture you’d like to take.

Next, you can configure additional options. A few of the options include whether you want to capture the cursor on the screen or apply image effects automatically.

Once you’ve configured your options, click the red capture button to take your screenshot.

The best snipping tool for Windows and Mac

Don’t let clumsy built-in tools hold you back. Take and edit screenshots with Snagit!

Get Snagit
Someone capturing a screenshot of a mountain scene with a person and goats using Snagit, showing cropping tools on the screen.

Editing and enhancing your screenshots

Once you’ve taken a screenshot with Snagit on your monitor setup, you can enhance your image by utilizing Snagit’s powerful editing tools, including annotations, callouts, arrows, and text. 

One of my favorite tools to use is the blur effect. This allows me to blur out and redact sensitive information that I do not want being shared.

Using shapes and arrows can be a great way to highlight key elements. The elements draw the users attention to a specific area of the screenshot.


Why use Snagit for screenshots?

Snagit allows users to capture scrolling windows, menus, and specific regions with precision. Built-in tools are unable to capture scrolling windows. They limit the captures to what is visibly seen on the monitor.

Snagit’s editing capabilities let users enhance their screenshots without needing additional software, making it ideal for creating polished, professional-looking images.

Moving from capturing to editing your screenshot is a seamless experience in Snagit.

Snagit provides the ability to easily and quickly share screenshots through various channels (email, cloud storage, Slack).

Sharing an image with a colleague or friend can be done with a click of a button. To save your capture to your hard drive, you can click on the floppy disk icon.

Snagit also allows you to organize captured images for future use within the Snagit Library. Organizing your captures plays a large role in helping you work efficiently.

Ready to take better screenshots with Snagit?

To get started with Snagit, first download the program.

From there, you will be able to start capturing, editing, and organizing your screenshots. Having Snagit as your screen capture tool will help you communicate more effectively.

To really get a head start on becoming a Snagit expert, be sure to check out all of our quick tutorials. Free webinars are also available that help you get started with Snagit or learn new tips and tricks.

FAQ about taking screenshots on a single monitor

Can I capture an entire webpage on a single monitor?

Yes, you can capture an entire webpage on a single monitor by utilizing Snagit’s scrolling capture feature.

How do I add annotations to my screenshot?

With your screen capture in the Snagit Editor, select an annotation tool from the top of the Snagit Editor. You can choose from arrows, text, shapes, callouts, stamps, or more options.

Can I edit and share screenshots directly after capturing them?

Snagit is the perfect tool for capturing, editing, and sharing screenshots easily. After capturing your screenshot, you can quickly make any edits and share your screenshot to any number of destinations.

Annotate and edit screenshots with Snagit

Professional mark-up tools and powerful features make it easy to create helpful images.

Try it Free
Screenshot of a document about puffin migration patterns with a section for changing styles highlighted.

TechSmith

TechSmith is the market leader in screen capture software and productivity solutions for daily in-person, remote, or hybrid workplace communication and customer-facing image and video content. Our award-winning flagship products, Snagit, Camtasia, and Audiate, empower anyone to create remarkable videos and images that share knowledge for better training, tutorials, and everyday communication.

Process Improvement: Strategies and Examples for Success

An arrow stepping up and towards the right, with a gear and a checkbox along the path and a target at the end.

Does hearing the word process in a professional setting make you think, “Ugh, here comes a boring time-waster”? If process has a negative connotation to you, there’s a good chance that your team or your organization has drifted away from business processes that focus on outcomes, and you are instead floating in the doldrums of process for process’s sake. Don’t feel bad – it’s easy to get there, but with a dedicated push, some organizational introspection, and a little tooling, you’ll be sailing right back to meaningful work.

Spending time on process improvement is well worth the effort because it increases efficiency and productivity not just in the amount of work that is done, but also in the quality of employees’ work lives. 

Employees who feel like their valuable time is being used wisely and are engaged in improvement will deliver better work and be more likely to stick around. And, with the application of continuous improvement, team members can see small changes add up to making a big difference. This is important because feeling impactful is at the core of what people want in the workplace.

What is process improvement?

Process improvement is a systematic approach to identifying areas for improvement. That could be identifying inefficiencies, waste, or errors in a workflow and then making incremental changes to improve outcomes. Continuous improvement applies to the idea that the environment that we work in will continue to change, and we will need to continue to change along with it. 

What is a great solution today will not remain a great solution because the problem itself will change. Teams need to continue to refine the problems they are facing and the outcomes they are seeking. By embracing continuous, iterative improvement, even small incremental changes, teams and organizations can keep themselves in step with the pace of change. 

Snagit is a useful tool for process improvement because it makes it easy to document existing processes, workflows, and bottlenecks in just a few clicks. Having a visual illustration of issues gives a team something to respond to when coming up with a solution. For example, you could use Snagit to annotate screenshots of all the steps of a process and then use Snagit’s callout tool to highlight the problems for further discussion.

Image of the Snagit interface with a step by step guide on it.

What is the continuous improvement process?

The continuous improvement process encourages employees at all levels of an organization to suggest and implement small changes for constant betterment. Organizations that successfully implement and encourage continuous improvement create teams that are empowered to solve the problems that they see.

There is no one right way to implement continuous improvement, but there are a number of methodologies that can help get you on your way. Some of these methodologies overlap, and some are born out of others, but all are based on improvement over time.

  • Kaizen: Toyota popularized the concept of continuous improvement (kaizen) in auto manufacturing. The company minimized waste and increased efficiency through many small improvements.
  • Agile: Agile methodologies have their roots in the software industry. Agile practices are customer-first and incremental. Rather than providing a strict list of rules, the Agile Manifesto favors one set of things over another set of things. Individuals in an agile system have room to do what makes sense.
  • Plan-Do-Check-Act (PDCA): PDCA is a four-part, cyclical process that highlights the importance of data in continuous improvement. A team must measure their work in order to know how they are improving. The “Check” piece of the cycle is critical for success.
  • Kanban: Kanban is focused on the flow of work often through a visualization called the kanban board. With kanban, teams attempt to move any one piece of work from start to finish as quickly as possible. The team has a WIP (work in progress) limit, which requires problems to be resolved before new work can be picked up. This also encourages work to be broken down into the smallest reasonably executable and valuable pieces.
  • Lean: Lean methodology highlights the value in putting the smallest amount of work possible into a product before putting it in front of users. In Lean product development, the next iteration of a product is always done based on the learnings from the last round of user testing.

How to implement a continuous improvement process

Get kinda meta

The process of implementing a process is its own process. Keep the principles of continuous, incremental improvement in mind. Do not try to change a process suddenly, by yourself, or with a big bang. 

Start small

Identify one small team to work with on your process improvement. Even if you think your whole organization could benefit from the change, working through the process and refining it with a small group of people will leave you better prepared to expand it to others.

Get buy-in

Others in your group will need to understand why you are suggesting a process change. Highlight the goals and improved outcomes you hope to see. Listen to feedback and make adjustments to your initial implementation ideas to include others in the process.

Try it

Put whatever methodology you chose and plans you made into action!

Remember to retro

After you have tried the process improvement, gather your small group together to discuss what is working, what is not working, and any tweaks you want to make for the next iteration. 

Celebrate successes

Take a minute to recognize what you’ve learned so far. Celebrate any improvements and efficiency gains you’ve seen. Share your findings with other teams you work with and include data and details about the improvements.

Repeat

Repeat, repeat, repeat. Be intentional about learning from every iteration and sharing your results. Building context with others is the first step to getting your workplace to develop a culture of continuous improvement. As the organization sees your improved process working for the small group, others will want to try it with their teams too, and you can begin to consider what process improvement could look like on the department or organization level.

The best snipping tool for Windows and Mac

Don’t let clumsy built-in tools hold you back. Take and edit screenshots with Snagit!

Get Snagit
Someone capturing a screenshot of a mountain scene with a person and goats using Snagit, showing cropping tools on the screen.

Continuous improvement examples

Improving team communication

Michelle and Amy on TechSmith’s Community Engagement and Human Resources teams frequently use Snagit to replace meetings and work asynchronously. It can be a real challenge to wrangle the calendars of busy coworkers, particularly across teams. Michelle and Amy use Snagit with Screencast or Slack to get work done more quickly than they could even assemble in the same (virtual) room.

Enhancing the customer support process

“Time not spent serving customers is expensive,” says Mike on TechSmith’s Sales Operations team. He saw a challenge in keeping all his teammates and partners up to date and knowledgeable about new software and processes. By creating bite-sized demo and tutorial videos, he was able to recycle his answers to common questions and to deliver training in a uniform way. He employs a similar strategy with individual customers. If a customer has a question about a feature, it would be easy to throw them a link to a tutorial online, but by creating a video that shows the exact part of the tutorial that would help the customer and includes Mike’s webcam video, he is able to create more personalized, more human interaction. 

Streamlining project management workflows

Steve in TechSmith’s Project Management Office helps support a kanban workflow with the software teams developing Snagit. He creates pre-watch videos to set expectations and context about meeting agenda items. He also uses screenshots of team kanban boards to illustrate the teams’ status at any given time, which is useful for pointing out blockers and bottlenecks. These images also provide a good visual summary of backlog refinement meetings for team members who couldn’t attend.

Benefits of continuous improvement

Increased efficiency

This is the most direct benefit of continuous improvement. All those little changes over time add up to increased efficiency, reduced waste, and better outcomes for your organization.

Enhanced employee engagement

Gallup, a data-driven thought leader in workplace culture, describes employee engagement this way:
People want purpose and meaning from their work. They want to be known for what they’re good at.

A continuous improvement process gives employees systematic opportunities to provide input into the environment they are working in, enhancing both feelings of empowerment and autonomy. This, combined with the focus on improvement itself, hits on all three pieces of Daniel Pink’s elements of true motivation: autonomy, mastery, and purpose. In short, a continuous improvement process gives employees a voice.

Better customer satisfaction 

The more efficient we are, the more value we can get out to customers in a given timeframe. And the more quickly we can iterate, the faster we are able to identify customer pain points and act on them to ship improvements to customers. By making small changes and getting customer feedback between each, we are more likely to get customers a product that delights them and solves their problems well than if we release big changes all at once.

Why use Snagit for continuous process improvement?

Visual documentation of workflows

Snagit makes it easy to document the work on your screen in just a few clicks. You can capture your screen in an image (or a scrolling capture for long content) and then use annotation tools to document steps or make callouts. Or, you can capture your screen in a video while you’re explaining your steps in a voice-over and using Snagit’s screen draw tool to call attention to particular parts of the screen.

Image of someone capturing their screen in a video while showing steps.

Easy collaboration and sharing

Snagit’s sharing capabilities allow teams to quickly capture and distribute visual updates, ensuring everyone is aligned during the process improvement journey. It connects to tools you’re already using at work like OneDrive, Google Drive, Slack, Teams, and more. Or, you can use Snagit’s “Share Link” feature to quickly upload your content and get a link to it on Screencast. Using Screencast allows others to view and comment on your media, providing a convenient place for communication.

Share link button highlighted showing shareable link options.

Streamlined implementation

Snagit’s template functionality can help create artifacts that are repeatable and easy to consume. Know that you’re going to be comparing the same two sets of data every week? Use a Snagit template to standardize the presentations and provide a point-in-time record to look back on.

Ready to improve your processes with Snagit?

Download the free trial of Snagit to visually document and share your process improvement. Get others onboard with your continuous improvement idea by walking them through your perceived roadblocks and potential outcomes in a Snagit screen share with webcam video!

The best snipping tool for Windows and Mac

Don’t let clumsy built-in tools hold you back. Take and edit screenshots with Snagit!

Get Snagit
Someone capturing a screenshot of a mountain scene with a person and goats using Snagit, showing cropping tools on the screen.

Frequently Asked Questions

What are the key steps in process improvement?

The particular process improvement methodology you choose will have its own set of steps, but in all cases, you must:
1. Identify the need to improve.
2. Desire to work to make a change.
3. Believe that change is possible and that you (and your team) are capable of starting it.

How can I foster a culture of continuous improvement in my organization?

Culture change doesn’t happen overnight. Start small, get a couple partners and work on making a small change in your team. Make sure to celebrate and share what you learned, even if the outcome isn’t the result you hoped for. Try again!

How can Snagit help with documenting and sharing continuous improvement efforts?

Snagit is an essential tool for capturing, annotating, and sharing visual content that support process improvement strategies. Because it’s simple and straightforward, Snagit can help create a friendly, casual tone, bringing more collaborators into your improvements.

TechSmith

TechSmith is the market leader in screen capture software and productivity solutions for daily in-person, remote, or hybrid workplace communication and customer-facing image and video content. Our award-winning flagship products, Snagit, Camtasia, and Audiate, empower anyone to create remarkable videos and images that share knowledge for better training, tutorials, and everyday communication.

The Ultimate Guide to Effective Business Communication

Yellow video in the shape of a briefcase.

Business communication is more critical than ever in today’s fast-paced digital world. Whether you’re coordinating with remote teams, pitching a product or service, or sharing complex data, how you communicate can make or break your business success. This guide will explore different types of business communication, give tips for using visual elements effectively, and show how tools like Camtasia and Snagit can help enhance visual communication strategies for better engagement with your audience.

What is business communication?

People smiling and discussing a bar graph
Business communication refers to the sharing of information between people inside and outside of an organization to achieve business goals.

Effective communication ensures that team members and stakeholders are aligned, employees feel connected, and customers are well-informed about your product or service. 

Some important key elements of communication in the workplace include clarity in messaging, active listening, appropriate communication tools, and visual appeal and engagement. Utilizing these components, such as communication tools, will improve team relationships and have a positive overall effect on the company. Being able to use these elements, like tools in communication, will advance your relationship with team members and bring an overall positive impact to the organization. 

Types of business communication

Internal Communication

This type of communication is collaboration among team members and management within the organization. Some examples are instant messaging, emails, video conferencing, and internal reports. Need a quick reminder on how to do something? Hop on a call with your manager. Need support on a project? Email your coworker for help. These are real-world examples of internal communication.

Messages within Slack

External Communication

This type of communication involves sharing information with clients, partners, or customers. Some examples include customer support emails, marketing materials, social media posts, and presentations. External communication is much more formal and should be presented with thoughtfulness and precision. A company posting on social media for thousands to see is going to be reviewed more times than an email going to a few co-workers. 

Verbal and non-verbal communication

Verbal communication is the words that are being said. This is done through face-to-face meetings, phone calls, and video conferencing. For example, “Can you get me that report you did last week?” is verbal communication. 

Non-verbal communication is your delivery of the words being said. Body language, tone, and gestures during face-to-face or virtual interactions are all examples of non-verbal communication. Going back to the verbal question above, adding some urgency into your voice paired with a concerned facial expression can communicate to someone that this is a time-sensitive request and to prioritize it.

Business visual communication

Types of visual communications include infographics, charts, videos, and images that help explain complex information or enhance presentations. It is important to incorporate visual communication into your workflow for the sake of your co-workers. Information is much easier to digest when you add a visual to it.

Results from Chaos to Clarity: How to Thrive in the Modern Workplace.

Research has found that 83% of people prefer to learn via video over audio and text only when learning instructional or informational content (source: Video Viewer Study 2024). Tools like Camtasia and Snagit are crucial for creating high-quality visuals and videos that effectively communicate ideas.

Make videos your viewers crave

Discover the secrets of what your viewers truly want in your training and instructional videos.

Get the Full Report

The role of visual communication in business

Why visuals matter:

Humans process visual designs faster than text, making them ideal for explaining complex data or simplifying messages. Think about those times when you were reading directions and thought to yourself, wow, this would be so much easier if I had a video or picture to follow. Effective visual communication is important as it leads to better understanding and retention of information.

Common forms of visual communication in business:

Data visualizations: Charts, graphs, and infographics to convey complex data in a simple way. Snagit is a great option for creating visual content by screenshotting and annotating graphs.

Videos: Training videos, product demos, and webinars. Camtasia is perfect for creating these kinds of high-quality videos. Utilizing video for business can enhance customer engagement, boost brand visibility, and drive measurable growth through effective visual storytelling and marketing strategy. 

Screenshots and annotations: Useful for graphic design, technical guides, or instructional materials. Snagit makes it easy to capture and annotate your screen, making information more digestible.

Screenshot of Snagit with a step by step guide of how to find a sales report.

Visual communication strategy

Adding visuals to your communication tool stack can improve clarity, engagement, and visual appeal. For example, during video conferencing, visuals like shared screens and video demonstrations can make complex topics easier to understand. Effective visual communication can save a significant amount of time by reducing the need for back-and-forth, ensuring that ideas and instructions are conveyed clearly and quickly.

How to incorporate visuals into your business communication

Step 1: Identify opportunities for visual communication

Analyze your communication flow to find areas where visuals can simplify or clarify information, such as presenting complex information in reports or proposals. Maybe information seems clear to you, but not to others. This is your opportunity to ask co-workers if anything is difficult to understand.

 Step 2: Use tools to create high-quality visuals

Camtasia: Create professional videos to showcase new products, explain processes, or train employees. The intuitive interface of Camtasia makes it easy for all.

Camtasia interface with a video for workplace communication.

Snagit: Capture and annotate screenshots for presentations, tutorials, or visual documentation. You can also use Snagit to create quick data visualizations for internal communication.

Snagit of screenshot with graphs to ask a sales question.

Step 3: Choose the right visual format

Consider the format that best suits your message, such as videos for complex data or infographics for quick insights. For social media platforms and marketing, social media posting with visually appealing images or videos can enhance brand messaging. If you are presenting on PowerPoint, using infographics or just pictures can enhance the look and feel of your content. 

 Step 4: Maintain visual consistency

While creating content, ensure that your visual communication is aligned with your brand’s design guidelines, such as colors, fonts, and tone. This creates a cohesive look and builds trust. You can use presets for brand logos and colors in Camtasia and Snagit.

Best practices for effective business communication

Know your audience

Tailor your message to the needs of your audience, whether they are team members, clients, or stakeholders. Adjust the complexity of your visuals or data presentations accordingly. Both internal and external people appreciate visual appeal, so it is important to include these high-quality visuals.

Encourage feedback and engagement

Instead of dumping a bunch of information on someone, try sprinkling in questions to encourage collaboration. Use instant messaging or internal surveys to gather feedback on how well your communication is being received and whether employees feel engaged. Incorporate open-ended questions in surveys to better understand how employees feel about the current communication flow. 

Use communication tools effectively

Leverage digital communication tools like Camtasia for recorded presentations or Snagit to create quick, clear screenshots and guides to accompany instructions or project updates. Use video conferencing platforms to share screens and present visual data during meetings. 

Communication via video conferencing feels more interactive and allows for questions. Adding visuals during the meeting helps ensure that team members fully understand complex information. Imagine a presentation with no visuals. How boring! 

 Keep information clear and concise

Avoid information overload by focusing on the main message and providing only relevant details. A lot of the time, our conversations tend to wander from the main topic. To avoid this, try making an agenda and sticking to it. 

Use visuals to break down complex information into manageable parts, making it easier for your audience to absorb and act on the content. Nothing is worse than trying to focus on long, drawn-out videos. If you think about TikTok, most of the videos are well under one minute. Human attention spans are only so long.

Wall of text? Next!

Snagit makes it easy to communicate more effectively with visuals.

Learn More
Screenshot of a document about puffin migration patterns with a section for changing styles highlighted.

Business communication tools to improve efficiency

Video conferencing platforms

Platforms like Zoom or Microsoft Teams enable face-to-face communication across distances and allow you to share visuals during meetings. Camtasia can enhance these meetings by allowing you to record presentations, tutorials, or explanations that can be referred to later. Face-to-face meeting communication is great for comradery and real-time questions. Recorded communication is great for future endeavors when you need to refer back to information or procedures. 

 Instant messaging tools

Slack, Microsoft Teams, or Google Chat help teams stay connected and share updates in real-time. Snagit can be used to quickly capture and annotate screenshots that can be shared instantly with the team for feedback or further discussion. 

Both real-time and screenshot communication are great for specific situations. If you want to message your co-worker quickly, Slack is a great option. If you want your coworker to have something to refer back to, Snagit is the best option for that. 

Project management tools

Tools like Asana, Trello, or Monday.com help teams stay on track with tasks, enabling better collaboration and accountability. These tools are especially helpful when you have numerous tasks to keep track of.

Tasks within a project management tool.

Collaborative document sharing

Google Docs and Microsoft SharePoint enable teams to collaborate on documents in real time, improving efficiency and keeping everyone aligned.

Enhancing business communication through visual storytelling

Using data visualizations to tell a story

Presenting complex data as charts or graphs in a way that tells a compelling story is key to driving action. Snagit makes it easy to create quick charts from raw data that you can embed in reports or presentations.

Building trust and transparency

Sharing behind-the-scenes content or internal updates with the team can foster a culture of transparency. Use Camtasia to create video messages from leadership or to share progress on key initiatives. 

Engaging with clients and customers

Create product demos or explainer videos using Camtasia to help customers understand your product or service and its benefits. Videos are a powerful way to communicate visually and keep audiences engaged.

Step guide made with Camtasia.

Measuring the effectiveness of your business communication

Analyze engagement

Use analytics to track engagement with your visual content. For example, how many employees watched your training video made with Camtasia? How many clicks or views did your social media posting receive? Understanding what factors of your content are contributing to engagement is crucial for content improvement.

Gather feedback

Regularly survey your team to gather feedback on your communication methods. Use open-ended questions to understand how employees feel and where communication can improve. Internal quarterly surveys are a great cadence to follow as feelings are always changing. The same goes for external communication.

Adjust and iterate

Based on feedback and data, continuously adjust your communication strategy to meet the needs of your audience. Adding new tools like Snagit and Camtasia can help you improve the clarity and effectiveness of your messaging.

Boost your business communication with visual tools

People at a meeting looking at visual representations.

Effective business communication requires the right mix of verbal, written, and visual communication strategies. Incorporating high-quality visuals can enhance understanding, whether through videos created with Camtasia or data visualizations captured with Snagit. 

One of the most important factors to remember about communication is openness and listening. You will never be a great communicator if you aren’t putting in the effort to truly hear and understand others. Keep your thoughts open-minded and be ready for change when necessary.

Ready to improve your communication in the workplace? Start integrating visual tools like Camtasia, a powerful video editor and screen recording tool, into your communication strategy. Combine it with Snagit for screen capture, screen recording, and visual design.  All in an effort to create clear, engaging content that drives results and enhances audience engagement.

The easiest way to edit videos

Stop wasting time and discover how Camtasia makes creating incredible videos easier than ever.

Free Download
An image of a laptop showing the camtasia drag-and-drop editing feature

Ryan Knott

Ryan Knott is a Marketing Content Strategist at TechSmith, where he creates content about easy, effective, and efficient video creation, editing, and tips and tricks, as well as audio editing for creators of all kinds. He/him.

How to Merge Videos With Step-by-Step Instructions

Two video clips being merged in camtasia -- How to merge videos

You’ve captured all the magical moments from your team’s stellar performance at the company event. The footage is brilliant, and snapping it all on your phone was a blast.

Two businesswomen taking a selfie on a phone.

But now, the dread creeps in. How are you going to take all those great video clips and turn them into a single, polished video? And with less than an hour before the pitch session—gulp.

Whether you’re combining videos for a work presentation or creating an Instagram-worthy reel, editing always seems more daunting than shooting. Why is it so frustrating?

Maybe it’s the image of editors wading through reels of film on a cutting room floor. Or perhaps it’s the unreliable free apps that crash your computer. It could even be those complicated Hollywood-style editing tools that take forever to master. Or maybe you just haven’t found the right tool for the job.

Let’s skip the hassle and dive into some quick, easy tips for merging your videos.

Step-by-step guide to combine two videos

Step 1: Choose the right video editor

First, you need the right tool for the job. Camtasia offers the perfect mix of power and simplicity. Its drag-and-drop interface makes it easy to arrange video clips however you like.

Unlike many online editors, you don’t have to worry about file formats. Camtasia supports multiple formats, like MP4, MOV, JPG, and PNG. Just drag and drop your videos and images onto the timeline to merge them seamlessly.

Step 2: Import your video files

Importing videos and images into Camtasia is a breeze. Simply double-click in the Media Bin or hit the green import button, then browse your hard drive to find the two videos you want to merge.

Gif of dragging media onto Camtasia editor timeline.

Once imported, your videos will sit in the Media Bin, ready for you to drag them onto the timeline. You can add as many videos as you want to the Media Bin, but only those you drag to the timeline will appear in the final product. No need to worry about file formats—Camtasia has you covered with a wide variety of supported types.

Step 3: Arrange and edit your video clips

Now for the fun part! Select both videos from the Media Bin and drag them onto the timeline. Congratulations! You’ve started the merge process (cue the dramatic space opera music).

Your clips are now lined up on the timeline, ready to go. If you want to adjust the order, simply drag the clip you want first to the left. Need to trim? Just hover over the edge of a clip and drag to shorten it.

Image of selecting part of a track in the Camtasia editor.

Once your clips are set, it’s time to spice things up. Explore Camtasia’s wide range of transitions. Find one you like and drag it between your clips to create smooth, professional transitions. You’re now editing like a Hollywood pro!

Step 4: Export your merged video

It’s time to wrap things up and export your masterpiece. Look to the top-right corner and find that big green Export button. Click it to start the process.

Image of export button clicked in Camtasia with a menu of export options.

Camtasia lets you save your video as an MP4 or send it directly to platforms like YouTube. Choose your destination, name your video, and hit Export. In just a few moments, your video will be ready.

Now sit back, relax, and enjoy your newly merged video masterpiece!

Other tools for merging videos

Using Snagit for basic video merging

Still worried about the big video merge? Or maybe you’re looking for a lightweight solution that handles basic video recording and image capture? Well, let me introduce you to Snagit.

Image of someone picking videos to combine in Snagit.

Snagit is fast, simple, and efficient. It captures images, records video, and yes—it merges videos too. There’s no timeline or complex video editor to deal with—just a no-nonsense tool that gets the job done. Perfect for quick and easy video tasks. And when you need more advanced features, Camtasia has your back with its editing tools, trimming options, and video effects.

Image of cropping a video in Snagit.

Mobile apps from the App Store

Need to merge videos on the go? There are several great apps available on your phone. Here are three of our top picks:

  • Canva (iOS/Android): Known for creating professional designs, Canva also helps merge videos. Available on Google Play and the iOS App Store.
  • iMovie (iOS): If you have an iPhone, you likely already have iMovie. Just select the movie option and choose your clips to merge.
  • InShot (iOS/Android): Quickly merge videos from your iPhone, iPad, or Android device with InShot.

These mobile tools are convenient on the go, but if you’re working from your laptop, a desktop solution like Camtasia gives you greater control. With a larger screen, accurate trimming, smooth transitions, and support for a wide range of file formats, Camtasia makes video merging effortless.

Frequently asked questions

Can I merge more than two videos?

Absolutely! Merge multiple video clips together by dragging them to the timeline, and Camtasia will take care of the rest.

What file types does Camtasia support?

Camtasia supports a rich array of video files on top of the industry standard MP4 files. Apple ProRes, AVI, GIT, Lottie, M4A, MOV, TREC, and WMV all work well in Camtasia. Visit Camtasia’s file format support page for more details.

Screenshot of LottieFiles interface.

Conclusion

A great video merger helps you quickly combine MP4 files, insert branding clips, or add an extra section to your videos. With so many tools on the market, it’s tough to sift through them all. That’s why choosing an affordable, reliable, and professional tool like Camtasia makes sense.

Camtasia delivers everything you need—powerful merging and editing features, all in one easy-to-use package.

Do yourself a favor and download a free trial of Camtasia. Your future self will thank you!

The easiest way to edit videos

Stop wasting time and discover how Camtasia makes creating incredible videos easier than ever.

Free Download
An image of a laptop showing the camtasia drag-and-drop editing feature

Lizzy Smiley

Marketing Content Writing Specialist at TechSmith. I love my dog and The Office.

How to Zoom in on a Video: A Step-by-Step Guide

Green computer screen with magnifying glass with a plus sign.

Videos are a powerful way to tell a story. Whether you are a content creator, educator, marketer, or simply sharing memories with your family, sometimes you want to draw attention to a specific moment in a video that might otherwise go unnoticed. That’s where using a zoom effect can come in handy. 

With the right video editor, you can enhance your video’s impact with this easy and simple technique.

Step-by-step guide to zooming in on a video

Step 1: Choose the right video editing tool

Most video editors will have the ability to do a zoom effect. 

For example, Adobe Premiere, Filmora, and Camtasia all have this ability. It can be daunting to start using advanced tools such as Adobe Premier, which are complex to navigate. 

Camtasia contains powerful, professional features for advanced users, but is also incredibly simple to use for beginners. Camtasia’s simplicity is ideal for making quick edits, like zooming in. 

When choosing your tool, consider whether you need a more advanced video editor, or prefer a simple but powerful editor, like Camtasia.

Step 2: Import your video clip

Now that you have chosen a video editor, the next step is to import your video clip. Camtasia supports many different video formats, which makes it versatile for a variety of projects. In Camtasia, importing your video is dead simple – all you need to do is drag and drop the video into the Media Bin:

Importing a video from your files explorer to Camtasia.

Step 3: Apply the zoom effect

Next, apply Camtasia’s zoom effect, also known as the video zoomer. To use the zoom effect, first drag the playhead on the timeline all the way to the beginning of your video clip. 

The playhead at the beginning of the timeline.

Then, in the Toolbar, click Animations, and then click Zoom-n-Pan. Use your mouse to drag and resize the mini preview to zoom in on a specific portion of your video.

Zoom and pans location in Camtasia and applying it to a clip.

It really is that easy! Camtasia’s effect controls give you the power to adjust the zoom level, so you can zoom in just the right amount, and focus on the exact portion of your video that you want to highlight.

Step 4: Fine-tune the zoom with the Ken Burns effect

To make your video even more dynamic and professional, consider using the Ken Burns Effect. This is a technique you may have seen in documentary films. 

The basic idea is to dynamically pan and zoom across a still image throughout the duration of a clip. 

To do this in Camtasia, start with a still image, like a screenshot or photograph. 

Drag and drop the image onto the timeline. 

In the toolbar, click Animations, and then click Zoom-n-Pan. Using the mini preview in the Zoom-n-Pan tab, drag and resize the selection area to pan and zoom in on one part of the image, as in step 3. This creates an animation. On the timeline, the animation looks like an arrow. 

The animation has two dots, one at the beginning, and one at the end, which are called keyframes.

 To finalize the effect, drag the keyframes for the animation all the way to the beginning and end of the image on the timeline, so that it looks like this:

Dragging the end keyframe across the footage.

This causes the zooming and panning to happen gradually over time, creating a feeling of movement. That’s it! You are now using the Ken Burns effect to add dynamic movement to a still image.

Step 5: Preview and export your video

Now that you have applied the zoom effect, double-check that everything looks good by previewing the video. 

Drag the playhead all the way to the beginning of the timeline, and hit the play button above the timeline. After you preview your video, export it in the desired video format so that you can share it with others. 

Click the green Export button in the top right of Camtasia. You can choose local file to export a file you could send to others or upload directly to YouTube or other destinations.

 The advanced options in the Camtasia Exporter give you the power to format your video in many ways, so you can optimize it for certain platforms, like social media websites.

Why use Camtasia for zooming in on videos?

User-friendly interface

Camtaisa’s user interface is designed to be super user-friendly for video creators of all skill levels, from beginner to advanced professional. You can use your mouse to drag and drop a video into Camtasia and to zoom in on a portion of the video. 

This makes it easy for anyone to apply the zoom effect without needing advanced skills.

Built-in zoom tools

Camtasia has built-in tools for zooming in and out. You can apply a smooth zoom effect or more advanced effects without being a professional. While it is easy to get started, Camtasia also exposes advanced effect controls so that you can fine-tune your shots to ensure they are pixel-perfect.

The easiest way to edit videos

Stop wasting time and discover how Camtasia makes creating incredible videos easier than ever.

Free Download
An image of a laptop showing the camtasia drag-and-drop editing feature

Conclusion

Camtasia makes it simple to zoom in on your videos, making it a great choice for anyone looking for a powerful, easy-to-use video editor. 

The zoom effect is just one of many built-in video editing features Camtasia offers to help you create professional-quality videos, even if you are just getting started with video editing. And with a free trial available, you can download Camtasia and get started today!

Frequently Asked Questions

Can I zoom in on specific parts of my video?

Yes, with Camtasia’s zoom effect, you can easily zoom in on any portion of your video clip and adjust the scale and duration of the zoom to fine-tune the effect.

What video formats can I use in Camtasia?

Camtasia supports a variety of video formats, including MP4, AVI, and more, which make it an excellent choice for a multitude of projects. To see a full list of supported file formats, go here for Camtasia Windows: Camtasia Supported File Formats on Windows – TechSmith Support and here for Camtasia Mac: Camtasia Supported File Formats on macOS – TechSmith Support.

Guy Larcom

Guy is the Global Content Strategy Manager at TechSmith. If he's not golfing or skiing, he wishes he was.

How to Write a Bug Report: A Step-by-Step Guide

Clipboard with bug in magnifying glass.

An effective bug report is crucial to improving your product’s user experience. A clear and detailed bug report helps the QA teams and developers understand the issue, reproduce it, and ultimately fix it.

What is a bug report?

A bug report is a document that contains details about a software defect. It helps developers fix the bug by providing essential information, such as when and how the bug occurs. The defect should be recorded in a bug tracking system, like GitHub, to monitor its status and impact. Bug reports help product stakeholders prioritize fixing the bug by informing them of its severity and are a key component of the software development process.

The importance of writing a good bug report

A good bug report can be the difference between a defect being fixed or not. It communicates the user experience and helps the entire team understand the issue. A good bug report speeds up the fixing process and ensures the bug doesn’t negatively affect the final product. It’s a crucial part of the software development life cycle. 

Critical elements of an effective bug report

1. Title and bug ID

A bug report begins with a title and a unique bug ID. The report’s writer usually creates the title, while your bug tracking system typically automatically generates the bug ID. The title of an effective bug report should be a clear, concise summary of the defect. In some cases, it includes the type of bug.

2. Application version and operating system

A good bug report must include the application version and operating system used when the bug occurred. It is also valuable information to know whether the bug occurs on different versions, device types, or operating systems! When you take a screenshot with Snagit, the application version and operating system are automatically recorded and can be displayed on the image using the Capture Info effect.

3. Steps to reproduce the bug

The most effective bug reports include steps to reproduce the bug. These steps should be easy for developers to follow and replicate. Snagit can take images or video captures of the steps to reproduce. Add arrows, callouts, and blurs to your screenshots to help developers focus on the critical elements required to reproduce the bug.

4. Actual vs. expected result

Most bug reports describe the actual result of the bug, but don’t forget to include the expected result. The actual result can be defined as “what happens when the bug occurs,” while the expected result is “what should have happened without the bug.” It may be challenging to fix the bug if the developers don’t know the expected result.

5. Screenshots and videos

Screenshots and screen recordings can significantly enhance a bug report by showing exactly where a bug occurs and providing visual evidence. 

Important screen capture tool features include the following:

Screenshots, including scrolling capture

It’s preferred to grab the entire long webpage, if applicable. This ensures that all needed information is captured.

Snagit supports up- and down-scrolling as well as left- and right-scrolling capture, unlike most capture tools.

Image editing tools

Leverage annotation tools such as arrows and callouts to refine screenshots and focus on relevant details.

Snagit offers efficient screenshot editing capabilities, including Magnify and Spotlight. It also provides blur and redact capabilities to hide personally identifiable information.


Screen recording

Video recordings illustrate the flow of events leading up to an issue.

Unlike many alternatives, Snagit captures mouse movement and system audio for the richest bug event captures possible.

For added clarity, include narration and a live drawing while recording.

Snagit provides microphone capture and a variety of Screen Draw markups, including automatic step annotation. Optional webcam integration is also provided for a more personal touch.

Text grab and metadata capture.

The most efficient products, like Snagit, will reduce the time needed to enter bug-tracking information by making it easy to text-grab (OCR) information from the screen.

Library and file management

Snagit enables you to organize your screenshots and recordings with automatic metadata and custom tags.

Every capture provides copy-and-paste metadata like URL and timestamp to save time completing bug reports.

Snagit is the top-ranked screen and video capture software available and is used by all Fortune 500 companies.

Stop repeat questions

Create clear videos and guides with Snagit so you only have to explain tasks once.

Try it Free
Screen recording of a dashboard showing conversion rate, spend, and monthly performance with a picture-in-picture webcam view of a smiling man.

6. Error messages and logs

Ensure your bug report includes any error messages or log files generated by the bug. Error messages can quickly be captured with a screenshot, while log files can be attached to your bug report. This provides developers with crucial technical information for debugging.

What makes this bug report effective?

This is an effective bug report because it includes a descriptive title, precise steps to reproduce the bug, an annotated screenshot, and system information. This report provides ample information to ensure developers clearly understand the issue and can fix the problem efficiently. 

Notice how the screenshot was annotated with a shape highlighting the problem link and a callout pointing to the link with further details in its text box. Unrelated links on either side are blurred out so the developer can quickly find the bug while keeping the context of where the bug is located.

Common mistakes to avoid when writing a bug report

1. Vague descriptions

An effective bug report should be as specific as possible to prevent confusion. Avoid vague descriptions such as, “The button doesn’t work.” A better description would be, “The red button displays an ‘Error 404’ message after clicking it.” This clarity ensures the entire team has a strong understanding of the issue.

2. Missing steps to reproduce

The developers may need steps to reproduce the bug to understand or fix the issue. Clear and precise steps will save the developers time and frustration. Consider taking a video recording of yourself walking through the steps to reproduce.

3. Forgetting visual evidence

A common mistake in bug reports is not including any screenshots or videos. There is nothing more effective than the visual proof of screenshots in speeding up the understanding and fixing of the bug. 

Snagit can be used to quickly and easily capture screenshots and screen recordings. The Snagit Editor can annotate your screenshots, clearly highlighting the relevant information. Any sensitive information from the final screenshot can be blurred or redacted. Screen recordings are another versatile form of evidence.

Bug reporting tools and tracking systems

Why use a bug tracking system?

A bug-tracking system helps the development team organize, track, and prioritize bugs across different teams and stages of development. It assigns unique tracking information, such as a title bug ID. It helps QA teams understand how frequently users encounter a bug and helps product stakeholders see when work to fix a bug is complete. These systems can provide insights segmented by type of bug and bug priority.

Who uses bug tracking tools?

Software development teams use these tools to identify and fix bugs during the development lifecycle: 

  • Quality Assurance (QA) teams formally track defects found during the test phase.
  • Project Managers leverage these systems to monitor risks of timely delivery.
  • Customer Support logs issues reported by end-users to ensure they are addressed.

Key features of bug tracking tools

  • Bug capture – Ability to log new detailed bug reports
  • Bug reporting – Ability to find bugs based on severity levels or other metadata
  • Custom workflows – Support for team-specific rules that fit with their internal processes like status progression and governance
  • Bug prioritization – The ability to prioritize, pull, and defer bugs
  • Bug assignment – The ability to assign a bug to a team member
  • Integration capabilities – Seamless integration with other development tools, typically version control systems or project management tools
  • Automated notifications – Support notifying team members about status changes through push alerts
  • Dashboards – Visual insights into bug trends and overall team performance

Comparison of bug tracking systems

Popular bug tracking tools include Jira, Bugzilla, Trello, and GitHub. These tools enable the creation of bug reports and collaboration between team members. Other common tools include Redmine, MantisBT, Zoho Bug Tracker, and Asana.

Most of these systems offer limited or no support for screenshot and screen recording capture. Customers typically use an additional product like Snagit for robust screen capture.  

  • However, there are third-party tools available for some of these platforms, such as Capture for Jira by Zephyr, BetterBugs for Trello, and a third-party Chrome extension called Trello Capture. 
Feature/ToolJiraBugzillaTrelloGitHub
Custom WorkflowsYesLimitedNoYes
Agile SupportStrongNoneLimitedYes
Integration OptionsExtensiveModerateModerateExtensive
User InterfaceComplexBasicSimpleDeveloper-friendly
CostPaid (with a free tier)FreeFree (with paid options)Free (with paid options)

Best practices for creating bug reports

1. Provide detailed reproduction steps

Clear, step-by-step instructions for reproducing the bug are crucial for an effective bug report. This helps ensure everyone on the team has a clear understanding of the issue. Developers will follow the steps to reproduce the bug and then investigate potential solutions. Multiple people, including QA or different development teams, need the information to reproduce the problem. 

2. Always include screenshots and visuals

Every bug report should include screenshots, screen recordings, or video clips. Snagit is the ideal tool for gathering and sharing visual information with the development team. Arrows, shapes, callouts, and much more can be added to a screenshot to highlight important information. 

3. Test on multiple environments

Testing in multiple environments can provide valuable information—did the bug only happen on a specific application version, device type, or operating system? These details can help developers determine when a bug was introduced and how to fix it.

4. Update and review bug reports regularly

It’s important to review and update bug reports regularly. When the QA teams find new information about a bug, they should include it in the existing bug report. This ensures the developers have the most accurate details when fixing the bug.

Collaborating with QA teams and developers

Clear communication is key

Effective software development requires clear communication between the QA teams and developers. Fixing a bug requires the developers to understand the issue and be able to reproduce it. Developers should feel comfortable asking the QA teams for testing techniques, and the QA teams should be able to ask the developers for their technical expertise. 

How Snagit can help collaborate with visuals

Snagit is a powerful tool for helping QA teams and developers collaborate more effectively. Snagit can quickly create and share visual reports, ensuring clear communication and collaboration between development teams.

Conclusion

Effective bug reports are crucial to software development and help ensure high-quality products. When writing a bug report, include detailed reproduction steps, screenshots and video recordings, system information, and expected vs. actual results. 

Snagit is the best product available to create high-quality visuals and help improve understanding and communication in the bug-fixing process.

Speed up your screenshot workflows

Stop wasting your time with built-in snipping tools, and try Snagit!

Learn More
Screenshot of a document about puffin migration patterns with a section for changing styles highlighted.

TechSmith

TechSmith is the market leader in screen capture software and productivity solutions for daily in-person, remote, or hybrid workplace communication and customer-facing image and video content. Our award-winning flagship products, Snagit, Camtasia, and Audiate, empower anyone to create remarkable videos and images that share knowledge for better training, tutorials, and everyday communication.

What is SCORM E-Learning Content?

Connecting lines of different technology boxes.
SCORM is an established e-learning industry standard for online learning content. 

This standard allows instructional designers and educators to use diverse tools to author and deliver online course content.

SCORM is short for Sharable Content Object Reference Model.

Tip: “Shareable” content object reference model is an alternative spelling.

SCORM compliance is a critical part of E-learning content creation. This article explains everything you need to know:

  • E-learning
  • E-learning management systems (LMS)
  • SCORM Files
  • SCORM-compliant content creation
  • Camtasia: The best SCORM-compliant video editor

First, let’s cover the importance of this standard.

Why use SCORM?

This standard lets you create and reuse content across different courses and platforms. It provides detailed insights into learner performance by tracking time spent, scores, and completion rates.

eLearning providers use SCORM to ensure their content works with Learning Management Systems (LMS). This helps in several ways:

  • Educational institutions give students consistent access to courses and assessments.
  • Corporate and government training programs deliver standardized training across various departments and locations.
  • Third-party creators build seamless content for any customer’s LMS.

E-Learning: What is an e-learning platform?

E-learning, or electronic learning, is a way to deliver education through digital platforms. While often linked to online courses, it can include virtual classrooms and immersive experiences.
E-learning platforms provide online courses to students. They host the content, organize it into courses, and track how users engage with it.

Two people communicating via video.

What are Learning management systems (LMS)?

E-learning platforms that are full-featured learning management systems (LMS) include: 

  • Authoring tools
  • Course creation definition
  • Assessment capabilities
  • Analytics to assess learner progress. 

SCORM-compliance enables LMSs to import, launch, and track standardized courses.

Why is a standard important for LMS Platforms?

SCORM-compliant courses work on different learning management systems (LMS). This makes it easy to share, reuse, and integrate content. One tool can create content, and another can host it.

Learning professionals can scale online courses without worrying about platform limits. This standard also helps track learner progress and results, giving organizations essential data to improve training.

Do all LMS platforms support SCORM?

Most modern LMS platforms are SCORM-compliant.

Tip: Verify the version(s) supported before investing in one.

Popular LMS platforms include open-source Moodle, Blackboard, and Canvas. These systems are compliant so that they can use packages without extra changes.

What is a SCORM file? What is a SCORM package?

The standard defines how to organize e-learning content LMSs. E-learning content is packaged into SCORM files (also called SCORM packages.) 

Run-time communication occurs between the LMS and the file during a learning session. This data exchange enables the LMS to interpret the course content and track user progress, including:

  • Quiz scores
  • Time spent
  • Completion status.

Each zip file contains all the components necessary for delivering an e-learning course on an LMS:

The manifest file provides the data to import, launch, and manage the course. This XML file describes the content structure, sequencing rules, and metadata. 

Learning materials are training resources such as text, images, videos, quizzes, and interactive elements.

Sharable Content Objects (SCOs or learning objects) are the smallest units an LMS can track individually.

SCORM courses may comprise multiple zip files. 

Versions between SCORM 1.2 and SCORM 2004

Four versions of SCORM are widely available. All ensure compatibility across different LMS platforms.

Version 1.2

The original version, known for its basic tracking capabilities, is still widely used today.

Tip: Scorm 1.1 had limitations and was quickly replaced.

Version 2004 2nd Edition

Adds more advanced sequencing and navigation features, offering greater flexibility for course designers.

Version 2004 3rd Edition

Largely a set of improvements to the sequencing specification to tighten the details.

Version 2004 4th Edition

Contains further enhancements to the sequencing plus new features for navigation.

How to create SCORM content 

Products like Articulate Storyline, Adobe Captivate, and iSpring Suite enable compliant content creation.

One challenge with these types of tools is that they need help to make great videos. You typically need a second tool to capture screen content and edit videos. Interactive videos keep users engaged and are an important part of online course creation.

Camtasia is the market-leading video editor and screen recorder for corporate training and higher education.

Crystal-clear screen recording

Why settle for blurry screen content? Camtasia’s screen recorder captures everything at up to 4K!

Free Download
A image showing the user interface for the recorder in camtasia
ToolScreen Recording Video Editing 
Articulate StorylineBasic featuresLimited capabilities for simple edits
Adobe CaptivateCapabilities for simulations and demosMore features, including interactive videos with branching and quizzes
iSpring SuiteBasic features integrated with PowerPoint Basic features for enhancing PowerPoint with interactive media
CamtasiaFull-featured screen recorder with the ability to capture screen, camera, microphone, system audio, and mouse cursor dataFull featured video editor

Camtasia: Best Video Editor for LMS Integration

Camtasia is a powerful and user-friendly tool for creating engaging eLearning videos and tutorials. 

With Camtasia’s advanced e-learning features, you can:

  • Require a viewer to watch a specific percentage of your video to complete the course. 
  • Add interactive quizzes
  • Require the viewer to get a particular percentage of questions correct to pass.

How to export SCORM content in Camtasia

Exporting a file and clicking "include SCORM."

Export your SCORM-compliant video recordings and upload them directly into an LMS: 

  1. Create your video tutorial in Camtasia.
  2. (Optionally) Use quizzes and interactive elements to enhance learner engagement.
  3. Export your project as a SCORM-compliant zip file that integrates smoothly with your LMS.
Manifest Options popup.

Whether you’re building corporate training or academic courses, Camtasia makes it easy to produce and deliver eLearning content.

Frequently Asked Questions (FAQs)

What is the Experience API (xAPI)?

The Experience API, or xAPI or Tin Can API, is an alternative, more recent, standard.
xAPI supports various learning experiences, including informal learning and real-world performance. 
While xAPI offers advanced capabilities, it is only sometimes compatible with older LMS systems. 
SCORM remains the standard for now because of its simplicity and established legacy infrastructure.

What are the limitations of SCORM?

Users express some frustrations with the standard and seek options to improve flexibility and learner experience:

File Size
– Large files, especially with some LMSs, hit data limits or lead to buffering issues.
Flexibility
– Some designers prefer custom solutions over industry standards because they offer more flexibility and learner engagement. 
– Others want to switch to newer standards like xAPI for more features.
Authoring Tools
– Specific tools need extra customization, plug-ins, or add-ons like screen recording and video editing software.

Create E-Learning content today.

SCORM standards are essential to eLearning, helping to share and track content on different platforms. And while older and less refined, scorm stands as a useful tool in every learning designer’s toolkit.

Camtasia makes it easy to create content that keeps learners engaged while meeting industry standards.

Ready to make SCORM-compliant video projects? Try Camtasia today to build interactive eLearning courses that integrate with almost any LMS.

The easiest way to edit videos

Stop wasting time and discover how Camtasia makes creating incredible videos easier than ever.

Free Download
An image of a laptop showing the camtasia drag-and-drop editing feature

TechSmith

TechSmith is the market leader in screen capture software and productivity solutions for daily in-person, remote, or hybrid workplace communication and customer-facing image and video content. Our award-winning flagship products, Snagit, Camtasia, and Audiate, empower anyone to create remarkable videos and images that share knowledge for better training, tutorials, and everyday communication.

How to Get a Transcript of a YouTube Video: A Guide

Image of youtube video with transcript.

Video transcripts may not seem like a vital part of your content creation process, but they are incredibly important to make your video content more accessible for everyone watching.

Accessibility is important for individuals who need to read along with your videos, such as those with hearing impairments. However, it is also important to include a transcript for people who would just rather watch the video on mute – we don’t judge!

Having a full video transcript can also save time when analyzing or repurposing video content on other platforms. YouTube makes it easy to copy and paste the transcript from one document to another, like Microsoft Word or Google Docs.

Learning how to get a transcript of a YouTube video is super easy, and we’ve created this helpful guide to make it even easier for you to follow along.

Use YouTube’s built-in transcript feature

YouTube makes it easy to find a video’s transcript directly from the website. This tutorial is tailored toward people accessing videos from their computer device. Let’s see how it’s done.

Step 1: Open the video you want to transcribe

You can access a video’s transcript right from the YouTube website. To do so, open the video you want to transcribe by clicking on it. It’ll start playing.

Step 2: Click the “Show transcript” button

Locate the description box under the title. Click the “more” option to open the whole box.

Screenshot from YouTube showing the "more" link in the video description

There, you will click the “Show transcript” button option, which will open the transcript box with the text inside.

YouTube screenshot of the Show Transcript button at the end of the video description

Step 3: Copy and paste the transcript

Copy and paste the transcript where you need it. Highlight the text and right-click it.

Select the “Copy” option in the menu. Or, with the transcript highlighted, press Command+C keys on a Mac or Ctrl+C keys on Windows. This will automatically copy the text to your clipboard.

To paste, right-click where you want to place the text, for example Microsoft Word or Google Doc, and select the “Paste” option. Or use the Command+V keys on Mac or Ctrl+V keys on Windows.

Your transcript will appear in the new document. YouTube includes timestamps next to each section of text, allowing you to jump to specific parts of the video, making it easier to access. This is useful for identifying the key points of a video at a glance.

However, if you do not need the timestamps, you can easily remove them by deleting them from the document.

Automatically generate transcripts with Camtasia Audiate

Camtasia Audiate is a powerful tool for transcribing video content. With this tool, you can automatically generate transcripts from any video you upload. This is done with even greater accuracy than YouTube’s automated captions.

Plus, you can use this feature even if your video is not on YouTube, making it a versatile tool for every content creator. Let’s see how it’s done.

Step 1: Download the video from YouTube

To download videos from YouTube, select the video you want to download and hit “Download” from the menu.

Step 2: Import the YouTube video into Camtasia

Import the video into Camtasia by dragging and dropping the file into the media library or right-clicking on the library.

Once your video is imported, drag and drop it onto the editing timeline.

Step 3: Generate the transcript in Audiate

Right-click the video on the timeline and click “Edit in Audiate.” This will export the video’s audio, where it will be transcribed in real time.

Screenshot of a video transcript in Camtasia Audiate

Transcribing YouTube videos is all automatic with Audiate, making it an easy solution.

Step 4: Edit your transcript if needed

Audiate automatically generates an editable transcript, allowing you to correct any errors and polish the final text.

Although errors are rare, you can correct proper names and difficult-to-understand terms to reflect the true meaning. This editable option makes it easy to create a perfect transcript in no time.

Since the audio is transcribed in real-time, Audiate has the option to play the video’s sound over the transcript’s sound while you edit. This makes it easy to spot mistakes and correct them so you can ensure high-level accuracy every time.

Edit audio like text

You don’t have to be a professional to record and edit audio. Audiate makes it as easy as editing a text document.

Get Audiate
An image showing text being deleted in a doc and a corresponding timeline being cut

Step 5: Export the transcript

To export the full transcript as a text file, select the File menu, then “Export”, then “Export Script.” You can also export this as an SRT file if needed for your video content.

To export a selection of the transcript, click and drag the desired portion of text from the transcript and follow the same instructions until you reach “Export Selection as Script.”

Get YouTube transcripts from a mobile device

To access the transcript from a mobile device, you can do so on the YouTube app. However, you can’t download the transcript on your mobile device.

Step 1: Open the video you want to transcribe

You can access a video’s transcript right from YouTube. To do so, open the YouTube app and access the video you want to transcribe by clicking on it.

Step 2: Access the transcript in a few clicks

Once your YouTube video is open, click on the downward pointing arrow on the right-hand side of the title. This will open the description box for the video with extra information.

Click on the “Show Transcript” button at the bottom of the page. As you play the video, the transcript will scroll along with you so you don’t lose your spot.

Again, you cannot download the transcript from your mobile device and will need to access the video from a computer to download a YouTube transcript.

Manually transcribe YouTube videos

If you prefer to manually transcribe YouTube videos, you can do that too. This option is not for the faint of heart. Although it gives you full control over the transcription, it is extremely time-consuming.

Step 1: Play the video and type the transcript

This method is pretty straightforward. Access the video of your choice and press play. Type along and pause at intervals so you can keep up with typing out the transcription. For easy edits, type the dialogue into a text document.

Step 2: Use timestamps for specific sections

YouTube adds handy timestamps so users can easily refer back to the most important parts of the video. You can also do that by manually adding timestamps to jump to specific parts of the video. This can be especially useful for creating more organized and searchable transcripts.

Plus, you can choose where those timestamps are, giving you ultimate control over what sections to highlight.

Instant video translation

Easily translate your videos scripts and voice over into any of dozens of languages and dialects!

Get Audiate
An image of the UI in audiate for translating a script into other languages

TechSmith

TechSmith is the market leader in screen capture software and productivity solutions for daily in-person, remote, or hybrid workplace communication and customer-facing image and video content. Our award-winning flagship products, Snagit, Camtasia, and Audiate, empower anyone to create remarkable videos and images that share knowledge for better training, tutorials, and everyday communication.

Chroma Key Green Screen: Creating with Portable Chroma Key

Image of a person with a split background. One with a blank green screen and one with nature scenery in the background.

Everyone wants to create engaging and professional-looking videos, but without a professional recording studio, this can seem like a daunting task. Green screens are a staple of special effects, used extensively in everything from movie sets to broadcast TV. They let a blank background be replaced in postproduction with any video or image to give a production a professional look or create more engaging content.

A portable green screen and Camtasia’s flexible and easy-to-use chroma key features give you the power to create high-quality content in just minutes.

Image of a dog and the background has been replaced by a color gradient

What is chroma key and how does it work?

Chroma Keying is a technique for replacing a specific color in a video with another video or image.

This specific color will be removed at a certain range to account for variations caused by lighting and shadows.

Portions of the original video matching this range will be made transparent, allowing other media to be inserted into the scene. 

This is commonly used in films to make actors appear in computer-generated scenes. An actor walking around in front of a green screen can suddenly be transported to the surface of the moon. 

It can also be used to put a YouTuber in front of the media they are talking about to create more engaging content, allowing both the speaker and content they are showcasing to be displayed together. Virtual presentations may also place speakers in front of a neutral background to minimize distractions that filming in other locations could create.

Why green (or blue) screens are used

Green screens are the most commonly used background color for chroma keying. For the cleanest background removal, you want a high contrast between the background being removed and the subject you want preserved. 

Chroma keying removes anything matching the selected color range, so productions want to avoid a background that matches their subject too closely. The bright green shade used for green screens is typically the easiest to remove in most productions. Human skin tones usually have very little green. Green clothing is also less common than other colors, making green backdrops ideal. 

Today, green screen or blue screen backgrounds are commonly used. In productions where someone needs to wear green or where other subjects, like plants, could cause issues, a blue screen can be used instead. A green background is also easier to remove from brightly lit scenes because of its high luminosity. However, in a less well-lit scene, blue may be a better choice for the same reason. The high luminosity of green can reflect green light onto the subject, making the effect more noticeable and less professional.

Stardom awaits!

Camtasia is the perfect way to create exciting content for YouTube, TikTok, Instagram, and more!

Free Download
An image of a phone and laptop both showing variation of a cooking videos in both device sizes

Portable chroma key solutions for content creators

Benefits of a portable chroma key setup

A portable chroma key solution makes it easy to quickly improve the quality of your productions. Portable solutions are an affordable and high-impact way to level up your creation process. They are also versatile; instead of being limited to a permanent location, you can quickly film with them at home, the office, or on the go.

For collapsible convenience, Elgato’s Green Screen is great for on-the-go creators. Within seconds, it can be deployed and ready for use. In its collapsed state, it is easy to store and transport and has a convenient carry handle.

More budget-minded users can still achieve a high-quality effect with a Neewer 2-in-1 Collapsible Backdrop. This backdrop is packable, providing easy portability. It also provides both a green and a blue side, maximizing versatility for recording at different times of day or with different subjects at one location.

For the highest quality video production, the Pro Cyc GS80 Portable Green Screen provides a huge 80-inch wide by 80-inch high backdrop for filming one or two subjects. This portable screen enables users to set up a professional-quality green screen within minutes on location.

How to use chroma key in Camtasia

Step 1: Import your footage

The first step is getting your green screen footage into Camtasia. In the Camtasia Editor, you can import your video into the media bin and then add it to the timeline. You can also record your footage in the Camtasia recorder with your webcam once you have your green screen setup ready. See How to Record Your Webcam (Step-by-Step Guide) for more information.

Step 2: Apply the chroma key effect

Once your media is on the timeline, you can select the “Visual Effects” tab. The “Remove a Color” effect (chroma key) can then be added to your media by dragging it, or via the context menu.

Drag the Remove a Color effect onto the media on the Camtasia timeline

Once the effect has been added to your media, you will see “Remove a Color” in the properties panel. You can now adjust these settings to correctly remove your background color and ensure smooth edges. The color picker allows you to easily select the color of your green/blue background from the preview so that your specific background color is removed.

Use the color picker in the Properties panel to pick the color to remove from the media

There are also the following settings to fine-tune the effect:

Tolerance

This adjusts how close a color has to be to your selected color to be removed.

Softness

Adjusting can help smooth out rough edges you may see around your subject.

Hue

Adjusting this can help you get more accurate skin tones.

Defringe

Adjusting this can also help smooth out the edges of your subject, especially if you notice a faint halo effect around it.

Remove a Color options in the Properties pane

Step 3: Add a custom background

Now that you have fine tuned the background removal, it’s time to add your custom background. Insert your background image or video onto the timeline behind your subject footage.

Media and background tracks on the timeline in Camtasia.

Tips for achieving best results with Camtasia

  • Ensure proper lighting to avoid shadows and uneven color on the green screen.
  • Use Camtasia’s “Remove a Color” settings to fine-tune the effect.

Conclusion

Chroma key is a great way to create more professional and engaging content. Subjects can be placed directly in front of content being highlighted, engaging backgrounds, or even appear to be in different locations. Camtasia makes it fast and easy to achieve this effect in your videos. Get started with a free trial of Camtasia and a portable green screen to level up your production skills today!

The easiest way to edit videos

Stop wasting time and discover how Camtasia makes creating incredible videos easier than ever.

Free Download
An image of a laptop showing the camtasia drag-and-drop editing feature

TechSmith

TechSmith is the market leader in screen capture software and productivity solutions for daily in-person, remote, or hybrid workplace communication and customer-facing image and video content. Our award-winning flagship products, Snagit, Camtasia, and Audiate, empower anyone to create remarkable videos and images that share knowledge for better training, tutorials, and everyday communication.

How to Screenshot Dropdown Menus

Blue image of dropdown menu with mouse and camera.

Do you remember your high school teacher expecting you to “show your work” when solving a problem? While we rolled our teenage eyes at the teacher back then, we never realized that visual communication would be a practical benefit in our adult lives. 

Visual content improves our daily communication skills by making content easy to digest, whether we are creating peer-to-peer instructions or a presentation for a larger audience.

Grabbing that dropdown or pop-up menu can be a hassle, but there are a few tricks for effectively capturing the dropdown menu content.

Before and after screenshots of a desktop with and without a dropdown menu included

Why it’s hard to screenshot dropdown menus

The only thing more frustrating than explaining a complicated process is struggling to capture a screenshot of the menus in the complicated process. 

Modern computer operating systems now have built-in screenshot programs to help grab a visual of your steps, but those screenshot applications are not always user-friendly for the menus requiring mouse cursor contact.

Delay dropdown menu in Windows Snipping Tool

Windows screenshots

Windows Snipping Tool can get the job done, but its lack of functionality can be disappointing. 

When you need to capture a dropdown menu, how can you get that capture if you are pressing the capture button? 

To capture dropdown menus or areas that aren’t visible on the screen, you need to start the capture using your mouse cursor or a keyboard shortcut. 

With the Snipping Tool, you can also set up a delay capture. The delay provides time to open the area you want to capture. The delay can be used with capturing a region or the entire screen. 

However, these are the extent of the customizations, and the app is otherwise limited.

Example screenshots with and without a dropdown menu taken with macOS built-in screen capture

MacOS screenshots

Apple also has a built-in screen capture in the macOS environment. Use hotkeys to start the capture. Pressing and holding Command + Shift + 3 will take a full-screen capture, or Command + Shift + 4 will capture part of the screen. 

Extra steps are needed to modify or crop captures.

You’ll need to open the drop-down menu, press the hotkey to take the screenshot, and then open the screenshot for editing.

The editing tools are similar to the screenshot editing tools found on the iOS platform, making this application familiar for iOS users, though not always intuitive.

If the built-in apps are not meeting your needs, TechSmith Snagit may be the solution you’re looking for!

Try out a no-obligation free trial today for a hassle-free screen capture tool to create dynamic screenshots, easy-to-follow step-by-step instructions, or engaging content for your audience.

Time Delay option in Snagit

How to screenshot a dropdown menu using Snagit

Step 1: Set up Snagit

Install Snagit on a Windows or a macOS device and follow the steps to create an account or sign in with your TechSmith account.

Step 2: Use Snagit’s hotkeys to capture the menu

Take a moment to learn the Snagit Capture Menu and utilize the default hotkeys to engage the capture. Once you are ready, expand your dropdown menu and hit the hotkey. Windows uses Print Screen (PrtSc) and macOS uses Control+Shift+C.

An arrow annotation pointing to the "join a meeting" option in the dropdown menu

Step 3: Annotate and edit your screenshot

Once the capture is taken, the screenshot of your dropdown menu will open in the Snagit Editor. Snagit offers a rich editing experience to enhance screen captures with a variety of tools.

Step 4: Save or share your screenshot

When it is time to send the screenshot out, Snagit supports several platforms for managing or exporting the image, including email, cloud locations, or Screencast. The Share Link menu provides several output options, or you can simply copy and paste the final image.

Why Snagit is the best tool for capturing dropdown menus

When you need a screenshot of a dropdown menu, Snagit is the everyday tool you never knew you needed.

Screen captures, edits, and sharing content are easy and save time. The program’s many options give you a ‘one-stop shop’ for images and screenshots. Snagit is compatible with Windows and macOS and efficiently integrates with the operating systems for custom hotkeys and capture presets.

Unlike the built-in screen capture applications, Snagit can take your instructional screen captures a step further with scrolling capture, video recording, easy-to-use templates, and the ability to convert still images to videos.

The best snipping tool for Windows and Mac

Don’t let clumsy built-in tools hold you back. Take and edit screenshots with Snagit!

Get Snagit
Someone capturing a screenshot of a mountain scene with a person and goats using Snagit, showing cropping tools on the screen.

TechSmith

TechSmith is the market leader in screen capture software and productivity solutions for daily in-person, remote, or hybrid workplace communication and customer-facing image and video content. Our award-winning flagship products, Snagit, Camtasia, and Audiate, empower anyone to create remarkable videos and images that share knowledge for better training, tutorials, and everyday communication.

The Best Microphone for Recording Video

Purple microphone with a video icon on a green background with sound waves.

Choosing the best microphone for recording videos is crucial. If the audio quality is poor, viewers will click off quickly. Now, that’s something we don’t want!

We’ve created this guide to help you learn about different types of microphones and figure out which microphone is the best option for you.

Why the right microphone matters

According to a TechSmith study, responders noticed that a quality presenter and audio is an aspect of the video they found engaging. Additionally, for respondents who stopped watching a video for any reason, poor-quality audio and blurry footage were tied for the number one reason.

Make videos your viewers crave

Discover the secrets of what your viewers truly want in your training and instructional videos.

Get the Full Report

Although you definitely can edit audio to perfection with the right audio editor, having good audio to begin with is crucial. We’ll dive into how to edit your audio later on.

Having the right microphone for recording video is a good place to start recording good audio, but how do you know which microphone is going to serve your needs best? After all, there are seemingly endless options out there. 

What to look for in a microphone

There are three different characteristics of a microphone that you need to look out for:

Sound quality

Almost every time, any microphone will be better than the one built into your laptop. The sound quality of a microphone refers to the clarity and tone of the sound, including how your voice sounds as you speak through your script. 

For example, certain letters, such as “p”, can create a plosive sound that is highly distracting in the audio. Pop filters are a great addition to a microphone because they provide a film of protection against those plosive “p” sounds. You can also use a pop filter removal feature in your audio editor post-production to smooth out the audio.

“When audio quality is diminished … people perceived the person speaking as less intelligent, their research less valuable or less important.”

Pickup pattern

Not all microphones pick up audio in the same way. For example, a cardioid microphone picks up sound in a heart-shaped pattern. This type of microphone is great for a single speaker to record clear, even audio. 

Super cardioid microphones are narrow, focused, and often found in shotgun microphones. This helps the microphone not pick up any extra noises, but if not properly aligned to the speaker, this microphone might also not pick up their voice well.

Omnidirectional microphones don’t just capture the speaker but also noise around the entire room. These work great for recording bands, moving targets, and meetings in large rooms. They ensure that sound from anywhere in the room can be heard. 

Bidirectional microphones pick up audio from opposite sides of the microphone, which works well for sit-down interviews across a table or podcast-style discussions. 

Noise handling

Microphones handle background noise differently. As we mentioned, omnidirectional microphones will pick up every noise in a room, making it harder to keep background noise to a minimum. 

The most important thing you can do about background noise is minimize it before you record. Soundproof your room by adding padding to all large surfaces. Foam padding on walls, rugs on floors, and window covers are good places to start. Soundproofing is always key, whether you’re recording from a home office, a closet, or a professional studio.

Some audio editing software can also help minimize background and room noise post-production. Although extremely useful while editing, it’s always best to start with the clearest audio possible so your finished product is polished.


Dynamic vs. Condenser microphones

Which one is right for you?

Condenser microphones

Condenser mics rely on a sensitive vibrating core to capture sound. These mics are sound-sensitive, which makes them great for recording vocals and musical pieces.

For great sound, these types of microphones are usually held up on a shock mount. This suspends the microphone in the air, like you see in professional musical recordings!

Some pros of condenser mics are their omnidirectional nature and their wide frequency. Wide frequency refers to the mic’s ability to capture everything, no matter how subtle. This is incredibly important for crystal-clear vocal recordings.

Some cons of condenser mics are that they are usually on the higher side budget-wise and rely on an external power supply. You’ll need to plug the microphone into an audio interface or preamp through an XLR cable. USB condenser mics draw power from the USB port they are plugged into.

Dynamic microphones

Dynamic mics generate audio using a magnetic field. They can record nearly every type of sound, making them a highly versatile option.

Some pros of dynamics mics are their durability, price point, and not requiring an external power source. These mics aren’t sensitive to humidity, heat, and other external factors, making them able to withstand rough handling and conditions.

Some cons of dynamic mics are their limited frequency response and lower sensitivity. They won’t capture the same amount of detail as a condenser mic. You can lose details if you’re not careful, especially for musical studio recordings. 

USB vs. XLR microphones

Not every microphone is made the same, so let’s figure out which one is best for your setup.

USB microphones:

USB mics have a huge advantage: ease of use. Just plug in your microphone and start recording on your device. This set-up is ideal for gamers who need a gaming mic without a steep learning curve. 

Popular USB microphones are:

Condenser mic: Audio-Technica AT2020USB and The Yeti

These two condenser microphones are ideal for beginners. Condenser mics are more sensitive than dynamic mics, making them ideal for capturing more subtle sounds.

Dynamic mic: AT2040 and Shure SM7B

These dynamic microphones are also perfect for beginners. Dynamic mics are considered more durable and better at rejecting room noise than condenser mics.

XLR microphones:

XLR microphones are sometimes associated with professional production, but that isn’t necessarily true. Microphones depend on control and what you –the user – are looking for in your audio.

XLR mics usually have more flexible options. It requires an audio interface and XLR cables for setup, but it is not a complicated process! Behringer, Focusrite, and plenty of other brands have small mixers that will accept the XLR and convert it to USB. 

These mixers are essential because they provide the end user high control over the sound even before it is recorded. For example, mixers let you add high, mid, or low tones to the sound before it is recorded. Or, you can adjust the gain up or down to help you make sure that you have a clear, distortion free signal from your microphone. 

Best podcast microphones

Looking to upgrade your podcasting mic? Look no further than these microphone options:

The Shure SM7B is an industry-standard for podcast recording. This microphone has an XLR and USB option so the choice is yours. 

A downside of this option is cost. It is quite expensive compared to other options, but that price is reflected in the high-quality audio recordings it produces. 

Additionally, this mic requires the user to speak fairly close to the microphone, which means that if you’re shooting a video alongside your podcast, it will most likely be on camera. Whether or not that matters is up to your preference.

The Audio Technica AT2020 is an affordable and high-quality option for podcasters. This condenser will pick up your audio effortlessly and make podcasting easy. It is available as a USB and XLR option.

The Blue Snowball is also an extremely affordable option. It is powered by a cardioid condenser capsule to ensure high-quality audio for every recording. It is only available as a USB option.

Best microphones for streaming

Need to record the perfect game stream? This options have you covered,

The HyperX QuadCast S is the best USB microphone for streaming with RGB lighting and a built-in pop filter. The setup is quick and easy, and you can adjust the level and color setting with the software. 

The color-changing look makes it a no-brainer choice for gamers looking for a fun pop of color in their camera recordings.

The Rode NT-USB is a versatile USB microphone for streamers who need professional sound quality while being easy to use. Again, the USB-setup makes this an easy plug-and-play option.

Streaming setups can usually benefit from boom arms to improve the quality and minimize background noise. Boom arms can make your space clutter-free and professional by keeping your desk space clean and hiding cables. 

Best microphones for gaming

The Yeti X, a more advanced mic then the popular blue Yeti, features multiple pickup pattern options and filters and effects. It’s USB setup makes it a convenient plug-and-play option, perfect for beginners and professionals alike.

The Razer Seiren X is compact and perfect for gamers who need a high-quality, low-profile microphone. Sounding great is easy in front of this mic.

Some features gamers should keep in mind are ambient room noise, built-in pop filters, and ease of setup. You want to be able to game at any time, without wasting time with a long setup.

It’s common for gamers to want to turn their gaming sessions into podcasts or streaming highlights to post later on. This can easily be done with the video and audio editing software Camtasia Audiate. 

With Audiate, you can transcribe your in-game commentary in real-time so you can edit your videos using your transcript. Don’t want to share your reaction to a certain part of the game? Simply cut it out by deleting the words from the transcript. 

Plus, you can create closed captions and dynamic captions in Camtasia so your content can be accessible and eye-catching for your viewers.


Key accessories to consider

A microphone is a great way to begin recording great audio. However, there are certain accessories you may want to consider adding to your setup to truly elevate it. 

Pop filters

Pop filters are essential additions to your recording setup. Whether physical or digital, you’ll want to minimize the pesky plosive sounds that can annoyingly pop in your audio recordings.

You can either buy a pop filter or edit it out post-production using a high-quality audio editing software like Camtasia Audiate. With Audiate, you can edit your audio to a crystal-clear level. 

Boom arms

Boom arms help with microphone positioning and can reduce unwanted noise. They also lift the mic off your desk so you don’t bump it or touch it during recordings. 

Try to position it away from your keyboard and mouse so it can focus on picking up your voice – unless that is you want to record your keyboard and mouse clicks. 

Microphone stand

A mic stand is an important component of a music recording, especially if you’re standing. By using a mic stand, you don’t have to worry about holding a mic in your hand the whole time. This allows you to focus on other aspects, such as your instrument or vocals. However, this can be substituted by a boom arm as well.

Audio interface

An audio interface is necessary for those using XLR microphones and wanting to record directly to their computer. Your audio needs to be converted from an XLR cable to a USB cable, thus making audio interfaces essential. 

Audio interface devices have various controls for adjusting sound before recording. Most allow you to adjust input gain, the balance of your sound, and some basic EQ functionality. Depending on your recording, these controls can dramatically change the sound you capture.

Some devices will allow for multiple inputs from various microphones. Great for recording a multi-guest set up in the same space. 

Consider Focusrite Scarlett 2i2. This audio interface enhances the quality of XLR mics for smooth, clean audio.

Post-production editing with Camtasia Audiate

Video and audio editing is just as important as finding the right microphone for your recordings. After all, you can take every precaution to record perfect audio, but there might still be small imperfections to iron out in post-production. The reality is that not everyone has a state-of-the-art recording studio with perfect controls and a nice flat room tone, and most of us will always have some echo or noise.

Luckily, Camtasia Audiate makes it easy to edit your audio until it sounds perfect. Audiate has many noise controls like Remove Noise, Remove Plosives, Equalizer, and more so your audio turns out crystal-clear every time. 

With Audiate, you can transcribe your video recording in minutes, and use the text to edit out imperfections. Get rid of ums, ahs, and other hesitations with the click of a button so that you sound confident in every recording. This is especially useful for creators who want to repurpose their gaming or streaming content across different platforms. 

Edit audio like text

You don’t have to be a professional to record and edit audio. Audiate makes it as easy as editing a text document.

Get Audiate
An image showing text being deleted in a doc and a corresponding timeline being cut

Plus, when you record a video alongside your audio, you can use Camtasia’s captions features to create closed captions that meet accessibility standards or create dynamic captions that add an eye-catching pop to your videos.

Camtasia is the perfect companion for every creator from podcaster to streamer.

Finding the best microphone for you

Although there are many factors to consider, it comes down to just a few microphones that stand out from the rest. Depending on whether you’re a podcaster, gamer, streamer, or musician, your audio deserves to sound good so that no viewers are ever tempted to press the mute button. 

Think about your specific needs, such as sound quality, ease of use, and microphone type before making a decision. Try to remove as many barriers to recording as possible through your choice. Luckily, there are countless options for everyone to find their perfect fit, so you can always find the best microphone for recording videos.

Matt Pierce

Matt Pierce is a Learning & Video Ambassador at TechSmith. In this role speaks and teaches about video creation and visual communication. A graduate of Indiana University he has ten years of experience working in learning and development with a focus on visual instruction. He has directly managed the training, user assistance, video, and other teams for TechSmith. Teach him something @piercemr

7 Ways to Promote Your YouTube Video and Grow Your Channel

Illustration of a megaphone broadcasting the YouTube logo

You’ve probably heard the quote before, “if you build it, they will come.” When it comes to YouTube videos– not unlike many other forms of content– this statement couldn’t be less accurate. The existence of a video on your YouTube channel alone is not enough to get views and drive awareness, interest, and action for your business. It’s imperative to promote your YouTube videos in order to get the attention they deserve!

Generic line chart showing returning viewers compared to new viewers over time

YouTube is a vast platform, with over 500 hours of content uploaded every minute. With millions of videos competing for attention daily, even the best videos can get lost in the sea of content, making it challenging to reach your target audience. Promoting your YouTube videos helps them stand out, giving them the visibility they need to attract viewers, gain subscribers, and generate engagement. 

Let’s dive into the variety of ways you can effectively promote your videos to grow your YouTube channel.

1. Optimize your video for search engines

Use keywords and descriptions

One of the most important ways to get views of your YouTube videos is to optimize it for search. YouTube, owned by Google, is one of the largest search engines in the world. So identify upfront– ideally before you even create your video– what keyword you wish to target with the content. 

When you post the video, you will want to use the keyword and supporting phrasing which is relevant to that topic in the video title, description, and tags. Optimizing for search helps videos rank higher on the results page, making it easier for potential viewers to discover your content.

Create an engaging thumbnail

It’s also important to create eye-catching thumbnails to grab attention in search results. If you are able to rank well enough, making the video look inviting to click on is going to help drive more clicks and give you a better chance to get views.

YouTube thumbnail  with an expressive person, keyboard keys, and graphics

2. Share on social media platforms

Leverage social media to reach a wider audience

Another way to get views on your YouTube videos is to promote them on platforms like Facebook, Twitter, Instagram, TikTok, and LinkedIn to reach a broader audience. Instead of posting the entire video, create brief clips or teaser videos to generate interest in your topic and encourage viewers to click through to YouTube to watch the full video.

Camtasia screenshot with a vertical video on the workspace

Camtasia is an excellent tool for creating promotional social media videos as well as your YouTube videos. It’s especially beneficial if you’re new to video creation and are looking for a user-friendly tool for beginners that also has the capacity to grow with your skills.

3. Cross-promote your YouTube channel

Collaborate with other YouTubers

Collaborating with other YouTubers is one of the most effective ways to expand your channel’s reach and introduce your videos to fresh audiences. By partnering with creators in your niche or complementary fields, you gain direct exposure to their subscriber base, many of whom may not have encountered your content before. This cross-promotion introduces you as a trusted creator to an already engaged audience, increasing the likelihood of gaining new subscribers and loyal viewers. 

One of the key benefits of collaborations is the mutual value they bring to both parties. Whether through shoutouts, guest appearances, or co-creating content, you and your collaborator can introduce each other’s channels to new viewers while enriching your audience’s experience with fresh perspectives. 

For example, guest appearances in each other’s videos allow for a seamless exchange of audiences and create a more engaging and dynamic content offering. This approach not only boosts awareness of both channels but also provides more varied and relevant content for your viewers, helping to maintain their interest and keep them coming back for more.

Cross-promotions, when done thoughtfully, can foster long-term relationships with other creators and introduce sustainable growth strategies for both parties involved.

Promote videos across different channels

Additionally, you should be embedding your YouTube videos on your blog, website, or even in email newsletters to attract viewers from other sources. Depending on what kind of products or services you or your brand offers, creating tutorials and how-to videos with Camtasia is a great option for providing your audience with more engaging how-to video content, in addition to the marketing video content that is likely already top of mind.

Screenshot of a TechSmith blog post with an embedded YouTube video

This type of content might be a better fit for your website, but it can also link back to your YouTube channel. You can consider keeping how-to content in a different playlist on your channel to ensure relevance to your audience.

4. Engage with your audience

Encourage comments and replies

YouTube comment asking for advice and helpful responses from the video creator

Once you’re getting views on your YouTube videos, ideally the comments will follow! Consider asking questions in your videos to encourage viewers to leave comments, and always respond to them to keep the conversation going. Responding to individuals will help to foster your community and boost visibility on YouTube.

5. Use playlists to keep viewers watching

Create themed playlists

Relevance is incredibly important when it comes to keeping your audience engaged and viewing videos on your YouTube channel, which can in turn signal to YouTube that yours is one of quality.

View of four topical playlists on YouTube

If a viewer doesn’t find what they are looking for or content they are interested in, they’ll stop watching. Creating playlists based on specific themes can keep viewers on your channel longer because it helps individuals hone in on specific topics and continue viewing related content, leading to increased watch time for your channel overall.

6. Share your video in online communities

Promote in forums and groups

To effectively promote your videos, consider sharing them in online communities where your target audience already gathers, such as Reddit, niche forums, and Facebook groups. It’s important to approach these social networking spaces thoughtfully, though—avoid spamming your content. Instead, focus on providing valuable contributions by engaging in meaningful discussions and sharing insights.

When appropriate, share your YouTube video as a helpful resource that adds value to the conversation, positioning it as a solution or informative addition rather than self-promotion. This approach builds trust and credibility within the community, leading to more organic interest in your content.

7. Run YouTube ads to boost reach

Use YouTube ads for targeted promotion

Running YouTube ads is an effective strategy to promote your videos and boost visibility, as it allows you to target specific demographics, interests, and behaviors. By utilizing YouTube’s advanced targeting options, you can ensure that your videos are shown to people who you believe are most likely to engage with your content. 

For example, you can target viewers based on their age, location, or specific interests, such as gaming, beauty, or technology, among others. YouTube also enables you to reach audiences based on their viewing behaviors, ensuring your ads are displayed to those who frequently watch similar content. This precision helps your videos appear in front of the right audience, significantly increasing the likelihood of views, subscriptions, and engagement.

While advertising is obviously a paid method of promotion, it offers one of the quickest and most scalable ways to grow your YouTube channel. Investing in ads can provide immediate exposure and allow you to reach audiences that might not have discovered your videos organically. 

Advertising can be particularly valuable for new creators or brands looking to establish a presence and gain momentum quickly. By leveraging YouTube ads, you can accelerate your growth, build brand awareness, and increase your video reach much more effectively compared to relying solely on organic traffic.

Summing it up

While the list isn’t short, these methods are tried, true, and effective strategies for promoting your YouTube videos. To recap, below are all of the approaches outlined:

  • Optimize your videos for search engines
  • Promote on social media
  • Cross-promote your YouTube channel
  • Engage with your audience
  • Use playlists to keep viewers watching 
  • Share your video in online communities 
  • Run YouTube ads to boost reach

Whether you’re well-versed with video creation or new to it, Camtasia is a helpful tool for creating YouTube video content that is engaging and professional. It’s perfect for a variety of video types, from marketing to instructional, and more. Starting with high-quality video content is going to be a dependency when it comes to launching and growing a successful presence on YouTube. 

Like so many other pursuits, regardless of how many of these strategies you’re already using to promote your videos, there’s always going to be an opportunity to push a little harder to drive improvement. We hope this post has inspired you with some ideas where you can focus some energy to grow your YouTube channel!

Stardom awaits!

Camtasia is the perfect way to create exciting content for YouTube, TikTok, Instagram, and more!

Free Download
An image of a phone and laptop both showing variation of a cooking videos in both device sizes

TechSmith

TechSmith is the market leader in screen capture software and productivity solutions for daily in-person, remote, or hybrid workplace communication and customer-facing image and video content. Our award-winning flagship products, Snagit, Camtasia, and Audiate, empower anyone to create remarkable videos and images that share knowledge for better training, tutorials, and everyday communication.

The Complete Guide to 360 Feedback

Cyclical diagram with icons of a single person, a group of people, and a speech bubble in the center.

As organizations and human resources strive to grow and develop their staff, 360-degree feedback has become a crucial tool in the modern workplace. By offering a comprehensive view of performance, it drives employee growth and development more effectively.

This guide delves into everything you need to know about the 360 review process, from understanding the steps to exploring its impact on leadership development. Additionally, we’ll demonstrate how tools like Camtasia and Snagit can streamline your feedback processes, making them more engaging and actionable.

360 Feedback (also known as 360-degree review or 360 assessment) is a process of gathering feedback from multiple sources to provide comprehensive employee insights.

Team members, peers, supervisors, and sometimes clients offer anonymous feedback, giving the employee a well-rounded view of their strengths and areas for improvement.

Anonymity ensures confidentiality and encourages honesty. This multi-source approach results in more thorough feedback compared to traditional performance reviews.

How does 360 feedback differ from traditional performance reviews?

Two messages praising Jen for their contributions to a campaign, emphasizing creativity, strategic thinking, problem-solving, and dedication. Several phrases are highlighted in blue and yellow for emphasis.

In a traditional performance review, feedback usually comes directly from the supervisor or manager, based on their observations or information shared with the manager about the employee. 360 feedback contains insights gathered from various sources, including team members, subordinates, peers, senior leaders, and sometimes customers. This multi-rater provides a comprehensive view of the employee’s performance, considering all the different interactions they have.

Traditional performance reviews often focus on specific tasks and whether the employee achieved the desired outcomes. They may not thoroughly evaluate leadership skills such as communication, problem-solving, accountability, and emotional intelligence. 360 feedback helps identify areas for improvement and support effective action plans, making it particularly useful for employee leadership development.

According to a Culture Amp article, a study found that people who participated in 360 feedback reported that it became easier to discuss previously tricky issues. This was because of removing barriers to open conversations. It also aids in collaboration by increasing trust with each other and helps make expectations more transparent. This leads to better outcomes for the team as all individuals get better-rounded feedback to aid their learning and development. That does not tend to be the case in traditional performance reviews.

The 360 feedback process: step by step

A document titled '360 Feedback for Jen' discussing the purpose and participants involved in a 360-degree feedback process.

Step 1: Define the objectives of the review process

Before starting the 360-degree review, you first need to decide what you want to achieve with the review. Are you focusing on leadership skills, improving teamwork, or identifying gaps in performance?

Step 2: Select reviewers

Select the appropriate participants to provide feedback, ensuring a diverse group of raters who interact with the employee in different capacities like peers, subordinates, supervisors, and even clients. This will provide a well-rounded view of the employee’s strengths and weaknesses.

You will need to inform the reviewers of the 360 feedback process’s purpose and ensure they understand the importance of honest and constructive feedback. Set expectations around timelines, confidentiality, and how you will use the feedback provided. Snagit is a great tool for quick visual information sharing to eliminate any confusion.

Step 3: Create the feedback survey

Create or customize the survey, ensuring your questions cover key competencies and behaviors expected of the employee’s role. Include a mix of rating scales and open-ended questions to gather both quantitative and qualitative insights.

Step 4: Ensure anonymity

Ensuring anonymity while both collecting and sharing feedback helps guarantee reviewers can provide honest and constructive insights without fear of repercussions. You may have a reviewer who asks to have their information shared with the employee, but there should be no expectation or pressure for any reviewer to do so.

Annotate your screen with Snagit

Snagit makes it easy to mark up any document for fast feedback.

Get Snagit
Screenshot of a document about puffin migration patterns with a section for changing styles highlighted.

Step 5: Collect feedback

Use a centralized platform to gather feedback, making sure the process is easy and accessible for all participants. This could be an online survey tool, specialized 360 feedback software, or a simple form. Send the survey to the selected reviewers with clear instructions on how to complete it.

Snagit can help you create step-by-step, easy-to-understand visual instructions for reviews on the platform you choose. You will want to follow up with reviewers to ensure a high response rate and reinforce the importance of input for the employee.

Step 6: Analyze the results

Gather the feedback and put it into a single dataset. Review the feedback to identify common themes, trends, patterns, strengths, and areas for improvement in employee performance. Focus on areas like problem-solving and leadership potential. Look for feedback that is consistent across all reviewers. 

Summarize the feedback in a report for the employee that ensures the anonymity of the reviewers. These reports can include visual aids like charts and graphs to highlight key points. Using Snagit annotations can enhance these visuals significantly, guiding employees on where to focus and highlighting key areas of the visual for greater emphasis.

Step 7: Deliver feedback

Schedule a one-on-one meeting with the employee with a clear agenda to discuss the 360 feedback you have collected. Prepare the employee for how to receive feedback. Humanergy, a leadership development company, shares the SARA model for processing feedback. This model could be useful for employees ahead of the meeting to give them a tool to process the feedback that will be shared with them.

During the meeting, share the feedback constructively, giving both strengths and areas of improvement. The employee should be encouraged to ask questions and share their perspective. The employee does not need to agree with the feedback but does need to understand the feedback they are being given.

Step 8: Develop an action plan

Based on the feedback, create an action plan that targets key areas for improvement, supports employee growth and development, and leverages their strengths. The action plan should set specific, measurable, achievable, relevant, and time-bound (SMART) goals. Identify resources and support, like training or mentoring, the employee may need to achieve their goals. 

Step 9: Follow up on action plan

Set up regular check-ins with the employee to monitor progress towards the goals in their action plan. Ensure you are offering ongoing support and resources as needed. Depending on the severity of any improvement needed, you should consider following up with reviewers to assess progress and make any needed adjustments to the action plan.

Benefits of 360 feedback

Improved performance management:

360 feedback provides a more complete understanding of an employee’s performance, making it easier to develop performance management strategies and set goals for improvement. It reduces bias by utilizing multiple sources of feedback to minimize a single individual’s bias.

Encourages self-reflection:

Employees can compare their self-evaluations with feedback from others, fostering self-awareness and guiding leadership development. This will help them gain a better understanding of their strengths and areas of improvement from several perspectives. It increases accountability by allowing employees to feel more responsible for their performance and development.

Strengthens team dynamics:

By encouraging team members to provide feedback on each other’s performance, 360 feedback can improve open communication, teamwork, and collaboration across departments. It builds trust and fosters a culture of transparency and openness.

Enhanced leadership development:

According to a Humanergy article, it is recommended that it’s best to use 360 feedback in the context of development, and it allows raters to contribute meaningfully to a person’s continued growth. For senior leaders and managers, 360 feedback provides insights into how their leadership style is perceived, helping them refine their approach and grow as effective leaders. The feedback allows companies to make better informed decisions regarding promotions, training, and development needs.

How to give and receive constructive 360 feedback

Tips for giving constructive feedback:

It can be challenging to give constructive feedback but is a necessity to facilitate development. To effectively provide feedback to an employee, you need to be specific and focus on observable behaviors.

Make sure you are focusing on the behavior and not them as a person. For example, instead of saying “You’re not a good listener,” say, “During team meetings, I’ve noticed you tend to interrupt others before they finish speaking.” Balance positive feedback with areas for improvement so employees feel supported in their growth.

Combining empathy and respect in your feedback helps create a positive and constructive environment where the recipient feels valued and motivated to improve. You can use Camtasia to create training videos that explain how to give constructive feedback during the review process, helping team members develop better feedback skills.

Tips for receiving feedback

Receiving constructive feedback can be difficult, but it is a valuable opportunity for personal and professional growth. Approach feedback with a positive attitude, an open mind, and a willingness to learn. Remember that the goal of the feedback is to help you improve. That is why all the reviewers took their time to provide you with the feedback.

Pay attention to what is being shared without interrupting to ensure you hear what is being said. Avoid being defensive, and instead, ask clarifying questions to help you understand the feedback and show that you are engaged and interested in it.

Take time to reflect on the feedback and how it applies to your work and/or behavior. Consider how you can improve. Use the feedback as a tool to create an action plan for improvement, focusing on areas where you can develop new skills or enhance existing ones. Be appreciative of the feedback, even if it is hard to hear.

Record your screen with Snagit

Snagit makes it easy to share quick updates and how-to’s by capturing exactly what’s happening on your screen.

Get Snagit
Screen recording of a dashboard showing conversion rate, spend, and monthly performance with a picture-in-picture webcam view of a smiling man.

How 360 feedback supports leadership development

360-degree feedback is a valuable tool for evaluating and developing leadership potential because it provides a comprehensive view from multiple perspectives, including peers, subordinates, and supervisors. This feedback helps identify key strengths and areas for improvement in communication, decision-making, and problem-solving while also recognizing behaviors and traits leaders might not be aware of, allowing them to address potential blind spots.

Leaders can leverage this feedback to create personalized action plans to enhance their skills. Using tools like Snagit to capture key points and action items from feedback sessions can streamline the review process and help track progress effectively. Regularly receiving feedback encourages leaders to maintain a growth mindset and continuously improve their leadership style, ultimately fostering stronger relationships, better team dynamics, and alignment with organizational goals.

Common challenges with 360 feedback (and how to overcome them)

One common challenge with 360 feedback is the fear of negative feedback. Some employees may hesitate to participate or provide honest feedback for fear of retaliation or conflict. To overcome this, it is crucial to ensure that the feedback process is anonymous and to emphasize the goal of constructive feedback.

Another challenge is misinterpreting feedback. Without context, employees may misunderstand the feedback they receive, leading to frustration or confusion. To address this, pair feedback with clear examples and suggestions for improvement. Additionally, using tools like Camtasia to create video guides can help explain how to interpret and apply feedback effectively.

Lastly, a lack of follow-up can diminish the value of feedback and leave employees feeling disengaged. To prevent this, develop a clear plan for addressing feedback and schedule regular check-ins to monitor progress and discuss any additional support needed.

How to use 360 feedback to create actionable development plans

Step 1: Prioritize areas for improvement

Focus on critical areas that will significantly impact the employee’s growth and the company’s success. This involves using feedback from multiple sources, such as peers, supervisors, and self-assessments, to identify these critical areas. By prioritizing these areas, you can ensure that efforts are directed toward the most significant opportunities for development and improvement.

Step 2: Set specific goals

Once the key areas for improvement are identified, set specific goals using the SMART framework. This means creating Specific, Measurable, Achievable, Relevant, and Time-bound goals. For example, instead of setting a vague goal like “improve communication skills,” a SMART goal would be “attend a communication workshop and practice active listening techniques in team meetings over the next three months.” This approach ensures that goals are clear and attainable, providing a concrete path for employees to follow.

Step 3: Create a timeline for development

Establish a timeline for reviewing and reassessing goals. This involves planning regular performance review sessions to check progress and make any necessary adjustments. Setting milestones along the way can keep employees motivated and on track. For instance, you might schedule monthly check-ins to discuss progress, address challenges, and celebrate achievements.

Step 4: Provide resources and support

To help employees meet their goals, offer the necessary resources and support. This could include training programs, mentorship opportunities, or additional tools. For example, you can use Camtasia to create leadership training videos or tutorials that employees can refer to while developing their skills. Providing access to these resources demonstrates a commitment to their growth and helps ensure they have the support needed to succeed.

The role of technology in facilitating 360 feedback

Technology is crucial in facilitating 360 feedback by streamlining the collection of the feedback. Modern tools like survey platforms make distributing, gathering, and analyzing multi-rater feedback easier. These platforms can automate the feedback collection process, ensuring that feedback is collected from various sources in a timely manner.

Additionally, tools like Snagit can be used to visualize the results, capturing and sharing key insights from feedback reports in an easily digestible format. This helps in presenting the feedback in a clear and concise manner, making it easier for employees and managers to understand and act upon.

Creating training materials is another area where technology can significantly enhance the 360-feedback process. Camtasia, for instance, can be used to create training videos or onboarding materials that explain the 360 feedback steps, how to give constructive feedback, and how to act on the feedback received. These videos can serve as valuable resources for employees, helping them understand the importance of feedback and how to use it effectively for their personal and professional growth. By leveraging technology in these ways, organizations can ensure a more efficient, transparent, and impactful 360 feedback process.

Camtasia interface with editing tools, a video preview with text annotations about a teammate named Jen, and a timeline at the bottom.

Why 360 feedback is essential for employee growth and leadership development

360 feedback is invaluable for fostering employee growth and development. By offering comprehensive insights into an individual’s strengths and weaknesses, it provides a well-rounded perspective that is often missing from traditional feedback methods. This holistic approach highlights areas for improvement and recognizes and reinforces positive behaviors and skills. As a result, employees receive a balanced view of their performance, which is crucial for their personal and professional growth.

Moreover, 360 feedback serves as a roadmap for improvement, guiding employees and leaders on their journey to reach their full potential. Identifying specific areas that need development allows for targeted training and support, ensuring that efforts are focused on where they are most needed. This targeted approach helps build a more competent and confident workforce, ultimately contributing to the organization’s overall success.

Ready to implement 360 feedback in your organization? Consider using tools like Camtasia to create engaging training materials that explain the feedback process and how to give and act on constructive feedback. Additionally, Snagit can capture and share feedback results, making it easier to visualize and understand key insights. By integrating these tools into your performance management process, you can enhance the effectiveness of your 360-feedback system and drive continuous improvement within your team.

The easiest way to edit videos

Stop wasting time and discover how Camtasia makes creating incredible videos easier than ever.

Get Camtasia
An image of a laptop showing the camtasia drag-and-drop editing feature

TechSmith

TechSmith is the market leader in screen capture software and productivity solutions for daily in-person, remote, or hybrid workplace communication and customer-facing image and video content. Our award-winning flagship products, Snagit, Camtasia, and Audiate, empower anyone to create remarkable videos and images that share knowledge for better training, tutorials, and everyday communication.

Align Your Style of Communication to Any Situation

Illustration of two figures in conversation with speech bubbles.

Communication is a cornerstone of civilization. Its roots can be traced back to early cave paintings created by distant ancestors. Throughout the thousands of years that have followed, it has proven to be a catalyst for change, growth, and expansion. 

It’s a neural network that connects humans, ultimately creating and shaping communities. Today, we live in a world where a person can communicate with the entire globe with the simple click of a button. 

With communication now happening faster than ever, it’s important to understand that regardless of its form, the fundamental styles of communication remain the same. It’s critical that individuals can recognize and understand the various styles and how they can influence intended meaning. Without mutual understanding, projects stall, outcomes miss the mark, relationships suffer, and things can easily begin to crumble. 

The different communication styles to focus on are:

  • Passive
  • Aggressive
  • Passive-aggressive
  • Assertive. 
Infographic showing four communication styles: Aggressive, Assertive, Passive Aggressive, and Passive, each with corresponding facial icons and descriptions.

Each of these can impact workplace dynamics, some having detrimental effects on working relationships and potentially on outcomes. Something that seems so simple can cause both big challenges or big successes. 

Communication can hinder group collaboration, lead to confusion, damage coworker relationships, and affect the dynamics of the entire workplace culture. Or it can enrich relationships, foster trust, and positively influence the overall well-being of an organization, even those with remote teams. 

TechSmith’s Snagit is a tool that can help individuals express themselves more clearly, regardless of their communication style. This levels the playing field, ensuring that messages are sent and received with their intended information and meaning intact. 

What are the different styles of communication? 

The way in which people communicate is influenced by internal and external factors. Emily Marsh said it well in her article about personality and communication:

Personality impacts how we prefer to communicate with people, as well as how we ourselves respond to information. The more we understand our own communication styles and those of the team members we work with, the more effective we can be as leaders, teams, and colleagues.

Forbes identified culture as a key influencer on how we communicate, in both aspects of giving and receiving. When considering what culture implies, it can include everything from the macro level, for example, a person’s country of origin, all the way down to the micro level, such as an employee’s working team. 

Understanding that people communicate in different ways is the first step to adjusting and improving the approach taken to sharing information. 

Taking a deeper look at passive, aggressive, passive-aggressive, and assertive communication styles, it’s easy to identify key characteristics that could hinder or help the sharing of information. 

Annotate and edit screenshots with Snagit

Professional mark-up tools and powerful features make it easy to create helpful images.

Get Snagit
Screenshot of a document about puffin migration patterns with a section for changing styles highlighted.

The University of Toledo has defined the different types of communication styles as the following: 

Passive communication 

This type of communication occurs when someone avoids expressing their opinions, needs, or values. Often, the person focuses on the needs, values, and opinions of others over their own. A substantial motivator for relying on this type of communication is to avoid confrontation and conflict. 

According to this LinkedIn article, passive communication can also:

  • Lead to feelings of resentment and helplessness
  • Harm self-esteem and self-confidence
  • Cause lack of satisfaction in relationships due to unmet needs
  • Result in being overlooked or taken advantage of

Snagit can assist passives by helping them communicate effectively using visuals. It can easily convey a person’s needs or opinions in a straightforward and neutral manner with screenshots or video messages. It lends itself well to asynchronous communication, which removes the pressure that might come with a face-to-face interaction. This reduces the urge to engage in avoidant behaviors since the immediate risk of confrontation or conflict is greatly diminished. 

Aggressive communication 

Conversely to passive communication, aggressive communicators are very comfortable expressing their needs, values, and opinions. Often, they might struggle to see the needs, values, and opinions of others. Aggressive communicators can dominate conversations, forcefully express their opinions, or even come across as dismissive of others. 

According to this LinkedIn article, aggressive communication can also:

  • Lead to confusion and conflict
  • Harm relationships and alienate others
  • Foster a negative environment of fear and hostility
  • Lead to bad behavior, further escalating conflicts

Snagit creates visuals to paint a clear picture of the messenger’s information, helping to limit aggressive verbal and non-verbal language. Both the sender and the receiver can reduce possible damage to their relationship that might otherwise take place in an in-person setting. 

Passive-aggressive communication 

This style combines passive and aggressive communication traits. The communicator appears passive but communicates in subtle or indirect ways that show anger. In addition to the sender’s passive aggressive style, individuals may also display resentful behavior or a failure to be direct. 

According to this LinkedIn article, passive aggressive communication style can also:

  • Annoy and frustrate others
  • Lead to an overall neglect of responsibilities
  • Precipitate future poor performance

Snagit removes barriers and clarifies communication by capturing exact details and creating annotated visuals. Ultimately, Snagit can greatly decrease unintended narratives that can evolve into passive-aggressive communications and behaviors between individuals and within teams. 

Assertive communication 

This style, like aggressive communication, involves being comfortable with expressing opinions, needs, and values while still respecting the values and needs of others. Ideas are often expressed confidently, with respect, and are clear and direct. 

According to this LinkedIn article, assertive styles of communication can also:

  • Promote self-confidence and increase self-esteem
  • Help decrease stress and anxiety
  • Result in more satisfying and respectful relationships
  • Encourage mutual understanding and respect

Use Snagit to complement and amplify assertive communication with visuals, such as diagrams or annotated screenshots, to enhance clarity and ensure the message is understood. 

Record your screen with Snagit

Snagit makes it easy to share quick updates and how-to’s by capturing exactly what’s happening on your screen.

Get Snagit
A screenshot featuring a software interface with a prominent pink arrow pointing to a bar chart on a screen, indicating a feature or data point. A video call window showing a smiling person is also visible, suggesting a screen recording or tutorial scenario.

Simple ways to improve communication and avoid conflict

Now that we’ve identified the different communication styles we will encounter, you can apply some simple techniques to improve your effective communication style and avoid conflict in specific situations. 

Practice active listening

Two men seated at a table engaged in conversation; one listens intently while the other speaks.

Communication is a two-way street, and we can’t simply focus on the points we want to make or the words we want to convey. When engaging in a conversation where sides are at odds, we can easily find ourselves listening to respond, not actually listening to understand. Neglecting to truly engage with the meaning of what’s being said often leads to confusion and conflict. 

By practicing active listening, we work to create a mutual understanding of what is being communicated. Active listening also helps build trust by making people feel like their thoughts and feelings are heard, understood, and valued. 

Watch body language

Close-up of people gesturing with their hands during a conversation.

When a person communicates, it’s not just the words they use that express a lack of satisfaction or delight. According to the University of Texas, Albert Mehrabian, a researcher of body language, found that 55% of communication is nonverbal, 38% of communication is vocal, and 7% of communication is words only. 

Reading body language is more difficult to achieve in a remote work environment, compared to face-to-face discussions, but it still can be achieved in specific situations that include on-camera meetings. Pay attention to body language, eye contact, and facial expressions. It is an easy way to add more context to the conversation. With passive-aggressive communication, it is likely their body language does not match the words they are speaking.

Be mindful of the mode of communication

Chat interface overlaying an image of a man speaking.

We need to pay attention to how communication is happening, as most of the workplace is now mixed with in-person, hybrid, and remote coworkers. Many of the face-to-face communication elements that can paint a broader picture don’t translate with text in emails, chat, and remote meetings. 

It’s important to be clear and concise. Avoid unnecessary jargon or complex language. Get to the point while ensuring your message is comprehensive. Using videos and visuals like screenshots can help add more context to the conversation without adding unnecessary verbiage. 

Why use Snagit to enhance communication styles? 

Visual clarity

Snagit helps users create visuals like annotated screenshots and videos, improving communication for all styles. It allows the user to have absolute control over what information is being shared, reducing confusion and enhancing understanding. This is especially key for analytical communicators. 

Laptop screen with the Snagit dashboard showing conversion rates and graphs, alongside a Quick Styles panel.


Avoid miscommunication

Visuals captured with Snagit can reduce misunderstandings, especially for passive and passive-aggressive communicators. Misunderstandings can have a tangible cost effect on businesses. 

It reduces efficiencies, erodes trust, and, at its worst, can create manipulative communication styles severely impacting relationships. Snagit also removes any unintended communication components, such as body language or facial expressions, that the messenger might not even realize they are conveying. 

Enhancing assertive communication

Snagit can empower assertive communicators to create visual guides or presentations that support their clear and confident communication. Employees empowered to share their knowledge with others can become more engaged in the workplace and create impacts outside their scope of responsibility, whether with other teams, departments, or even senior leadership. 

Ready to improve your communication skills with Snagit? 

Communication is an integral part of our everyday lives. The effects of poor communication can have a lasting influence, well after the incident has taken place. It is such a critical factor in the success of organizations that, according to an article on Expert Market, 86% of employees cite lack of workplace collaboration for workplace failures. A key component of effective collaboration is communication.

Additionally, 97% of employees believe communication impacts their task efficiency every day. A company’s costliest asset is usually its workforce, and employees who can’t communicate effectively may unintentionally wreak havoc on the bottom line. 

Pie chart with 97% filled in, with text stating that 97% of employees believe communication impacts their efficiency.

Let’s also consider the new normal. After the pandemic saw entire workforces transition from in-office to fully remote on the flip of a dime, companies have had to become accustomed to communicating in new ways while still trying to maintain original intent and successful knowledge transfer. 

Without quality face-to-face interactions, it left room for confusion of tone in written communication, causing additional misunderstandings. For those individuals who display challenging communication styles, this became an additional obstacle. This is where Snagit can make a positive impact. 

Regardless of where an employee is working in the hybrid-friendly corporate world, Snagit provides an avenue for employees to communicate with anyone at any time. It reduces barriers for effective knowledge sharing and problem solving, further enhancing connections between individuals, teams, and departments within an organization. More importantly, Snagit provides a consistent communication experience, regardless of an individual’s typical communication style. Consistency and clarity are fundamental to reducing misunderstandings that could prove costly in the future. 

Snagit’s ability to share visual information across multiple platforms makes it an essential tool for any company. Whether your corporation uses email, Slack, Teams, or any other communication channels available today, Snagit is adaptable to meet your needs.

Its screenshots and videos can be sent using just about any communication method, ensuring consistency, even across multiple organizations. This is particularly important if you need to effectively communicate your point of view with clients, vendors, consultants, or any other third party who may not be part of your corporate network. 

In the end, corporate leaders are responsible for removing obstacles and providing resources needed for employees to complete their jobs effectively. Snagit is a solution for many of the communication problems faced every day. Although it’s highly unlikely anyone can fully eradicate all miscommunications, it is critical that companies explore and implement tools that allow employees to mitigate pitfalls as much as possible. Snagit can be the answer. 

The best snipping tool for Windows and Mac

Don’t let clumsy built-in tools hold you back. Take and edit screenshots with Snagit!

Get Snagit
Someone capturing a screenshot of a mountain scene with a person and goats using Snagit, showing cropping tools on the screen.

TechSmith

TechSmith is the market leader in screen capture software and productivity solutions for daily in-person, remote, or hybrid workplace communication and customer-facing image and video content. Our award-winning flagship products, Snagit, Camtasia, and Audiate, empower anyone to create remarkable videos and images that share knowledge for better training, tutorials, and everyday communication.