Blur Tool

Add a blur to hide or mask sensitive information.

3d Snagit icon

Note: Blur and other tools in the Snagit Editor toolbar are available to edit images. To blur a video, share your video to TechSmith Camtasia.

Add a Blur

  1. Click the Blur tool in the Snagit Editor toolbar.
    Blur tool

    Note: If the tool is not visible in the toolbar, click the More dropdown. To customize your toolbar, see Customize the Snagit Toolbar.

  2. Select a Quick Style or edit the tool properties to customize the tool. See Tool Properties.
  3. Click and drag on the Canvas to draw the blur.
  4. When you are finished with the Blur tool, click the Move tool to select, move, edit, or delete objects you added to your image.
    Move tool

Note: Some third-party tools can reverse blur and pixelation. To secure confidential information, select the Black shapes option from the Type property dropdown and share as a JPG, GIF, PNG, PDF, or other flattened file type.

Tool Properties

Edit the properties to customize the tool.
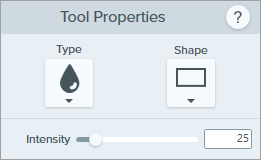
Blur tool properties

Type
Click the dropdown to select the blur type:

  • Blur: Smooths the details in a capture similar to viewing though an out-of-focus lens. Use to apply depth or to blur the details in sensitive information.
    Smooth blur
  • Pixelate: Covers up an area with a set of large square pixels. Use to mask faces or sensitive information in an image capture.
    Pixelate blur
  • Black shapes: Covers an area with a fully opaque black shape. Use this option to redact confidential information. To ensure security and prevent others from removing the redaction, be sure to flatten the file (right-click and select the Flatten All option) or save to a flattened file type such as JPG, GIF, or PDF before sharing.

Shape
Click the dropdown to select the blur shape.
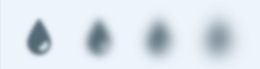
Intensity
Drag the slider to adjust the blur level.

Smart Redact


Smart Redact identifies and automatically covers sensitive information, such as contact information, credit card numbers, and more.

Before and after example of Smart Redact

To automatically redact sensitive information in an image:

  1. Click the Blur tool in the Snagit Editor toolbar, or from the More dropdown in the toolbar.
    Blur tool
  2. In the Actions panel, click Smart Redact.
    Smart Redact button
    Snagit detects different categories of sensitive information and covers them with black shapes.
  3. Complete any of the following to edit the redactions:
    • Toggle off information categories that you want to keep visible in the image. Snagit removes redactions from those categories.
      Smart Redact information categories
    • In the Type dropdown, select the Blur or Pixelate option to change the appearance of the redactions.
      Smart Redact type dropdown

      Note: Some third-party tools can reverse blur or pixelation. For the most secure option, keep the Black shapes redaction type.

  4. Click Done to close Smart Redact.
  5. To edit individual redactions or blurs, complete any of the following:
    • To remove a redaction and reveal the information underneath, click to select the redaction and press Delete.
    • To edit the redaction type, shape, or intensity (blur or pixelate types only), click to select the item, then adjust the tool properties.
  6. Flatten the image before sharing so that redactions and blurs cannot be removed to reveal the information underneath. Complete any of the following:
    • Right-click (Windows) or Control+click (Mac) and select the Flatten All option.

      Note: With this option, redactions and blurs cannot be edited further.

    • Click Share Link to share the image via Screencast. See Get a Shareable Link.
    • Select File > Save As and save the image in a flattened format such as JPG, PNG, or GIF for sharing.

Note: Smart Redact leverages AI technology, specifically ABBYY and OpenCV Classifier on Windows and Apple OCR and Apple Person Selection on Mac, to identify common patterns of sensitive information in text and images. Neither the image nor the sensitive information in the image is uploaded to TechSmith or to any service provider, so your data remains secure. For more information, see TechSmith and AI.

Note: This tutorial is for Snagit version 2025. Previous versions may look or function differently.

All Snagit Tutorials