Michele Wiedemer of Virtual Customer Learning has been helping companies create how-to resources for their customers for over 20 years. In this course, she shares her expertise in providing content that helps customers help themselves.
This course looks at Michele’s three principles for creating effective Help center content:
- Deciding what to write
- Making it look good
- Making it easy to find
Table of contents
1.1 Introduction
Connect with Michele at: https://linkedin.com/in/michele-wiedemer
1.2 What is Your Help Goal?
1.3 Define Your Goal
The previous lesson discussed five common goals companies have for their Help center content. Review the following questions and examples to help you define your own Help center content goal.
As you start your Help center improvements, try to set a SMART goal. SMART goals are:
- Specific
- Measurable
- Achievable
- Relevant, and
- Time-bound
Reduce Support Costs
- What are your top 5 support requests?
- Do any of those requests represent how-to questions?
- How much time does support staff spend answering the same questions?
- What $$ does that time represent?
- Could support staff time be better spent on more complicated or individualized issues?
- Are other aspects of your business suffering because too much time is spent on support?
Example SMART goal: “I want to reduce support tickets by 10% for Q3.”
Improve Customer Onboarding Experience
- Are there a set collection of steps that new users need to take to be successful with your product?
- How much time do Customer Success or other employees spend on helping new customers get oriented to your product?
- Even if you have a very technical product with a high-touch learning process, is there a way to standardize some of the content to support customers as they learn?
- If your goal for your Help center content is related to improving the customers’ onboarding experiences, how will you measure that?
- Are you talking to customers about their impressions of your process or just collecting general satisfaction surveys?
- Do you have the tools and/or data to connect customers who view your Help center with their renewal rates?
Example SMART goal: “I want to reduce CSM time spent onboarding new customers by an hour (from 6 hours average to 5 hours average) per account by the end of August.”
Improve Trial or Freemium Conversion Rates
- What are the most important tasks that convince trial or freemium users of the value of your product so they become paid customers?
- Can Help center content or a getting started guide provide a quick reference or job aid for performing those tasks?
- What is your current conversion rate?
- What percentage improvement would justify an investment in starting or improving your Help center content?
Example SMART goal: “I want to make an average of 10 additional sales per month (from my current average of 50) in 2025.”
Support Feature Adoption
- Do you have statistics on how features are used?
- Have you connected particular feature use with renewal rates?
- What kind of improvement in renewal rates can you expect as customers adopt additional features?
If your goal is related to new feature adoption, you’ll need to consider some additional logistics questions.
- How will your Help center authors work with the development team to understand new features?
- What is your release cycle?
- How can you incorporate Help center updates with product updates?
- Will you reuse Help Center content when marketing new features?
Example SMART goal: “I want at least 40% of our customers to use features in the 20.3 release within the first three weeks of release.”
Begin or Supplement a Customer Education Initiative
- What are the quick questions your customers ask?
- How do those questions currently get answered?
- Could that staff time be better spent on more complicated or customized guidance?
- What savings in time or money does that represent?
Example SMART goal: “I want to provide articles answering the top five questions customers ask by the end of the month.”
Conclusion
Remember that defining one goal for now will help you focus your efforts as you get started or move to the next stage of development for your Help center.
Making a SMART goal can help you justify the time and expense spent on creating helpful Help content.
1.4 Did You Set a Goal?
Which most closely describes your organization’s overarching goal for a Help center?
- Reduce Support costs
- Improve customer onboarding
- Improve trial or Freemium conversion rates
- Support feature adoption
- Begin or supplement a Customer Education initiative
- Other
Summary
Remember that your goal may evolve and change over time. Just pick one to get started. Having one goal will help you stay focused and measure the effectiveness of your Help content efforts.
Deciding What to Write
2.1 Introduction
2.2 Don’t Write, Chunk!
Summary
You can download a checklist for evaluating your own content here.
2.3 Procedures Aren’t Everything
A good Help center is full of procedure topics. But procedures aren’t everything.
You may have conceptual information that users need for context and understanding before a procedure will make sense to the reader. Or maybe there’s an overall process that connects more than one procedure together.
These types of topics CAN have a place in your Help center. They won’t have exactly the same chunks, but you still want to break the information down.
However, before including them, go back to your Help center goal. Many people try to have help that is all things to all people. That’s not realistic, especially when you are just starting out.
While some conceptual information may be useful in setting up your procedures, it can clutter up the effectiveness of a good support framework if it’s not done right.
If you find yourself wanting to include lots of conceptual information, maybe what you are trying to create is self-service training instead of help. There’s absolutely nothing wrong with creating self-service training, but online training is a more involved, more advanced project, not a Help center. Don’t try to run before you’ve learned to walk.
2.4 Don’t Assume Too Much
2.5 Explain it to a 12-Year-Old
Another way to improve your help center writing is to check your readability. Your Help topics won’t be helpful if readers can’t understand your explanations. One of the ways you can do this is by checking the vocabulary you use.
Dr. Suess wrote The Cat in the Hat as a new kind of children’s reading primer (published in 1957) using a vocabulary of just 236 words most first-graders would know. And despite using such a limited vocabulary, it’s gone on to be one of the top selling children’s books of all time.
Now, you don’t have to aim your topics at a first-grade level.
You can aim for a sixth to seventh grade reading level (or around age 12) to make the topics easy enough for most people to grasp without much effort, without also being patronizing or overly simplistic.
Approaching your topics as if you are explaining them to a child can also help you focus on clear, concise content. Remove difficult or unfamiliar words (including jargon) so that a 12-year-old could understand it. This can be done even with complicated topics.
Summary
A fun tool that can help you simplify your content is called the Up-Goer Five text editor.
The aim with using this tool is to stick to the 1000 most-used words in English. The tool will highlight any words in your text that are not on the list. (You can get away with using words not on the list if they are names of common items or tasks related to your product.)
For highlighted words, challenge yourself to find different words to make the content more readable.
2.6 Decide What to Write Summary
When writing content for your Help center:
- Chunk the information to make it easy to scan.
- Make sure you aren’t missing any steps.
- Stay focused. Link to other topics if needed to keep topics concise.
- Use simple, straight-forward sentences.
- Use words a 12-year-old would understand.
Making it Look Good
3.1 Introduction
3.2 Style is Not Just for Designers
You don’t need to be a designer to make your content look good. You only need to know a few key concepts that can make a big difference.
Remember that most of your readers are going to scan your Help center content. So you want to format text so that important details stand out. You do this with font, color, size and spacing.
Fonts
When choosing fonts for your Help content, make sure they are easy to read. Serif fonts, used in traditional publishing, such as Times New Roman, have extra strokes in the typeface that can be harder to read on screen, though in some cases they can work if used sparingly.
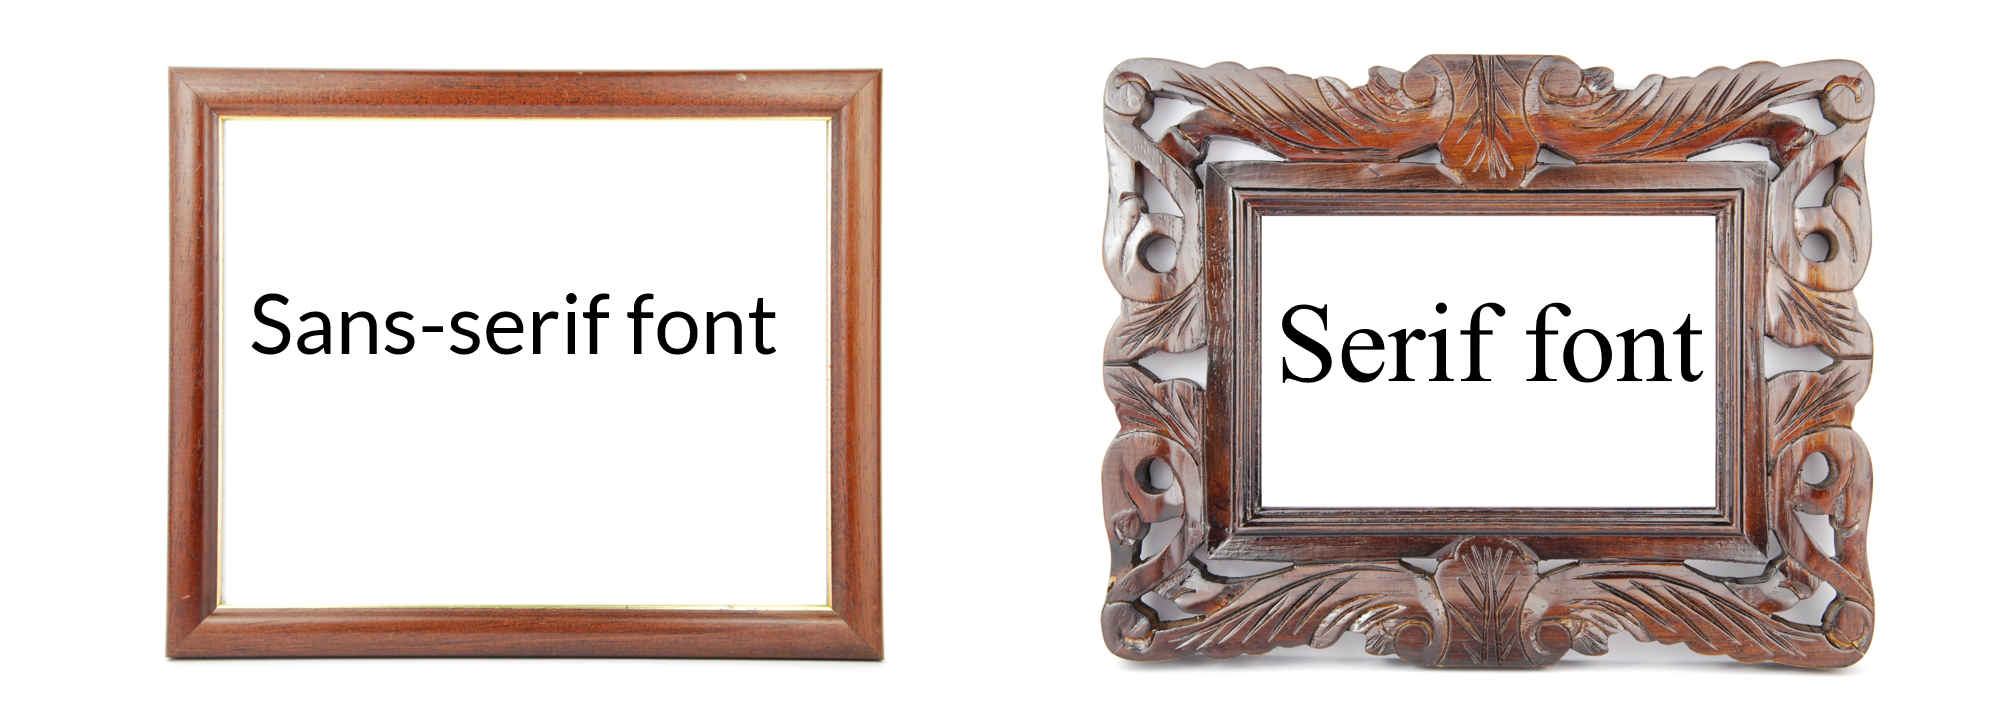
Sans-serif fonts, such as Arial, Helvetica or Lato, are better for on-screen reading.
You only want to use 2-3 fonts for your entire project: one for headings, one for body text, and maybe a third for the title or special information. Too many different fonts make for a cluttered experience. We want to avoid that clutter so the reader’s eye flows easily across the screen.
Font Decorations
Bold and italic text are font decorations that can help important details stand out. My preference is to use italics for things like screen names and bold for anything the user touches (like button or field names).
Depending on which font you choose, you may need to make adjustments. For example, italics may not be very readable on-screen in your font choice, so you might use color or another way of drawing attention to that text.
I don’t recommend using underline, with one exception. Hyperlinks tend to be underlined as the default formatting.
You can use font choices like all capital letters or small caps in your text, but only extremely sparingly. All caps and small caps are also hard to read. You might consider using a different form of contrast, like a different color.

Color is an important aspect of your visual design. But again, you just need a few – maybe 3 to 5, including your branding and main text color. You don’t want too many colors – each with a complicated meaning. Keep it simple. A different color for headings and an accent color or two can really make the project more enjoyable to view.
Size and Spacing
Text size is another way to make your Help content look good. Choose a consistent size for headings and body text.

Spacing is a very important aspect of chunking your information. You need to have white space to create your chunks. There are three types of white space to keep in mind: margins, line spacing and paragraph spacing.

Group related content together by spacing them closer together. And create chunks by including more space before and after the chunk.
Make a Style Guide
Depending on the tool you are using for publishing and/or hosting your Help content, you may not need to make many decisions about any of these formatting concerns. But if you aren’t using the default, you will want to create a quick style guide – even if it’s only for your own use – so you can remember or communicate with others on your team about what decision you made for each element.
To make your Help look good, keep it simple and stay consistent.
Summary
Here’s a sample style guide to use as a template for creating your own record of the styles you are using.
3.3 Showing is Better Than Telling
As we mentioned when discussing chunks for your topics, images can be an important aspect of your topic that help your reader make sense of your instructions.
“Show, don’t tell” is not just an empty cliche. Our brains actually process visual information in images faster than words.
However, it’s a balancing act. While screen capture images can provide lots of information about a process or procedure for the reader without using much space, they can be used when not really necessary or even overused.
As you are writing your content, you’ll balance the need to use images to inform the reader, with the need for conserving space by keeping your topics concise and uncluttered.
It may be tempting to have an image for every icon or button in a procedure. I’ve done this before in some cases. But in modern Help publishing tools, having too many images may be difficult to maintain going forward. And even when skimming, readers don’t want to scroll through pages of images with very little differences between them.
When you are writing a procedure, consider where an image will be helpful. If it clarifies or makes a distinction between items in your procedure, include an image. If not much has changed since the last image, or if the procedure is just a few simple steps, you may not need an image.
If your user interface includes quite a bit on one screen, don’t show too much at a time. You can crop the image down to show just enough to give the image context in relation to the text. You can also use annotations, like circles, arrows and/or numbers to connect the image with the related text.
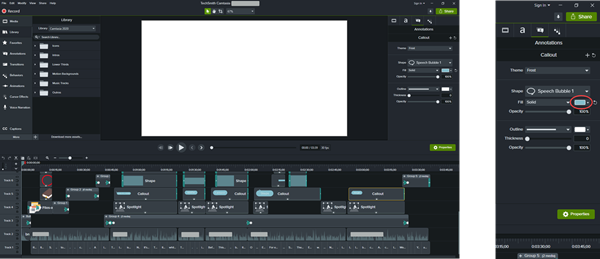
Images don’t need to be full-size to be helpful. However, if you are going to resize them, make sure you scale them proportionally so that you retain the image quality.
How you handle screenshots is a topic you will want to include in your style guide. Consider how you want to format your images. Is there a border? What color are the annotations? What size are the images?
You need to find a good flow for your screen capturing process. I often grab images as I’m writing the steps. But if I’m creating multiple assets at the same time-like writing Help content and developing related video tutorials at the same time, I might write the steps and come back and add the images later to streamline things for a more efficient process.
Whatever your process, start small, keep it simple, and find the flow that works best for you.
In the next lesson, we’ll look at a typical process for capturing images for Help content.
3.4 Screen Capture Basics
Check out these additional resources:
3.5 Simplified Images (SUI)
Check out these additional resources:
3.6 Animated GIFs
Check out these additional resources:
3.7 How-To Videos
3.8 Make it Look Good Summary
To make sure your content looks good and is easy to read:
- Keep fonts and styles simple and consistent.
- Find a balance for images: not too many, not too few.
- Size images proportionally, and crop if needed.
- Use simplified images, animated GIFs and how-to videos as needed.
Making It Easy to Find
4.1 Introduction
4.2 Cover Tasks, Not Functions
4.3 Connect Everything with Hyperlinks
4.4 A Word About Authoring and Publishing Tools
If you are just getting started with developing a Help center, you may also be facing decisions on which authoring and/or publishing tools or platforms to use. There are many popular solutions to help you build and host your self-service content.
I recommend that you first start planning your center and writing at least a few topics before trying to pick a new tool. Keep your goal in mind as you evaluate different solutions. Try to determine how those solutions might grow along with your company.
I also recommend that you evaluate the options BOTH from the author’s and the reader’s perspective.
From the author’s perspective, consider how easy it is to add images, videos, and links to other topics. How many levels of categories can you use in your structure? How easy is it to format your text? I’ve used some solutions that do not make these tasks easy. If it’s not easy to provide helpful content, chances are what you provide won’t be that helpful.
From the production perspective, you’ll also need to consider the process. Will one person be creating the content, or will you be sourcing articles from many authors, such as your support reps? Consider the workflow for sourcing, editing and publishing articles if necessary.
You might also consider whether you can brand the help center to look like your other resources.
A reader, on the other hand, primarily wants it to be super easy to find the information they need. You might eventually consider more advanced options, like putting the helpful content in-product. But make sure it’s easy for the reader to find out what they need to know or you may as well not have created the content in the first place.
If you have a tool that’s not perfect, don’t let that stop you. You might need to find some creative work-arounds to implement some of the suggestions in this course.
But no matter which authoring tool or publishing platform you end up using, the principles of deciding what to write, how to make it look good, and how to make it easy to find will guide you in writing helpful help.
4.5 Apply SEO Techniques
Most people these days are going to their favorite search engine to find out what they need to know.
Readers only spend a few seconds typing in a search term and reviewing the results, so your goal is to have your content show near the top of the page when your readers need your help.
Ideally, the content might even be used as a Feature Snippet, which is a summarized answer from an organic search result. A Feature Snippet is the search engine’s attempt to answer the question so the reader doesn’t even have to leave the search results page.
If your content isn’t at or very near the top of the search results page, your content may be competing with answers that aren’t quite right for the readers you want to help. If the top results include content you don’t control, the answers could be wrong or at least of questionable value.
Or worse, you might be competing with a similar solution from a competitor who would also love to solve the reader’s problem with their product.
Search Engine Optimization, or SEO, is the practice of ensuring your content shows up at the top of the results page when your readers search for a topic. The goal of any of your SEO efforts should be the same as the goal for your content itself: to help your readers succeed.
There are Webmaster Guidelines (sample here) for the various search engines, which all include some basic principles and things to avoid when trying to optimize your content in search engine results.
The basic premise is to provide your readers with a great experience that answers their questions, while avoiding any efforts to trick the search engines.
An overarching guideline for SEO is simply to create the best content on the Internet for that particular topic. No pressure, right?
However, you’ll see that many of the concepts we’ve already covered in this course address SEO by making for a better reader experience.
- By chunking your topics to make them more scannable by human readers, you also make them more scannable by search engine crawlers.
- Focused, clear topics (especially procedures) are more likely to be read by the search algorithm as a summarized answer to show as a Feature Snippet on a Search Results page.
- Using proper formatting, including heading tags, helps search engines emphasize important text.
- Images in your help content (especially with ALT text added) helps the search engine crawlers index your content.
- Adding hyperlinks back to a topic after it’s published is a small way to make a big impact on how content ranks. These links signify to search engines that a topic is important and popular.
There are few other techniques specific to publishing your content that can help your SEO efforts.
While titles are a very important aspect of helping to find your content, the search engines are also going to look at the URLs for where your content lives.
Hopefully, your help center platform will let you modify those URLs. If so, you’ll want to make sure a word representing the main idea of your topic is in the URL. But you’ll also want to keep the URL short and focused. And if possible, you’ll want to use readable words in the URL rather than numbers or codes.
There are two additional SEO strategies that use the HTML coding behind the scenes of your Help content. One is the Title tag, which is the text that for the reader, only shows at the top of the browser on the tab. You’ll want to first make sure that every page has a unique title captured in that HTML Title tag.
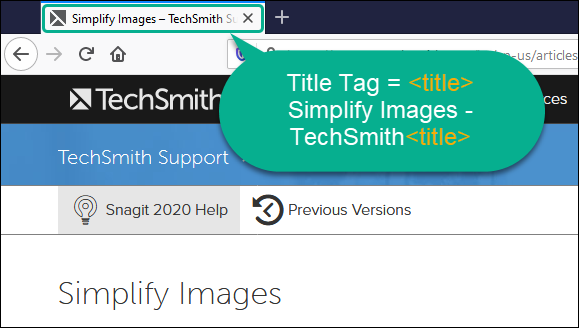
And you want to make sure that Title text accurately describes the page’s content.
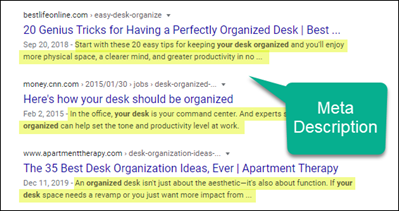
The second strategy is to carefully craft the text you include as the HTML Meta description.
Think of this text like an advertisement for the page. The meta description doesn’t show anywhere in the article itself (although it might duplicate content in the article. It’s present in the HTML coding, and it shows on the Search Results page. You’ll want to use that description to clearly summarize the page content and convince readers that the page answers their question.
You don’t need to overthink your SEO efforts. Search engines are usually going to rank content written by a company about its own product higher than content published by others. So focus on the other aspects of writing helpful help and you’ll find you’ve already done most of the work needed to make it show up on search results pages.
Summary
Check out these additional resources:
4.6 A Sample Search for Information
4.7 Make it Easy to Find Summary
When writing and organizing content for your Help center:
- Remember to consider what the reader wants to DO for topic focus and organization.
- Use relevant categories to help organizing your content.
- Take advantage of hyperlinks to connect related information and keep the number of topics in categories manageable.
- Consider the pros and cons of authoring and publishing tools from both the authoring and reading perspectives.
- Search engines are looking for many of the same things that make content helpful for human readers.
Conclusion
Writing Your Help
As you are deciding what to write, making it look good, and making it easy to find, try not to get overwhelmed. The great thing about Help content is that starting anywhere is better than waiting for perfection. And it’s a project that lends itself well to making a regular schedule for adding new content or making improvements to existing content.
You can also iterate to make improvements as you get feedback. Use the goal you originally set to define metrics that make sense for your business, and then track the effectiveness of your content using those metrics over time to see what is working and what needs improvement.
Good luck!


