When you start creating videos, there’s often a lot of preparation required before you can even think about hitting the record button. If you are recording using a camera, you need to find a set, adjust lighting, and have the proper camera angles.
The best way to organize this preparation is with a shot list.
Even if your video will only use screen recordings without any camera footage, it’s helpful to have a shot list to help you identify and plan for everything you want to record on shooting day.
What is a shot list?
A shot list is a document that maps out exactly what will occur and what will be used in that particular shot, or scene, of the video. Think of it as a shooting schedule to help organize and begin with a solid plan.
Shot lists go hand-in-hand as part of writing the script, creating a storyboard, and the overall pre-production process.
These lists are essential parts of the video creation process because they allow you to organize your information, stay on track, and keep an updated list of every shot you need to finish your video. They are detailed, and they are worth every minute you spend on them.
The easiest way to edit videos
Stop wasting time and discover how Camtasia Editor makes creating incredible videos easier than ever.
Free Download
The essential elements of a shot list
Let’s look at how to make a shot list, starting with a breakdown of each of the key elements you should include:
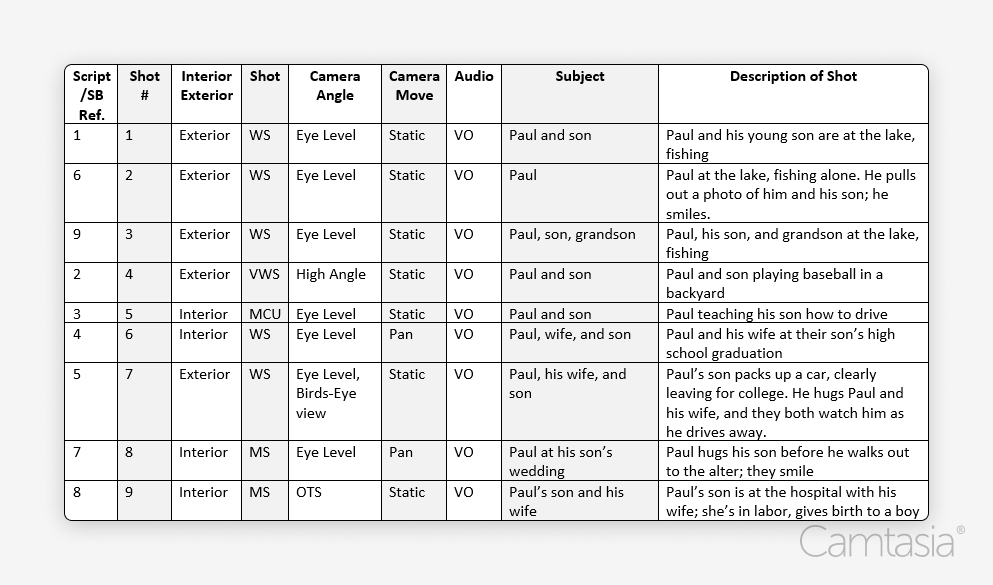
- Script/SB reference: Indicates which part of the script or storyboard the shot corresponds to, ensuring alignment between planning and execution.
- Shot number: The reference number assigned to each shot. This is essential for easy identification and organization.
- Interior/exterior: Specifies whether the shot takes place indoors or outdoors. This is crucial for lighting and equipment planning.
- Camera shot: Identifies the type of shot—such as Wide Shot (WS), Medium Close-Up (MCU), or Very Wide Shot (VWS)—to establish the shot’s visual style.
- Camera angle: Specifies the perspective from which the camera will capture the shot—like eye level, high angle, or even birds-eye view—adding layers of meaning to the scene.
- Camera movement: States whether the camera will remain static or employ a specific movement like panning, which affects the energy and pacing of the scene.
- Audio: Indicates if the shot includes specific audio elements like a voice-over (VO), an important note for post-production.
- Subject: Listing any people needed in the shot is an important detail for scheduling and ensures all team members know what should be captured.
- Description of shot: This is a detailed summary of the shot in question, including the visual elements and type of shot to help guide the director, cinematographer, and crew.
While there is basic information that should be included on every shot list, there’s no right or wrong way for you to put yours together.
With that in mind, you may wish to add or even swap out some columns to list other bits of information, such as:
- The scene number: This is a number to identify each scene, which will help with the organization and workflow of the shoot.
- Location: Specifying the set or location for each shot will help when planning logistics.
- Framing: This should indicate how you want a shot to be composed, which will help maintain artistic coherence and consistency.
- Action/dialogue: This is where you’ll describe what you want to happen in the shot, such as character actions and important lines, ensuring key parts of the story are captured.
- Props needed: Detail the props required for each shot.
- Extra notes: You can also add a section for other (yet essential) information, like special camera instructions, lighting requirements, or anything else that needs to be conveyed to the crew.
Free shot list template
Now let’s take a closer look at what a shot list might actually look like.
In the screenshot below, you can see a clear shot list example, complete with information about individual shots to help convey to the crew who’s needed on set, details of the action, and where each shot will be filmed.

We’d recommend organizing your shots based on location. Grouping shots this way will make it easier to film because you’ll be able to film everything you need at one given time.
For example, to shoot a scene at a lake for the beginning and end of the video, it would make sense to film these shots at the same time rather than separately. While you won’t be filming in the order of the storyboard, this makes filming much more convenient for everyone involved, from crew members to the assistant director and you!
The different types of shots
Perhaps one of the most important aspects to consider when creating your shot list is how you want each shot to be captured. This includes information about the types of shots you want to film, as well as camera angles and movements.
Camera angles could include high and/or low-level shots, whereas a move may be on a handheld camera, a crane, or a dolly. Once you’ve decided on your camera work, it’s also important to think about how you’ll record the audio, whether it’s using a boom mic or a voice-over—and don’t forget about your B-roll. We’ve assembled a quick and easy chart that you can refer to below for more shot types, camera angles, camera moves, and audio.

This is a lot to consider, but all of these details are vital to creating a shot list that ensures your shoot runs smoothly.
How to create a shot list in 5 steps:
For the actual process of creating your shot list, we suggest using a spreadsheet. The layout makes it easy to organize all the information and rearrange it as needed.
We’re going to show you how to make a shot list in five easy steps.
1. Pick a scene
The first step in creating a shot list is choosing a scene from your script to focus on. Then, in your spreadsheet, create column headings using the nine essential elements of a shot list that we’ve discussed above, such as the scene and shot numbers, location, framing, etc.
2. Break down each capture
Now that you have your scene and spreadsheet ready, it’s time to dissect each shot. This means going through them one at a time and thinking about how you’d like to capture them.
3. Number your shots
Clarity is key when organizing your shot list, which is why it’s so important to number your shots. Start with the number 1 for your first shot, and for each subsequent shot, create a new row in your spreadsheet and give it a unique number.
This simple system makes it much easier to reference specific shots during a busy shoot and also helps in the editing process later on.
4. Assign a shot for every part of the scene
While it can be tempting to skip a “minor” shot when creating your shot list, with an “it-will-all-work-itself-out” mentality, the whole point of your shot list is to list all your shots. So, make sure that each part of your scene, no matter how small, has its own spot on your spreadsheet. By being meticulous in this way, you’ll eliminate uncertainty and ensure that every element in your scene gets the attention it deserves during filming.
5. Draw rough sketches
This visual aid will help you and your crew better understand how a scene will unfold. Plus, it’s also a good way to try and spot any potential issues before you’re on set. If something doesn’t look correct in the sketch, you can adjust your shot list accordingly.
Your shot list can be as simple or as detailed as you see fit. The most important thing is making sure you have a shot list in the first place—while it might seem like a lot of work upfront, it will make both shooting and editing your video much easier in the long run.
The easiest way to edit videos
Stop wasting time and discover how Camtasia Editor makes creating incredible videos easier than ever.
Free Download


Share