How to Record a Zoom Meeting and Zoom Screen Recording

Illustration of a green laptop showing a four-person zoom call interface, with a blue camera icon and control panel.

There are multiple reasons why it might make sense to record a meeting in Zoom. Communication happens everywhere, including remotely – and it tends to happen fast.

It’s easier than ever to connect with people with cloud recording software such as Zoom, which serves as a virtual bridge between participants.
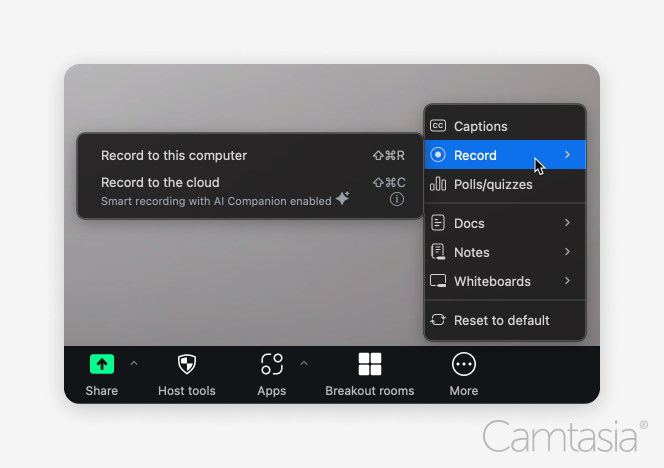
Zoom interface with recording options and toolbar displayed.

Zoom has its own built-in recording features that allow the host to capture the contents of the conversation. However, sometimes the host of the session doesn’t enable recording or doesn’t have an easy way to share the video with everyone who participated or might have an interest in the content.

This allows other software programs, such as Snagit and Camtasia, an opportunity to shine. 

User-friendly solutions such as these allow participants to capture and edit Zoom screen recordings for creating tutorials, reviewing the discussions, or even helping a team member who couldn’t attend the meeting.

Why record Zoom meetings?

Remote meetings offer an easy, synchronous way for family, friends, and coworkers to interact. 

Instead of having to type out lengthy emails or trying to type out texts on the go, software like Zoom has enabled people to see video and audio of one another, even over a mobile device. 

That human connection and ability to have robust conversations in the moment are incredibly important, but by default, there’s no written record to refer to later either.

That’s where a recording can be valuable. Team meetings, webinars, and training sessions are all typical business reasons for Zoom calls. 

There’s a personal side to Zoom, too, as family and friends often use software such as this to catch up with one another or celebrate major life events. Having a recorded file is the perfect way to retain and remember these moments beyond just the Zoom call.

Later, these recordings can be used for documentation, revisiting specific details, or simply sharing what happened with those who could not attend during the live session.

How to record a Zoom meeting using Zoom’s built-in feature

Step 1: Enable Zoom recording permissions

Log into Zoom using the website link zoom.us/profile/setting

You can choose the ‘Recording’ tab at the top of the page. 

Zoom navigation menu with tabs: AI Companion, General, Meeting, Webinar, Recording, Calendar, Audio Conferencing. 'Recording' tab is selected.

Make sure that the toggle switch “Record to computer files” is on. 

Zoom interface showing a menu bar with the 'Recording' tab selected. A blue toggle switch labeled 'Record to computer files' is turned on.


Then, check the box for the appropriate recording options marked for local recordings and Zoom cloud recordings. 

Tip: If these (or any of the other options in this tab) are disabled / grayed out, you must contact your Zoom account administrator to have those settings configured for access.

Step 2: Recording a Zoom meeting

When you are in a Zoom meeting (especially as the host), the toolbar at the bottom of the app is your best friend. 

It has a ton of options. For the purposes of this blog post, you’ll want to press the ‘Record’ button towards the right to start your recording.

Zoom interface with recording options and toolbar displayed.

Tip: The Zoom desktop app allows you to customize which buttons are seen and the order in which they appear. 

You may see one or two options depending on what features you have turned on. 

You can record locally to your machine or you can record to the cloud. 

Recording directly to your machine is generally faster if you want to work with the files later, such as editing them in Camtasia. However, recording them in the Zoom Cloud will make them more readily accessible to others when you want to share the recording as-is with an audience.

Once you’ve started your Zoom meeting and clicked the record button, you can pause and stop the recording. 
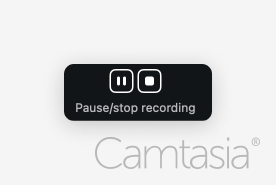
Black Zoom button with pause and stop symbols, labeled 'Pause/stop recording.'

Pause and stop controls are along the bottom toolbar and in the upper right corner of your Zoom window.

When the Zoom recording is stopped, it saves the recording as a video file. Depending on your settings, the file will be on your local machine or the cloud. 

You can check and change those settings in the Zoom app by clicking the settings wheel and then going into the recording tab, where you can find those settings.
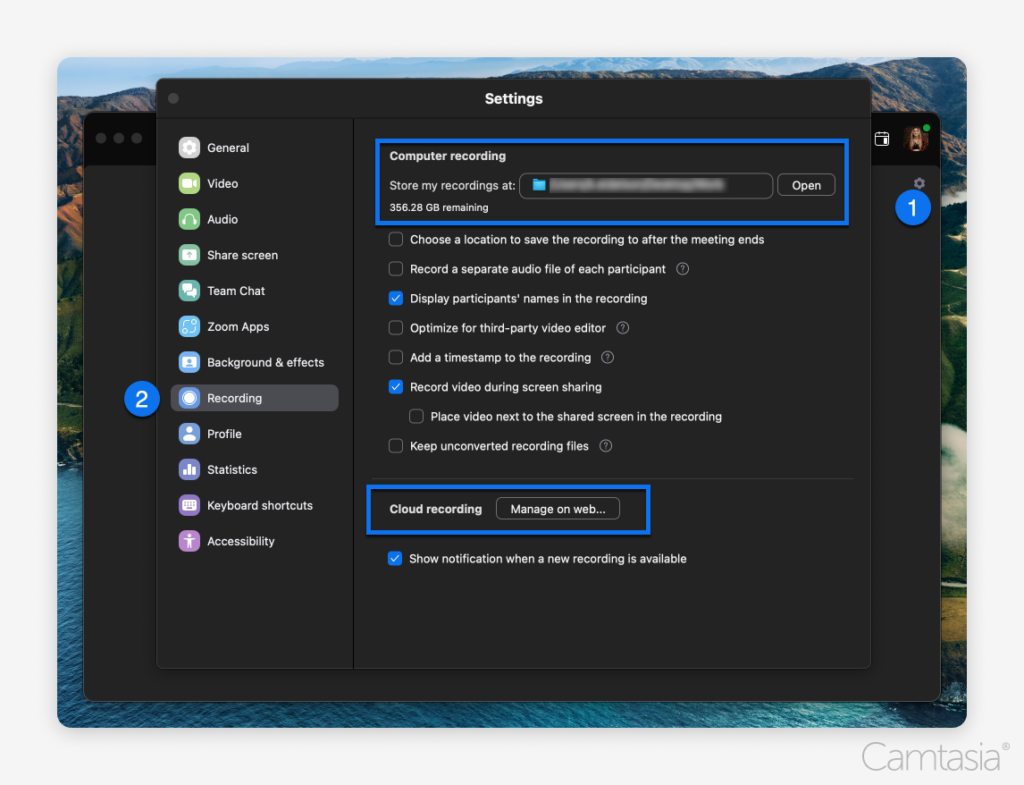
Zoom settings window focused on recording options with highlighted sections for computer and cloud recording.

Tip: The “More” button in the Zoom interface will display more available options.

If you resize your Zoom application window to be smaller, there are only so many buttons that the app can display on that menu bar along the bottom. 

If you can’t find a button you’re looking for, such as Record, click the “More” button, and you may see the feature you were looking for in a vertical menu pop-up.
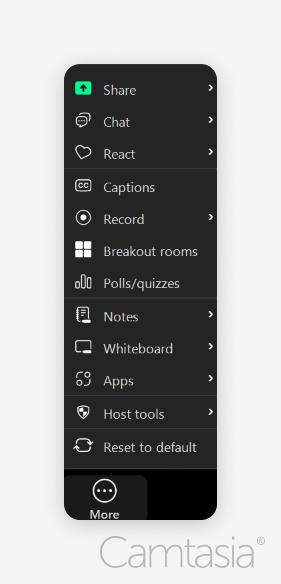
Zoom vertical menu interface with options for sharing, chat, captions, and more.

Step 3: Limitations of Zoom’s built-in recorder

If you know that you will want a recording later, the most convenient way to make a video of a Zoom meeting is to use Zoom’s built-in recorder. 

However, there are some limitations that you should be aware of. 

Video recordings are in a particular format; if you plan to use them in another program, there may be compatibility issues. However, there is an option in the Recording interface that makes the recordings more readily compatible with more programs.

Also, video files can be quite large, so be mindful of storage space on your machine or in the cloud. 

You don’t want to lose a recording due to storage restrictions. 

Zoom also doesn’t offer a lot of editing features. If you forget to pause the recording during a break or try to omit something potentially sensitive, you may need to use a different editing program to trim those moments out later.

How to record a Zoom meeting using Snagit

Snagit is a fantastic tool for quick, easy recordings of the screen. 

You might want to make your own recording of a Zoom meeting for multiple reasons. 

Perhaps the host forgot to make their own recording, or you’re unsure if they will share it. Maybe you are only interested in a select portion of the meeting and don’t want to have to sift through a recording of the whole thing later.

These and more are valid reasons to have Snagit set up and ready to record some or all of a Zoom meeting.

Step 1: Setting up Snagit for screen recording

You will want to make sure you have everything ready before you start. 

Do you want part or all of the screen? Are you only looking to record the audio from the meeting? Or do you want your own microphone to be in play here so you can narrate over it? 
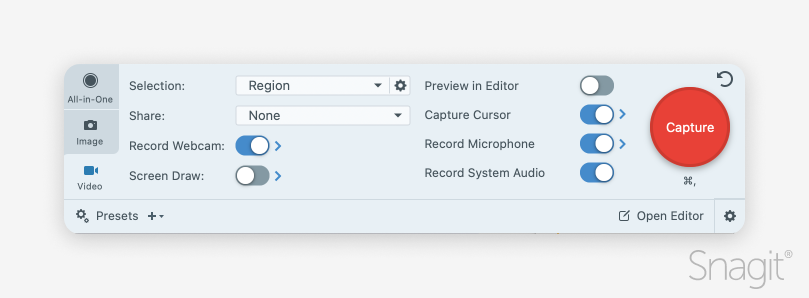
Snagit's screen recording interface with a red capture button and video settings.

This tutorial on using Snagit to record a video will carefully walk you through the options and help ensure you get the best results.

Tip: You can also use Snagit for image captures. This can be particularly handy if you’re only interested in capturing and later annotating a few moments of the meeting, such as a graph or some other visual.

Step 2: Recording your Zoom meeting with Snagit

There’s a great deal of flexibility in Snagit’s recording toolbox. 

You can choose whether you want the entire screen or just a section of it. 
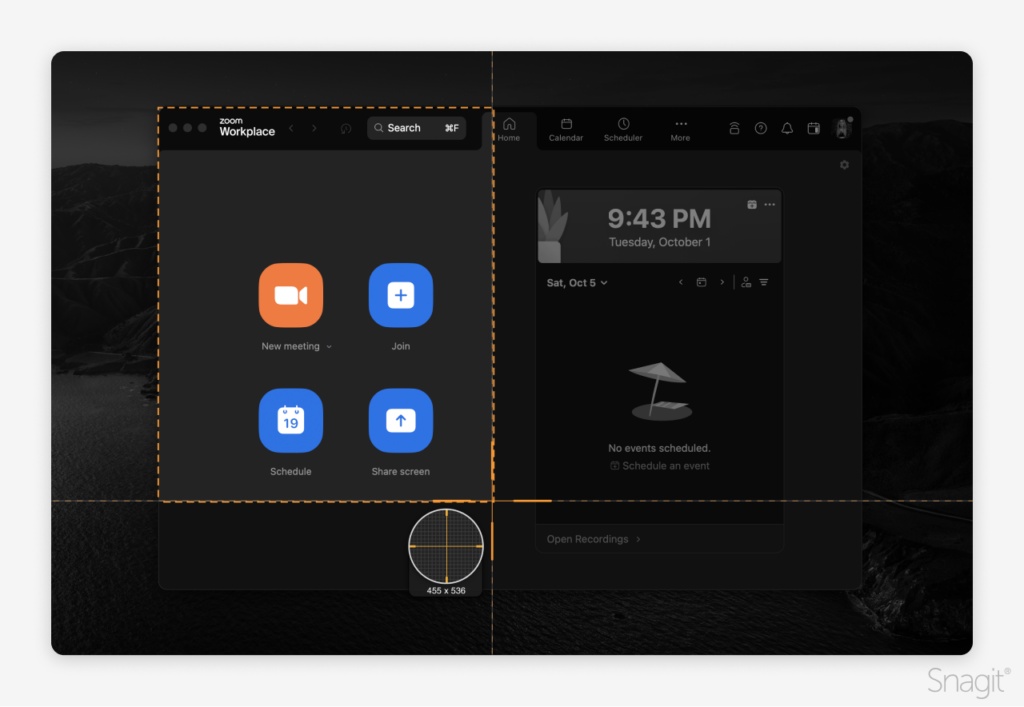
Zoom application interface showing options to start or schedule meetings.

It is worth noting, however, that there are things you can do to make this recording a success. 

Close programs you don’t intend to use during this time. It may help prevent notifications from popping up on your screen or unwanted sound effects from showing in your recording. 

Also, as a rule, the fewer programs you actively run on your machine during a recording, the more resources it has and the less likely you are to encounter any performance issues. 

If I know I will be recording something important, I will often reboot my machine and only start the software I know I will need during the recording. This gives my machine a clean slate.

Step 3: Editing your Zoom recording with Snagit

Snagit’s ability to trim, annotate, and enhance your recordings makes it an appealing option to touch them up before sending them out to others or even when referencing them later yourself. 

The most obvious use cases are when you want to highlight important items from the meeting with callouts or trim off parts that aren’t relevant or shouldn’t have been recorded in the first place. 

I’ve been in meetings where the host forgot to pause while everyone took a fifteen-minute break. It only takes a few of those over the course of a longer session to add nearly an hour of dead space to the recording that doesn’t serve any purpose when watching it again later.

Tip: The tutorial I linked to before has a video and instructions on how to effectively edit a video in Snagit as well. 

Record your screen with Snagit

Snagit makes it easy to share quick updates and how-to’s by capturing exactly what’s happening on your screen.

Get Snagit
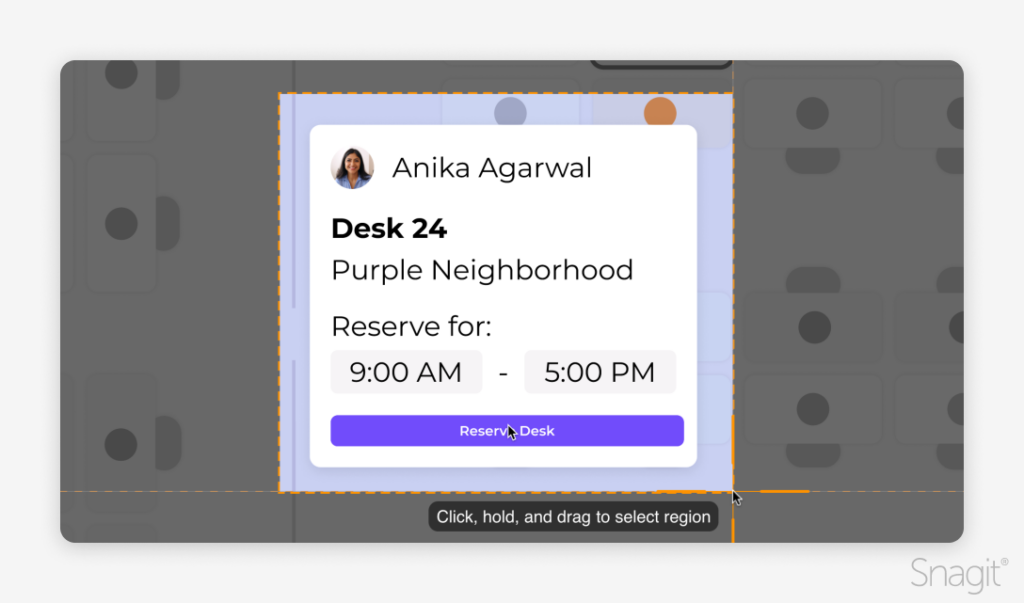
Screen recording of a dashboard showing conversion rate, spend, and monthly performance with a picture-in-picture webcam view of a smiling man.

How to record a Zoom meeting using Camtasia

Step 1: Why use Camtasia for screen recording

Snagit is a fantastic tool for quickly and easily capturing images and video, and as mentioned above, it is relevant to Zoom meetings. However, sometimes you know that you want more performance and power in your recordings and editing, and that’s where a program like Camtasia can help.
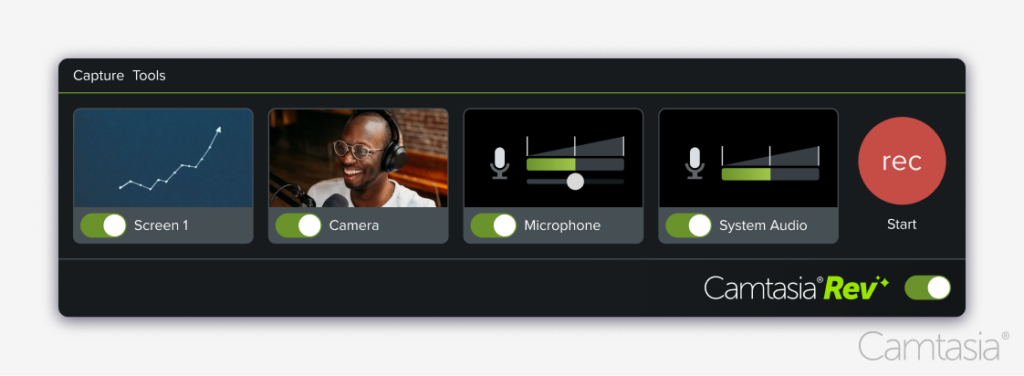
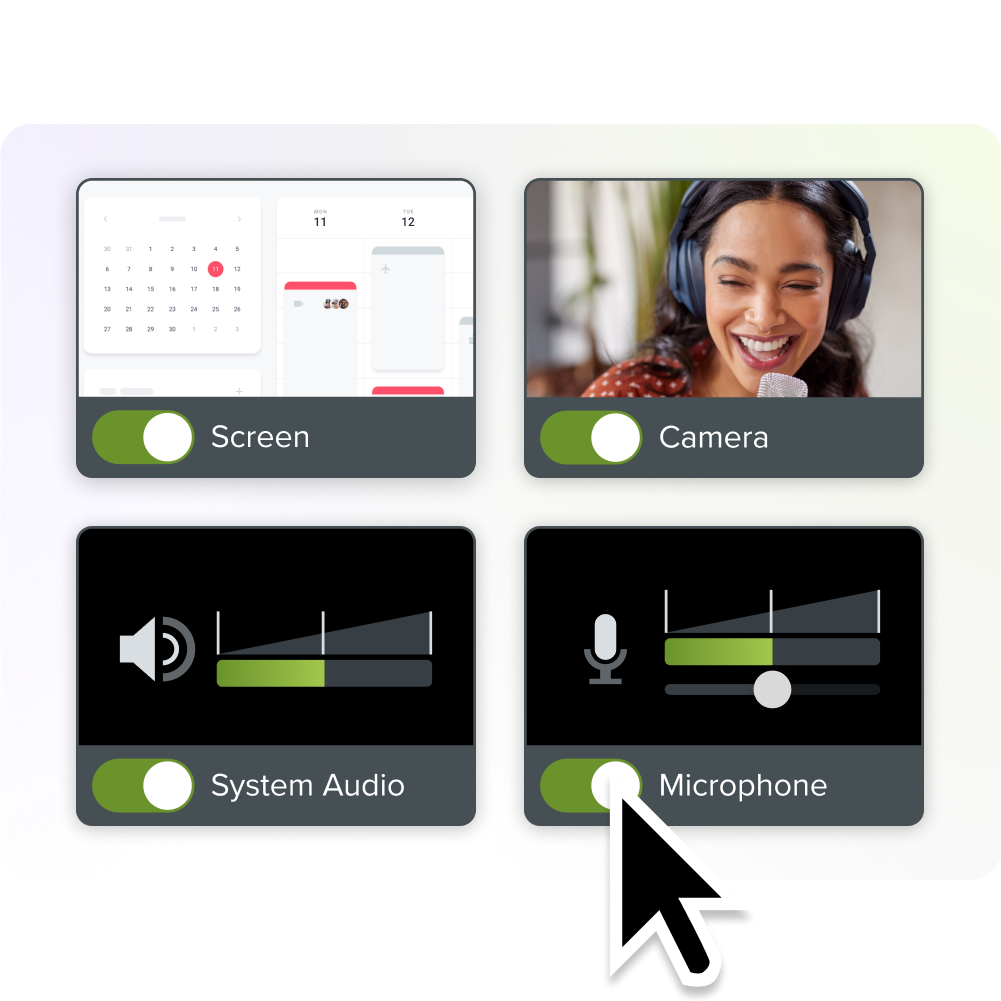
Snagit's software interface showing options for recording screen, camera, microphone, and system audio.

Step 2: Recording your Zoom meeting with Camtasia

The basics Snagit provides, such as audio inputs and choosing what you want to record on your screen, are available in Camtasia. Camtasia is much more robust yet easy to learn. 

Many of the same tips about prepping your machine apply, such as closing out unnecessary programs. 

It is always a good idea to do a quick test recording first to make sure you’ve configured everything to your liking, giving you a better sense of confidence when it’s showtime.

Step 3: Editing your Zoom recording in Camtasia

Camtasia provides many quick, basic editing options, such as annotating and trimming your videos. 
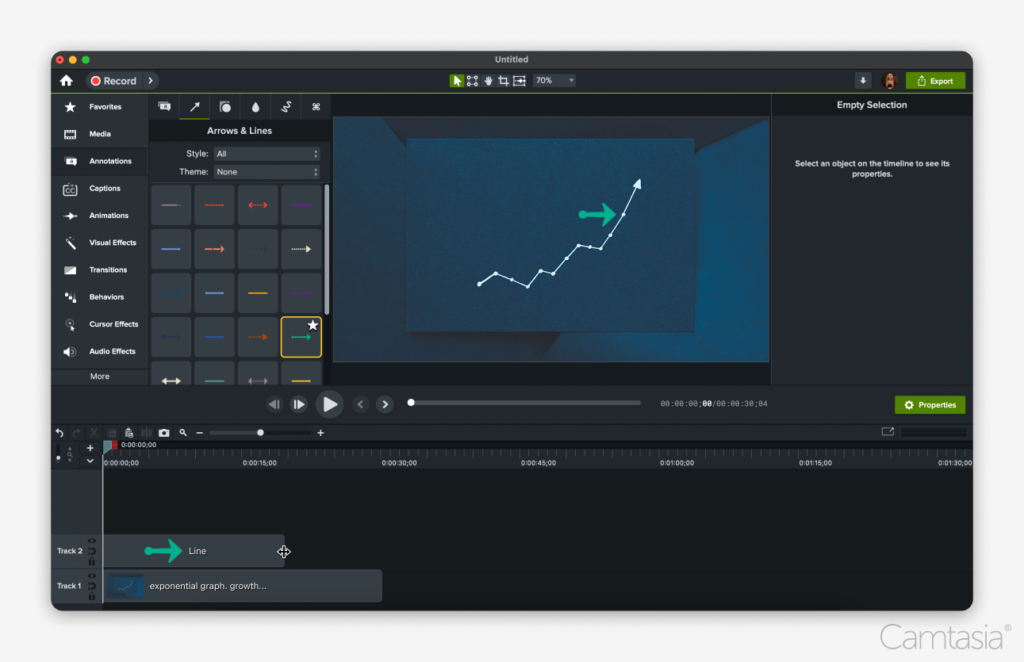
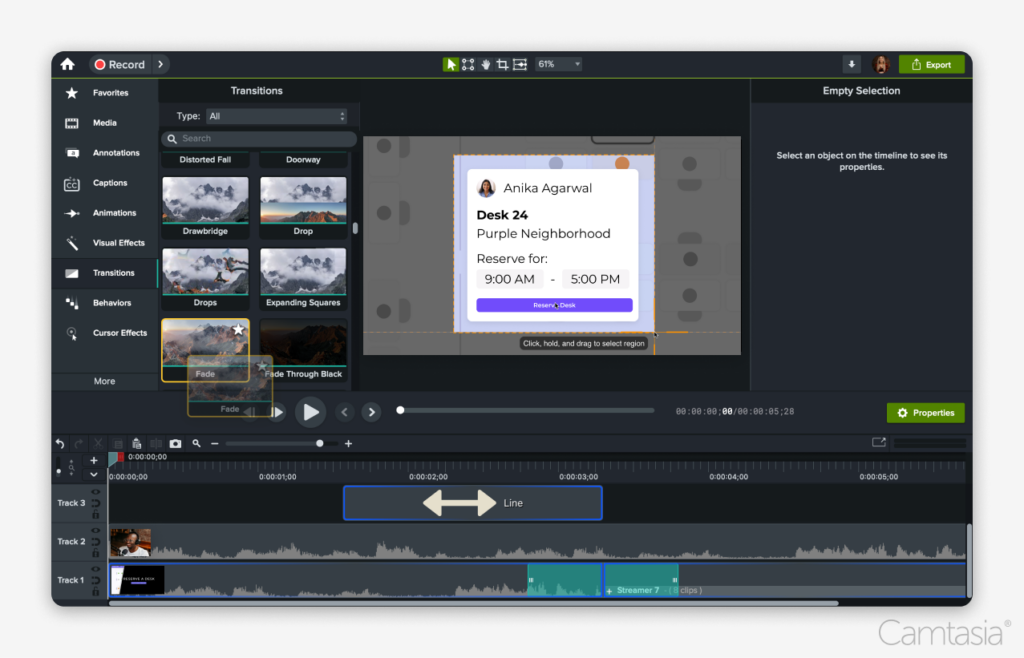
Camtasia video editing software interface with a graph and arrow in the preview area.

Its timeline allows for a lot of very flexible editing, such as moving multiple clips at once, adding markers to build out a table of contents, and ways to add flair to your video with transitions, animations, and more. You can see a variety of tutorials on these and other topics.

Tips for better Zoom meeting recordings 

A little preparation goes a long way toward creating a good recording. So optimize your audio and video settings before getting started.

Be mindful of your surroundings

Are you in good lighting? Is there ambient noise like a fan blowing? Will there be visual distractions, such as people walking in and out of your video? Getting the lay of the land in advance to minimize potential distractions is key.


Make sure your hardware is ready

First, quit any unneeded applications. Zoom leverages your webcam and microphone. Make sure the webcam is cleaned for the best possible image. Have your microphone close to picking up your voice and not other nearby sounds. Be mindful of audio feedback if you’re not using an echo-canceling microphone and speaker.

Be kind, and let your participants know they are being recorded, if possible

Zoom by default displays a message in the app when it’s recording. Other participants might not notice it until later, and if you’re using a third-party program to record the screen, they’ll receive no notifications unless you tell them.

Camtasia recording toolbar with recording and control icons.

Record only what you need

If you don’t need the entire screen, reduce your recording to a cropped size when capturing with Snagit or Camtasia. Computer performance will improve during the Zoom call and your file sizes will be smaller. A smaller recording area will cut out unnecessary clutter. 

Tip: Remember that if you are recording as the host, make use of your pause button to remove parts you don’t want people to see later, like breaks. If you’re using Snagit or Camtasia, you can also pause your recording, or trim out the excess later during editing. 

The easiest way to edit videos

Stop wasting time and discover how Camtasia makes creating incredible videos easier than ever.

Get Camtasia
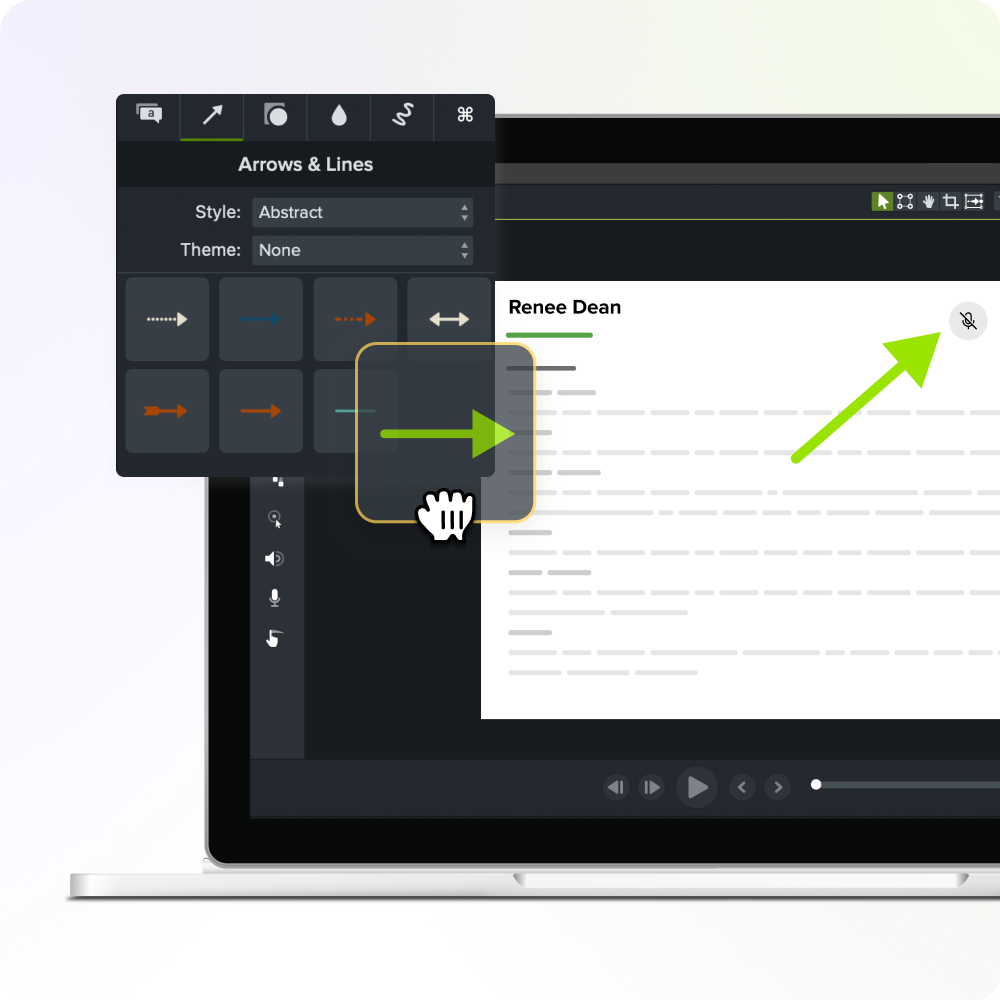
An image of a laptop showing the camtasia drag-and-drop editing feature

Ready to record your next Zoom meeting?

While it’s great that Zoom offers built-in recording, you can do so much more using Snagit or Camtasia. They have more options for customizing your recordings and robust features for optimizing them after the fact. 

You can download a free trial of Snagit and Camtasia and see if they suit your needs. Camtasia and Snagit also provide help online.

FAQ: Zoom screen recording

Can I record a Zoom meeting if I’m not the host?

Yes, you may – as long as the host has the setting enabled within Zoom. Even if they do not, you can use software such as Camtasia or Snagit to record it as you watch it.

How do I add notes or annotations to a Zoom recording?

The best way to do this is to import the recording into software such as Snagit or Camtasia. In particular, the latter has a robust set of tools that make editing easy and powerful.

The non-linear editor, when combined with features like annotations, callouts, animations, transitions, and captions, provides a lot of options to add focus and polish to the content.

How can I share my recorded Zoom meeting?

You can share a Zoom recording by downloading it, or you can go to the recording section of the Zoom web portal and use the provided share options. 

You can share your recordings from Snagit and Camtasia. Snagit provides multiple options, including sharing with many of the major file-hosting sites. Camtasia has a different set of sharing options, including directly to YouTube, Screencast.com, and other file-hosting sites.

TechSmith

TechSmith is the market leader in screen capture software and productivity solutions for daily in-person, remote, or hybrid workplace communication and customer-facing image and video content. Our award-winning flagship products, Snagit, Camtasia, and Audiate, empower anyone to create remarkable videos and images that share knowledge for better training, tutorials, and everyday communication.

OBS Screen Recording Step-by-Step Guide

OBS screen recorder icon on a computer screen

Screen recording is a valuable tool for sharing ideas, creating software tutorials, or even capturing gameplay footage. There are several ways to do this, including Xbox Game Bar on Windows or QuickTime Player on Mac OS, to cross-platform solutions like Camtasia. Another popular option is OBS Studio, and in this guide, we’ll walk you through how to set up OBS for screen recording.

What is OBS, or Open Broadcaster Software?

OBS Studio is a free and open-source software created for screen and video recording as well as real-time video streaming. OBS Studio screen recorder is available for Windows, Mac, and Linux computers. Gamers are the largest and most prominent user group for OBS Studio. OBS enjoys an active development community, with updates frequently made available, along with an ecosystem of plugins available to extend the software capabilities even further.

OBS is a good option for recording your screen, but it does have some limitations. First, the recordings you make are flattened, meaning the screen, webcam, cursor, and everything else is burned into a single file. Additionally, OBS does not contain any functionality for editing your video after you stop recording, so you will need to use a video editor such as Camtasia to trim your clips, add annotations, and more. Finally, it can have a high learning curve, and might not be a simple option for those new to screen recording or video editing.

Crystal-clear screen recording

Why settle for blurry screen content? Camtasia’s screen recorder captures everything at up to 4K!

Free Download
A image showing the user interface for the recorder in camtasia

Now that you know what OBS Studio is and its benefits, let’s dive into the process of using OBS to record your screen. Follow the instructions below to get started:

Step 1: Install OBS

To begin, you’ll need to download and install OBS Studio on your computer. Here’s how:

1. Go to the OBS Studio website: Navigate to obsproject.com and download the latest version of OBS for your operating system (Windows, Mac, or Linux).

2. Run the installer: Open the downloaded file and follow the on-screen instructions to install OBS.

3. Launch OBS: After installation is complete, launch OBS Studio to get started with your screen recording.

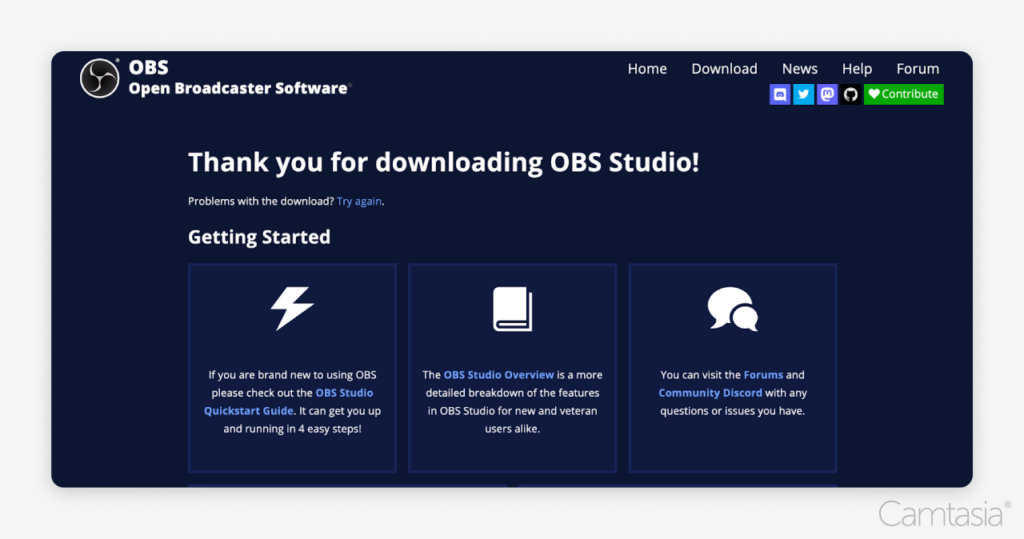
Thank you for downloading OBS Studio message.

Step 2: Initial setup

Once OBS is installed, it will guide you through the initial setup process:

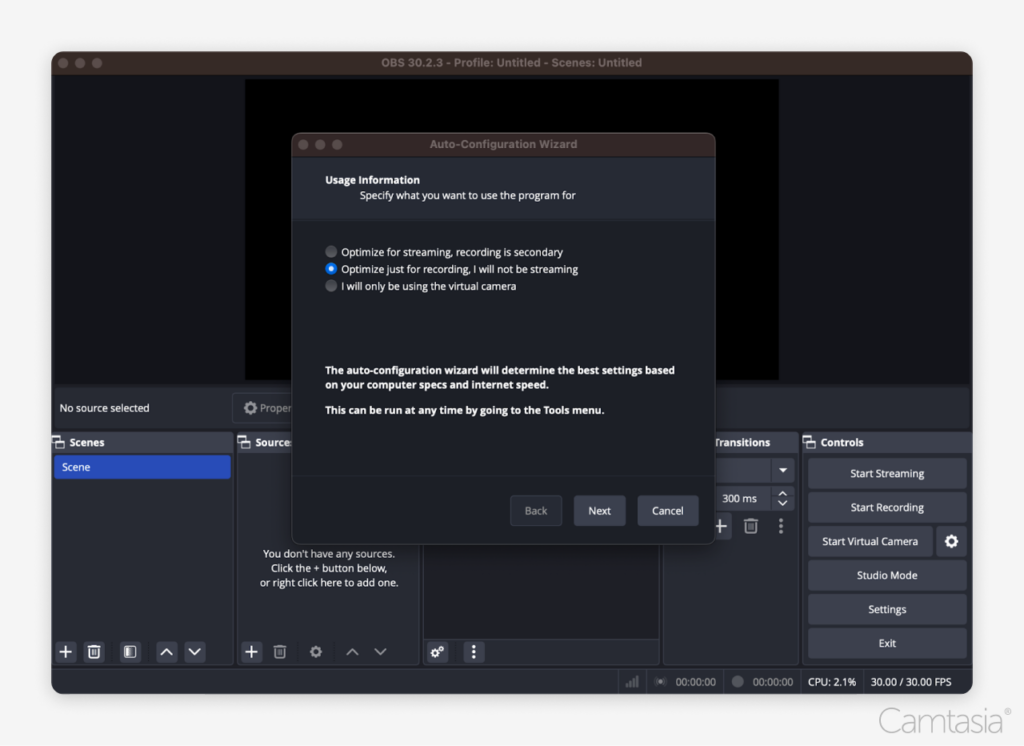
1. Auto-Configuration Wizard: Upon opening OBS for the first time, you’ll be prompted to use the Auto-Configuration Wizard. Select “Optimize just for recording” (if you’re not planning to stream) and click “Next.”

2. Resolution & FPS: OBS will recommend a resolution and frame rate (FPS) based on your system. You can accept the recommended settings or modify them if needed.

3. Complete Setup: Click “Apply Settings” to complete the initial setup.

Auto-configuration wizard open in OBS studio.

Step 3: Adding inputs

To record your screen, you’ll need to add the sources or inputs you want to capture.

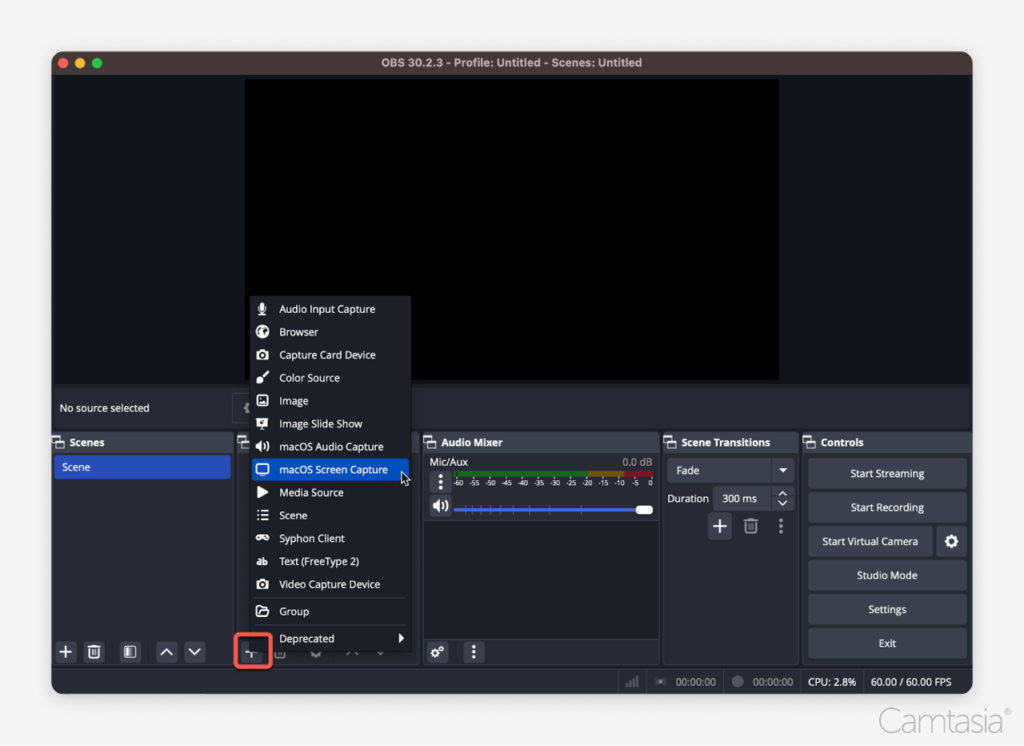
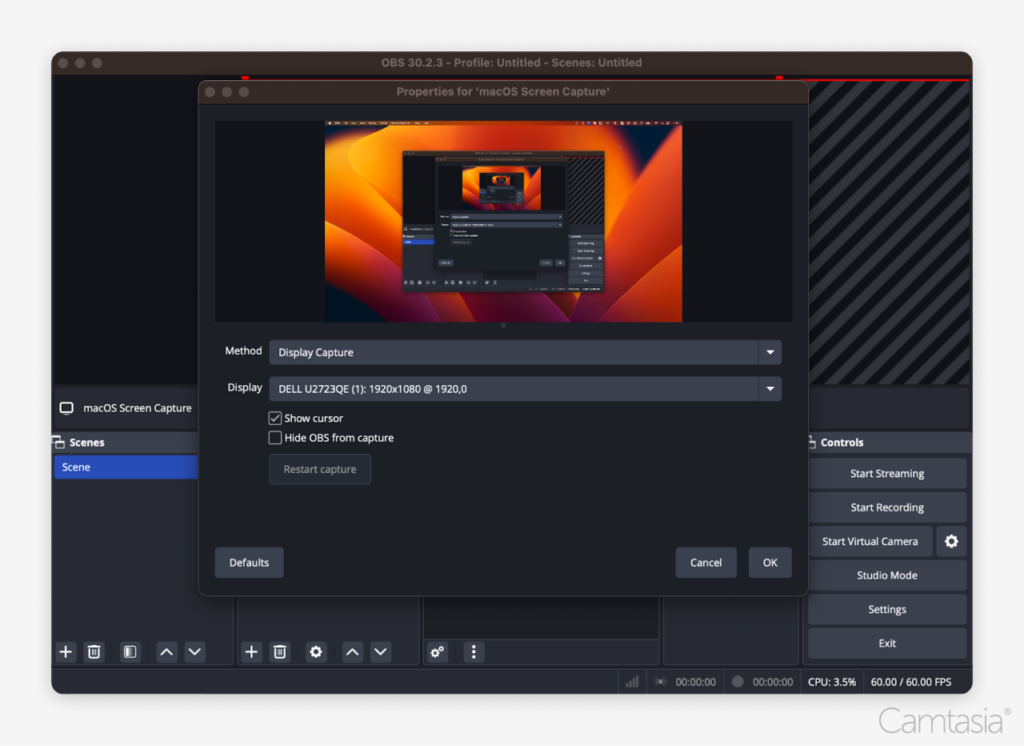
1. Add a Display Capture: In the “Sources” box, click the “+” icon at the bottom left and choose “Display Capture.” This will capture your entire screen. NOTE: When adding a Display Capture, be aware that your desktop resolution might be larger than the capture resolution in OBS. If this happens, you may need to manually resize or adjust the capture region to fit the screen properly within the recording area.

2. Configure Display Settings: A new window will pop up, where you can select the monitor (if you have multiple) and customize the display. Click “OK” to save. Essentially, you’re selecting the window capture area.

3. Additional Inputs (Optional): You can add other inputs, like a webcam or audio sources, by selecting “Video Capture Device” (for a webcam) or “Audio Input Capture” (for your microphone).

Mouse overing over macOS Screen Capture option in OBS Studio.
Properties for macOS Screen Capture open.

Step 4: Change recording format from MKV to MP4

By default, OBS saves recordings in the MKV format, which may not be compatible with all video editors. Here’s how to use OBS settings to switch to MP4:

1. Go to Settings: In the bottom right corner of OBS, click on the “Settings” button.

2. Navigate to the Output Tab: In the Settings window, select the “Output” tab from the sidebar.

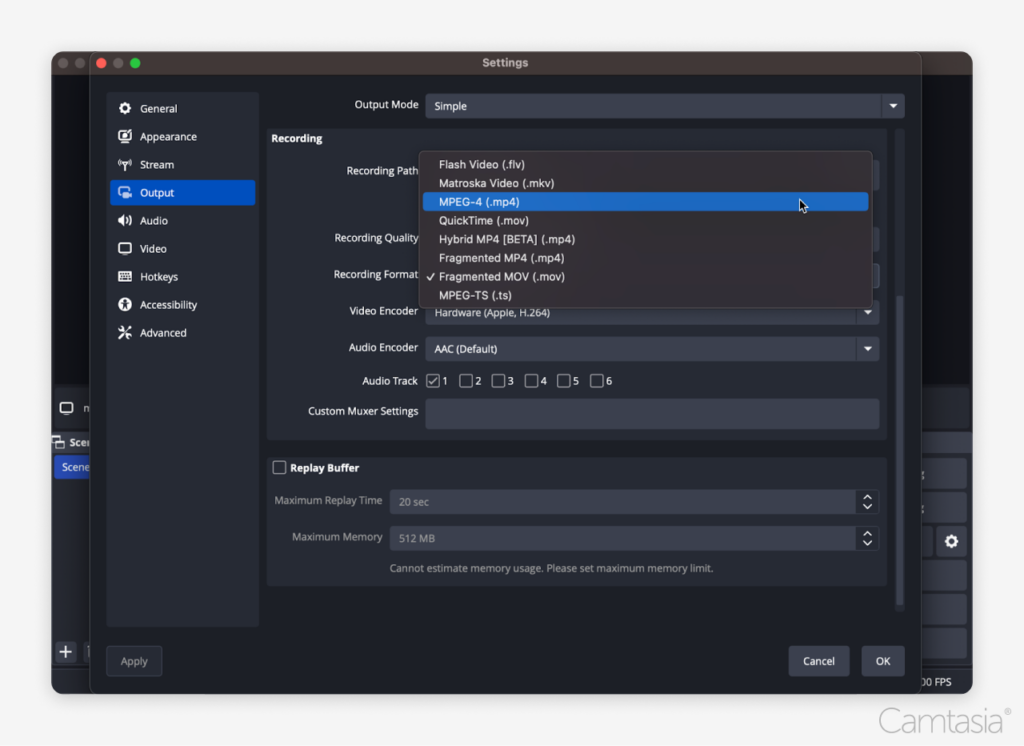
3. Change the Recording Format: Under the “Recording” section, find the “Recording Format” dropdown and change it from MKV to MP4.

4. Adjust Recording Quality (Optional): In the same “Output” tab, you can change the recording quality under the “Recording Quality” dropdown. Higher quality settings will result in clearer videos, but will also produce larger file sizes and may require more system resources.

5. Save Your Changes: Click “Apply” and “OK” to save your changes.

Settings option open clicking on MPEG-4 (.mp4) option.

Step 5: Set the file save location

To control where your recordings are saved:

1. Go to Settings: Click the “Settings” button in the bottom right of OBS.

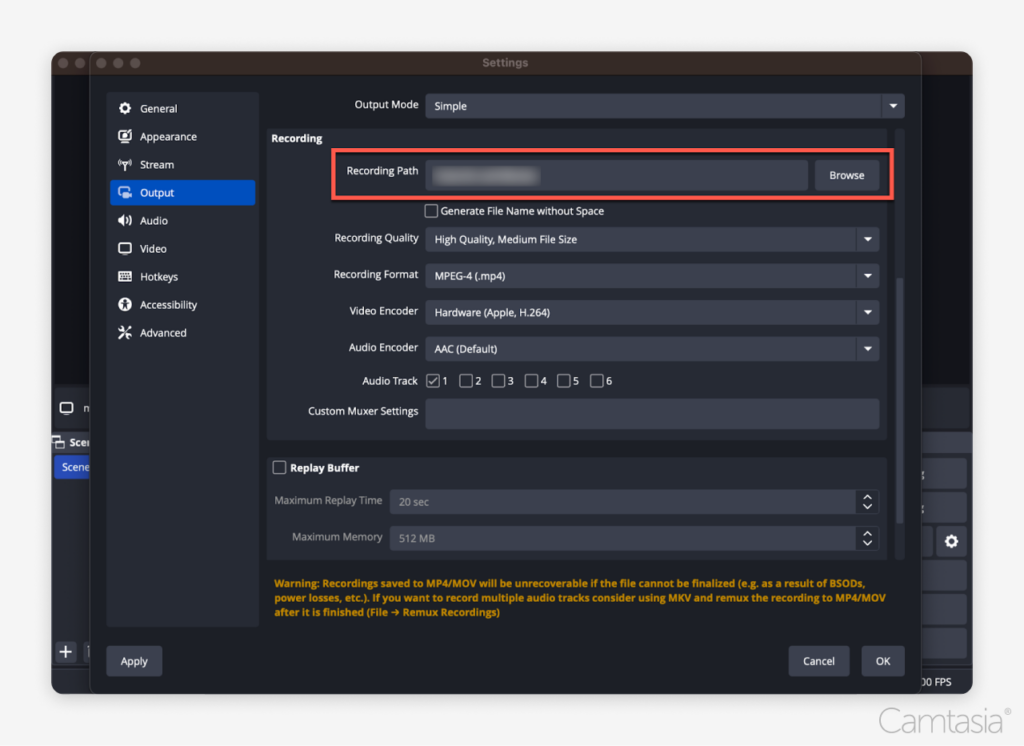
2. Output Tab: Under the “Output” tab, look for the “Recording Path” section.

3. Choose a Save Location: Click the “Browse” button and select the folder where you want OBS to save your video file.

4. Save Settings: Click “Apply” and “OK” to confirm.

Red box around "recording path" in settings.

Step 6: Start recording

With everything set up, you’re ready to begin recording:

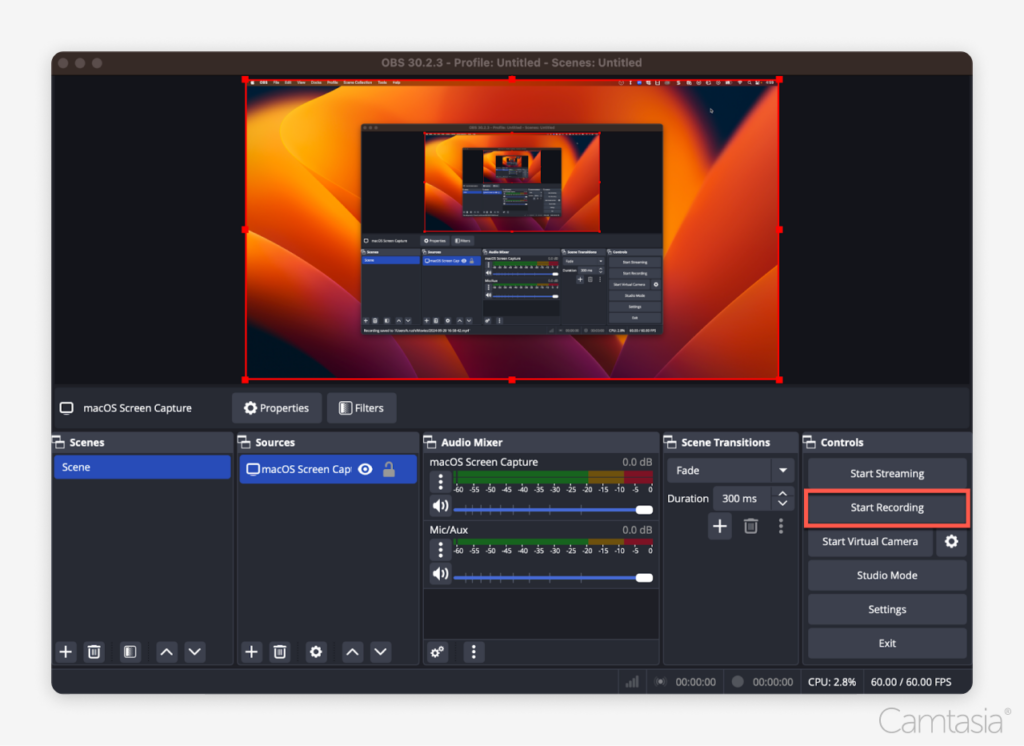
1. Click the Start Recording Button: In the bottom right corner of OBS, click the “Start Recording” button. OBS will begin capturing everything happening on your screen.

2. Minimize OBS: Once recording starts, minimize OBS to avoid recording the OBS interface itself, unless you need it visible for your demonstration.

Start recording button highlighted in OBS studio.

Step 7: Stop recording

When you’re done recording:

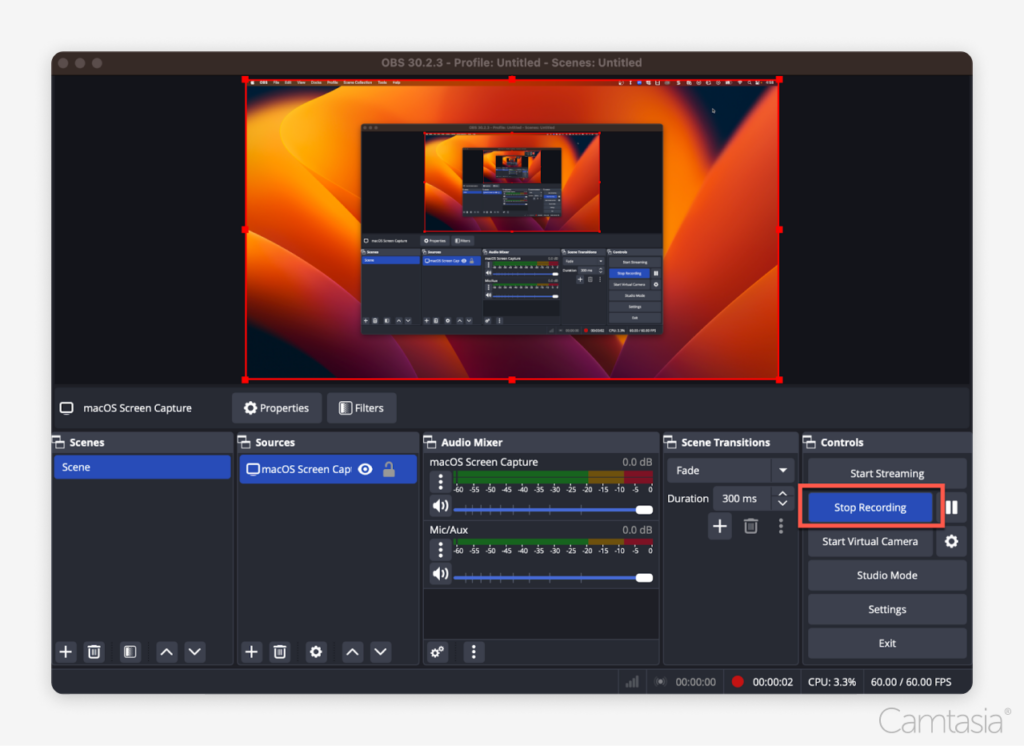
1. Click “Stop Recording”: After you’re finished, return to OBS and click the “Stop Recording” button in the bottom right.

2. Find Your File: Your recording will automatically save to the location you set in Step 5.

Stop recording button highlighted in  OBS Studio

Step 8: Edit your video elsewhere

OBS doesn’t offer built-in video editing tools, so you’ll need to use another program to edit your recording. Here’s how to do it:

1. Choose an Editor: You can use programs like Camtasia, Adobe Premiere, or Final Cut Pro.

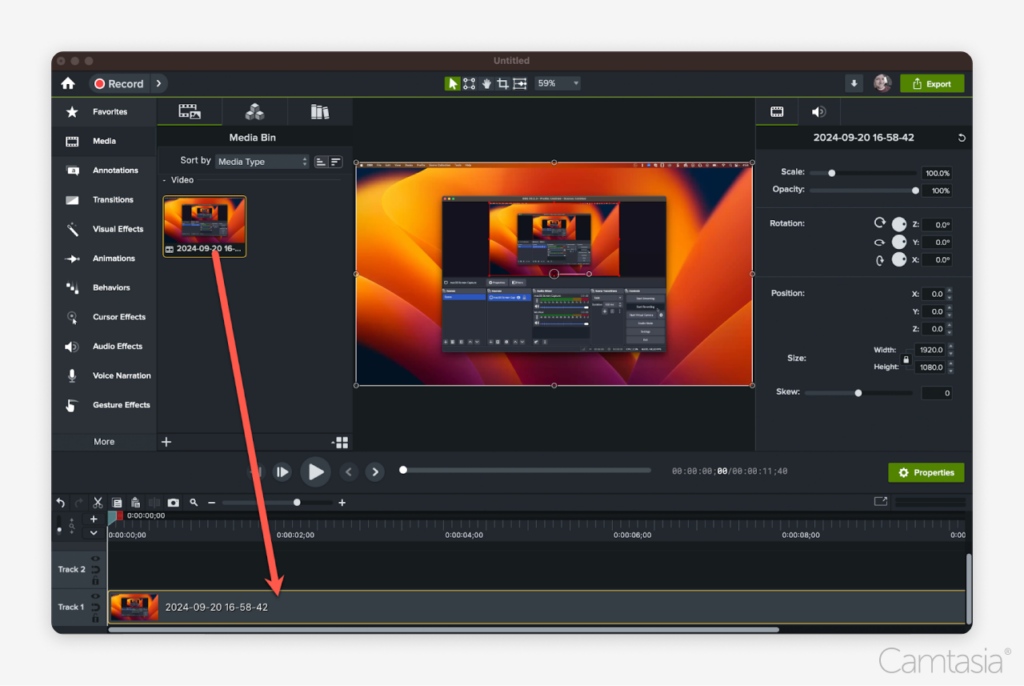
2. Import the Recording: Open your chosen video editor and import the screen recording file you just created.

3. Edit: By editing your video, you can trim unnecessary footage, add effects, annotations, and captions, or adjust audio levels. Editing allows you to enhance your video’s quality, making it more engaging and polished for viewers.

4. Add Transitions Between Screen Recordings: If your project includes multiple screen recordings, consider adding transitions between them for smoother flow. Transitions help maintain viewer engagement and make your video appear more professional by visually connecting different segments of your content seamlessly.

5. Add Voice Narration (Optional): Many video editors allow you to record and add voice narration as part of the editing process. This can be useful for explaining what’s happening on screen, guiding viewers through steps, or adding commentary to your recording.

6. Export and Share: Once you’ve finished editing, the final step is to export your video. Most editing programs allow you to export in MP4 format, which is widely supported. From there, you can easily share the file with others or upload it to platforms like YouTube, TikTok, or Instagram.

Image showing where to drag screen recording to video editor in OBS Studio.

Conclusion

Screen recording with OBS Studio can feel intimidating, especially for those who are new to screen recording. Its interface and setup process may seem a bit overwhelming at first, and the fact that it flattens your recording—locking the screen, webcam, and other elements into a single file—might be limiting for some users. However, OBS is still a solid, free option for screen recording, offering flexibility and high-quality capture once you get the hang of it. It provides a great foundation for screen recording, and when paired with an editor like Camtasia, which offers robust tools for editing screen content, you have a powerful combo for telling compelling stories through your recordings.

Crystal-clear screen recording

Why settle for blurry screen content? Camtasia’s screen recorder captures everything at up to 4K!

Free Download
A image showing the user interface for the recorder in camtasia

TechSmith

TechSmith is the market leader in screen capture software and productivity solutions for daily in-person, remote, or hybrid workplace communication and customer-facing image and video content. Our award-winning flagship products, Snagit, Camtasia, and Audiate, empower anyone to create remarkable videos and images that share knowledge for better training, tutorials, and everyday communication.

What is Knowledge Centered Support (KCS) And How to Use It.

knowledge centered support icon containing books, gears, and a magnifying glass
Knowledge-Centered Support (KCS), also known as Knowledge-Centered Service, is a customer service methodology designed to manage and share knowledge more effectively.

It focuses on capturing, organizing, and reusing knowledge to solve customer problems quickly and efficiently.

In today’s fast-paced digital world, customers demand quick, accurate solutions to their problems. Organizations find it increasingly important to streamline their customer service operations to keep up with rising expectations. This is where Knowledge-Centered Support (KCS) comes into play. KCS transforms the traditional approach to customer service by allowing support teams to leverage a centralized, continuously updated knowledge base.

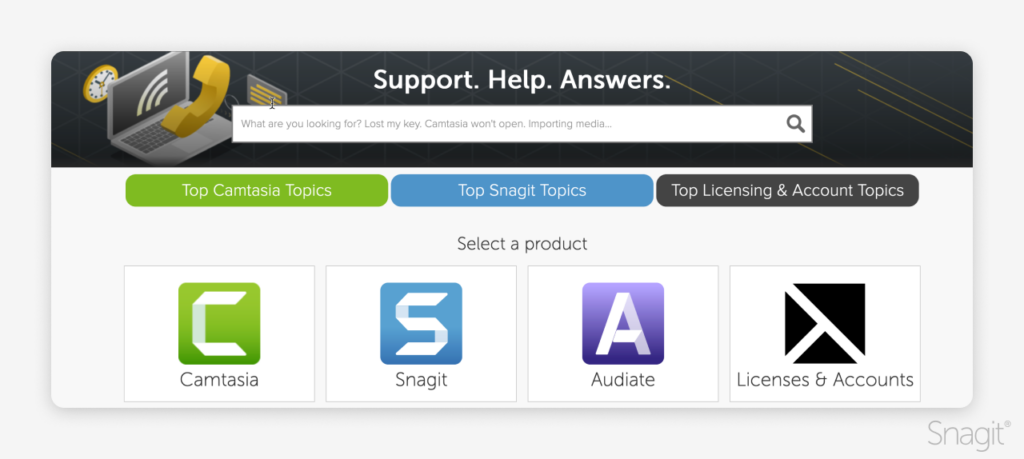
Image of Support, Help, Answers page with TechSmith's products

By adopting the KCS process, businesses can significantly reduce response times and improve the accuracy of their solutions. 

Support teams can turn every customer interaction into an opportunity to refine and expand their knowledge base, ultimately delivering better, faster results. With KCS, support teams become more efficient, customers get answers quickly, and overall satisfaction improves.

In this blog, we’ll explore KCS, how it works, and how implementing it can transform your customer service experience.

What is Knowledge Centered Support (KCS)?

It was developed by the Consortium for Service Innovation to help support teams streamline their knowledge management processes.

By continuously improving the knowledge base with every interaction, support teams ensure that they provide consistent, high-quality answers to common customer inquiries.

This approach helps organizations respond to customer issues more rapidly and create a self-service model where customers can find solutions on their own without needing to contact support. The result is improved customer satisfaction, faster problem-solving, and a more scalable support system.

The KCS process explained

The KCS process is a set of steps that helps support teams build and use knowledge while they work.

Each step helps improve the knowledge base with every customer interaction, making support faster and more efficient.

Step 1: Capture knowledge as you work

When building a knowledge base from the ground up, there is no better place to start than by creating knowledge-base articles about the very interactions you’re helping customers in real time.  

This ensures that the content created is relevant to those seeking help. The best place to start is to take each common support interaction in a single day and create a knowledge-based article to answer that question. This will help build up your knowledge base quickly.

Step 2: Organize knowledge for easy use

While it’s good to have a lot of knowledge-based articles, it’s even better to organize them so that customers can easily and intuitively navigate to them.  

Spending time sorting similar articles into categories and sections can go a long way toward helping customers find what they need without opening a service request.

Step 3: Reuse knowledge to stay consistent

As a customer, getting different answers from different support agents on the same question can be very disheartening.  By having your support team work from a collective knowledge source, with the ability to send links to articles, it ensures your team is providing consistent, accurate answers to customer questions. 

Not only can support agents reuse answers while helping customers, customers themselves can find answers to their own questions without the need to reach out to support.

Step 4: Keep improving knowledge

It’s important to keep the information updated as the knowledge base grows. Regularly reviewing and improving the articles ensures that they stay accurate and useful. Support teams should update the knowledge base as products or services change to keep everything current and helpful.

The benefits of knowledge centered support for customer service 

KCS offers many benefits to both customers and support teams. Businesses can improve their customer service and satisfaction by using a knowledge-centered approach.

Enhance customer experiences with KCS

KCS helps provide better customer experiences by giving fast, accurate answers. When a knowledge base is updated regularly, customers can find solutions quickly without contacting support.

This not only saves time for the customer but also gives them more control. Self-service options, like finding articles in the knowledge base, empower customers to solve their own problems and reduce the need for service requests.

Improve customer satisfaction

KCS also boosts customer satisfaction by making sure that answers are consistent and reliable. When customers receive fast, accurate information, they are more likely to have a positive experience.

Support teams can use KCS to find patterns in recurring issues and fix them in the knowledge base, making future interactions smoother and more efficient.

How support teams benefit from KCS

KCS doesn’t just help customers—it also makes life easier for support teams. Support teams can solve problems faster and work more efficiently by using a shared knowledge base.

Faster problem solving with KCS

With KCS, support teams can access a centralized knowledge base that grows with every customer interaction.

This means agents can quickly find the answers they need without having to start from scratch. Instead of spending time searching for solutions, they can focus on resolving issues. As the knowledge base expands, problem-solving becomes faster and easier, benefiting both the team and the customer.

Continuous improvement through knowledge sharing

One of the key principles of KCS is continuous improvement. Support agents constantly refine and expand the knowledge base based on real-time customer interactions. This ensures that the knowledge base stays current and useful for everyone. By updating content, teams ensure that they always have the most accurate information, making their jobs easier and more effective.

How to implement knowledge centered support in your organization

Implementing KCS in your organization requires a few key steps to ensure its success. Here’s how to get started:

Step 1: Teach support staff KCS principles

By adopting the KCS core principles you can start your organization on a path of collaboration and continuous learning.  It is important to educate your support teams on the benefits of KCS to ensure buy-in from the support teams themselves as well as leadership.

Step 2: Build a knowledge base from customer support interactions

Create a robust knowledge base by having agents create content and publish knowledge base articles based on their customer support interactions.

Tools like Snagit can help easily capture screenshots or video tutorials that can be included in knowledge base articles to improve clarity and understanding.  Utilizing the Snagit step tool to help guide users along a specific set of steps in a knowledge base article can be very valuable when paired with written steps.

Step by step guide made in Snagit.

Step 3: Review and update the knowledge base regularly

Be sure to encourage support teams to regularly review and update their knowledge base to ensure it remains accurate and relevant.  

Having a review cadence for each article can help make sure all articles get continuous improvements.  Not all articles need to be reviewed at the same cadence.  It is okay to have different cadences for different articles depending on the content and how often its relevance and accuracy may change.  

Another way to keep the knowledge base fresh is to use a program like Camtasia to create updated video tutorials or demonstrations that show how to resolve customer-facing issues.

Using Snagit and Camtasia to enhance knowledge centered support 

KCS can be even more effective when paired with the right tools. Snagit and Camtasia help support teams create clear, visual content that makes knowledge-based articles more engaging and easier to understand.

Capturing clear visuals with Snagit

A picture can often explain a process better than text alone. Snagit makes it easy for support teams to capture screenshots and record short videos to document solutions. 

Image containing directions on how to crop something

These visuals can be added to knowledge-base articles to help customers and agents follow step-by-step instructions. The step tool feature is helpful, as it visually guides users through a process, making complex solutions easier to understand.


Creating tutorials with Camtasia

For more detailed explanations, Camtasia is an excellent tool for creating video tutorials

Image added into Camtasia.

Support teams can record in-depth walkthroughs to show how to resolve more complicated customer issues. These videos can then be embedded directly into knowledge-base articles, providing customers with helpful visual aids that complement the written instructions.

With Camtasia, even the most complex solutions become accessible and easy to follow.

Success stories of KCS adopters

TechSmith has been adopting many of the steps in the KCS methodology to build out a very comprehensive knowledge base. 

We have multiple support team members creating knowledge base articles based on recent ticket trends.  These articles are then reused by the entire support team to quickly solve issues which results in higher customer satisfaction.

We have also established a process where support team members review current knowledge base articles each time we release a new version of our software to ensure they remain up-to-date and accurate. 

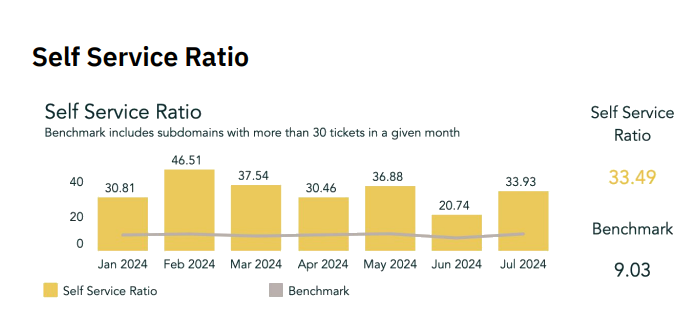
We can measure the success of our knowledge base by using a self-service ratio. The self-service ratio is the total number of knowledge base views on our support site divided by the total number of new tickets created in that same time frame.  

Self Service Ratio chart

TechSmith’s self-service score is roughly 3.6 times higher than the industry average.

Challenges in implementing KCS and how to overcome them

One key challenge organizations face as they implement Knowledge-Centered Support is ensuring their support teams actively contribute to and use the knowledge base. 

A great way to overcome this challenge is to provide training on the KCS principles and have your support teams use tools such as Snagit and Camtasia to make creating content easier as they document and share knowledge. 

Another challenge is maintaining the accuracy and relevance of the knowledge base as it grows.

It’s important to establish regular reviews and updates of knowledge base articles. Using a tool such as Camtasia to update video tutorials will also ensure the articles reflect current processes. 

If you are using Zendesk Guide as your knowledge center they also have an article verification feature that lets you set reminders to verify your articles are still up-to-date.  It has the flexibility to create different verification cadences which can be applied to different articles.  

This is great because different articles need to be updated or verified at different frequencies based on the content in the article.

Conclusion

Adopting Knowledge Centered Support (KCS) can help your support teams solve problems faster, improve customer satisfaction, and build a continuously evolving knowledge base.

By capturing and reusing knowledge, KCS allows support teams to provide consistent, accurate answers to customer inquiries while empowering customers to solve their problems through self-service. Incorporating tools like Snagit and Camtasia into your KCS process makes creating and updating helpful content even easier.

These tools allow support teams to document solutions clearly and visually, making the knowledge base more effective for both customers and agents.

TechSmith

TechSmith is the market leader in screen capture software and productivity solutions for daily in-person, remote, or hybrid workplace communication and customer-facing image and video content. Our award-winning flagship products, Snagit, Camtasia, and Audiate, empower anyone to create remarkable videos and images that share knowledge for better training, tutorials, and everyday communication.

How to Transcribe a Video to Text

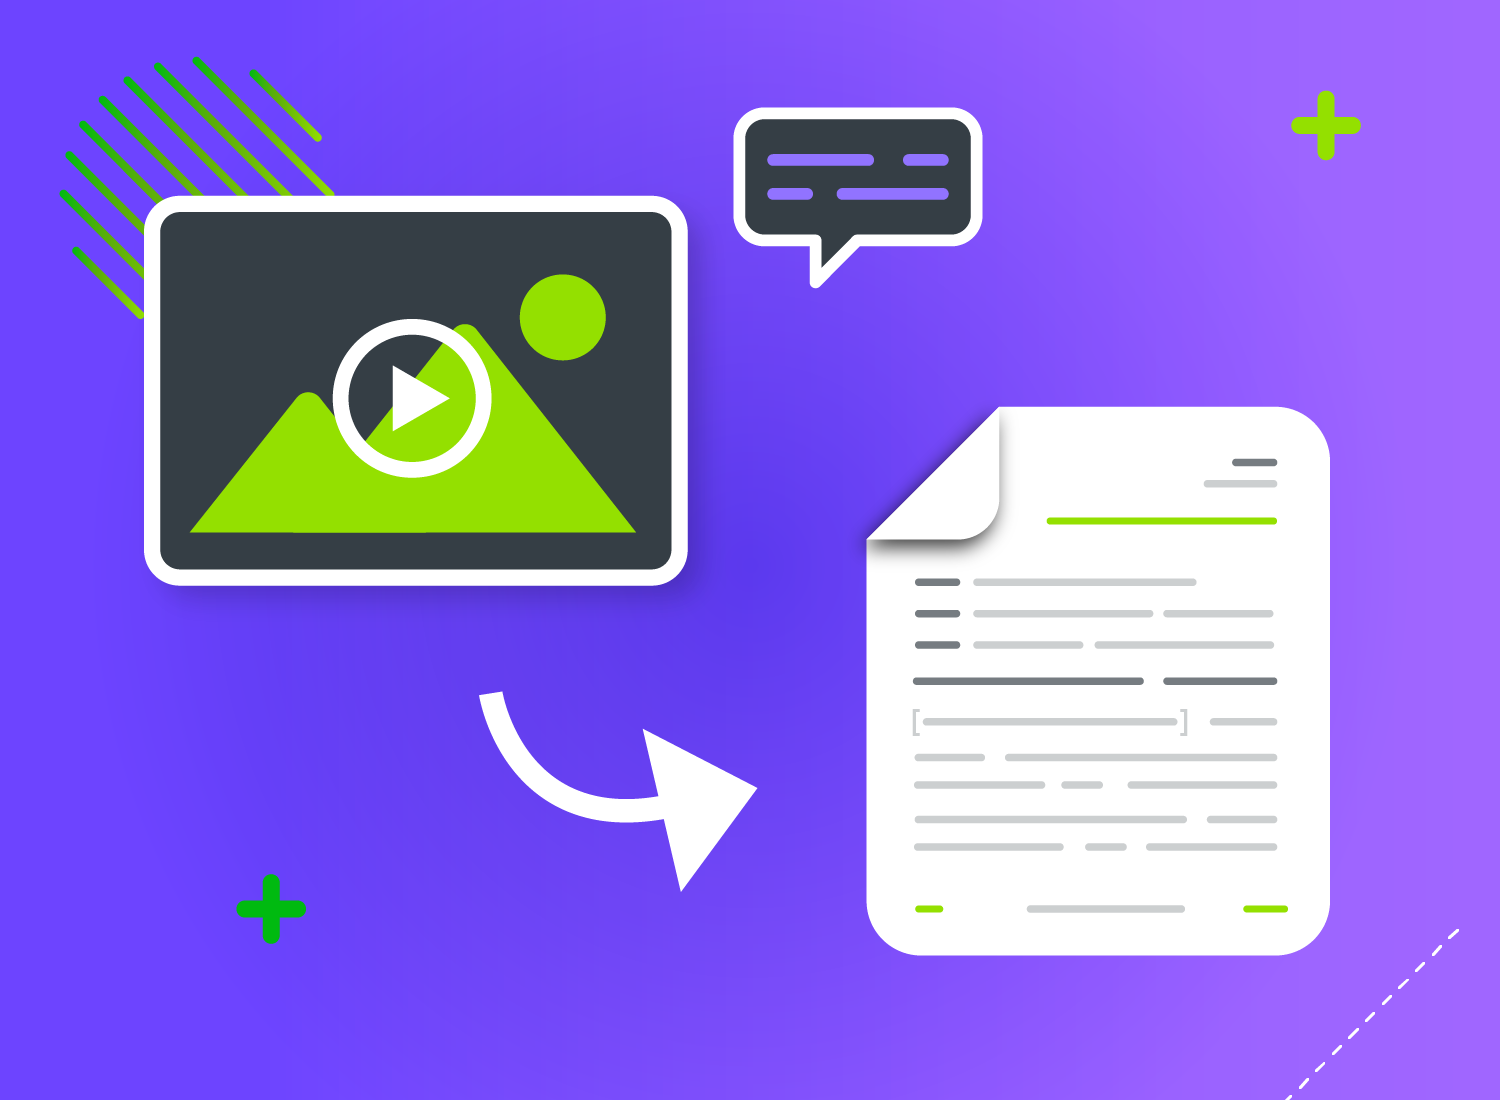
Illustration of a video to text transcription concept with a video player icon on the left, featuring a play button and an image of a mountain landscape. A curved arrow points from the video player to a stylized document on the right, representing the transcription process. The document is filled with lines of text, suggesting converted content from the video.

Transcribing videos can be a long and tedious process that wastes time you can spend creating. Nobody wants to spend their time manually pausing, rewinding, and typing out every single word.

Thankfully you don’t have to do that anymore. In this post, we’ll explain how to transcribe a video to text automatically so you can speed up your entire workflow.

Edit audio like text

You don’t have to be a professional to record and edit audio. Audiate makes it as easy as editing a text document.

Get Audiate
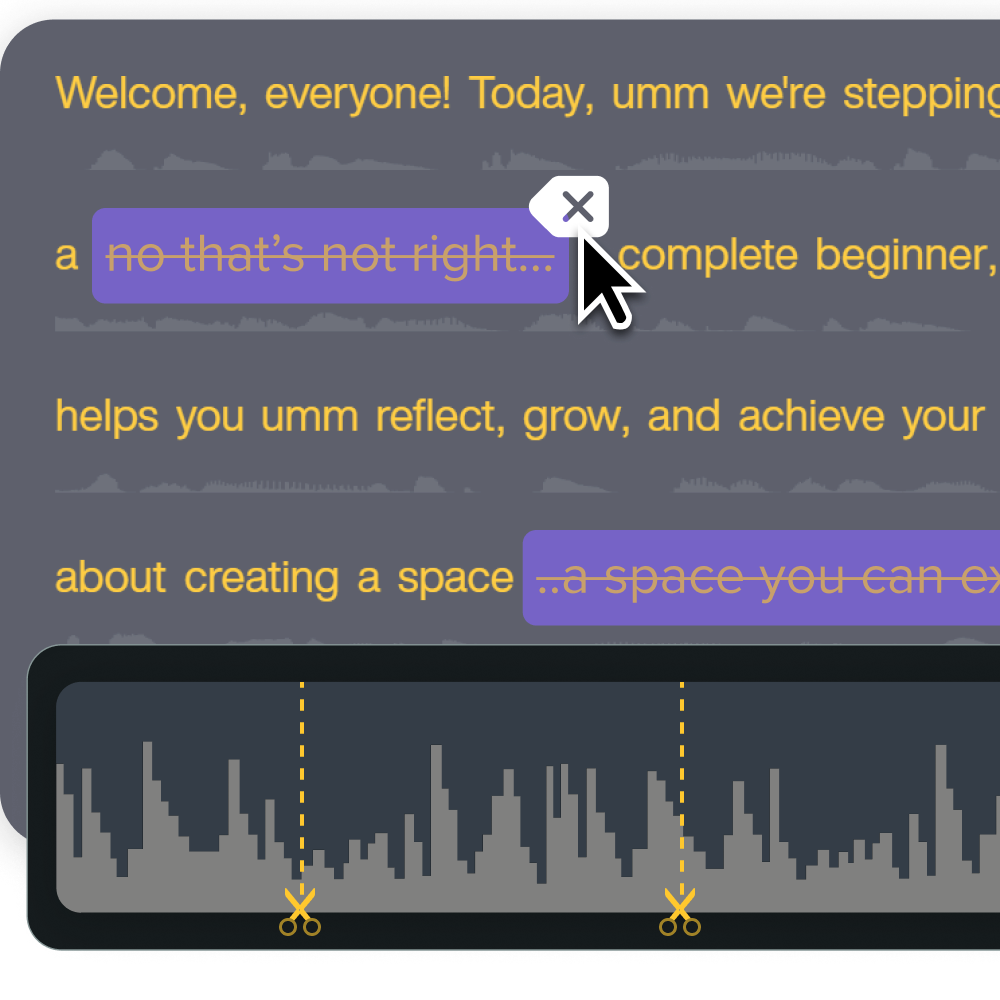
An image showing text being deleted in a doc and a corresponding timeline being cut

How to transcribe video to text

Audiate makes converting video to text and revising them as easy as editing a text document. This guide will walk you through the process of getting started, making edits, and applying effects in Audiate.

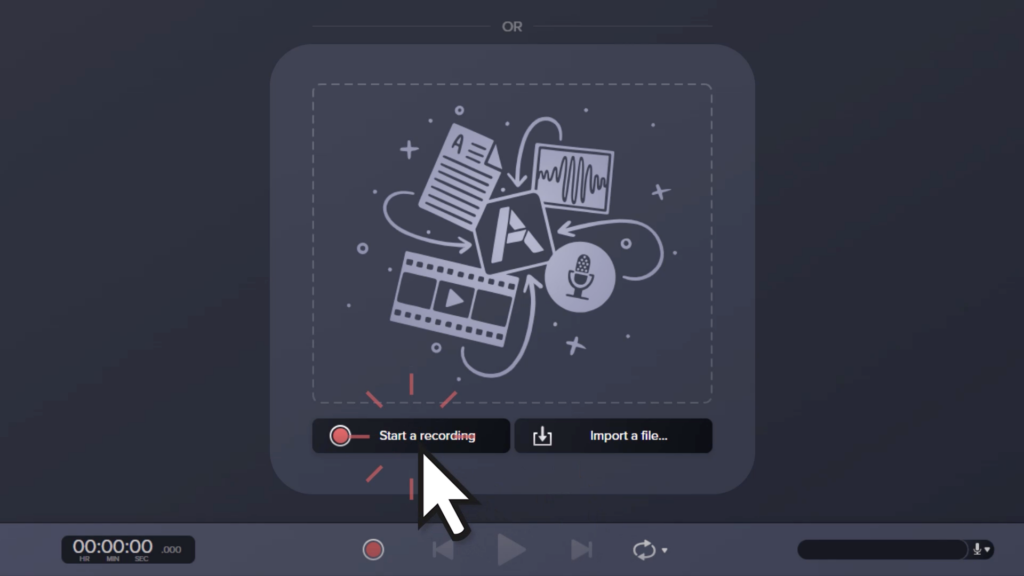
1. Import or Record Audio

To get started, you can either:

  • Import an existing audio file, or
  • Record a new narration track using your microphone.
Starting a new recording in Audiate for video transcription to text.

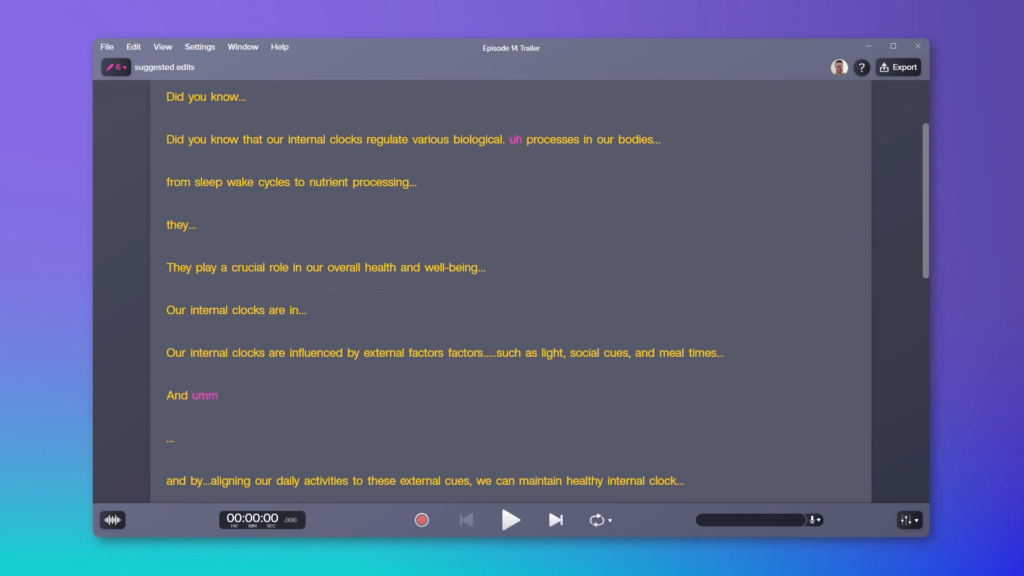
2. Edit your transcript

Once the text transcription process is complete, you can easily scan your text to identify slip-ups, repeated lines, or other unnecessary words and phrases.

Editing a video transcript in Audiate's transcript editor.

Use your cursor to highlight anything you’d like to edit out, just like working with any other text document. Press delete to remove the corresponding audio from both your recording and your transcription.

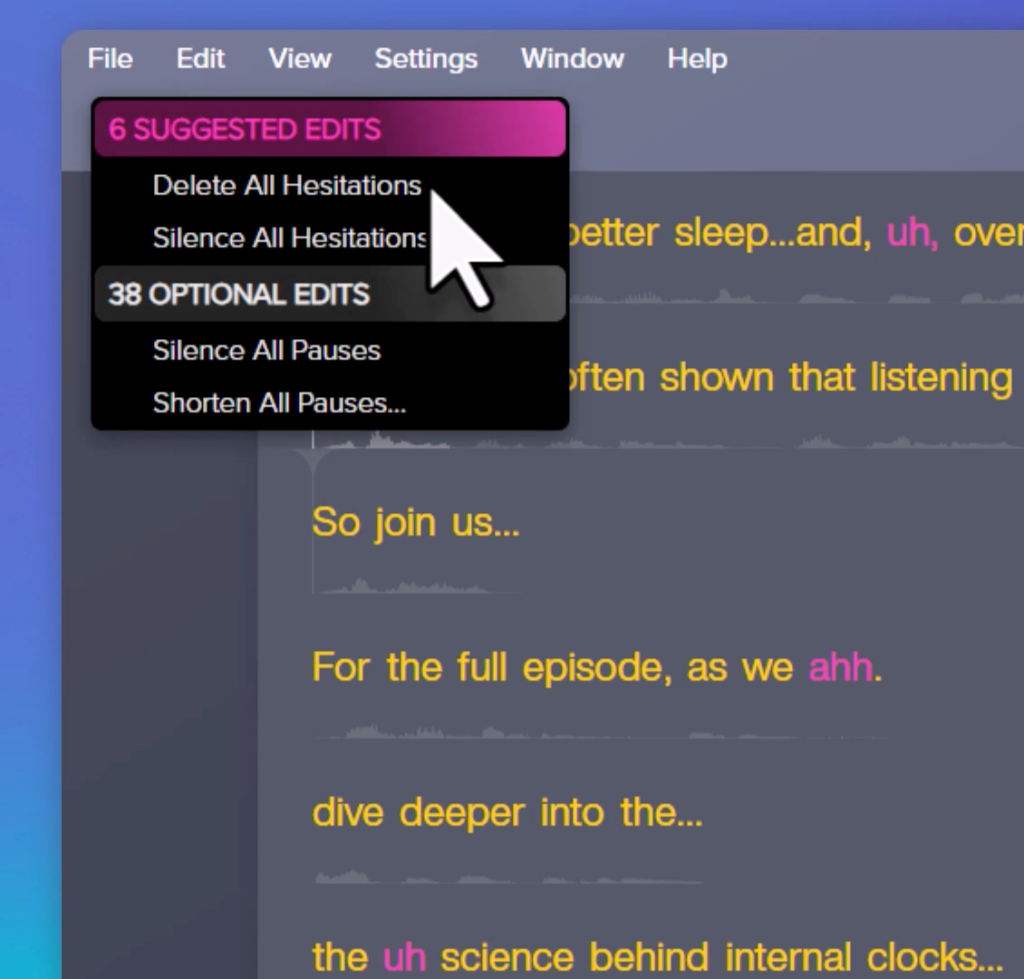
If your recording contains many “ums” or “ahs,” Audiate’s Suggested Edits feature can save you time by automatically detecting and removing these hesitations.

In the top left corner of the interface, click the drop-down arrow, then choose Delete All Hesitations from the list. Each hesitation is instantly removed, creating a perfectly edited audio track with no further action required.

Editing suggested hesitations in Audiate during video transcription.

3. Review your edits

If you prefer a more cautious approach, you can skip the suggested edits and review each hesitation manually.

Use the find option from the edit menu to review all hesitations or pauses in your audio. Use the next and previous arrows to move through isolated words or pauses. Click once to silence the selection and click again to delete it if necessary.

Audiate is a non-destructive editor, meaning you can restore your audio to its original recording at any time. As you play back your audio and video, you’ll see marker lines where each edit was made. If you cut something you didn’t mean to, click the top of the marker and choose Restore Audio to revert the edit back to your original recording.

4. Add professional audio effects

When you’re done with basic edits, you can add professional effects to create studio-quality sound.


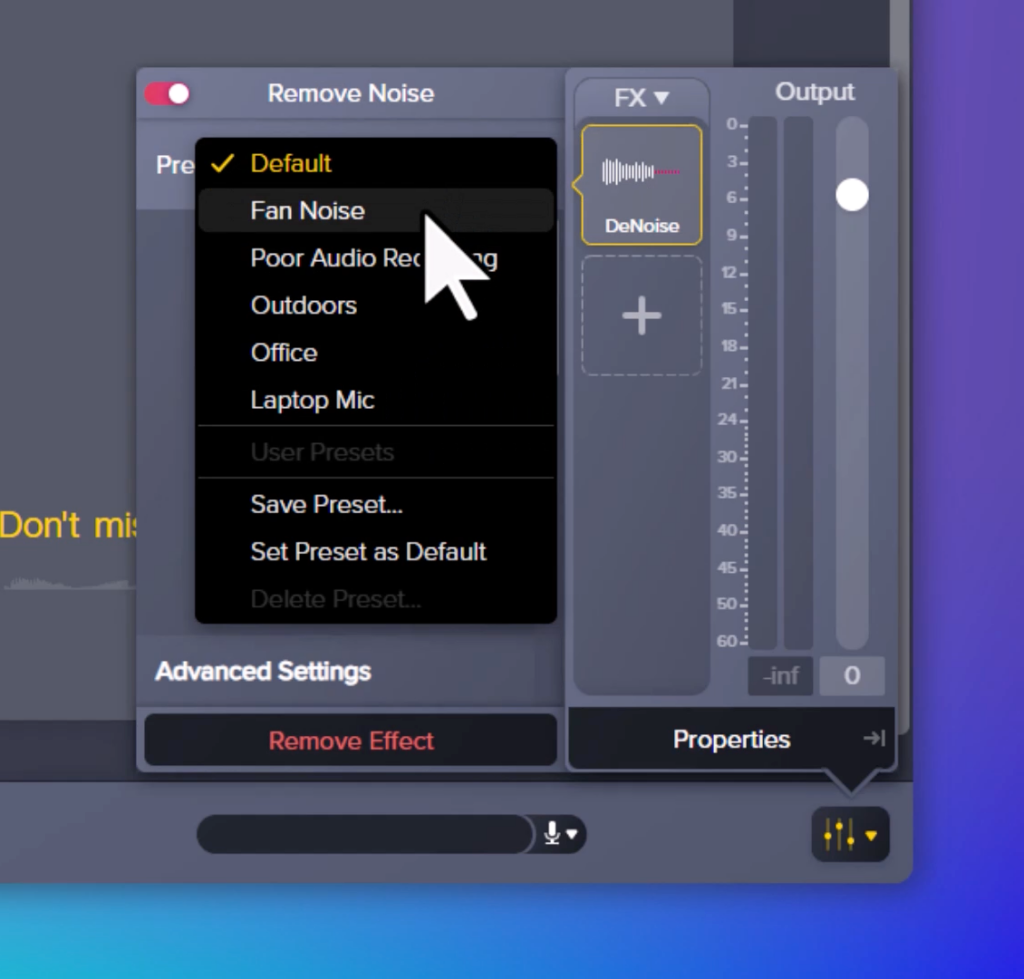
Remove Background Noise: Click on the Properties button in the bottom right corner, then add effects by clicking the plus icon under Effects. Select Remove Noise to clean up your recording.

Removing background noise in Audiate while transcribing video to text.

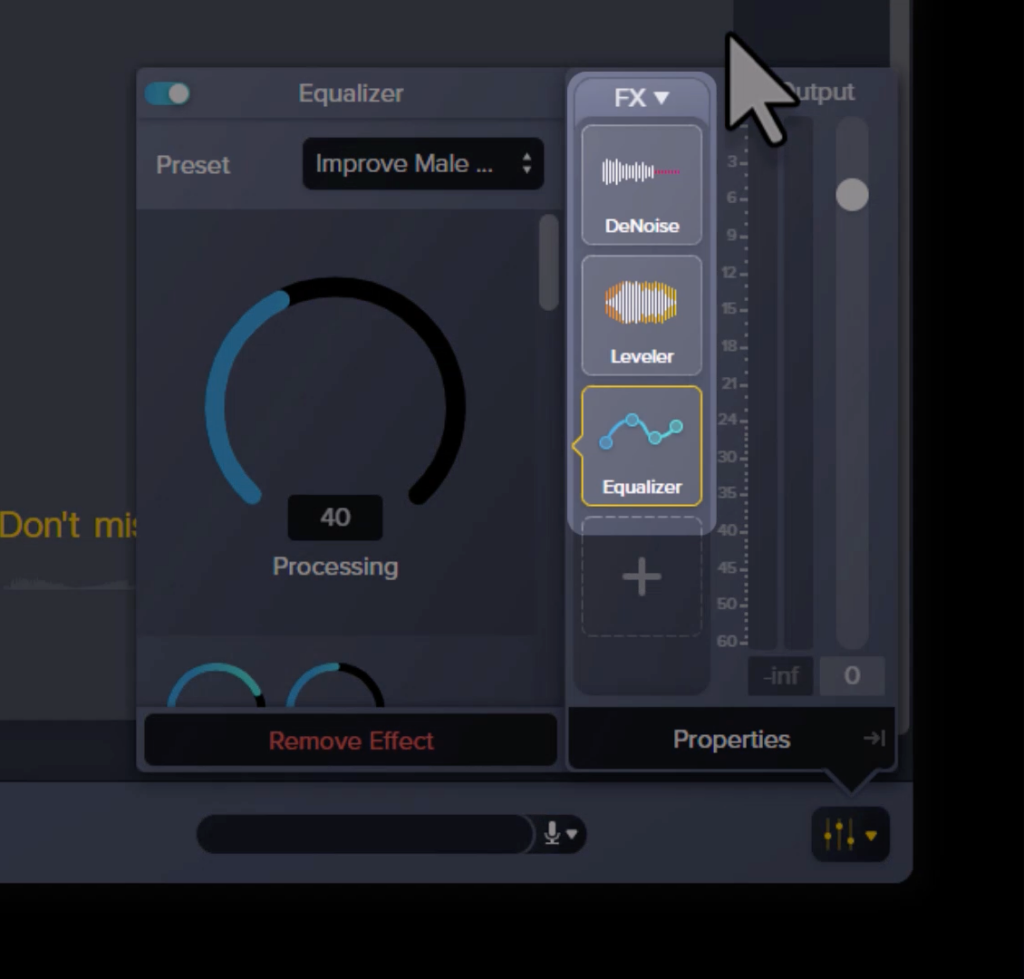
Adjust Effects: Many effects come with presets to match your goals. Make adjustments to the effect settings until you’re satisfied with the result.

Audio equalizer settings in Audiate used to improve voice quality during video transcription

5. Export your script or captions

You can add subtitles and captions to any video. These are perfect for YouTube, an LMS, or any social media platform.

  1. To export the entire script, select File menu > Export Script. To export a selection, click and drag to select the desired text from the script and select File menu > Export Selection > Export Selection as Script.
  2. Enter a file name.
  3. Select a location and file type.
  4. Click Save.
 

What is video transcription?

Video transcription is the process of converting recorded speech in a video into text. Transcribing your videos makes your content more accessible and engaging to your audience.

Benefits of transcribing video to text

Video transcription isn’t the most glamorous topic. But there are many good reasons for transcribing videos. Here are just a few of them:

  1. Video SEO optimization: Transcripts are easily indexable by search engines, increasing your opportunities to rank for long-tail keywords.
  2. Flexibility: Many people prefer to scan a summary of the video content before deciding whether to watch it.
  3. Accessibility: One of the best reasons for transcribing videos is to make your content accessible to all your users, including people who can’t hear the audio or see the video.

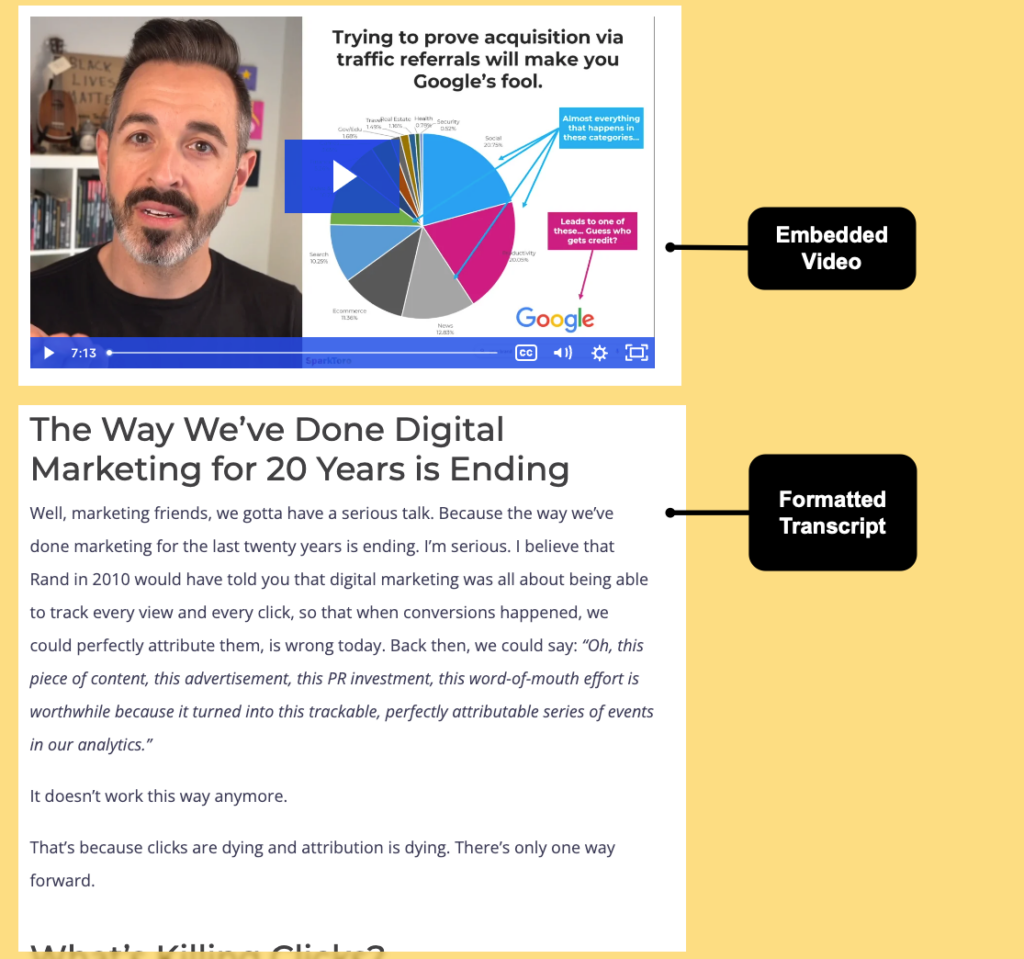
In the example below, SparkToro includes an edited and formatted version of their transcript below the embedded video. This helps it rank in Google and gives its audience multiple ways to consume the content. 

Video transcript blog post example from SparkToro.

Posting a transcript alongside a talking-head video makes it possible for users with disabilities to read the text or listen to it using screen-reading technology. Transcripts can also be converted into captions or subtitles and synced to the video for an even better user experience.

Video transcription methods

There are two primary ways to get a video transcript:

  1. Human transcription
  2. Automated transcription software

1. Human transcription

Human transcription is the traditional method of transcribing videos. You’ll have to manually transcribe your video by listening and writing everything out yourself, or hire a transcription service to do it for you. This may be the most accurate video transcription, but human transcription is often time-consuming and costly. 

2. Automated transcription software

Automated transcription has changed the way this entire process is done. You no longer have to listen to every word and type it out in separate document. Now you can upload a video file and get a full transcript draft in only a few minutes. 

Audiate automatically transcribes your video to text, translates it into different languages, and makes it simple to edit the final text. 

Additional AI assistance

If you want to do even more with your video transcripts, Audiate also offers several AI-powered options for generating scripts from ideas, rewriting or summarizing existing scripts, or translating your script into another language.

Edit audio like text

You don’t have to be a professional to record and edit audio. Audiate makes it as easy as editing a text document.

Get Audiate
An image showing text being deleted in a doc and a corresponding timeline being cut

Frequently asked questions

How to Transcribe a Video to Text for Free?

You can transcribe a video to text for free by using tools like Google Docs or even Notes on iPhone or iPad. Simply play the video while the software captures the audio as text. This is a simple and cost-effective way to transcribe video content without any additional software even if it’s not the most powerful or efficient.

How to Convert a Video into Text?

Converting a video into text is easy with transcription software like TechSmith Audiate. Just upload your video, and the software will automatically generate a transcript, allowing you to make any necessary edits for accuracy.

Is There an App that Can Transcribe Video to Text?

Yes, apps like TechSmith Audiate can transcribe video to text automatically. These apps allow you to upload your video and quickly generate a transcript that you can edit and use for your projects.

How Do I Get the Transcript of a Video?

Some programs allow you to directly download the transcript from the video if one has already been provided. But if that is not an option, use an Ai-powered transcription software like TechSmith Audiate. Simply upload the video, and the software will automatically create a text transcript. You can then review, edit, and export the transcript for your needs.

TechSmith

TechSmith is the market leader in screen capture software and productivity solutions for daily in-person, remote, or hybrid workplace communication and customer-facing image and video content. Our award-winning flagship products, Snagit, Camtasia, and Audiate, empower anyone to create remarkable videos and images that share knowledge for better training, tutorials, and everyday communication.

How to Work with Subject Matter Experts (SMEs)

This image is a stylized illustration featuring two characters engaged in a professional interview. The background is a gradient of light to medium green, with abstract geometric shapes and plus signs, which may symbolize a positive and dynamic exchange of ideas. Both characters are smiling and appear to be communicating effectively, embodying the concept of teamwork between subject matter experts and colleagues.

Many trainers, marketers, or instructional designers find it frustrating to work with subject matter experts (SMEs). But that doesn’t have to be the case.

In this post, we’ll walk you through how to level up your relationships with the subject matter experts inside your organization so you can work more effectively. 

What is a subject matter expert (SME)?

A subject matter expert (SME) is a person who is an expert in a content topic, industry, or field.

It can be someone on your team, another colleague outside your department, or even someone outside your company entirely. 

These are the people you look to in order to create highly relevant content when you’re not the expert. They help provide valuable context and technical knowledge that make your training videos and other content more beneficial to your viewers.

Why are subject matter experts important?

When it comes to creating training or tutorial content, your SME can make all the difference. Imagine creating a video on how to work within a software program when you only know a few of the features. Sure, you could highlight some good information, but your video wouldn’t be complete. That’s not good content.

Your SME fills in your knowledge gaps and ensures that everything you show and share is accurate and complete. They can provide valuable context and technical knowledge that make your videos more beneficial to your viewers.

Think of them as your own private knowledge bank.

That said, not everyone thinks like a content creator. So, while SMEs might have all the knowledge needed to create great content, they’re not necessarily the appropriate choice for actually creating the content. 

How to work with subject matter experts

When it comes to developing a great curriculum for the employees in your organization or your customers, finding the right SME and building up that relationship can mean the difference between a smooth, efficient process and a never-ending loop of complexity.

As workplace educators, our job is to help people succeed in the workplace or with our products. 

But our SME has a different role. 

Their role is to have complete knowledge of the topic. And their knowledge helps the organization perform at level best.

Now enters the big question:

How do you work effectively with subject matter experts?

First, try to imagine how the SMEs think about the world around them and their role within the organization. 

Take a moment to stop and remember their perspective will be inherently different from your own. Your goals are different, your perspective of the business needs will be different and your approach to solving those problems will be different.

Keeping these in mind throughout the process will you build a better relationship and create better content in the end.

Here are six tips to help you build your relationship and work effectively with your SME.

Make amazing videos with Camtasia!

Need to make a video? Download a free trial of Camtasia and learn to quickly and easily make your own videos.

Download for free!
Camtasia user interface

1. Use active listening

Developing your active listening skills will help you in all areas in your life and not only working effectively with SMEs. If your SME appears to be difficult in your first meeting, this is likely due to their passion for the topic. They may try to steer the conversation in a completely different direction than you need it to go. 

But if this is your first time working together, try to break the ice and discover common ground. 

  • Share success stories
  • Discuss difficult projects
  • Reflect on what they are telling you and why

Remember, active listening means focusing on the words and showing verbal and nonverbal signs of listening. Pay attention to what is not being said as well as the content of the words. 

And being in tune with their feelings will help you better understand your SME’s perspective.

2. Avoid assumptions

As with any working relationship, avoiding assumptions will get you closer to your goal. And get you there faster. 

Our gut reactions tend to believe SME’s will share our overall perspective. We assume the SME will agree because you both have the best interests of the organization in mind.

However, studies on a cognitive bias called the “false consensus effect” indicate we significantly overestimate the extent to which others agree with our opinions. 

As a result, we are actually closer to conflict when we assume agreement with the SME. This ends up contributing greatly to the “us versus them” mentality.

The key is to ask a few solid follow-up questions: 

  • “I think I heard you say…”
  •  “Help me understand why this is important?” 

These will get you both closer to your goal.

3. Remove communication barriers

For open and honest communication to work, first remove communication barriers.

Figure out your communication preferences and compromise on something that works well for both of you. 

You can’t underestimate the importance of mirroring someone’s communication style. A great beginning is in understanding your SME’s mental state. Is your SME happy, excited, frustrated, or stressed out about working on the project? How you interpret that will adjust your communication style accordingly.

As you communicate with each other, don’t listen only to what the other person is saying. Listen to the emotions underneath the words. SMEs are understandably passionate about their subject. Acknowledge their passion and work together to clarify goals.

4. Have healthy disagreements

Conflicts can be healthy! Don’t let the first serious disagreement lead to the end of the partnership. 

Instead, learn strategies for healthy conflict resolution.

Talk about both the facts and how you feel about them. Be open to understanding why your SME feels strongly about certain content, images, or processes. 

It’s easy to self-sabotage the relationship by trying to put yourself in a position of power, however, be as generous as you can be in interpreting the other person’s actions. Be open to changing your mind if you discover you made a mistake and apologize quickly.

5. Be willing to compromise

Sometimes we have to compromise to get the hard work done. In this case, think about compromise in this way: 

“Individual commitment to a group effort to reach an agreed goal.” 

Compromise doesn’t have to be a win-lose scenario.

When you and your SME collaborate, you both integrate ideas and energies so that the whole is greater than the sum of the parts. Balance getting your needs met with meeting the needs of the SME.

Remember, Your SME has worked hard to achieve the level of knowledge they have. When you respect this you will get you further than focusing on being right.

6. Set proper expectations

There is nothing wrong with setting some ground rules for working together. Setting the expectations with your SME will ensure everyone is on the same page at the same time.

Know your project may not be the SME’s main priority. Here are some quick easy to establish clear guidelines for communication and collaboration.

  • Create a collaboration area to minimize meetings and to respect the SME’s time. 
  • Use tools like Asana, Google Docs, or other project management tools to share information.
  • Give everyone is clear on deadlines and review cycles. 
  • Get the SME’s buy-in and write a schedule with agreed review dates.
  • Record your meetings and share the video out afterward. 
  • Create a shared notes document to avoid misunderstandings.

At the end of the day, you and the SME both want the same thing: to help people in the organization perform at the highest levels. 

Because people are people, this takes some negotiation and ground rules to meet those goals. 

Use these six tips to help guide your project journey and you’ll see higher success rates with your content and SMEs who want to collaborate and work on projects with you.

Make amazing videos with Camtasia!

Need to make a video? Download a free trial of Camtasia and learn to quickly and easily make your own videos.

Download for free!
Camtasia user interface

Common SME pitfalls and how to avoid them

Sometimes, all the planning, preparing, goal-setting, and listening in the world isn’t enough to get things going in the right direction. But, that doesn’t mean your video project is doomed! Here are a few common issues that can arise when working with SMEs and how you might avoid them.

1Your SME is a “talker”

The best SMEs are great communicators. They understand what you need and have relevant answers to your questions. They can elaborate and give pertinent details, and make good, succinct points that are easy to follow.

On the other hand, there are the “talkers.” We all know someone like this. They have a LOT to say, and not all of it (or even much of it) is relevant to the topic or task at hand. They go off on tangents and forget what they were originally trying to say, or seemingly have no regard for their time or yours. It’s not ill-intended! They’re probably even a great person. But they’re definitely not helping you finish your video

Your best defense against a talker is to come prepared with a list of very specific questions. Remember the closed-ended questions we highlighted earlier? They can be a great way to keep someone focused and you in control of the conversation. 

Another way to keep someone on topic is to submit questions to them before a meeting and have them respond via email or on a collaborative document. That way you ensure you get your most relevant questions answered up front. Then, any face-to-face meetings can be more follow-up and clarification oriented. 

Your SME is not a talker

On the other hand, some SMEs have all kinds of knowledge, but seem loathe to actually share it with anyone. 

There may be a variety of reasons for this. Some people are just more introverted than others and may not feel comfortable speaking with someone they’re not super-familiar with. Other people are — let’s face it — just plain old anti-social. 

Whatever the reason, getting information from someone like this doesn’t have to be like pulling teeth.

Thinking about journalists again, most good reporters know that getting more information from someone who seems unwilling to cooperate can be as simple as staying silent. Even non-talkers get more uncomfortable the longer an awkward silence goes on. At some point, they may get so uncomfortable that they just start talking to fill the silence. Then you can use your questions to get at the real knowledge.

Also, like with the talkers, you might have more luck by sending a list of questions and asking for answers before any face-to-face meetings. Even bullet points would help. Make sure your questions are pointed and get to the heart of what you need to know to make sure they can answer them without too much effort. 

As a last resort, if your SME just isn’t giving you the information you need, work with your boss or another colleague to identify someone else in your organization who might be a better fit. Keep this in mind the next time you have need of an SME so that you don’t have the same problem again.

Too much knowledge

Sometimes a SME has so much expertise it can be hard to find the most relevant information for the task at hand. They have so much to share that it can strain the scope of your current video and threatens to balloon the viewing time beyond what’s reasonable. 

In cases like this, setting goals and expectations and having a shared understanding of the project scope at the outset helps keep things focused and on target. 

Make sure your SME understands the purpose of this particular piece of video content and why it’s important. Be upfront with what you need and why you need it. An outline of your video can be helpful in maintaining focus, as well.

On the other hand, don’t be afraid to listen to your SME when they have a valid reason for providing more information than was requested. Maybe your original video scope won’t accurately or completely answer the problem at hand. Perhaps there is different or additional content that will make more sense to present. 

Listen to their perspective and be prepared to change if there’s good reason to. Keep in mind that changing project scope may need permission from a supervisor or the person who requested the project. 

Your SME wants to create the content

While this is more common with written content, for video creators, there will be times when your SME just wants to take the reins and create some of the content themselves. While they likely won’t want to actually make your video, they may want to write the script, work on the storyboard, or take over on another aspect of the pre-video planning.

Handle this on a case-by-case basis. If you have a good working relationship with your SME and you’re confident in their content abilities, this can actually work out well. As the SMEs, they can go a long way in creating — at the very least — a good place to start.

On the other hand, if you’re new to working with this SME, or you’re not confident that this kind of “help” will actually be helpful, it’s better to push back. There are a number of ways to do that without hurting feelings. 

For example, thank them for the suggestion, but let them know that you’re relishing the opportunity to really learn from them, so it will be more helpful for you to get the information and boil it down to the most salient points. 

Or, remind them of the expectations and roles you set at the beginning of the project. 

Finally, you can compromise and ask them to put together an outline to help shape the content.

No matter what, make sure they understand you appreciate all their effort and you’re happy to be working with them.

10 tips to create great content with your subject matter expert

1. Simply the language

Your SME probably knows all kinds of technical terms, acronyms, and jargon that — unless they’re experts themselves — may be unfamiliar to your users or customers. Be sure to create your content to a level makes it easier to understand.

2. Start from the beginning

Remember, before someone starts using that nifty new software feature, they have to log in. Did you include all of the steps, even if they seem obvious to you or your SME?

3. Don’t be afraid to ask for help

Clarify what you don’t understand. Your SME will be more than willing to help you out if you explain what you need and how they can help.

4. Take it slow

While you don’t want to waste your SME’s time, be sure to take the time you need to truly understand what you have to explain in your video to avoid unnecessary follow-ups.

5. Explore the “what-ifs”

What happens if the customer clicks this button? What would happen if this system failed? What would a customer do if this happened?

6. Explore the “whys”

Why does this happen? Why would a customer need to do this? Why is this a best practice?

7. Ask follow-up questions

Why is that? Can you tell me more about how this happens?

8. Ask the SME if they have anything to add

You never know what insights they may provide!

9. Let them give you their background story

While it may not be pertinent to the discussion at hand, it helps build rapport by showing you care about more than just what they can give you. And, you never know, you may end up learning something more useful than you thought!

10. Come prepared, but don’t be afraid to deviate from your plan

Create a list of questions you need to be answered, but follow relevant answers down paths you may not have foreseen. You can gain valuable insights both for you and — ultimately — your video viewers.

Matt Pierce

Matt Pierce is a Learning & Video Ambassador at TechSmith. In this role speaks and teaches about video creation and visual communication. A graduate of Indiana University he has ten years of experience working in learning and development with a focus on visual instruction. He has directly managed the training, user assistance, video, and other teams for TechSmith. Teach him something @piercemr

Internal Communication: Everything You Need to Know in 2024

Good internal communication (internal comms) is key to the success of any workplace. And while the number and types of internal communication platforms and tools are expanding, email and meetings remain the two go-to methods for many organizations

But both of those methods aren’t as effective to communicate in remote and hybrid environments. 

Whether it’s for training, team updates, internal announcements or information sharing, video is changing the way organizations communicate. In this post, we’ll explore internal communication and how to level up your employee communication using video. 

Wall of text? Next!

Snagit makes it easy to communicate more effectively with visuals.

Learn More
Screenshot of a document about puffin migration patterns with a section for changing styles highlighted.

What is internal communication?

Internal communication is the process of communication between employees inside the organization. Effective internal communication is key to aligning around goals, sharing knowledge, providing feedback, and building trust inside the organization. A strong internal communication strategy is key to improving employee communication and the overall employee experience.  

Types of internal communication

The internal communication function plays a crucial role in making sure that key messages reach all employees. There are three primary types of internal communication used within an organization. 

1. Top-down communication

This type of communication is where information flows from management and leadershp down to all other employees. Top-down communication involves sharing company information, new policies, key decisions, and strategies. 

Examples:

  • All staff announcements
  • Executive directives
  • HR changes or updates

2. Bottoms-up communication

This type of communication is where information flows from employees up to management or leadership. Bottoms-up communication involves capturing feedback, ideas, concerns, and suggestions from the entire staff to create a more inclusive company culture. This type of communication helps employees feel like they are heard. 

Examples:

  • 1:1 meetings
  • Suggestion boxes
  • Employee surveys

3. Peer-to-peer communication

This type of communication is where employees, teams, and departments share information and ideas horizontally across the organization. Peer-to-peer communication is critical for effective communication among people within any organization to collaborate, coordinate plans, and ensure transparency. 

Examples:

  • Team meetings
  • Cross-departmental communication
  • Cross team projects

Examples of internal communication

Internal communications changed dramatically over the last few years. As more teams are becoming remote and hybrid, they must communicate effectively without being in person. Traditionally most inter-office communication was done through meetings or text communication like email or instant messaging. But now it has evolved to a 24/7 world where communication can happen anywhere, from any location, at any time.

This can be done synchronously, exchanging of information between two or more people in real-time). Or asynchronously, where there is a delay between when a message is sent and when the person on the other end receives and interprets it.

Here are a few of the top types of internal communication:

  • Video conferencing (Zoom, Skype, Google Meet)
  • Asynchronous video messaging (via screencasts & webcam recordings)
  • Instant messaging (Slack, Microsoft Teams)
  • Email (Outlook, Gmail)
  • Project management apps (Asana, ClickUp, Notion)
  • File-sharing platforms (Dropbox, Google Drive, OneDrive)
  • Meetings (in-person or remote between a team or individual)

Why use video for internal communication?

Email is a great communication tool. But the average employee receives 121 emails a day, according to Campaign Monitor. And if you’re being honest, most of these emails that hit your inbox email get skimmed over or, worse yet, ignored.

With any text communication, there is a big risk that even if the recipient reads your message, they might misinterpret what you’re trying to say.

Meetings are also an option for transferring important knowledge and information to colleagues. They provide an opportunity for organic discussion and allow you to convey your message more clearly. Of course, it can be difficult to align schedules and get all the necessary people in the same room at one time. 

And that’s not all. Face-to-face meetings can eat up the workday and might not be necessary when we just need to give a quick update that doesn’t require much or any additional discussion. 

There’s a new challenge added to work and office communication. 

In the last few years, many of us had to switch to and learn how to work from home. This change forced workers and companies to consider other options for effective communication. While meetings and email remain effective forms of communication, video emerged as a great and particularly efficient option.

What is video communication?

Video communication is the practice of using video to communicate. This can be done synchronously with Zoom calls, webinars, workshops, or team meetings. Or you can use asynchronous video with quick screen recordings, feedback videos, demos, and tutorials. 

Both are great options depending on your goals, processes, and urgency. 

Types of video communication

As we mentioned earlier there are two main types of internal communication, synchronous and asynchronous, and the same applies to video. Here’s a quick list of the different types of video communication methods:

Synchronous video communication

  • Video conferencing: These real-time meetings are commonplace in most organizations and happen on tools like Zoom, Microsoft Teams, or Google Meet. 
  • Webinars: Typically involve larger groups of people and combine a live presentation and Q&A. 
  • Live streaming: Like other forms of video conferencing this is a live broadcast that can be used for announcements, product launches, or virtual conferences. 
  • Live customer support: Like phone support, these live calls give customers a way to get immediate feedback and assistance but in a face-to-face way.

Asynchronous video communication 

  • Training videos: These pre-recorded videos can be watched at any time by employees or customers. 
  • Internal updates and announcements: Use these to easily share policy updates, product roadmaps, or company news that can be shared and rewatched later. 
  • Video message: Send a quick personalized video to an individual or team to replace a long email or meeting.
  • Video tutorial: Show an employee or customer how to complete a task. These videos can be accessible at any time for them to review. 

Which tools work best for creating internal videos?

Videos cannot only replace emails, but they can also help keep your calendar clear by replacing meetings. Instead of getting your whole team together for a shareout or presentation, send them a video that they can watch on their own time.

But which tool is best for each job?

TechSmith offers two different video creation tools: Snagit and Camtasia. Let’s break down each one. 

Snagit

Snagit is great for quick, easy-to-create videos. It’s perfect for video messages, simple tutorials, and screen recordings. 

Strengths

  • Simplicity 
  • Speed
  • Ease of use

Weaknesses

  • Limited editing
  • No video templates
  • Not well suited for longer recordings

Camtasia 

Camtasia is a full-fledged video editor for polished, professional videos. It’s the ideal pick for training videos or tutorials that require in-depth editing and effects. 

Strengths

  • Lots of editing features
  • Easy-to-use templates
  • Multi-track editor
  • Includes graphics, music, and effects

Weaknesses

  • Steeper learning curve
  • More complex

Video is a great resource for your internal communications strategy. 

Businesses that use the power of video to improve employee engagement are future-proofing their workplace. Using video tools like Snagit and Camtasia to communicate is efficient, it’s something employees desire, and it’s extremely cost-effective, saving you and your business time and money.

3 reasons video is the right internal communication method

1. Video is more effective than email

Not only does video work, but it works better. Messages conveyed in video are more engaging and they lead to a higher retention rate. 90% of information transmitted to the brain is visual and visuals are processed 60,000 times faster in the brain than text according to Pop Video.  

Compared to email, video is far more engaging. Studies have shown that the average viewer retains 95% of the message if it is in video form. If made right, videos can make complex information easy to interpret. 

Video messages > meetings

Record your screen and camera with Snagit for quick updates and feedback.

Learn More
Screenshot of a video message with a dark-themed dashboard and various reaction emojis

2. Video is preferred in the workplace

It shouldn’t come as a shock that our research found that most people prefer to watch a video rather than read a bunch of text. 

As younger people enter the workforce, the desire for video content will continue to increase. Younger generations lean more towards video and visuals rather than text when it comes to communicating. And, they appreciate short and quick videos that are more engaging than long, imageless emails.  

Regardless of age, the desire to see increased video communication is pretty universal. In our research, we found that:

  • 48% of all employees consider video the most engaging form of communication
  • 37% prefer text with images
  • 15% who prefer text-based email
visual engagement chart

3. Video saves time and money

Perhaps the biggest reason to use more video is that videos can actually save organizations money.

Our research found that using more visuals in your internal communication can save the average employee, conservatively, 6 minutes and 43 seconds a day.

That may sound modest, but six minutes and 43 seconds a day calculates out to over half an hour per week, and over 25 hours per year, for every employee. Using our economic modeling, which was conservative to avoid over-promising, a company would save approximately $1,200 a year in productivity per employee, just by using more visuals in the workplace. A company of 500 employees could add the productivity of 7 full-time employees without hiring a single person.

visual communication statistics for internal communication at a workplace

It’s clear that visuals are more effective, desired by today’s workforce and save time and money. All that’s left to do is start creating. To get started, try replacing an email or meeting with a simple screencast or even an unedited webcam recording can work. You’ll quickly notice the difference and soon video may be part of your regular work communication arsenal.

If you are looking to up your video game, you can learn about the basics of video creation for free at our TechSmith Academy. Lessons include script writing, lighting, recording your screen, audio recording, and more!

Wall of text? Next!

Snagit makes it easy to communicate more effectively with visuals.

Learn More
Screenshot of a document about puffin migration patterns with a section for changing styles highlighted.

TechSmith

TechSmith is the market leader in screen capture software and productivity solutions for daily in-person, remote, or hybrid workplace communication and customer-facing image and video content. Our award-winning flagship products, Snagit, Camtasia, and Audiate, empower anyone to create remarkable videos and images that share knowledge for better training, tutorials, and everyday communication.

How to Record Audio from Your Computer: A Step-by-Step Guide

Audio recording icon on a desktop computer screen representing recording audio on your computer

Capturing high-quality audio directly from your computer is easier than you think! Whether saving a podcast, trying to record desktop audio, or capturing sound from a video, knowing how to record system audio is a handy skill. 

This guide will show you how to easily record the audio from your computer, highlighting both built-in tools and popular apps like Camtasia. We’ll also cover tips to ensure the best sound quality and explain how to save and manage your audio files. Remember, when recording audio, sound quality is essential.

How to record sound on a PC with Windows Sound Recorder

Step 1: Open the Sound Recorder app

The built-in Sound Recorder app is the simplest way to record Windows. To find it, go to the “Start Menu”, type “Sound Recorder” into the search box, and select the app. This is a quick tool for basic recordings. Additional apps like Camtasia can be utilized if you are looking for more advanced options. 

Step 2: Set your recording device

Before starting, it’s essential to ensure you have selected the correct recording device. Open your sound settings, click the “Recording” tab, and choose the appropriate device. This could be your system’s microphone if you’re recording your voice or your speakers for internal audio. It’s extremely frustrating to find out after recording that your computer used the wrong audio device. Save yourself time and grief by always double-checking before you click the red button.

Tip: “Stereo Mix” is also an option for some audio cards. This allows you to capture exactly what is being outputted by your computer’s sound card and can result in clearer recordings. In the Control Panel, open Sound Settings. Show Disabled Devices to make this option visible to enable.

Step 3: Start recording

After setting your device, hit the “Record” button to start recording. The app will instantly begin capturing sound.

Step 4: Stop recording

When you’ve finished, press the “Stop” button to end the recording.

Step 5: Save the file

Once done, save the audio file in a location of your choice and click the audio file to preview it. If you want more control over the sound, you can open the audio file and play it back or edit it using an audio program like Audacity or Camtasia.

Recording system audio with Camtasia

Camtasia overview

Suppose you’re looking for a more advanced option to capture sound on a PC. In that case, Camtasia is a robust all-in-one video and audio recording program, perfect for capturing system audio directly from your computer. It’s beneficial for professionals who need to create tutorials, presentations, or demonstrations with both video and sound.

Step 1: Open Camtasia and set up audio recording

After launching Camtasia, go to the “Recording Options”. Under the audio section, select “Record System” Audio to capture sounds played through your speakers.

Step 2: Start recording

Click the “Record” button, and Camtasia will start capturing audio and video on your screen if needed.

Step 3: Stop recording and save the file

When you’re done, click “Stop Recording”. Camtasia automatically saves the audio in a high-quality format, making it easy to edit or export the file as needed.

Crystal-clear screen recording

Why settle for blurry screen content? Camtasia’s screen recorder captures everything at up to 4K!

Free Download
A image showing the user interface for the recorder in camtasia

How to record system audio on Windows with WASAPI

Step 1: Use Windows WASAPI

If you prefer to use a free tool like Audacity, you can record system audio using WASAPI (Windows Audio Session API). WASAPI captures high-quality sound directly from your system without external noise from a microphone.

Step 2: Configure audio settings

Go to the “Recording tab and select WASAPI as the input source for your recording software. This will capture the internal audio, ensuring you get clear sound from whatever is playing on your computer.

Step 3: Record and save the audio

After configuring your settings, hit the “Record” button. Once you’ve captured what you need, stop the recording and save the audio file for later use.

Tips to improve sound quality when recording computer audio

Check your recording device

Always ensure your chosen recording device is set correctly in your sound settings. If you’re recording system audio, ensure your computer’s internal sound source is selected rather than an external microphone.

Adjust volume levels

Make sure your volume levels are correctly set before you begin recording. If the audio is too loud, it could become distorted, too low, and difficult to hear.

Test your setup

Before capturing your final content, perform a quick test recording to check the audio quality. This will help identify potential issues, ensuring the final recording is crisp and clear.

Additional tools for recording audio on Windows

Snagit for quick captures

Snagit is a versatile tool for quickly capturing audio. While primarily a screen capture tool, it can also record videos that capture computer audio, making it a great option if you need to grab media for a presentation or guide quickly.

Annotate and edit screenshots with Snagit

Professional mark-up tools and powerful features make it easy to create helpful images.

Try it Free
Screenshot of a document about puffin migration patterns with a section for changing styles highlighted.

Dedicated audio recording programs

Tools like Audacity and Camtasia are ideal for more advanced audio editing and features. They allow you to enhance captured audio by removing background noise, adjusting volume levels, and splitting files into segments.


Conclusion: Start recording audio from your computer today

Recording audio from your computer is easy, using built-in tools like the Sound Recorder app or more advanced software like Camtasia and Snagit. You can create high-quality recordings for podcasts, tutorials, or presentations with the proper setup. Ready to take your audio recording to the next level? Try Camtasia or Snagit today to create professional-quality recordings with ease.

TechSmith

TechSmith is the market leader in screen capture software and productivity solutions for daily in-person, remote, or hybrid workplace communication and customer-facing image and video content. Our award-winning flagship products, Snagit, Camtasia, and Audiate, empower anyone to create remarkable videos and images that share knowledge for better training, tutorials, and everyday communication.

How to Create Effective Employee Training Videos in 2024

Presentation with a video of a person.

Video-based training is essential in today’s digitally focused workplace. Gone are the days of in-person onboarding or training presentations and seminars.

Corporate training videos have become a critical tool for team members to learn how to engage with the company and each other. A good training video can boost employee performance, and specific videos, such as customer service training videos, can make a huge difference in customer satisfaction.

Simplify HR workflows with visual tools

Create clear, engaging training and documentation that helps your teams better understand company policies and processes.

Learn More
A professional woman with straight black hair, wearing a white blouse, stands confidently with arms crossed against a yellow background. Next to her is a smaller inset image of a casual office meeting, featuring three people working collaboratively on laptops. A text overlay in the meeting image says,

Why use video for employee training?

Good training videos show increased engagement, retention, and flexibility in the workplace. For example, by using real-life scenarios, employee training can successfully increase productivity through applicable and relatable knowledge sharing. 

Video training tools are versatile for different types of employee education, from onboarding to compliance training. Plus, the more a video covers, the more knowledge employees will have for their new position.

Certain tools, like Camtasia, make it easy for organizations to create customized and effective training videos quickly. 

Employee training videos work better

In our study, “Video Viewer Trends Report,” we found that people increasingly seek out instructional and information videos.

In fact, 67% of respondents watch videos once or more per week, some even watching 10 or more videos per week.

People seek out more instructional and informational videos because they prefer video over other mediums of communication. 83% of people prefer to consume instructional or informative content by watching a video. That’s more than double the next preferred options combined: those who would like to read or look at images. Videos are by far the most valued medium.

However, it even goes beyond mere preference; our “The Value of Visuals” study found that video and visual content helps employee performance. According to the research, 67% of employees completed tasks better and absorbed information 7% faster with video and visual training compared to plain text. 

Employee training videos have the potential to accomplish all of that and more, so let’s dive into how you can make them effectively.

Make great training videos

Camtasia is the best way to make training and instructional videos that keep your viewers engaged.

Learn More
An image of a laptop playing a training video created in camtasia

The different types of employee training videos you can create

Training videos come in different formats. Let’s go over a notable few.

Talking head videos

Talking head videos are a simple approach to training when a presenter, such as a manager or subject matter expert, explains the topic on camera. This type of video creates a connection between the speaker and viewers since there is a real person on screen. 

Camtasia’s screen recording features can easily record these videos, providing the tools to polish up the presentation later, so you don’t have to worry about mistakes now. Just record your webcam and audio simultaneously to create this type of video.

Animated explainer videos

Animated explainer videos break down complex topics into digestible visuals. They are a great way to visualize abstract concepts or technical information that could otherwise overwhelm a viewer.

Interactive training videos

Interactive training videos allow employees to engage with the content by answering questions along the way or making choices within the video. This technique makes the content more immersive for employees and increases knowledge retention.

Scenario-based videos

Scenario-based videos highlight real-life scenarios that can be useful to the employee. These types of videos are especially useful for customer service training and compliance scenarios. 

Employees can watch a step-by-step process of how to handle a situation, making it practical.

What makes a good training video?

An effective training video should reflect most or all of the following:

Clear objectives 

Every video needs a clear purpose, whether it’s for driver onboarding, explaining new software, or to train employees in customer research.

Engaging content

Using a mix of visuals, presenters, and animations keeps content interesting. Flip between a talking-head type video and an animated explainer to create an in-depth outline of a process.

The role of storytelling in corporate videos is to make content more relatable and engaging for team members.

High-quality production

Good lighting, clear sound, and video clarity are all basics that need to be present in any video.

Then, edit your video with Camtasia to ensure training videos look professional. Use annotations to highlight information, arrows to highlight details, and transitions to move from one subject to another seamlessly.

Simplicity and focus

Keep videos short, focused, and avoid information overload. This is where interactive training videos can help break up longer content.

Step-by-step instructions

Use step-by-step guides in your videos to walk employees through tasks or processes clearly and logically. By following this approach, you’ll be able to carefully cover every important step without glossing over important information.


Step-by-step guide to creating effective employee training videos

Let’s go through the process.

Step 1: Identity training needs

Start by assessing what knowledge or skills gaps exist among employees. Understand what your team needs so you can effectively communicate it to them.

Step 2: Plan your video content

Define the structure of your video. What content will be covered? How will you present it? You can use one or more of the types of training videos mentioned above. Keep it engaging!

Step 3: Script the video

A well-written script ensures clarity and flow. Keep the language simple and include a clear call to action at the end.

AI-generated script writing tools can be a real life saver in these situations. Tools like Camtasia Audiate can generate a script for you in seconds based on the prompt you enter. Then, just revise, and you can start recording your video in minutes.

Step 4: Record the video

Recording a good video doesn’t mean you need the fancy equipment–you can do it all from your computer! Camtasia’s powerful screen recorder can record your webcam, microphone, screen, and system audio all at once so you can streamline your recording process.

Creating a screen recording is easy with Camtasia and only takes a few minutes–or however long it takes you to go through the training module.

Start by clearing your computer desktop of any clutter. Your employees don’t need to see the cat memes and various PDFs you have saved to your desktop. 

Then, open any software applications you need to show. 

Open Camtasia and click the New Recording button.

Then select the monitor and/or window you wish to record. You can also record your entire screen if necessary. 

Select your microphone and select your webcam if you want to include your face in the recording. Then, decide whether or not you need the recording to include your system audio.

Once you’ve made your selections, click Start Recording, wait for the three-second countdown, and you’re on your way.

Remember, if you mess up or otherwise make a mistake while recording, just keep going. Just pause for a moment and restart from the place just before where you made your mistake. You can fix it all in the editing process.

Pro Tip: Clap twice after making a mistake so you can easily find it in the soundwaves while editing.

When you finish recording, click the stop button, and Camtasia will automatically add your recording to the timeline in a new Camtasia project.

Step 5: Edit and add engaging elements

Editing is where your video comes to life. Cut unnecessary content and add visuals, music, and annotations wherever you need. Import any other assets you may need through the Camtasia library so you can easily add them to your video.

If you need a quick image, Camtasia also has an extensive library of free assets you can draw from.

Step 6: Review and get feedback

Test your video on a sample group of employees to ensure it’s engaging and easy to understand. Make adjustments based on feedback.

Make great educational videos

Create engaging videos that drive student success with Camtasia’s easy drag-and-drop editing.

Free Download
An image of a professor with a superimposed graphic of camtasia rev that she is using to edit her education video

Best practices for making interactive training videos

If you choose to create interactive training videos, you’ll need to add certain elements to your video for the viewers to engage with. This practice is great at boosting engagement and retaining knowledge better. 

You have a lot of options to add in content. For example, you can embed quizzes, decision points, or clickable content that lets viewers control and discover more on their learning journey. By making training content fun, you can start the onboarding process positively with everyone.

In certain industries, giving immediate feedback is a part of the job, so interactive training videos are crucial to an employee’s future reaction. For example, customer service positions may require employees to handle situations immediately, whereas a remote corporate employee may have more time to think about their answer. These differences can be explored in the training videos so everyone gets the opportunity to learn skills related to their position.

Common mistakes to avoid in employee training videos

Let’s dive into practices you should avoid when creating a video.

Too long or unfocused

Let’s be honest, training videos aren’t the most exciting parts of onboarding, so it’s important to keep them concise and to the point. No one wants to spend 45 minutes listening to a long, ranty ramble about a topic that could be covered in 10 minutes. Keep your videos short, and your new employees will thank you.

Overcomplicating the content

Keep in mind that these employees are new. They may already have experience in their field, but that doesn’t guarantee that they will understand all the jargon and technical terminology thrown at them right away. Keep your words simple and clear to avoid any confusion or unnecessary complications.

Poor quality production

The quality of a video can make or break its effectiveness. Low-quality video or audio can distract learners from the content of the video, especially if they have to spend energy trying to decipher what is being said in the first place.

That does not mean you need to buy new equipment; usually your computer or phone can do the trick just fine. Just make sure that you check out the quality of your recordings before you commit to a full recording session. 

Luckily, video editing tools like Camtasia can also enhance video and audio quality so that your videos look professional every time.

Forgetting to include engagement

Avoid adding haphazardly created quizzes just because you feel like including them. Instead, make a plan of everything you think is most important for your employees to retain and curate the quiz around that. By embedding the quiz into the video, you can make it interactive and fun while covering the most important information.

Neglecting accessibility

Accessibility is one of the most important aspects of video creation. Ensure your videos are accessible to all employees, including subtitles for the hearing impaired or text alternatives for visual content.

To create closed captions (subtitles), Camtasia can actually do it for you! Just upload your video and access the closed captions feature. It’ll transcribe your audio for you and you’ll be able to export it as an SRT or text file. 

The future of employee training videos

The future looks like a lot of AI. AI-driven tools can now create narration from text or script for your training videos, and some can even create a video from a script. Our guess is that this type of innovation will keep growing as AI evolves. 

Accessibility and individual learning paths also emerge as important aspects of video creation. By creating personalized learning journeys for certain employees, you can cater to their needs and increase their potential knowledge retention and overall understanding.

Technology will continue to grow and innovate. Camtasia’s video editor constantly updates to create an environment that makes it easy for companies to create highly interactive, professional training videos that meet the evolving needs of businesses.

Make great training videos

Camtasia is the best way to make training and instructional videos that keep your viewers engaged.

Learn More
An image of a laptop playing a training video created in camtasia

TechSmith

TechSmith is the market leader in screen capture software and productivity solutions for daily in-person, remote, or hybrid workplace communication and customer-facing image and video content. Our award-winning flagship products, Snagit, Camtasia, and Audiate, empower anyone to create remarkable videos and images that share knowledge for better training, tutorials, and everyday communication.

How to Build an Effective Customer Education Program

Customer education content, the guide
Customer education is onboarding and training your customer base to succeed with your business’s solutions.

Training programs help internal stakeholders improve job-related skills.

Customer education programs help customers maximize the value of your service. 

Building a strategic customer education program requires careful thought, including:

  1. Business goals
  2. Target audience
  3. Learning objectives
  4. Content creation
  5. Delivery methods
  6. Evaluation approach

First, let’s cover business benefits.

Benefits of customer education programs

A successful customer education program benefits businesses and customers by enhancing the user experience, reducing friction, and fostering long-term commitment. 

You can make a business case for investment in customer education by considering a few outcomes. First, customer education can increase customer retention and upsell opportunities. It can also increase loyalty and referral rates, increasing the customer base. Lastly, comprehensive customer education reduces support costs in the long run. 

There are six steps to developing a comprehensive and successful program.

Step 1: Evaluate your business goals

Customer education teams ensure customers’ success with a product or service throughout their journey. Consider which parts of the customer journey are most important for your business goals. 

Design your training content to match your business goals for each phase of the customer lifecycle. Education strategies may vary for each phase and business goal.

Consider the customer journey

The customer journey is outlined in these six steps: 

  1. Awareness: The user learns about the product (e.g., search, ads, or word-of-mouth).
  2. Consideration: The user tries the product or service. 
  3. Activation: The user sees the initial value and purchases.
  4. Habit Formation: Customers find value, forming usage habits. 
  5. Retention: The customer renews their subscription or stays active with the product. 
  6. Customer Advocacy: Satisfied customers see ongoing value and become loyal advocates.
The customer journey of awareness, consideration, activation, customer advocacy, retention, and habit formation.

Of course, no customer journey is identical; however, these steps are valuable resources to refer back to when evaluating where certain customers stand.

Align customer education priorities with business goals

A successful customer education program begins by aligning educational content with specific business goals to achieve key outcomes. For example, increasing product adoption and usage will take a different approach than if you’re looking to improve customer retention and reduce churn. 

Other common themes for business goals of customer education programs include increasing customer satisfaction and experience, driving upsell and cross-sell opportunities, and increasing market competence and brand reputation. All of these goals would in theory improve business outcomes and performance, but their approach differs vastly. 

Now, you may be thinking to yourself that you want all of those things, and of course you do! However, it’s important to focus on a few well-thought-out business goals and maximize their impact rather than spreading your team thin by mildly focusing on everything. 

Now that you have the themes of your business goals in mind it’s time to define who you’ll need to approach. 

Step 2: Define your target audience

Customer education teams work closely across departments to understand the audience, user needs, and pain points. Your audience will vary depending on your business goals, so you must take the time to figure out a target audience with the rest of the team. This team can include product managers, user experience designers, the development team, researchers, and customer support teams. 

Work with subject matter experts (SME) and key stakeholders to start designing and implementing your customer education solutions. 

Identify your audience’s needs.

Your audience may benefit from onboarding processes or expert tips. Knowing who your audience is shapes your customer education strategy and the knowledge base you can draw from.

First, define the target audience and personas. Identify customer personas and tailor content to their needs, experience level, and use cases to make customer onboarding and education simple.

Ask yourself: What goal, need, or problem am I solving for the target user? Tailor your content to the audience’s level of knowledge, interests, and goals.

While answering that question, take the time to understand the common challenges your users face. Create content that addresses those pain points fully.

You’ll want to deliver this information in an ideal format. Determine how your customers prefer to consume information (videos, written guides, interactive webinars, etc.). Offer diverse types of content to cater to various learning preferences. No two customers are the same, so providing various learning options has a great impact. 

Make great tutorial videos

Camtasia makes it ridiculously easy to make tutorial videos that keep your viewers engaged.

Free Download
An image of a laptop playing a training video created in camtasia

Define clear learning objectives. 

Your team needs to define learning objectives they can understand and carry out. First, you need to identify what you want the audience to learn. Be specific about the skills or knowledge they should gain from the customer education experience.

Foster a positive learning environment by making objectives and examples relevant to the customer. Use examples, case studies, or scenarios that resonate with your audience. Educate customers on how your product solves their specific everyday problems. 

As you work through the process, map out the customer journey and experience. Step-by-step, map out what the user experiences. Document using mockups, early builds, or screenshots. This journey map identifies pain points and highlights any areas requiring support. 

Stop repeat questions

Create clear videos and guides with Snagit so you only have to explain tasks once.

Try it Free
Screen recording of a dashboard showing conversion rate, spend, and monthly performance with a picture-in-picture webcam view of a smiling man.

This structure will ensure your customer education plan is comprehensive, targeted, and results-driven. 

Step 3: Develop engaging educational content

Creating an engaging learning experience requires balancing clear communication, visual appeal, and interactive options to keep the audience interested and help them retain information. You must understand your audience’s needs and deliver value in a way that connects and captivates attention. 

Create relevant and engaging content.

When creating educational content, there needs to be a balance between learning and engagement. Customers need to want to participate in the program. 

Quality is the first step. Include high-quality audio and visuals to enhance comprehension and engagement. Visuals can serve to illustrate key points through screen recordings, real-life footage, and animations. 

Start by building educational content in short, focused lessons like quick video tutorials or tips. These bite-sized pieces, known as microlearning, will keep your viewers’ attention.

Microlearning keeps viewers' attention.

As you build out your content, tell a story. Use examples and stories to frame the content around real-world scenarios. This makes the material more relatable and memorable. By using a positive tone and avoiding jargon or dull, long narration, you can ensure that users don’t grow distanced from your content.

Consider the tell-show-do approach: 

  • Tell: Explain the concept and what the audience will learn.
  • Show: Demonstrate using visuals or practical examples.
  • Do: Encourage viewers to apply what they’ve learned with exercises

Also, adding interactive elements like quizzes, sample projects, or captions can boost comprehension and engagement. You can turn those interactive elements into games by implementing rewards, badges, certifications, points, leaderboards, or challenges to motivate continued learning.

Now, you need to position your content to appear to the user at the correct time. Offer content customers can access when needed, such as in-app tooltips or quick reference guides. 

Once the educational session is completed, direct viewers to the next step, such as exploring related resources or a summary of the key points to reinforce learning. Encourage comments, questions, and sharing to build a community around your content.

Tell-show-do approach: 

Use Camtasia to create tutorial videos.

Camtasia makes creating engaging videos, tutorials, and product walkthroughs easy with these features:

  • Quality audio
  • Dynamic visuals
  • Interactive elements
  • Visual storytelling

Make great tutorial videos

Camtasia makes it ridiculously easy to make tutorial videos that keep your viewers engaged.

Free Download
An image of a laptop playing a training video created in camtasia

Step 4: Choose the right delivery method

A key aspect of customer education is delivering content at crucial moments in the customer’s workflow. 

To ensure success, the key is delivering the appropriate information at the right time in the customer journey. 

A best practice is to deliver educational content where and when the user completes the task. This content may be in-product or quickly accessible from a website. 

Leverage learning management systems

Learning management systems (LMS) can deliver educational content and track customer progress. LMS platforms allow businesses to create structured learning paths, quizzes, and assessments, ensuring customers gain the necessary knowledge. 

Tip: Create SCORM content to ensure it works with most e-learning platforms and LMSs.

Offer multiple learning formats.

Not everyone learns or prefers to consume information in the same way. Make learning accessible by offering videos, articles, webinars, printed guides, and infographics.

Tip: Video generally combines two channels: audio and visuals. Studies have suggested that this is why videos contribute to improved learning performance.

Two market-leading screen recording and video editor products create content that supports a variety of learning styles. Camtasia provides SCORM features that are compatible with most LMS e-learning platforms. Camtasia creates interactive video tutorials.

Use Snagit to create visual learning aids.

Use Snagit to capture screenshots and create visual aids that make learning easier. Customers love Snagit’s ability to create step-by-step instructions and illustrated images.


Annotate and edit screenshots with Snagit

Professional mark-up tools and powerful features make it easy to create helpful images.

Try it Free
Screenshot of a document about puffin migration patterns with a section for changing styles highlighted.

Snagit makes quick how-to images, short videos, and more!

Transform your screenshots with ready-made templates, custom themes, and unique stamps.

Add screenshots to templates in Snagit

Step 5: Measure and improve your customer education program

To improve your customer education program, set and monitor success metrics for your content. Use tools to track content analytics, video engagement, and helpfulness, and gather customer feedback.

Gather feedback and analyze results.

Create a schedule to gather feedback and review content analytics. This helps businesses refine their educational content using current data. 

Check metrics like play rate and percentage watched on your video hosting site. By monitoring what gets watched, you can tailor the content to reinforce the most watched content or improve the commonly skipped sections. Design content for specific user segments by referring to the metrics.

Add survey widgets to content pages to get direct feedback from customers. This will help your team measure how helpful the content is while the experience and information are still fresh in the user’s mind. In the same vein, you can conduct customer research and study how users interact with your product.

For more extensive revamps, try A/B testing. A/B testing refers to the practice of testing two content approaches to determine which one performs better. Try different formats, lengths, and interactive elements to see what boosts engagement.

To round out the research, use an SEO-focused program and look at customer search terms to find content gaps. Although plenty of stakeholders may have been involved in the customer education program creation process, some things simply get overlooked and that’s okay!

Continuous improvement of content and delivery

The needs of your customers and the competitive landscape are constantly changing. Make it a practice to review customer feedback and update content as products evolve regularly. 

Step 6: Track the success of your customer education program

To maintain an effective customer education program, evaluate the success of your content and strategies.

Monitor key metrics

Track key performance indicators (KPIs) to assess the success of your customer education program. These metrics reveal if the program meets its goals and supports business objectives. These include:

Customer satisfaction (CSAT)

CSAT measures happiness with your product and educational content. High satisfaction indicates customers find value in both. Low satisfaction indicates that either the product, the educational content, or both need to be improved.

Customer retention

Customer retention tracks the percentage of existing customers who continue using your product over time. Effective education reduces churn by helping customers maximize product use and engagement.

Support costs

This refers to the spending amount on customer service. Good education empowers users to self-serve, reducing support tickets and costs. A decrease in basic inquiries shows that your content is effective.

Identify areas for future growth.

By tracking results, you will identify new user needs and opportunities for growth. Consider how your customer education program can evolve as your product or service offerings grow.  Here are real-life examples:

Make great tutorial videos

Camtasia makes it ridiculously easy to make tutorial videos that keep your viewers engaged.

Free Download
An image of a laptop playing a training video created in camtasia

Common mistakes to avoid in customer education

Failing to align with business goals

A successful education program addresses customer needs and the business’s strategic objectives. 

Otherwise, a few common issues may appear. For example, failing to align with goals may lower customer satisfaction, reduce product adoption, reduce retention, decrease brand loyalty, and create overall low customer engagement and satisfaction. 

Not to mention that efforts and budgets would be incorrectly allocated and revenue opportunities would be missed. 

These fallacies make a solid business plan that much more efficient. If only one of two of these outcomes occurs, then simply tweaking the strategy may help. But, if there is a negative dip overall, it may be time to rethink the entire plan.

Customer education is a complex and nuanced process so don’t beat yourself up if you’re seeing unexpected results. Instead, be flexible and adapt to the findings to maximize the positive outcomes of the process.

Overloading customers with too much information

The customer learning experience can directly impact a customer’s perception of a product. Customers who feel confident will likely engage with your content more. Long, complicated materials can overwhelm viewers and decrease comprehension and satisfaction with your product. 

Follow these best practices for content delivery: 

  • Keep it focused: Break content into small, digestible chunks to prevent information overload. Focus on one task or user goal per video or page. 
  • Use plain language: Frame headings in the customer’s language or based on the goal or action they are trying to accomplish. Clear, simple language enhances understanding and engagement. 
  • Build structured content: Use subheadings and lists to structure content logically. Visually break up content, keeping paragraphs short, only 1-3 lines.
Content delivery best practices to keep it focused, use plain language, and build structured content.

Conclusion

Customer education is essential to a product’s success and to ensuring a positive customer experience. Align customer education with business goals, develop high-quality content, and steadily improve the program based on feedback.

Check out Camtasia (for training videos) and Snagit (for visuals, short videos, and documentation). TechSmith’s products are widely used in Fortune 500 customer education departments. Both products help create engaging and effective educational content that drives customer success.

Stop repeat questions

Create clear videos and guides with Snagit so you only have to explain tasks once.

Try it Free
Screen recording of a dashboard showing conversion rate, spend, and monthly performance with a picture-in-picture webcam view of a smiling man.

TechSmith

TechSmith is the market leader in screen capture software and productivity solutions for daily in-person, remote, or hybrid workplace communication and customer-facing image and video content. Our award-winning flagship products, Snagit, Camtasia, and Audiate, empower anyone to create remarkable videos and images that share knowledge for better training, tutorials, and everyday communication.

How to Remove Background Noise from Video

Graphic representation of audio editing, specifically the process of removing background noise. It features a sound wave pattern across the center against a gradient purple background, signifying audio frequency. Below the waveform, there are two icons: a speaker emitting sund waves and another with a line through it, connected by an arrow pointing right, symbolizing the transformation from noisy to clean audio. This image is suitable for educational content about audio editing techniques and sound engineering.

Have you ever played a video and couldn’t hear clearly? 

Background noise can take many forms—dogs barking at the mail carrier, lawnmowers outside your office, or even sounds from your computer fan and mouse. 

Why background noise removal is important

Clean and crisp audio in your videos is essential to maximize engagement and knowledge transfer. Unwanted noises distract the viewer and divert their attention from your voice and the content you share. 

In a TechSmith study, 35% of viewers reported that high-quality audio narration keeps them engaged. Audio quality is the most critical quality of a video. 


Best practices for high-quality audio

You create videos to convey a message, aiming for viewers to focus on your content without distractions. While you can’t control their viewing environment, you can ensure high video quality by following these best practices and leveraging noise reduction technology. 

  • Use the best quality microphone you can afford.
  • Locate a quiet space where there are minimal distractions.
  • Always run a quick test to ensure audio is being recorded.
  • Record your audio or video with a tool that offers noise suppression during recording, like Camtasia.
  • Use audio effects, such as noise removal, to enhance or correct audio.
  • Add audio filters or sound effects, which can further polish the audio 

Steps to use to remove background noise from audio and video files

Step 1: Upload your video

Pick a video editor that supports multi-track editing. This makes it easy to edit video and audio tracks separately. The market-leading choice is Camtasia.

Then 

  1. Start a “New Project”
  2. Upload your video file

The easiest way to edit videos

Stop wasting time and discover how Camtasia makes creating incredible videos easier than ever.

Free Download
An image of a laptop showing the camtasia drag-and-drop editing feature

Step 2: Isolate the audio track

The next step is to extract the audio from the video.

  1. Select the video track
  2. Right-click and select ‘Separate Audio from Video.’

Alternatively, begin by uploading your audio file or making a new video recording.

Step 3: Use noise reduction features

In Camtasia, click and drag the Noise Removal effect onto the audio track. You can also automatically reduce noise before recording.

In Audiate

  1. Click the Properties button
  2. Click the + icon to view Effects
  3. Click to apply the Remove Noise effect

Step 4: Fine-tune the sound quality

Camtasia and Audiate both provide easy-to-use sliders to adjust sound quality.

  • Sensitivity: Adjust how frequently the noise removal effect will be applied. When the sensitivity is high, the noise removal will apply even if the noise is soft.
    • Tip: If the audio becomes distorted, lower the sensitivity.
  • Amount: Adjust the amount of noise reduction applied. The higher the amount, the more dramatic the noise removal.
    • Tip: If the audio becomes distorted, lower the amount.

Audiate: Best for audio editing

Audiate integrates with Camtasia to enable AI-first video creation that starts with a script or audio recording. Audiate enables anyone, not just audio engineers, to have best-in-class audio. 

  • Effortlessly improve and enhance audio files.
  • Silence room noise and other imperfections
  • Automatically detect and remove “ums,” “ahs,” and other hesitations
  • Apply advanced audio enhancements

Features of the best audio editing tools

Other audio editing products with background noise removal include Audacity, Kapwing, and TopazAI. 

  • Tip: Be sure to evaluate the quality and flexibility of online tools closely. 

Professional video editing tools like Camtasia and Audiate offer numerous benefits over free products, enhancing video quality and efficiency.

  • Precise control: Capabilities like frame-by-frame editing and advanced audio adjustments provide control. 
  • Better sound quality: Sound is vital in any video, and premium software includes advanced audio features. These tools help clean up background noise, balance audio levels, and seamlessly add sound effects or music.
  • Customization: Premium software provides extensive customization options like keyboard shortcuts and personalized workspaces. 
  • Support and community: Access to tutorials, forums, and professional support are valuable for troubleshooting and improving efficiency.

Best practices for clean audio in video

To be recognized as an expert, your audience must hear your content clearly, not your background noise. High-quality audio is a critical component of any video.

Camtasia and Audiate make an excellent team for removing background noise. With clean and crisp audio, your videos will be elevated to a premium experience for your viewers. 

Edit audio like text

You don’t have to be a professional to record and edit audio. Audiate makes it as easy as editing a text document.

Get Audiate
An image showing text being deleted in a doc and a corresponding timeline being cut

TechSmith

TechSmith is the market leader in screen capture software and productivity solutions for daily in-person, remote, or hybrid workplace communication and customer-facing image and video content. Our award-winning flagship products, Snagit, Camtasia, and Audiate, empower anyone to create remarkable videos and images that share knowledge for better training, tutorials, and everyday communication.

Learning Management Systems (LMS): A 2025 Guide

Green graphics of play buttons, magnifying glass and graduation hat
A learning management system (LMS), also known as a learning content management system, is a software application designed to create, manage, deliver, and measure educational content and training materials.

The pandemic has forever changed the way people work, train, and learn. Gone are the days of every employee visiting the office in person 8 hours a day, 5 days a week. 

According to Gallup, 52% of employees with jobs that can be done remotely work in a hybrid setup, 29% work fully remote, and only 20% work entirely in the office. 

Why is this important? It changes how employees are onboarded and trained and affects what technologies and processes learning and development departments adopt. Training programs consisting of instructor-led face-to-face training have been replaced by online learning, remote and hybrid employee training, and asynchronous content delivery. One technology at the core of this evolution is the Learning Management System, more commonly known as the LMS.

What is a learning management system (LMS)?

Learning management systems serve as a hub for hosting training programs and online course content. This enables employees and students quick and easy access to learning anywhere, any time. From onboarding new hires to ongoing professional development, a LMS provides the infrastructure to support a wide range of training content and learning programs.

Effective training programs boost performance and retention. With the rapid pace of technological advancement and changing workforce skills needed to compete, continuous learning and upskilling are necessities. 

Adding to these challenges is the cost and difficulty related to finding new employees. Which means retaining existing talent is crucial. The LMS is a tool that offers a flexible, accessible, and scalable solution for organizations to develop employee training that boosts competence and employee retention.

The role of the LMS in learning and development

Learning management systems serve as the backbone for content management and content delivery, enabling businesses to create, organize, and distribute training materials efficiently. They also integrate with other enterprise systems and content creation tools by leveraging e-learning technology standards such as SCORM

An LMS can be self-hosted by an organization, or it can be vendor hosted in the cloud. Either way, learning and development teams create the content, including text, images, documents, and videos. All which are added to an LMS and organized into courses and modules. 

L&D teams can then create learning paths for employees to follow, provide checks for understanding along the way, and enforce an order of content consumption. The LMS also provides security and access controls to ensure private company information is only available to authorized users. 

Types of LMS courses include everything from soft skills training (i.e., how to give effective feedback) to technology training (i.e., how to request time off in the HR system) to in-depth role-based training (i.e., how to manage people), and more.

One key advantage of an LMS is its ability to support blended learning techniques. This approach combines traditional face-to-face instruction with online learning modules, providing a more comprehensive and flexible learning experience. For instance, employees can attend in-person workshops while also accessing supplemental online resources through the LMS platform. Another example is employees or students watching videos in the LMS prior to an in-person session where they then discuss the video material and work on assignments. This is called flipped learning and is a form of blended learning.

A 4 quadrant grid showing where different learning management system vendors fall based on customer satisfaction on the X axis and market presence on the Y axis.

G2 Grid for Learning Management Systems (LMS)

Modern LMS platforms empower subject matter experts within an organization to create, manage, and deliver training content directly. This division of content creation allows for more diverse and specialized training materials, tailored to the specific needs of different departments or roles within the company. It also helps scale training content development beyond just the training team. For example, Kobe City uses Cornerstone to enable department managers to create their own training content.

To enhance the quality of training content, many organizations are turning to video creation tools like Camtasia. This software allows trainers and instructional designers to create engaging video content that can be seamlessly integrated into the LMS. With features like screen recording, video editing, interactive quizzes and polls, and SCORM support, Camtasia enables the production of professional-grade training videos that can significantly boost learner engagement and retention. Its ease of use makes it ideal for instructional designers, managers, and subject matter experts who don’t have video editing expertise.

Key features of a learning management system

When evaluating learning management systems, it’s essential to determine the features that will best support your organization’s training and learning objectives. Differences exist across LMS companies. Some vendors focus on specific vertical industries like higher education or healthcare, while others tailor to different-sized organizations. Before looking, identify your top needs, and then evaluate who can meet those needs most effectively and within your budget. 

Content creation and management

A robust LMS should provide tools and integrations for instructional designers and content authors to develop and manage training content efficiently. For example, instructional designers often work with subject matter experts (SMEs) to create course modules. SMEs need the ability to easily record their knowledge, while instructional designers need an easy way to review and provide feedback that ensures the content supports the learning objectives. Keep in mind that video is preferred more than twice as much as other formats for instructional content.

Bar chart showing that 83% of people prefer to consume instructional or informational content through watching a video.

Source: Video Viewer Trends Report 2024
Look for platforms that offer:

  • Great support for video through integration with easy-to-use creation tools
  • Collaborative authoring capabilities between team members, streamlining the review and approval process for releasing new training content
  • Version control and content revision tracking

Make great training videos

Camtasia is the best way to make training and instructional videos that keep your viewers engaged.

Learn More
An image of a laptop playing a training video created in camtasia

Mobile learning and accessibility

With the increasing prevalence of remote and hybrid work, it is crucial to support the devices employees and students prefer to use. Mobile learning is the process of learning using personal mobile devices like smartphones. Most employees and students have a smartphone, which is now the most commonly used device to consume digital videos in the U.S. according to a statistic from Statista.

Not only is supporting mobile devices important, but it is also critical that instructional designers ensure training and learning content is accessible. This is both required by law and sound business practice.

A modern LMS should:

  • Offer responsive design that adapts to various mobile devices.
  • Provide offline access to learning materials.
  • Support microlearning modules optimized for mobile consumption.
  • Meet accessibility requirements, including support for screen readers, keyboard navigation, and videos with captions.

Tracking and analytics

One important capability of using an LMS is its ability to track learning progress. This is critical for compliance training when organizations must know if employees have completed training required by law or regulation. Understanding what and how much training employees consume also enables L&D teams to measure course effectiveness. An LMS should offer robust tracking and analytics features, including:

  • Real-time progress tracking for individual learners and groups
  • Customizable reports on course completion rates, assessment scores, and learner engagement
  • Integration with HR systems for comprehensive employee development tracking

How to choose the right LMS for your organization

Selecting the best learning management system for your organization requires careful consideration of several factors:

Scalability

Ensure the LMS can grow with your organization and support an increasing number of users and courses delivered to mobile and desktop devices.

User experience

Look for an intuitive interface that minimizes the learning curve for administrators, SMEs, and learners.

Integration capabilities

The LMS should integrate seamlessly with your existing or future HR systems, content creation tools, and other relevant software.

Customization options

Choose a platform that allows you to brand the learning environment and tailor the user experience to your organization’s needs.

Support for blended learning

The ideal LMS should facilitate a mix of online and in-person training methodologies.

Security and compliance

Consider how the LMS ensures security of user data. Training content contains proprietary information that must be protected. Also check for compliance with security certifications.

Consider case studies or examples of organizations similar to yours that have successfully implemented an LMS. This can provide valuable insights into how different features translate into real-world benefits. For example, read how an LMS helped improve required training completion rates.

The importance of content creation in an LMS

The success of any learning management system hinges on the quality of its content. High-quality training materials are essential for effective employee development and engagement. An LMS is an empty vessel that can be filled with either good or bad content. When creating content for your LMS, consider the following tips to create the most engaging content:

Identify learning objectives

Answer what is the outcome you want the learner to achieve by consuming this content? Try to keep it limited to a few. It is better to create additional content for different learning objectives rather than covering too many with one piece of content. Learners will get lost and disengage.

If the content is part of a course, be sure the content supports the overall course learning objectives as well.

Know your audience

Understand who the learners are and what their goals are. What format do they prefer to consume content in? Most likely, video will be a top priority, but taking time to research your audience will make it easier to meet their expectations.

Diverse Content Formats

Incorporate a mix of text, images, videos, and interactive elements to cater to different learning styles. Make sure your formats align with the learning objectives and preferences of your audience.

Engaging Content

Use tools like Camtasia to create professional-grade training videos with features such as high-quality screen recording, video callouts, mouse cursor highlighting, and interactive quizzes. Trainers and SMEs are not video creation experts. To ensure they can create quality content fast, you need a video editor with drag-and-drop simplicity and a short learning curve.

Make sure content is easy to integrate into the LMS using standards like SCORM. Camtasia’s SCORM support enables videos to track learner progress and report quiz scores directly to the LMS.

”Camtasia’s ease of use, output quality, and output format options are a million times better than anything else I’ve been asked to use for creating video content.”

Incorporate interactive elements to improve engagement

Capturing and maintaining learner engagement is one of the biggest challenges for L&D teams. Adding interactivity is one key strategy that can improve engagement rates and increase information recall.

Interactivity can include checks for understanding by using interactive quizzes, clickable links (sometimes referred to as hotspots) to choose a path, and more. The learner can answer questions and then be offered feedback and additional resources based on their response. Check out these 5 ways to make course videos more interactive.

Microlearning

Break down complex topics into bite-sized modules that are easy to digest and retain, also known as microlearning. This is especially useful for when employees just need to learn about a specific part of a general topic (i.e., how to use a specific feature) or to solve an immediate problem (i.e., where to submit an IT helpdesk ticket).

Regular updates

Keep content fresh and relevant by regularly reviewing and updating training materials.

Quality content can make or break an LMS implementation. It is important to consider creation as part of the overall LMS evaluation process. You don’t want to invest heavily into an LMS only for it to sit empty and unused because the process to fill it has too much friction.

Advantages of using an LMS for employee training

Implementing a learning management system offers numerous benefits:

Improved retention and compliance

Most importantly, LMS platforms help ensure that employees complete required training and stay up-to-date with certifications and regulatory compliance. Automated reminders and tracking features make it easier to manage ongoing training requirements. 

It also provides a single source for training content, making it easy for employees to find the training they need. 

Lastly, assuming it is filled with good content, an LMS can help employees feel supported and grow their skills more quickly. This leads to higher retention and improved employee engagement.

Scalability

As your organization grows, an LMS can easily accommodate an increasing number of learners and courses without significant additional investment. This assumes scalability was considered when choosing an LMS.

Cost efficiency

By reducing the need for in-person training sessions, printed materials, and travel expenses, an LMS can significantly lower training costs. It also provides a better ROI for training content because it can be accessed on demand by employees.

Crystal-clear screen recording

Why settle for blurry screen content? Camtasia’s screen recorder captures everything at up to 4K!

Free Download
A image showing the user interface for the recorder in camtasia

Leveraging video and screen capture for enhanced learning

Video content has become an integral part of effective online learning strategies. Why? Because video increases engagement. Tools like Camtasia enable the creation of engaging tutorials, how-to’s, process training, microlearning, and interactive presentations that can be easily integrated into your LMS.

For quick visual explanations and step-by-step guides, screen capture tools like Snagit are invaluable. These tools allow instructors to create clear, visual instructions that simplify complex processes and enhance understanding.


What’s next for learning management systems in 2025 and beyond?

As we look towards the future of LMS technology, several trends are emerging:

AI-powered learning

Advanced algorithms will provide deeper insights into learner behavior and predict outcomes, allowing for more personalized learning. Eventually, AI will create customized learning paths and personalize them on the fly for individual learner needs.

Gamification and engagement tools

Expect to see more sophisticated gamification elements integrated into LMS platforms to boost learner motivation and engagement.

Mobile learning optimization

LMS providers will continue to enhance their mobile offerings, providing seamless experiences across all devices.

Collaborative authoring tools

More advanced real-time collaboration features will emerge, allowing instructional designers to create and update content more efficiently.

Conclusion: Maximizing your LMS for employee training

To get the most out of your learning management system, consider the following tips:

  • Align LMS features with your organization’s learning objectives and culture.
  • Invest in content creation tools like Camtasia and Snagit to produce high-quality, engaging training materials.
  • Regularly gather feedback from learners and instructors to continuously improve your training programs.
  • Stay informed about emerging LMS trends and technologies to ensure your system remains cutting-edge.
  • Develop a content review process to ensure training materials get updated at appropriate times. This can be similar to creating a content calendar. You can designate different types of content to be updated based on criteria such as how important it is, how often it is viewed, how quickly what is covered in the training changes, regulatory changes, and more.

By leveraging the power of a well-chosen LMS and creating compelling content, organizations can build a culture of continuous learning that drives employee growth and business success. As you explore options for implementing or upgrading your learning management system, consider how tools like TechSmith’s Camtasia and Snagit can enhance your content creation capabilities and take your training programs to the next level.

Make great training videos

Camtasia is the best way to make training and instructional videos that keep your viewers engaged.

Learn More
An image of a laptop playing a training video created in camtasia

TechSmith

TechSmith is the market leader in screen capture software and productivity solutions for daily in-person, remote, or hybrid workplace communication and customer-facing image and video content. Our award-winning flagship products, Snagit, Camtasia, and Audiate, empower anyone to create remarkable videos and images that share knowledge for better training, tutorials, and everyday communication.

A Complete Guide to Image File Formats

An open book with various file formats floating above it, including PNG, MP4, PDF, GIF, and JPG.

You’ve grabbed the perfect screen shot or taken a photo, done a little editing, and now you need to get it out to the world. Understanding image file types is essential for selecting the format that best fits your needs, as each has unique strengths and weaknesses in terms of image quality, file size, and editability. 

Different image file formats exist because each is optimized for specific purposes, balancing factors such as image quality, file size, compression, and how they’re used across different devices or platforms. Each format exists to meet different needs—whether it’s maintaining high image fidelity, reducing file sizes for faster web loading, or supporting animation and transparency. This guide will provide helpful insight into a variety of file format types, the most popular formats used, and help you make a sound choice in what format your image should be in for optimal performance. 

Understanding raster image files vs. vector files

Raster image files

Raster images are composed of a grid of pixels, with the resolution of the image defined by pixels per inch (PPI) or dots per inch (DPI). Since the resolution is defined by the number of pixels and dimensions, scaling the image beyond the original dimensions will result in a loss of quality, often referred to as pixelation. Raster images are commonly used for web graphics, print media, and digital photography. Common raster image file types include JPEG, PNG, GIF, and BMP. 

Vector image files

By contrast, vector images are defined by a mathematical formula, allowing the image to be scaled without losing quality. This flexibility makes vector images ideal for graphics and logos that may need to be resized to fit a variety of applications. Common vector image types include SVG, EPS, AI, and PDF.

Streamline workflows with Snagit Assets

Transform your screenshots with ready-made templates, custom themes, and unique stamps.

Get Started
A laptop screen displaying a Snagit template with an image of a river otter swimming being dragged into the image placeholder.

Lossless vs. lossy image formats: What’s the difference?

When it comes to compressing images, there are two main methods: lossy and lossless compression. Understanding the difference between the two can help you choose the right format for specific uses, whether it’s for web content, photography, or graphic design.

Lossy compression

This reduces file size by permanently removing some image data. This process results in a smaller file size, which is ideal for applications like web pages where faster load times are critical. However, the trade-off is a slight decrease in image quality, which may or may not be noticeable, depending on how much compression is applied. Formats like JPEG rely on lossy compression and are frequently used for images captured by a digital camera. The advantage of JPEG is that it allows sharing and storing high-resolution photos to be manageable without consuming excessive storage space.

Lossless compression

On the other hand, this type of compression preserves all of the original image data. This means there is no reduction in quality when compressing the file. While this results in larger file sizes compared to lossy formats, the benefit is that no detail is lost, which is essential for professional or detailed work such as logos or vector-based images. PNG and TIFF are popular lossless formats, making them ideal for images that require transparency or need to be resized without losing clarity.

JPEG

JPEG (Joint Photographic Experts Group) is a widely used image file format that offers flexibility in terms of quality and file size. You may also see the file extension JPG, which is the identical format as JPEG. 

Pros:

  • High compression: JPEGs enable excellent compression that can significantly reduce file sizes, making them ideal for web use to reduce load times. Sharing the smaller JPEG files can often be easier as compared to other formats.  
  • Compatibility: JPEGs are widely supported across web browsers, image editors, and image viewers. 

Cons: 

  • Lossy compression: The removal of some data from the original image during compression results in the degradation of image quality. The degradation can be further compounded if the JPEG is compressed multiple times. 
  • Transparency: JPEGs do not support transparent backgrounds, which can make the format unfit for some use cases like logos. 

PNG

A PNG (Portable Network Graphics) is a lossless raster image file. By being lossless, the PNG format requires a tradeoff between quality and file size. 

Pros: 

  • Lossless compression: The data and quality of the original image are retained during compression, making it ideal for sharper, more detailed graphics. 
  • Transparency: PNGs support alpha transparency, enabling images to have a transparent background, making this format well suited for logos and graphics that require layering. 

Cons: 

  • File size: PNG files are typically larger due to the nature of lossless compression. The larger file size can increase load times for websites utilizing the format.  
  • Colors: PNGs support only RBG color profiles and do not support CMYK profiles commonly used in printing. When a PNG is printed using a CMYK profile, some of the colors may change unexpectedly.

GIF

When working with animated images, one of the most commonly used formats is GIF. GIF supports lossless compression, but it has a limited color palette of 256 colors, which restricts its use for complex or highly detailed images. However, because of its simplicity and support for animation, it’s frequently used for short clips, memes, and web-based visuals. GIF is supported by web browsers, making it easy to integrate into websites for quick, attention-grabbing animations.

Pros:

  • Animation: GIF files support simple animations commonly used to create looping animations or clips, made widely popular on social media. 
  • Small file size: GIFs have a relatively small file size because they are restricted to only 256 simultaneous colors. The small size of GIFs allows them to be used on web pages without significantly slowing down load times. 

Cons: 

  • Colors: GIFs are restricted to 256 simultaneous colors, resulting in detailed images losing quality. 
  • Longer animations: While GIFs have a relatively small file size, longer animations can become larger in size, which can extend page loading times. 

TIFF

TIFF (Tagged Image File Format) is a preferred file format for high resolution printing, artwork, and photography due to the prioritization of quality.

Pros: 

  • Quality: TIFF is a lossless file type that retains the original image’s quality without data loss, making it ideal for very detailed applications.
  • Color support: Supports a variety of color profiles, including RGB, CMYK, indexed color, LAB, and grayscale, amongst others. TIFF also supports color depth up to 32 bits. 

Cons: 

  • File Size: The tradeoff for extremely high quality is very large file sizes compared to other image file types. 
  • Web support: TIFF files are ill-suited for use on the web because their large size leads to slow loading times. 

There’s another important category of image formats to consider: vector image formats. Unlike raster files like JPEG and PNG, which are made up of pixels, vector images use mathematical equations to create shapes. This allows them to be infinitely scalable without losing quality, making vector formats ideal for logos, icons, and other design elements that need to look sharp at any size. Common vector formats include SVG, which is also widely supported by web browsers, enabling seamless integration into modern websites. Vector files can be smaller in size compared to raster images when dealing with simple graphics, although for complex designs, file size can vary.
The best snipping tool for Windows and Mac

Don’t let clumsy built-in tools hold you back. Take and edit screenshots with Snagit!

Get Snagit
Someone capturing a screenshot of a mountain scene with a person and goats using Snagit, showing cropping tools on the screen.

Emerging image file formats

HEIF (High Efficiency Image Format)

The HEIF file format strikes a balance between high quality and small file sizes by utilizing more advanced compression than older file formats like JPEG and PNG. A HEIF file can also store multiple images within a single file for use cases like photo bursts and live images, making the format popular on mobile devices. 

AVIF (AV1 Image File Format)

Much like HEIF, AVIF also creates a balance of high image quality and small file sizes by using advanced compression methods. As an open source format, AVIF is royalty free and does not require paying licensing fees like some other formats. It also supports HDR (High Dynamic Range) and broad color support, making it ideal for web use, media, and photography. 

Choosing the right file format for your needs

For web and social media

Which type of image file format is best for the web or social media depends on the particular image. For photographs or general images, JPEG files offer flexible compression for detailed images and near-universal support. For icons, logos, and graphics that require transparency, PNG and SVG files combine transparent capabilities and solid compression. The primary difference between the two is that an SVG file can be scaled without becoming pixelated. For animations, GIF files balance animation capability with relatively small file sizes. One newer file type to consider is WebP, which combines some of the advantages of each of the previously mentioned recommended formats.

For professional photography and printing

High quality is the primary concern for professional photography and printing. Choosing an image format that utilizes lossless compression will ensure quality is maintained. Two popular lossless image file formats are PNG and TIFF, with TIFF files being particularly optimized for maximum quality. 

How to convert between image file formats

Use Snagit to convert and edit images

Snagit is a screen capture and image editing software that supports a wide variety of image file formats. See a complete list of supported file formats. Snagit is capable of converting one file format to another, such as converting a PNG to JPEG with minimal quality loss. You can also add annotations, adjust image size, and enhance the visuals before saving in your preferred file format. 

Annotate and edit screenshots with Snagit

Professional mark-up tools and powerful features make it easy to create helpful images.

Try it Free
Screenshot of a document about puffin migration patterns with a section for changing styles highlighted.

Convert images in Adobe Photoshop

Adobe Photoshop is another image editor that offers the ability to convert images from one file type to another. Photoshop offers advanced, but sometimes complex workflows, while Snagit is known for its ease of use.

Best practices for reducing file sizes without losing quality

  • Resize the image to the exact dimensions that it will be displayed. 
  • Use the image file format that is optimized for the intended use. If the image will be shown on more than one medium, select the optimal format for each medium individually. 

Conclusion

There are a few questions to ask yourself before deciding on an image file format. Do I need the image to scale without pixelating? Am I willing to trade a reduced file size for quality? Where am I going to place this image? Answering these questions will tell you which characteristics to look for in an image file format, with each format optimized to satisfy particular requirements. Choosing the right file format can make the difference between your webpage loading quickly or your print ad looking crisp and clear. And keep in mind, there are options to convert image file types using software tools like Snagit and Adobe Photoshop.

TechSmith

TechSmith is the market leader in screen capture software and productivity solutions for daily in-person, remote, or hybrid workplace communication and customer-facing image and video content. Our award-winning flagship products, Snagit, Camtasia, and Audiate, empower anyone to create remarkable videos and images that share knowledge for better training, tutorials, and everyday communication.

How to Normalize Audio for Perfect Volume Levels

Audio wave getting amplified in the Camtasia editor.
Audio normalization is the process of adjusting the volume of an audio recording so that it maintains a consistent and balanced level throughout.

The goal is to ensure that the overall loudness of the audio remains uniform, regardless of where or how it’s played. 

Without normalization, listeners may experience sudden and unwanted shifts in volume, which can be particularly jarring when transitioning between different sections of the audio or when listening on various playback devices, such as headphones, speakers, or in a car.

This technique is crucial not only for creating a smooth listening experience but also for ensuring that your audio content sounds professional across different platforms, such as YouTube, Spotify, or other streaming services. 

Different platforms often have specific loudness standards, and normalization helps to meet these requirements while preventing distortion or clipping that can occur with excessive volume peaks. By applying audio normalization, creators can offer a more polished and consistent sound, making it easier for their audience to enjoy the content without constantly adjusting the volume manually.

The easiest way to edit videos

Stop wasting time and discover how Camtasia makes creating incredible videos easier than ever.

Free Download
An image of a laptop showing the camtasia drag-and-drop editing feature

Why normalize audio?

Consistent Volume Levels Across Playback

Audio normalization is crucial for maintaining consistent volume levels throughout a recording, which significantly enhances the listener’s experience. By ensuring that the audio’s loudest parts are undistorted and its quietest parts remain audible, normalization prevents the need for constant manual volume adjustments. 

This is especially important when audio is played in various environments, such as streaming platforms, mobile devices, or home speaker systems, where inconsistent volume levels can be distracting and diminish the quality of the content. Whether it’s music, podcasts, or videos, maintaining a steady volume ensures that your audience can enjoy your content without any interruptions or unpleasant surprises caused by sudden shifts in loudness.

For creators, this is especially relevant in professional audio production, where fluctuations in volume can detract from the overall experience. Imagine a podcast where the intro music blares loudly, but the conversation between hosts is too quiet to hear clearly. Audio normalization smooths out these disparities, resulting in a more polished and enjoyable product. 

This consistency becomes even more crucial in scenarios where the listener is switching between different pieces of audio content or playback devices, ensuring the audio maintains a similar perceived loudness no matter the context.

Adhering to loudness standards

Another important reason to normalize audio is to ensure compliance with industry loudness standards, such as the -14 LUFS (Loudness Units relative to Full Scale) often required by major streaming platforms like Spotify, YouTube, and Apple Music. These standards are in place to create a uniform listening experience across different pieces of content, avoiding extreme jumps in volume when transitioning between tracks or videos. Normalizing audio helps creators meet these target loudness levels without exceeding the true peak limit, which could otherwise result in distortion or degraded sound quality.

For professional audio distribution, adhering to these loudness standards is not just a best practice—it’s a requirement to optimize how your content is presented on various platforms. Failure to meet these standards could result in automatic adjustments by the platform, potentially compromising your audio’s quality. 

Proper normalization ensures that your content sounds as intended across all devices and platforms while maintaining clarity and impact. Moreover, meeting these loudness standards enhances discoverability and overall user experience, which are critical factors in growing your audience and maintaining high content quality.

The process of adjusting audio: Peak vs. loudness normalization

Peak normalization

Peak normalization is the process of adjusting the audio file so that the highest peak of the audio track reaches a target level, traditionally 0dB. In practical terms, aiming for an audio level close to 0 dB means optimizing the volume of the recording while maintaining sound quality. The peak normalization process adjusts the peak amplitude without affecting dynamic range or perceived loudness. In the simplest terms, peak normalization adjusts each audio sample up or down by the same amount to get the highest peak to the target level.

Loudness normalization

Loudness normalization focuses on perceived loudness rather than peak level. It adjusts the entire audio file to meet a loudness target, adjusting different samples by different amounts. This makes quieter parts of the audio more audible without adjusting the loudest part beyond the true peak. The end result will be an audio track with a more balanced listening experience.

How to normalize audio in Camtasia Audiate and in Camtasia

Using Camtasia Audiate for audio normalization

Camtasia Audiate is an excellent tool for editing and normalizing digital audio recordings. Audio clips can be manually normalized by opening the Edit menu and selecting the Normalize Audio option. You can choose to normalize entire audio tracks or just a selection of the audio from an audio track. Additionally, Camtasia Audiate can be set to automatically normalize audio files and recordings added to a project.

Normalize audio in Camtasia for video projects

Camtasia offers built-in tools for normalizing audio in video projects. By default audio normalization is applied to each audio file added to a Camtasia video project. It can then be turned on or off via the audio properties in the properties panel. Additional tools can be used to add fades between audio clips and adjust the volume for the perfect viewing and listening experience.

Best practices for normalizing audio

Avoid clipping and distortion

It is important to avoid clipping when normalizing audio, especially when aiming for a maximum volume level close to 0dB. Clipping causes distortion which results in an unpleasant listening experience. One way to help with this is to maintain headroom below the true peak which prevents distortion in the final audio file.

Meet the right loudness standards

Different platforms may have varying loudness standards. Many streaming platforms have a loudness standard of -14 LUFS, but not all platforms adhere to the same standard. Ensure that the target level of the audio file is optimized for the intended streaming platform to avoid issues like compression or clipping.

Edit audio like text

You don’t have to be a professional to record and edit audio. Audiate makes it as easy as editing a text document.

Get Audiate
An image showing text being deleted in a doc and a corresponding timeline being cut

Conclusion

Normalizing audio ensures consistency in volume, maintains dynamic range, and meets industry loudness standards. Whether you work on podcasts, video files, or digital audio, Camtasia or Camtasia Audiate are great tools for your audio normalization needs. They make it easy with automatic normalization, and easy volume adjustment. Get started with a free trial of Camtasia or Camtasia Audiate today and start creating professional audio that provides a consistent listening experience for your audience!

Frequently asked questions

What’s the difference between peak and loudness normalization?

Peak normalization adjusts the highest peak of the audio file, while loudness normalization adjusts the perceived loudness of the entire track. Peak normalization focuses on the maximum amplitude, whereas loudness normalization considers how loud the audio sounds to the human ear.

Can I normalize multiple audio tracks at once?

Yes! Both Camtasia and Camtasia Audiate allow users to normalize multiple audio tracks in a single project. This can be done automatically to all types of audio and audio files added to a project. It ensures a consistent volume level throughout your project and makes it easy to adjust the volume of the entire project without having to worry about individual pieces of content.

Andy Owen

Andy Owen is the Video Production Specialist at TechSmith.
Most Proud of: being a husband to Chandra, father to Elle & Kai Favorites: The Muppets, Hanna-Barbera, Friends & Firefly Dislikes: Writing in the third person...

What is Blended Learning? Everything You Need to Know

Blended learning graphic displaying different types of media

Blended learning, also known as hybrid learning,  is growing in popularity with students because it provides the best of both worlds between face-to-face instruction and fully online courses. In fact, according to recent research, 44% of college students prefer a blended or hybrid learning approach, making it the most preferred teaching method.

Blended learning is not only popular with students, however. According to The Training Industry Benchmark Report 2024, blended learning is expected to become the second highest course type offered by training professionals in the future.

This innovative approach is gaining popularity in schools, universities, and corporate training programs due to the flexibility it offers, while not sacrificing the human connection.

What is blended learning?

Blended learning is an instructional approach that integrates face-to-face classroom methods with online educational materials and activities. This model leverages the strengths of both in-person and digital learning to create a more effective and engaging educational experience. A key difference with blended learning is it changes how instructors use face-to-face time. In the traditional classroom, the instructor delivers a lecture while students listen and take notes in a passive learning experience. There usually is time for questions and discussion, but the majority of classroom time is spent delivering and receiving a lecture.

Blended learning enables instructors to strategically choose parts of the course to deliver online, and then use face-to-face time for more engaging activities. For example, students may watch online lectures outside of class, while in-class time is spent applying what they’ve learned through debate, discussion, or group work. How much face-to-face time is replaced by online coursework varies depending on the course, but research suggests that students perform better and perceive a course more favorably when 33%-50% is online.

Station rotation model

In the Station rotation model, students rotate through different learning stations, combining online and offline activities. This model is particularly effective in K-12 settings.

Flipped Classroom model

Instead of attending class to get the lecture, the Flipped Classroom model flips it so that learners watch online lecture videos outside of class. Class time is then spent working on assignments. Because learning activities like projects happen in class, the instructor is available to answer questions and provide guidance. This approach maximizes face-to-face time for interactive learning.

Lab rotation model

Similar to station rotation, this model sets up online learning to occur in a dedicated computer lab. This enables organizations to leverage their existing labs and provides more scheduling flexibility for instructors.

Self-blended model

In this model, students supplement traditional courses with online training courses of their choosing.

Flex model

Learning is primarily online in a Flex model, with instructors providing face-to-face support as needed. Students complete the course on their own schedule, often in computer labs where an instructor is available for questions. Learners have more control over the pace of the course. This model is useful for technology training.

Make great tutorial videos

Camtasia makes it ridiculously easy to make tutorial videos that keep your viewers engaged.

Free Download
An image of a laptop playing a training video created in camtasia

The benefits of blended learning

A blended learning strategy offers numerous advantages for both educators and learners that is supported by various research studies.

Flexibility

Students can access materials anytime, anywhere, catering to different learning styles and schedules. This flexibility provides learners the opportunity to move at their own pace and not get overwhelmed. They can work around job and family commitments and get personal instructor support when needed.

Increased learner engagement

Utilizing face-to-face time for more meaningful activities such as debates, role playing, group problem solving, etc. creates a more active learning environment. This increases learner engagement by promoting participation and enabling students to demonstrate their learning.

Personalized learning

A blended learning approach makes it easier to tailor content to individual learning needs, allowing students to progress at their own pace. It also allows students with different learning styles access to a variety of learning materials, including face-to-face time with instructors.

Enhanced Collaboration

Online learning tools facilitate collaboration among students, even outside of class hours. In-class activities can focus on group projects to further enhance peer-to-peer collaboration and peer-to-instructor collaboration. 
Engaging visual content becomes more important in blended learning environments. Tools like Snagit and Camtasia enable instructors to create study guides, record lectures, make tutorials, and facilitate asynchronous discussions around course content.

How to implement a blended learning program

To successfully implement a blended learning program, consider the following steps:

  1. Identify goals. Clearly define what you want to achieve with your blended learning program.
  2. Define course learning objectives. Consider what knowledge and skills learners will gain by completing the course. 
  3. Determine how you will utilize time in class and outside of class. Think about what activities you want students learning to participate in during class time vs. online. Consider how you can use class time differently to create a more active learning experience. Also leverage the strengths of online access to distribute course material. Need inspiration? Check out how Professor Jason Archer uses video for online learning.
  4. Plan how you will leverage educational technology to achieve the learning objectives. The LMS is an important tool to help setup course structure and enable online access to materials. Choosing the right digital image and video creation tools is critical to enhance student engagement. Camtasia is a screen recorder and video editor popular with educators and trainers alike because of its ease of use.
  5. Provide ongoing support. Ensure that both educators and learners have access to technical support and resources.
  6. Track student progress. Use the LMS and other learning platforms and tools to monitor student engagement and performance.

Challenges and solutions for blended learning

While blended learning offers many benefits, it also comes with challenges. Below are common challenges to implementing blended learning along with how you can overcome them.

Challenge: Maintaining balance

When it comes to striking the right balance, ensuring the right mix of online and offline instruction can be tricky.

Solution: Regularly assess 

Think of finding the ideal balance as an ongoing task by regularly assessing the effectiveness of your blended learning model and making adjustments as needed. Collecting student feedback and monitoring student progress are key tools to get insight on how well learners are adopting the blend.

Challenge: Keeping students engaged

Positive outcomes tend to correlate with student engagement. And when it comes to the online learning portion specifically, some students may struggle to stay motivated.

Solution: Be intentional with online course design

In order to proactively and intentionally provide an engaging experience for students, use interactive software, assign collaborative projects, and provide regular feedback. You can make videos interactive with quizzes to check for understanding, and stimulate asynchronous discussion about the learning content through commenting.

Challenge: Tracking progress

When it comes to having crystal clear, one-source-of-truth performance records, iIt can be difficult to monitor student progress across different learning environments.

Solution: Use the right LMS

Utilize learning management systems that offer comprehensive tracking and reporting features. Select content creation tools that integrate with your LMS to track learner progress with course materials using standards like SCORM.

Stop repeat questions

Create clear videos and guides with Snagit so you only have to explain tasks once.

Try it Free
Screen recording of a dashboard showing conversion rate, spend, and monthly performance with a picture-in-picture webcam view of a smiling man.

Conclusion

Blended learning represents a powerful shift in education and training, offering flexibility, personalization, and enhanced engagement. By combining the best aspects of traditional classroom instruction with the advantages of online learning, blended learning improves learning outcomes. 
However, blended learning is not without its challenges. It requires rethinking how to utilize face-to-face time and what course materials will be most effective when delivered online. The good news is choosing the right technology tools can help make the transition to blended courses easier. Try Snagit and Camtasia to create engaging course content that works seamlessly with your LMS and begin experimenting with blended learning. Look for inspiration from others using video to enhance blended learning like Columbia University.

Kara Swanson

Marketing Content Specialist at TechSmith. I know way more about tea than any human being ever should.

How to Improve Customer Retention: Effective Strategies

Magnet attracting viewers.

It’s easier and more cost-effective to keep an existing customer than to acquire a new one. Maintaining and growing the customer’s LTV (lifetime value) is how successful companies achieve steady, year-over-year growth.

Great advice, but it doesn’t mean customer retention is easy. This article from IBM Insights says it’s harder today than ever, and therefore personalized guidance, clear instructions, and exemplary customer support are even more important. A tool like Snagit is a simple and effective way of giving your team a way to drive customer engagement and deliver an unparalleled level of personalized service.

Wall of text? Next!

Snagit makes it easy to communicate more effectively with visuals.

Learn More
Screenshot of a document about puffin migration patterns with a section for changing styles highlighted.

Why is customer retention important?

When you retain happy customers, not only are you likely getting 5 times the profit over a newly acquired customer, but this base tends to generate new customers via their networks and word of mouth. It’s also much easier to introduce additional products and services to your existing customers compared to finding yet more new customers. MoEngage uses a common formula, CRR = [E-N/S] x 100, to help you calculate your retention rate.

Strategies to improve customer retention

There are a number of strategies, and something like loyalty or reward programs may work better in a commodity-like market when the customer makes repeated purchases among a breadth of similar options. Depending on your customer base or geographic location, emphasizing your company values may have a higher than typical impact. 

In this article, we focus on three universal, time-tested customer retention strategies:

  • Deliver excellent customer service
  • Personalize the customer experience
  • Implement a customer feedback loop

Deliver excellent customer service

While one-size-fits-all knowledge bases and generic tutorials have their place at scale, little is more impactful and helpful than delivering a clear and personalized response. Many companies will deliver text-based, scripted responses. They put it on the customer to navigate the options and figure it out. 

Compare this to a company that equips their chat, social, and ticket-based agents with a tool like Snagit. These agents respond with a clear step-by-step image tailored exactly to the customer’s needs. They can also share an on-demand video. 

Communicating in this manner means there is less back and forth, and the customer gets straight to success. Their expectations are exceeded, and they tend to leave the highest customer survey satisfaction (CSAT) scores.

Guide customers to what they need
Instead of dropping someone off in a forest of tutorials, guide them to exactly what they need.

Personalize the customer experience

Companies are often reactive. If the customer has an issue, then we respond. Try proactively reaching out to your loyal customers. An easy example is when you have a new or updated product or offering. Don’t just send them a faceless marketing message that the whole world gets.

Instead, make a Snagit video, from you (example). Acknowledge their investment with you and introduce the new product or service. Your tone and excitement comes through and you can tweak the message just right for your client or customer. Cut through all the noise and offers in their mailbox.

Record your screen with Snagit

Snagit makes it easy to share quick updates and how-to’s by capturing exactly what’s happening on your screen.

Get Snagit
Screen recording of a dashboard showing conversion rate, spend, and monthly performance with a picture-in-picture webcam view of a smiling man.

Implement a customer feedback loop

Customer feedback can flow into your company in a number of ways. One example is customer surveys, incentivized or not. There are endless survey prompts these days. Oil change, car wash, self-checkout; all surveys. There’s nothing wrong with surveys, but response rates are in the low single-digits, and the information tends to lack actionability. 

Customer-facing teams tend to have the most insight into everyday customer struggles and friction points. Equip these teams with a tool like Snagit so they can effortlessly capture, annotate, and tag examples. This is a great way to build empathy and understanding to increase customer retention. Even better, the results tend to be very actionable.

Example of capturing customer interaction
Capture an interaction while context is fresh. Tag and share to a feedback repository to increase understanding and actionability.

Leveraging Snagit to increase customer retention

Until now, this article has focused outward: from the company to the customer. But looking inward is a critical and under-examined aspect of customer retention. A company with ill-informed, lackluster agents without the capability to adapt to changing policies and processes is in big trouble. 

A tool like Snagit is invaluable for efficiently onboarding and maintaining top-quality employees. With Snagit, a new agent can quickly send a video question or timely image of a situation to a mentor in real time. They receive “just in time” training around a policy or process that was updated that morning. Customer Care, marketing, and other teams are able to communicate the latest feature or enhancement in an “on-demand” manner and avoid calling a face-to-face meeting. 

Benefit 1: Clear and effective communication

We can argue the numbers, but roughly 70% of learning and development happens through on-the-job experiences, 20% through interactions with others, and 10% through formal education. This is often called the 70/20/10 Rule as we know it today, and this is where Snagit comes in. 

We learn by doing, and we learn by show and tell. Just “telling” doesn’t work too well. With Snagit, someone asks a question in Teams, Slack, Skype, email…whatever team chat tool the company uses. Maybe they include an image of what they are struggling with. Maybe they create a short video question. 

Someone more knowledgeable reviews and obtains a crystal clear understanding of the problem at hand. They are able to respond accordingly, and if the answer is complex, they may include an image or video back. This is one of the cheapest and most effective ways to ‘level up’ your customer-facing teams. 

Example of text and image used together to describe a question or problem
Describing a question or problem with words alone usually doesn’t work nearly as well as sharing an image showing the problem.

Benefit 2: Efficient problem-solving

Subject matter experts (SMEs) have the potential to contribute a great deal toward your retention goals. Perhaps they have returned from a customer site visit or finally overcame a technical situation that was hurting customer satisfaction for weeks. 

Using Snagit to create documentation, supported with video, can be a great way to spread this learning among teams. Unlike a text-laden email or memo, information enhanced with images and videos is more likely to be understood and remembered.

Stop repeat questions

Create clear videos and guides with Snagit so you only have to explain tasks once.

Try it Free
Screen recording of a dashboard showing conversion rate, spend, and monthly performance with a picture-in-picture webcam view of a smiling man.

Benefit 3: Improved training and onboarding

This section led with the 70-20-10 “rule” and emphasized the informal side. But, guess what? Formal training is important too. There is a baseline of information that many people need to understand, and all companies have some LMS or SharePoint portal or means to deliver this training. 

We’re back to the chorus here. Formal training that has compelling image and video support tends to be a lot better than text-based training. Snagit can easily elevate and supplement formal training.

While there can be some good 3rd party content out there, many companies need content specific to their systems and needs.

Measuring the success of your retention efforts

There are different types of business and customer characteristics, so step one is to establish a baseline and test ‘what-if’ scenarios against it to ensure that the metric you use will hold up a year into the future. A software company that has a freemium model with monthly paid add-ons may care far more about the customer lifetime value than monthly active users. A provider of goods or services may focus on year over year retention rates. Below are some common industry approaches.
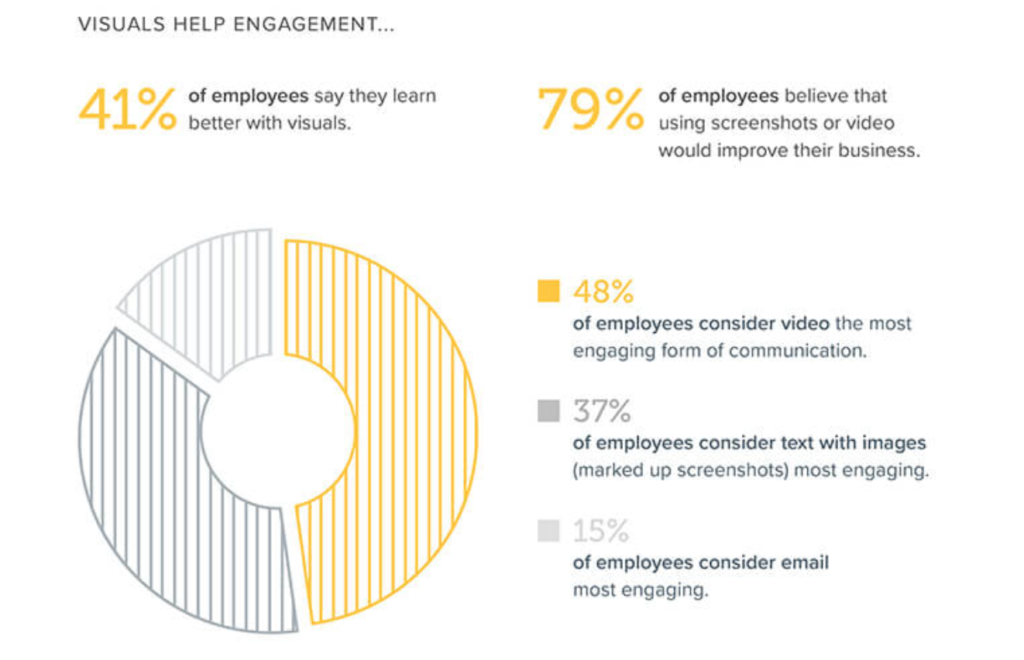
Customer Retention Rate (CRR)

For this measurement, a high number is a good number. The number is given as a percent. If the result is 77%, it means that over a period of time you retained (kept) 77 out of 100 customers. This calculation accounts for any new customers added during the time period as well.
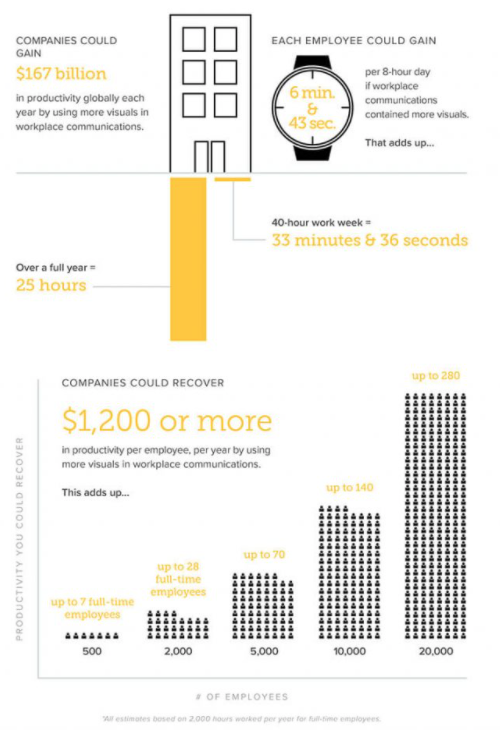
The formula is:

((Total number of customers – New customers) / Prior total customers) x 100
((E – N) / S) x 100

  • E = Number of customers at end of time period
  • N = New customers added during time period
  • S = Number of customers at start of time period

Example, using one month as the time period
(E) Number of customers on January 31 = 5,000
(N) Number of customers added during the month of January = 250
(S) Number of customers on January 1 = 6,000

(5000 – 250) / 6000 = 0.792
0.792 x 100 = 79.2% retention (CRR)

Churn Rate

Churn rate is just the opposite of retention rate. It’s how many customers you lost over a given period. It’s recommended that the company try to decide on whether you want to measure churn or retention. It’s frustrating if some in the company are using churn percentages while others are using retention numbers. Speak the same language.

Revenue Churn

In addition to measuring customer retention or churn, it is a good idea to add another layer that accounts for the revenue per customer. Having a great retention rate is a lot less meaningful if you have to slash prices and discount like crazy to keep them. Some companies try to include the cost of retention too. 

The idea of retaining a customer is that it’s far easier and cheaper to retain than to acquire new. Still, keep an eye on costs associated with mailings, phone calls, offers, targeted marketing, etc. 

Customer Lifetime Value (CLV)

This and the Repeat Purchase Rate metric are a level beyond simple churn or CRR. Retention is still a critical component, because if they don’t renew, their lifetime value has reached the end. 

This metric is more sophisticated because you can look across cohorts and customer segments and start to measure what sales (if anything) you are capturing in addition to the monthly or annual fees. The lowest lifetime value would be the baseline service or subscription fee * number of months/years a customer tends to be active.

Depending on the company or industry business model, one company could have the same retention rate as their competitor, but one of the companies has figured out how to provide more value, software, charged services, etc. and achieve a much higher CLV. 

Repurchase Rate

What’s nice about this metric is if you can tie the customer to the purchase(s), you realize a data point that is more quantifiable than perhaps surveys or satisfaction scores. Yes, surveys such as NPS (Net Promoter Score) can be helpful, but there is little substitute for the customer that backs up their commitment to your company by parting with their hard-earned cash. 

If you are able to connect purchases to individuals, you may also be able to segment and learn which demographics or “cohorts” you are seeing success with and adjust your strategies accordingly. 

You may also find that the first repeat purchase is the hardest to get. If you can get a customer to repurchase once, the odds of you keeping them for an extended period are likely improved. 

The calculation is simple: number of returning customers / number of total customers. 

Net Promoter Score (NPS)

Essentially, “On a scale of 1 – 10, how likely are you to recommend this product or service to a friend or colleague.” The goal is to get 9s and 10s. 6 and under is a really bad score, and 7-8 are considered lukewarm and nothing to get excited about. Learn more about NPS and other customer satisfaction metrics from a company like SurveyMonkey.

Ready to improve customer retention with Snagit?

The Snagit trial is 100% fully functional. 

  1. Learn about Snagit here
  2. Download it here
  3. Choose your own adventure—do you want to try Snagit images or Snagit video first? 
  4. Visit this tutorial page and choose one of the following sections—in less than 10 minutes, you’ll be on your way!
Snagit learning paths to get you started with images or video

FAQs about customer retention and Snagit

How can I use Snagit to improve communication with customers?

Top customer-facing uses include: delivering personalized customer service and support images and videos, and offering proactive updates that leverage image and video.

What are the best tools for collecting customer feedback?

Customer-facing employees should use Snagit to capture, annotate and tag examples of customer friction points, and situations that tend to lead to customer dissatisfaction.

How does improving communication help with customer retention?

Snagit helps people to communicate with more clarity and impact. This tends to reduce back and forth, misinterpretation, and customer frustration. An added benefit is that using Snagit adds a personal touch that makes customers feel special.

Annotate and edit screenshots with Snagit

Professional mark-up tools and powerful features make it easy to create helpful images.

Try it Free
Screenshot of a document about puffin migration patterns with a section for changing styles highlighted.

Matt Pierce

Matt Pierce is a Learning & Video Ambassador at TechSmith. In this role speaks and teaches about video creation and visual communication. A graduate of Indiana University he has ten years of experience working in learning and development with a focus on visual instruction. He has directly managed the training, user assistance, video, and other teams for TechSmith. Teach him something @piercemr