When you start creating videos, there’s often a lot of preparation required before you can even think about hitting the record button. If you are recording using a camera, you need to find a set, adjust lighting, and have the proper camera angles.
The best way to organize this preparation is with a shot list.
Even if your video will only use screen recordings without any camera footage, it’s helpful to have a shot list to help you identify and plan for everything you want to record on shooting day.
What is a shot list?
A shot list is a document that maps out exactly what will occur and what will be used in that particular shot, or scene, of the video. Think of it as a shooting schedule to help organize and begin with a solid plan.
Shot lists go hand-in-hand as part of writing the script, creating a storyboard, and the overall pre-production process.
These lists are essential parts of the video creation process because they allow you to organize your information, stay on track, and keep an updated list of every shot you need to finish your video. They are detailed, and they are worth every minute you spend on them.
The easiest way to edit videos
Stop wasting time and discover how Camtasia makes creating incredible videos easier than ever.
Let’s look at how to make a shot list, starting with a breakdown of each of the key elements you should include:
Script/SB reference: Indicates which part of the script or storyboard the shot corresponds to, ensuring alignment between planning and execution.
Shot number: The reference number assigned to each shot. This is essential for easy identification and organization.
Interior/exterior: Specifies whether the shot takes place indoors or outdoors. This is crucial for lighting and equipment planning.
Camera shot: Identifies the type of shot—such as Wide Shot (WS), Medium Close-Up (MCU), or Very Wide Shot (VWS)—to establish the shot’s visual style.
Camera angle: Specifies the perspective from which the camera will capture the shot—like eye level, high angle, or even birds-eye view—adding layers of meaning to the scene.
Camera movement: States whether the camera will remain static or employ a specific movement like panning, which affects the energy and pacing of the scene.
Audio: Indicates if the shot includes specific audio elements like a voice-over (VO), an important note for post-production.
Subject: Listing any people needed in the shot is an important detail for scheduling and ensures all team members know what should be captured.
Description of shot: This is a detailed summary of the shot in question, including the visual elements and type of shot to help guide the director, cinematographer, and crew.
While there is basic information that should be included on every shot list, there’s no right or wrong way for you to put yours together.
With that in mind, you may wish to add or even swap out some columns to list other bits of information, such as:
The scene number: This is a number to identify each scene, which will help with the organization and workflow of the shoot.
Location: Specifying the set or location for each shot will help when planning logistics.
Framing: This should indicate how you want a shot to be composed, which will help maintain artistic coherence and consistency.
Action/dialogue: This is where you’ll describe what you want to happen in the shot, such as character actions and important lines, ensuring key parts of the story are captured.
Props needed: Detail the props required for each shot.
Extra notes: You can also add a section for other (yet essential) information, like special camera instructions, lighting requirements, or anything else that needs to be conveyed to the crew.
Free shot list template
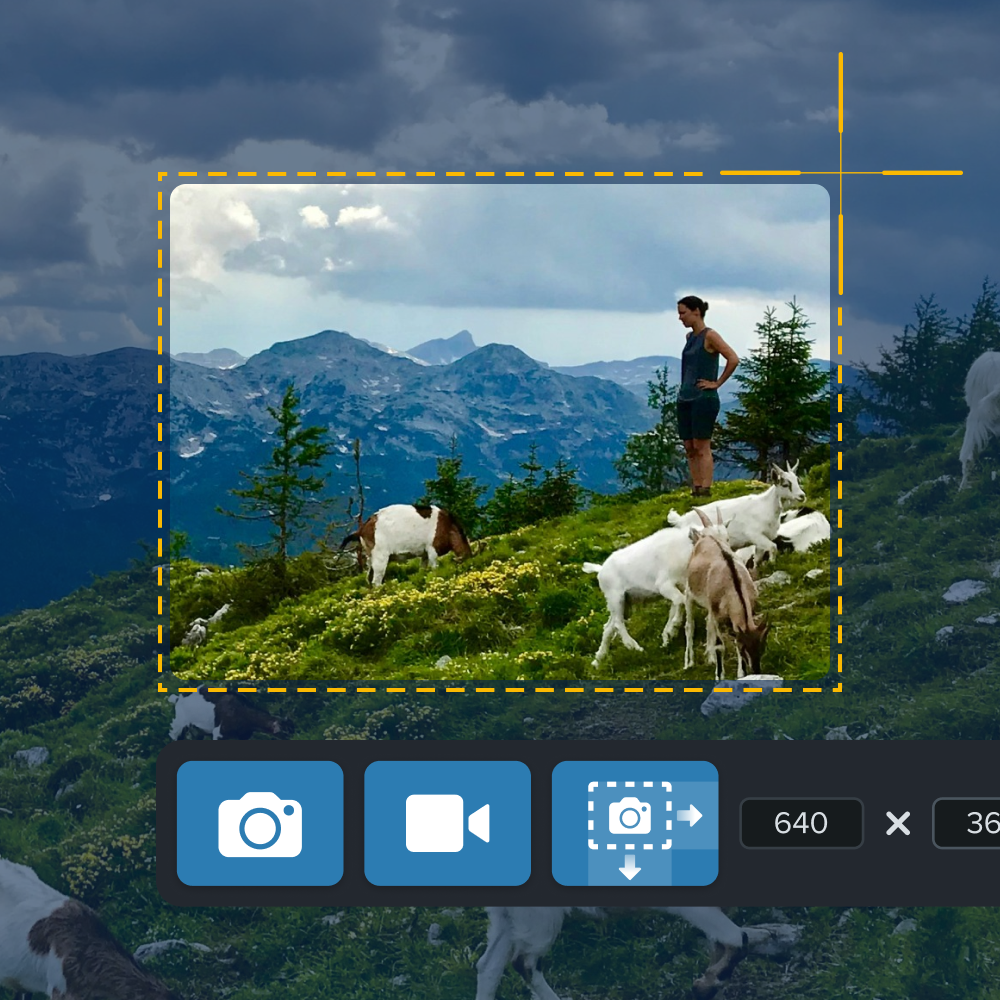
Now let’s take a closer look at what a shot list might actually look like.
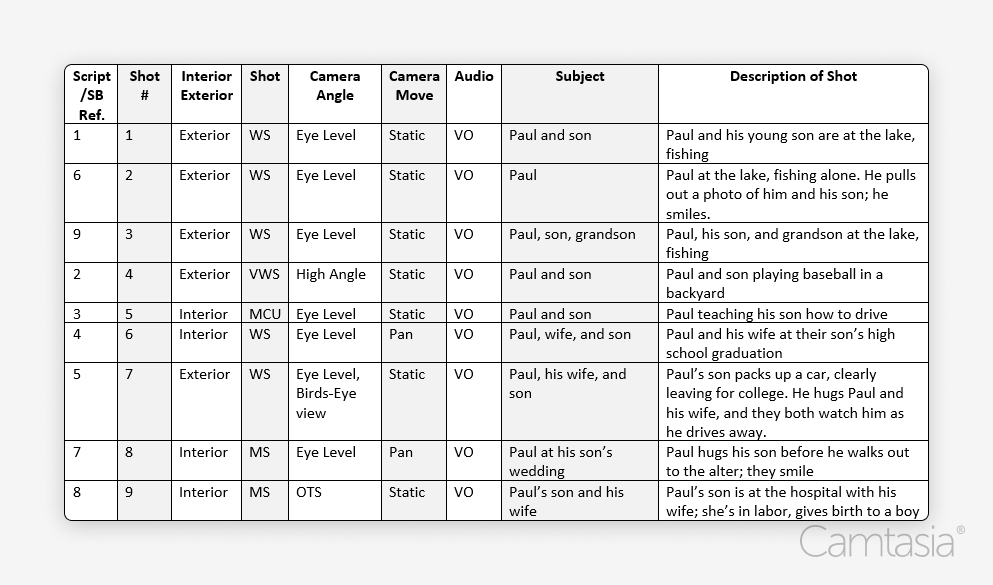
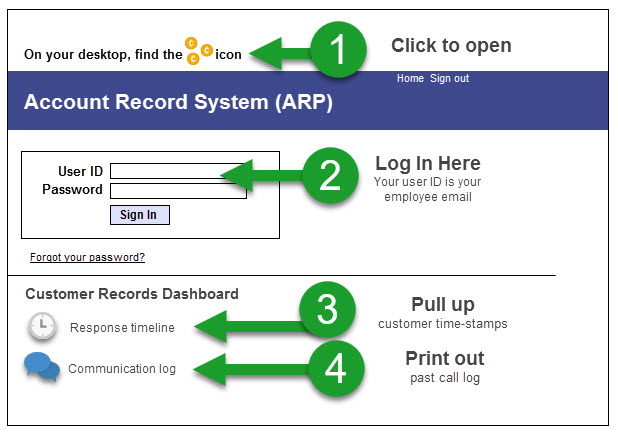
In the screenshot below, you can see a clear shot list example, complete with information about individual shots to help convey to the crew who’s needed on set, details of the action, and where each shot will be filmed.
We’d recommend organizing your shots based on location. Grouping shots this way will make it easier to film because you’ll be able to film everything you need at one given time.
For example, to shoot a scene at a lake for the beginning and end of the video, it would make sense to film these shots at the same time rather than separately. While you won’t be filming in the order of the storyboard, this makes filming much more convenient for everyone involved, from crew members to the assistant director and you!
The different types of shots
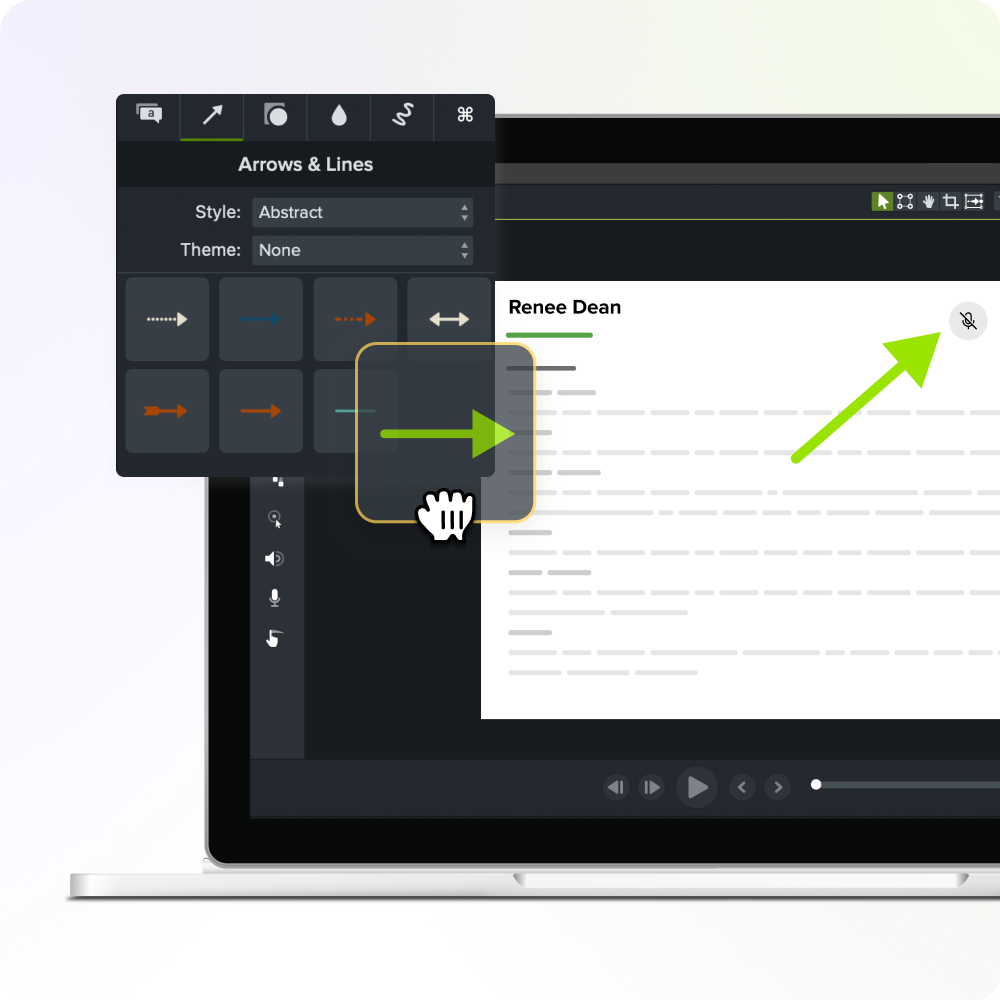
Perhaps one of the most important aspects to consider when creating your shot list is how you want each shot to be captured. This includes information about the types of shots you want to film, as well as camera angles and movements.
Camera angles could include high and/or low-level shots, whereas a move may be on a handheld camera, a crane, or a dolly. Once you’ve decided on your camera work, it’s also important to think about how you’ll record the audio, whether it’s using a boom mic or a voice-over—and don’t forget about your B-roll. We’ve assembled a quick and easy chart that you can refer to below for more shot types, camera angles, camera moves, and audio.
This is a lot to consider, but all of these details are vital to creating a shot list that ensures your shoot runs smoothly.
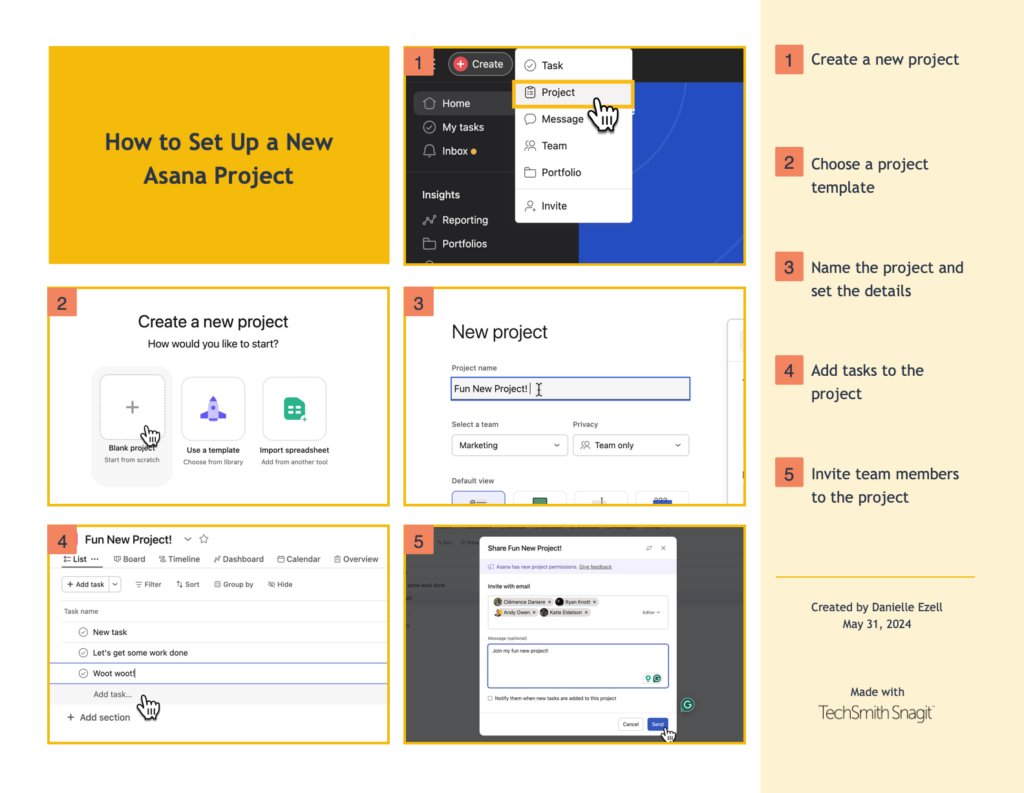
How to create a shot list in 5 steps:
For the actual process of creating your shot list, we suggest using a spreadsheet. The layout makes it easy to organize all the information and rearrange it as needed.
We’re going to show you how to make a shot list in five easy steps.
1. Pick a scene
The first step in creating a shot list is choosing a scene from your script to focus on. Then, in your spreadsheet, create column headings using the nine essential elements of a shot list that we’ve discussed above, such as the scene and shot numbers, location, framing, etc.
2. Break down each capture
Now that you have your scene and spreadsheet ready, it’s time to dissect each shot. This means going through them one at a time and thinking about how you’d like to capture them.
3. Number your shots
Clarity is key when organizing your shot list, which is why it’s so important to number your shots. Start with the number 1 for your first shot, and for each subsequent shot, create a new row in your spreadsheet and give it a unique number.
This simple system makes it much easier to reference specific shots during a busy shoot and also helps in the editing process later on.
4. Assign a shot for every part of the scene
While it can be tempting to skip a “minor” shot when creating your shot list, with an “it-will-all-work-itself-out” mentality, the whole point of your shot list is to list all your shots. So, make sure that each part of your scene, no matter how small, has its own spot on your spreadsheet. By being meticulous in this way, you’ll eliminate uncertainty and ensure that every element in your scene gets the attention it deserves during filming.
5. Draw rough sketches
This visual aid will help you and your crew better understand how a scene will unfold. Plus, it’s also a good way to try and spot any potential issues before you’re on set. If something doesn’t look correct in the sketch, you can adjust your shot list accordingly.
Your shot list can be as simple or as detailed as you see fit. The most important thing is making sure you have a shot list in the first place—while it might seem like a lot of work upfront, it will make both shooting and editing your video much easier in the long run.
The easiest way to edit videos
Stop wasting time and discover how Camtasia makes creating incredible videos easier than ever.
Creating an online course offers an excellent opportunity to share knowledge, build passive income, and engage learners. Whether you’re teaching a specialized skill, offering professional development, or sharing a hobby you’re passionate about, an online course allows you to package that knowledge in a way that’s scalable and accessible.
Not only can you reach learners from different parts of the world, but you can also engage them through interactive content, quizzes, and community discussions that enhance the overall learning experience. Plus, with the right marketing and platform choices, your course can generate income over time, providing long-term financial benefits as your student base grows.
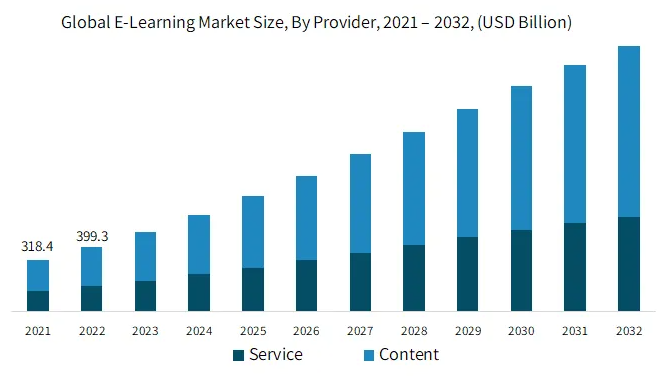
The e-learning market is experiencing rapid growth, with projections indicating it will grow more than 14% per year from $400 billion in 2022 to $1 trillion by 2032. This is a large market with many white space opportunities for successful online courses.
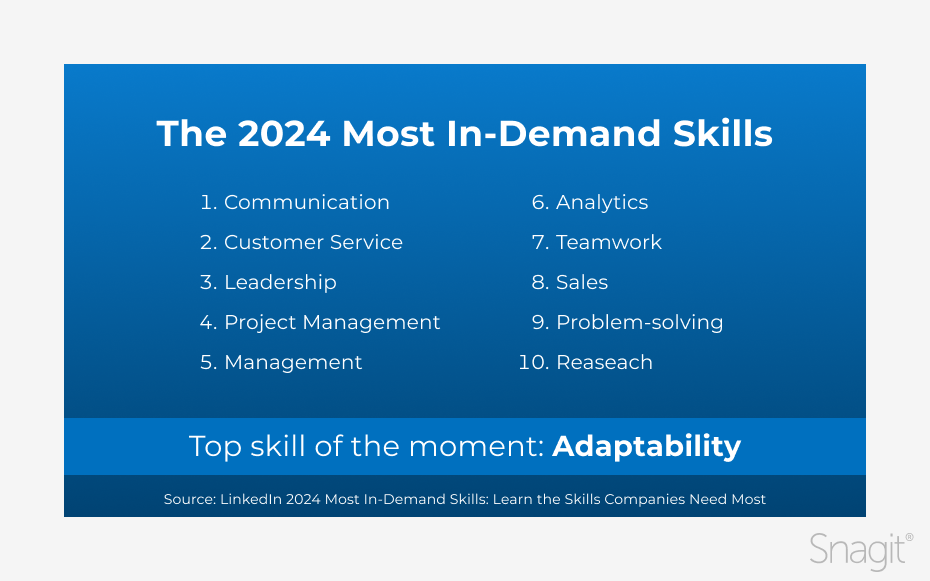
The most successful online courses are built around solving real-world problems. Begin by brainstorming topics that align with your expertise and passion while addressing the needs of your target audience. Consider focusing on skills that are most in demand as the subject for a course because these topics will be popular with learners.
Validate your course idea
Before investing time and resources into creating your course, it’s crucial to validate your idea. This process ensures there’s demand for your topic and helps refine your course concept. Some effective validation methods include:
Surveying your existing audience or social media followers
Analyzing competitor courses and their reviews
Conducting keyword research to gauge search interest
Creating a landing page to gauge interest and collect email sign-ups
You also want to research what existing topic areas are successful with course creators. If a niche is showing success, that indicates there is a market willing to pay for those courses. According to The State of Creators ‘24 Report, the top niches used by six-figure creators are business and marketing, finance, and real estate.
Step 2: Define your learning objectives
Create clear and actionable learning objectives
Well-defined learning objectives are the foundation of any successful online course. They help structure your content and attract the right audience by clearly communicating what learners will achieve. Well-defined objectives serve as a roadmap, helping learners understand what they will gain by the end of the course and keeping the content focused and relevant.
Here is how to effectively craft learning objectives for your online course:
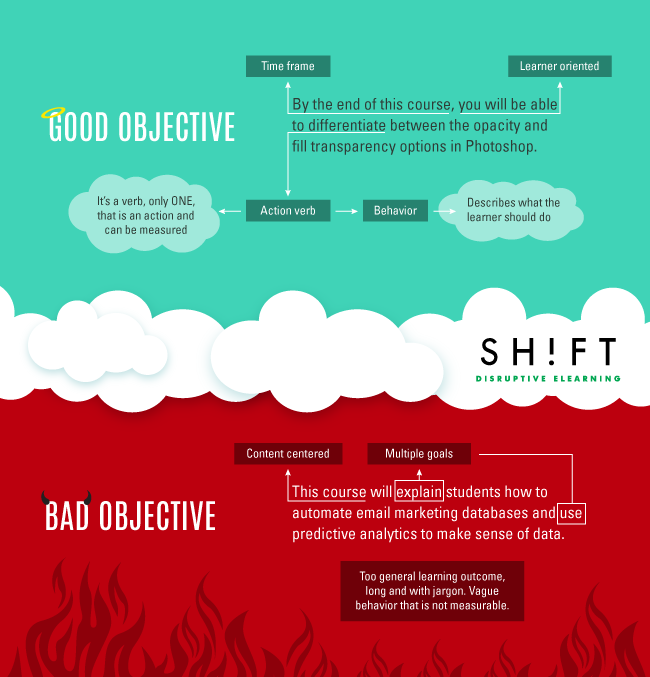
Use action verbs to describe measurable outcomes learners will acquire from course content.
When writing your learning objectives, use action verbs that describe specific, measurable outcomes. Words like “analyze,” “create,” “demonstrate,” “solve,” or “evaluate” clearly communicate what the learner will be able to do after completing the course. Avoid vague terms like “understand” or “learn,” which are harder to quantify. For example, instead of saying “students will understand the basics of marketing,” a clearer objective would be “students will be able to create a basic marketing plan for a small business.”
Focus on skills or knowledge that can be applied immediately.
Great learning objectives focus on skills or knowledge that learners can apply right away. Practical, hands-on skills are often more engaging for students because they offer tangible value. For instance, if your course is about digital marketing, one objective could be: “By the end of this course, learners will be able to design a social media campaign and analyze its performance.” This ensures learners can immediately put their new knowledge to use.
Ensure objectives align with your target audience’s needs and expectations.
Finally, ensure your learning objectives are aligned with the needs and expectations of your target audience. Understand their goals, pain points, and the outcomes they are seeking. For example, if your target audience is entrepreneurs, your objectives should reflect the business skills they’re looking to enhance. Well-crafted learning objectives not only attract the right audience but also keep them engaged throughout the course by delivering the value they’re looking for.
See the image below for an example of good vs. bad objectives.
Plan your modules, lessons, and activities with a course outline
There are building blocks you can leverage to help build the structure of your course, much like a document outline defines a document structure. Lessons are smaller units of content focused on teaching a specific objective or outcome.
A lesson may include videos, text, quizzes, assignments, and other resources. They can also help break a course into manageable time chunks for learners. Finally, lessons offer learners the opportunity to demonstrate the knowledge gained from the lesson through activities or assignments. For example, a quiz might be an activity you assign learners to help them know if they have learned the lesson objective.
Modules are bigger than lessons and cover a broader unit of information. They typically include several lessons. Think of modules like the main topic headings for a document outline. Organize your course content into a logical structure by combining lessons into modules that complement each other toward teaching a learning outcome.
This approach helps learners progress through the material logically and retain information more effectively. Make sure you ask yourself if each module and lesson is addressing the learning objectives. Lastly, ensure the order of modules and lessons enables learners to gain the prerequisite skills needed for more advanced lessons later in a course.
Module
Lesson
Activity
Purpose
Organize course content into logical units supporting a main course concept learning objective.
Help students learn a specific objective and demonstrate their learning. Typically, these are broken down into manageable time chunks.
Individual assignments learners do as part of a lesson. They help learners demonstrate their knowledge and reinforce the lesson objective.
Structure
A full unit or broad topic area that includes several lessons.
A group of activities that support a specific learning outcome.
One specific type of interaction that helps teach or reinforce lesson content.
Content
Made up of lessons and activities presented in a specific order.
May include videos, text, links, quizzes, assignments and more.
A specific item such as a quiz, video, discussion post, and more.
Pro Tip: Consider creating a mini-course from a module or lesson as an introduction or for niche topics, providing quick wins and focused learning experiences. You can leverage mini-courses to help build an audience for the complete course.
Step 4: Record and edit course material
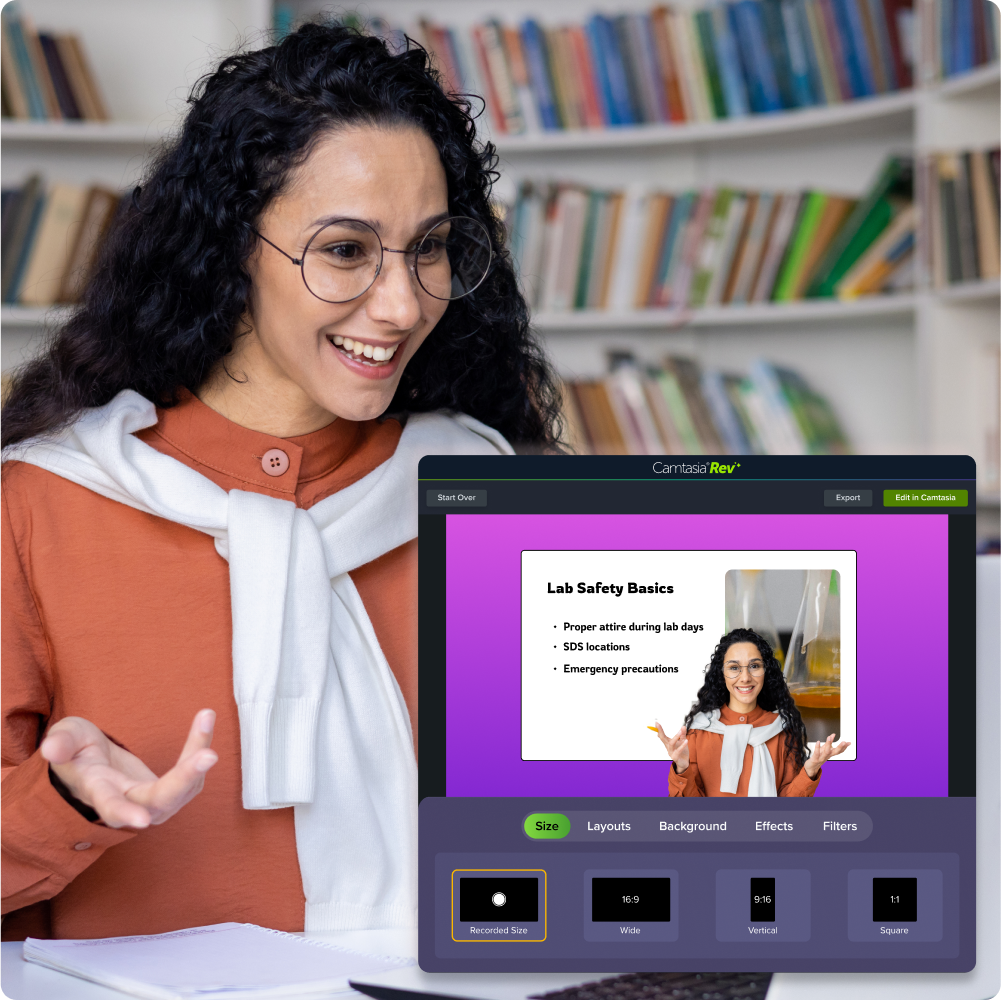
Create engaging and professional-looking videos
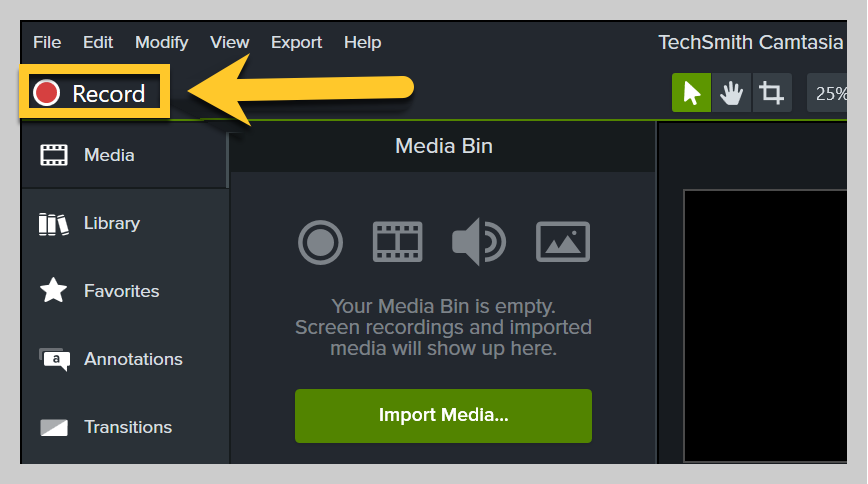
Video is the most engaging way to deliver course content, but creating and editing video can seem daunting. Leverage software like Camtasia to record high-quality video lessons, screen tutorials, or presentations. Its ease of use and short learning curve make it a great choice for both beginners and more experienced creators.
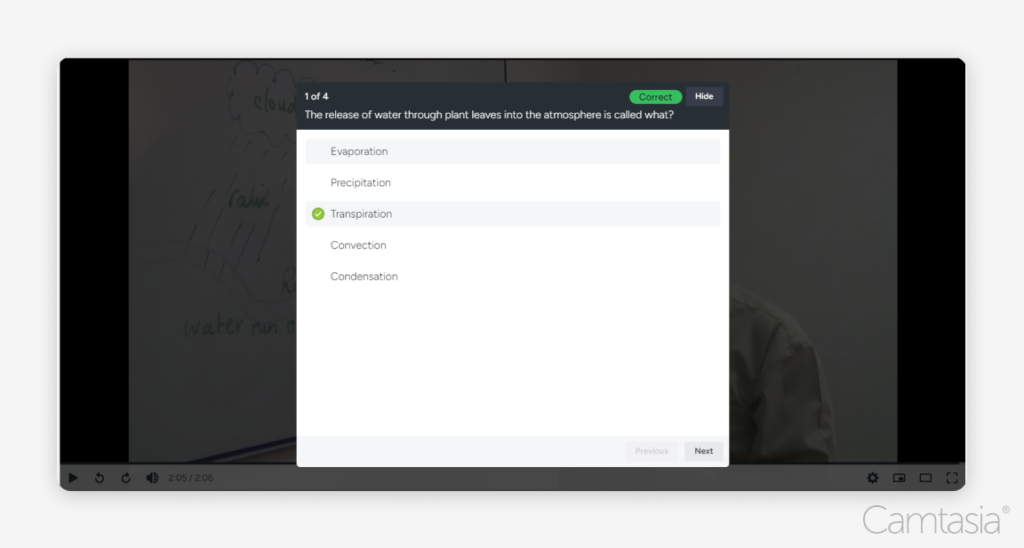
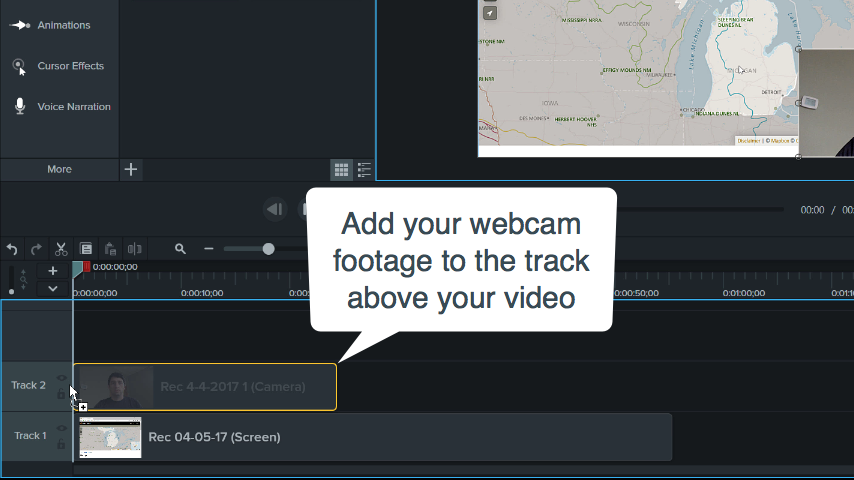
You can easily record your screen and camera, add transitions, callouts, titles, and captions, and more to enhance the overall learning experience. This tool is particularly useful for creating visually appealing content that keeps learners engaged throughout the course. Additionally, you can ensure your video’s audio is clear and high-quality to complement the visuals, making the learning experience more immersive and professional. Designed to make creating course material easy, it even includes the ability to add interaction to videos such as quizzes, polls, and clickable links.
“I find Camtasia fantastic. I use it to create video courses and I can do everything with it that I have always wanted. I can fade things in, fade them out, add effects, and I can recommend it to anyone who works with video courses or wants to create them. And from my point of view, there is no better tool than Camtasia.”
The easiest way to edit videos
Stop wasting time and discover how Camtasia makes creating incredible videos easier than ever.
To cater to various learning styles and maintain engagement, incorporate a mix of media types in your course. This will make the course content more interesting and dynamic. The more engaged learners are, the more likely they will complete the course and tell others about it. In addition to video, Include the following types of media in your course content where it makes sense:
Infographics and images for visual learners
Audio recordings for auditory learners
Interactive quizzes to reinforce learning
Written lessons for in-depth explanations
Downloadable resources for practical application
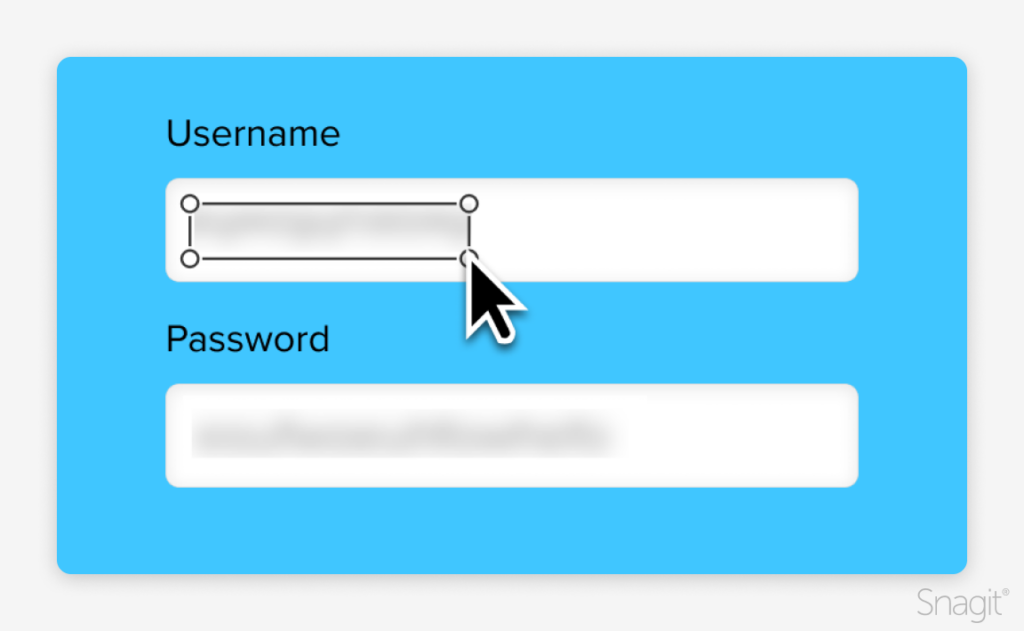
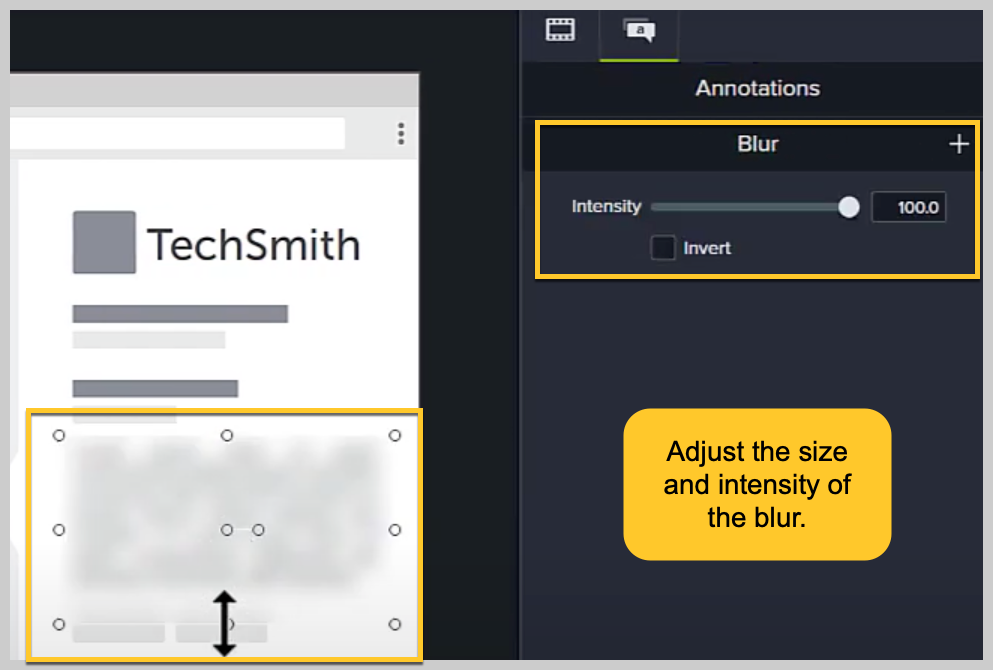
Utilize screen capture and image editing tools like Snagit to create custom visuals and guides for learners. Snagit makes it very easy to annotate images, such as identifying steps a learner should take to complete a task. The step tool automatically numbers and styles each step. It is also very useful for hiding sensitive information in your visuals.
Record your screen with Snagit
Snagit makes it easy to share quick updates and how-to’s by capturing exactly what’s happening on your screen.
Determining the right price for your course is crucial for its success. Consider factors such as:
Course length and depth of content
Unique value proposition
Target audience’s willingness to pay
Competitor pricing
Test different price points and consider offering tiered pricing options. It is tempting to offer a course at a lower price to make it more attractive. However, make sure to calculate a rough estimate of the number of customers you reasonably expect to gain.
If you price too low, you risk not earning enough revenue to meet your profit goals. According to a study by Podia, the average price for an online course is $137, but prices can range from $50 to $500+ depending on the niche and perceived value.
Don’t be afraid to experiment with pricing. You can change it over time. For example, you could offer a low initial price to the first 100 customers to create some urgency. You might also offer a free mini-course as a teaser to attract potential learners and showcase the value of your full course.
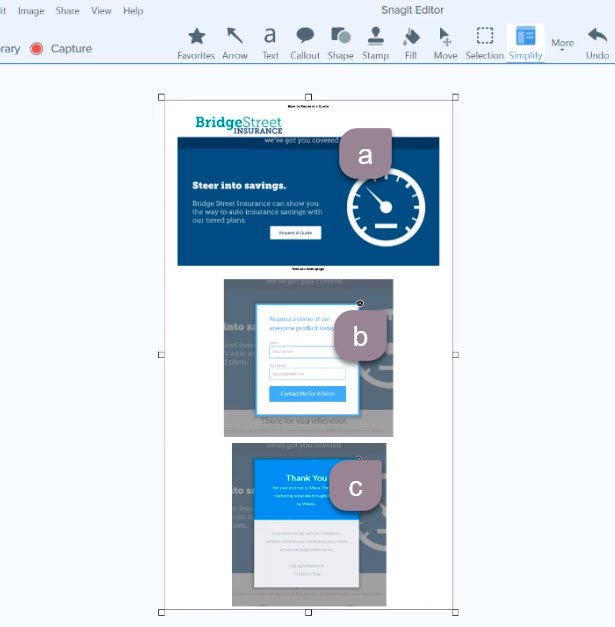
Your course sales page is critical for converting visitors into enrolled students. It serves as the first impression for potential learners, and it needs to clearly communicate the value your course offers. Key elements of an effective sales page include:
Clear, benefit-driven headline: Your headline should grab attention immediately and highlight the primary benefit of your course. This is the first thing visitors see, so it needs to convey how your course solves a problem or fulfills a need.
Compelling course description highlighting key learning outcomes: Focus on key learning outcomes and emphasize how this new knowledge or skill will positively impact their lives. Use bullet points to make this section easy to scan, and avoid lengthy paragraphs.
Social proof (testimonials, student success stories): They help build trust and credibility, showing potential learners that others have already gained value from your course.
Course curriculum overview: This helps students understand the course’s structure and what they’ll be learning at each stage.
Instructor bio establishing credibility: This is an opportunity to establish credibility and build a connection with potential students. Highlight your qualifications, experience, and expertise related to the course topic. Sharing a bit of your personal story can make you more relatable and trustworthy.
Clear calls-to-action (CTAs) encouraging enrollment: Encourage visitors to take the next step with phrases like “Enroll Now,” “Start Learning Today,” or “Join the Course.” Make sure your CTA buttons are easy to spot and lead directly to the enrollment process.
Use visuals, such as course preview videos or infographics, to make your sales page more engaging and informative. Include an introduction video from you to connect with your audience. This can include information about you to establish credibility, and an overview of the course focusing on what the learner will gain by completing the course.
Step 6: Promote your course
Leverage social media and marketing tools
Utilize social media platforms to reach a wider audience and promote your course effectively. Not all social media platforms are the same. Take time to think about your target audience and what social media tools they are most likely using.
For example, if your course is targeting business professionals, LinkedIn might be the best social media platform to leverage first. Some strategies include:
Sharing teaser content on platforms like Facebook, LinkedIn, Instagram, and YouTube.
Creating short video clips or animations using Camtasia to showcase course highlights
Engaging with your audience through live Q&A sessions or behind-the-scenes content
Using paid advertising to target specific demographics interested in your course topic
Build an email list
Email marketing remains one of the most effective ways to promote online courses. To build your email list:
Offer a free lead magnet, such as a mini-course or ebook, related to your main course topic (hint: repurpose a lesson or activity from your course and turn it into an ebook.)
Create a landing page optimized for email sign-ups
Use email automation to nurture leads with valuable content and course information
Segment your list to deliver targeted promotions and content
According to Campaign Monitor, email marketing has an average ROI of $42 for every $1 spent, making it a cost-effective promotion strategy.
Step 7: Host your course
Choose the right online course platform
Selecting the right online course platform is crucial for delivering a seamless learning experience and managing your course efficiently. The platform you choose should align with your content delivery needs and your audience’s preferences. Here are some key factors to consider when choosing a platform:
Look for a platform that’s user-friendly, both for you as the creator and for your students. It should be easy to upload content, set up modules, and track student progress.
Choose a platform that allows you to brand your course with custom themes, layouts, and colors to align with your business identity.
Make sure the platform offers various payment options, supports subscription models, and integrates with tools like PayPal or Stripe for smooth transactions.
Opt for a platform that includes built-in tools for email marketing, SEO optimization, and detailed analytics so you can track enrollments and course performance.
Ensure the platform provides strong customer support and has a vibrant community for troubleshooting and advice.
Consider course marketplaces
In addition to dedicated course platforms, you might also want to explore online course marketplaces like Udemy, Coursera, or Skillshare. These marketplaces offer built-in audiences, making it easier to reach potential students without heavy marketing efforts. However, keep in mind that they often take a percentage of your revenue and may have limitations on pricing and branding.
On the plus side, they provide valuable exposure and credibility, especially if you’re just starting out. Balancing between your own platform and a marketplace can be an effective strategy for maximizing reach and revenue.
Monitor student progress in real time
One of the key advantages of using modern online course platforms is the ability to track student progress and engagement in real time. This feature allows you to see how students are interacting with the content, which lessons they might be struggling with, and how long they’re spending on each section. By having access to real-time data, you can make swift adjustments to your course material, personalize learning experiences, and offer additional support where needed, ensuring your students stay on track and remain engaged throughout the course.
With the right online course platform, you’ll be able to deliver high-quality learning experiences and grow your business more effectively.
Step 8: Deliver an engaging learning experience
Provide ongoing support and feedback
Engagement is key to student success and satisfaction. Implement the following to keep learners motivated:
Host regular live Q&A sessions or office hours
Create a community forum for peer-to-peer interaction
Offer personalized feedback on assignments or projects
Regularly update course content based on student feedback and industry changes
Offer certificates and incentives
Providing completion certificates or other incentives can motivate learners and add value to your course.
Consider:
Issuing digital certificates upon course completion
Offering badges for achieving specific milestones within the course (hint: give a badge for completing a module)
Providing exclusive resources or bonuses for top-performing students
Certificates give learners a sense of accomplishment. Don’t forget to encourage students to share badges and certificates on social media channels. This helps the learner share your course branding without being too salesy, and highlights that your course offers a certificate.
According to a study by Accredible, 63% of learners are more likely to enroll in a course if it offers a certificate of completion. Make sure you talk about badges and certificates on your course sales page.
Common mistakes to avoid when creating an online course
Overloading course content
Avoid overwhelming learners with too much information. Focus on delivering clear, actionable lessons that align with your learning objectives. Quality trumps quantity when it comes to course content. This is also why course structure matters.
When designing lessons, make sure learners can accomplish the lesson in a reasonable amount of time. It is better to break down modules into smaller content chunks that take less time.
Not marketing enough
Creating a great course is only half the battle. Develop a comprehensive marketing plan that includes:
Consistent social media presence
Regular email campaigns to your list and list-building activities
Partnerships with influencers or affiliates in your niche
Content marketing through blog posts, podcasts, or guest articles
Consider creating multiple sales pages (aka course landing pages) for your course if it appeals to more than one target audience. The more you can target sales page messaging to specific audiences, the better it will convert. Plan to spend more time promoting your course than it takes to create it.
Conclusion
Creating a successful online course requires careful planning, high-quality content creation, and effective marketing strategies. By following this step-by-step guide, you’ll be well-equipped to develop a course that provides value to your learners and generates passive income for you. Remember to focus on creating engaging learning experiences and utilize tools like Camtasia to produce professional-quality content. With dedication and the right approach, you can join the ranks of successful online course creators in this rapidly growing industry.
“Camtasia unleashed my creativity. It’s truly simple and easy to use, and because of that, Camtasia helped me turn an old dream of creating an online course into reality.”
FAQs
What tools do I need to create an online course?
To create an online course, you’ll need a few key tools: a platform to host the course, content creation software (such as PowerPoint or Canva for slides and tools like Camtasia for recording videos), and marketing tools (email marketing platforms like Mailchimp or social media tools for promotion). Additionally, a microphone and camera will help ensure high-quality audio and visuals.
How do I structure my online course?
Start by outlining the main topics you want to cover and break them down into modules or lessons. Each lesson should focus on one specific concept or skill. Incorporate a mix of video content, reading materials, and quizzes to keep learners engaged. Be sure to organize the content in a logical sequence that builds on previous lessons and provides a clear path to the final outcome.
How long should my online course be?
The ideal course length depends on your subject matter and audience, but most online courses range from 1 to 10 hours of content. Shorter courses (1-2 hours) work well for focused skills or topics, while longer courses (5-10 hours) are great for more comprehensive subjects. Make sure the course length aligns with the value you’re offering and the attention span of your target learners.
How do I price my online course?
Pricing your course depends on several factors, including the depth of the material, your audience’s willingness to pay, and the competitive landscape. Research similar courses to gauge market rates and consider offering tiered pricing (e.g., a basic course for a lower price and a premium package with extra materials or support). Be sure to reflect the value of your course in the price—higher-quality, specialized content often commands a higher price.
How do I ensure my course content is engaging?
To keep your learners engaged, use a variety of content formats like videos, quizzes, interactive activities, and real-world examples. Break up long sections with visuals, animations, or discussion prompts to maintain attention.
Encourage participation through assignments, projects, or live Q&A sessions. Incorporating elements like badges or certificates for completing modules can also motivate learners to stay on track. Lastly, ensure your content is easy to follow by keeping lessons clear, concise, and relevant to their goals.
TechSmith is the market leader in screen capture software and productivity solutions for daily in-person, remote, or hybrid workplace communication and customer-facing image and video content. Our award-winning flagship products, Snagit, Camtasia, and Audiate, empower anyone to create remarkable videos and images that share knowledge for better training, tutorials, and everyday communication.
Understanding and improving employee engagement is key to long-term success in today’s competitive business environment.
An employee engagement survey is one of the best ways to gauge how your team members feel. When properly conducted, these surveys offer a clear window into your workplace culture, employee satisfaction, and the areas most needing improvement.
This guide will cover the importance of these surveys, tips for designing them, and best practices for using survey insights to create an impactful action plan.
Simplify HR workflows with visual tools
Create clear, engaging training and documentation that helps your teams better understand company policies and processes.
An employee engagement survey is a structured tool to collect employee feedback about their engagement, job satisfaction, and overall sentiment toward their workplace.
The purpose is to assess employee sentiment and understand how connected employees feel to the company, identify pain points, and gain actionable insights to drive positive change.
Key benefits of employee engagement surveys
Employee engagement surveys are a powerful tool for enhancing workplace culture, building trust, and providing insights to guide organizational improvements. Here’s a more detailed look at the main benefits of implementing these surveys.
Enhanced workplace culture
ThriveSparrow explains, “Engagement surveys provide insights into employees’ perceptions of workplace culture, allowing organizations to tailor initiatives that support inclusivity and respect. This approach helps companies proactively address cultural concerns, promoting a positive and supportive atmosphere.”
By regularly engaging employees, organizations demonstrate that they value employees’ perspectives, creating a culture of inclusion. When employees are asked for input, they’re more likely to feel like valued team members, making them more motivated and engaged in their work.
Increased response rate and trust
Conducting regular surveys shows a commitment to continuous improvement and openness, which helps foster trust.
Employees are more likely to participate if management consistently values their input and acts on their feedback. Surveys also establish a foundation of transparency, which is critical for building a reliable communication loop between employees and management.
According to an article by Harvard Business Review, “Employees in high-trust organizations are more productive, have more energy at work, collaborate better with their colleagues, and stay with their employers longer than people working at low-trust companies.”
Regular engagement surveys enhance employees’ confidence in the organization’s intentions, encouraging honest feedback and increasing survey participation rates over time.
Actionable insights
Employee engagement surveys reveal valuable insights that help managers pinpoint areas that need improvement.
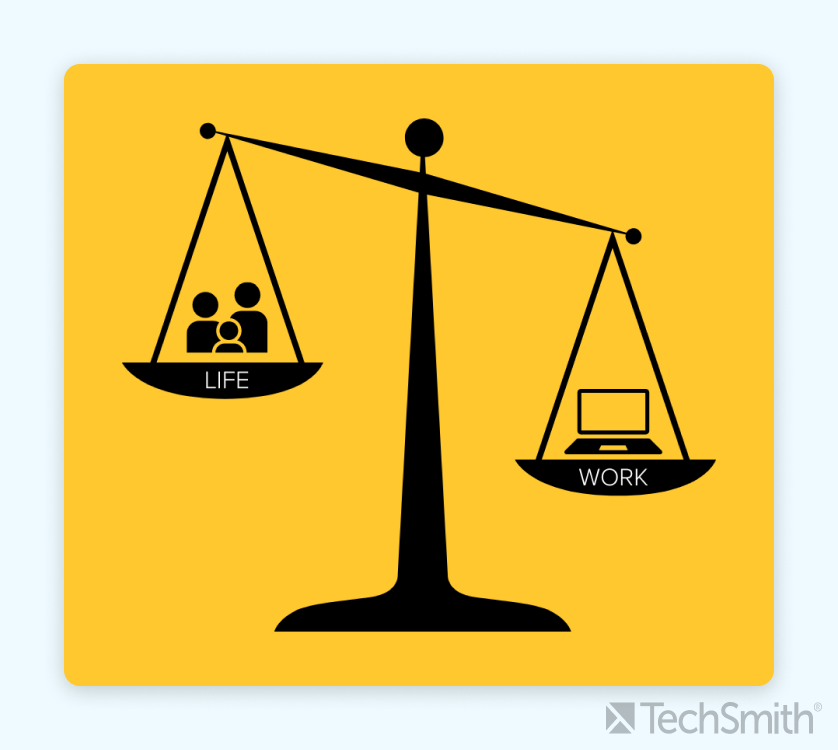
For example, if survey results indicate concerns about work-life balance, organizations can respond by reevaluating policies or implementing flexible work arrangements. Such targeted action plans, informed by direct employee feedback, contribute to ongoing improvements that align with employees’ needs.
A study by Forbes highlights that “95% of employees who perceive their leaders as adept at implementing effective actions based on survey insights report significantly higher engagement levels.” These insights empower managers to implement changes that make a real impact on employees’ daily work experiences, ultimately contributing to long-term satisfaction and performance improvements.
2024 Workplace Flexibility Trends Report
New data reveals workers do not feel supported amidst changing work environments.
Understanding employee engagement is essential for maintaining high morale and productivity. Engaged employees are more likely to work toward company goals, leading to a motivated workforce that performs better and stays longer.
Improved employee performance
High engagement levels are strongly linked to better job performance and productivity. Engaged employees are more likely to take initiative, collaborate with their peers, and align with organizational goals, collectively driving efficiency and innovation in the workplace.
Insights into work-life balance
Surveys provide information on how employees perceive their balance, helping to shape policies around flexibility and remote work.
When employees feel supported in balancing personal and professional life, it can reduce burnout and improve overall job satisfaction. This feedback also helps employers understand changing needs, allowing them to implement adjustments that enhance retention and employee well-being, such as flexible hours, hybrid work options, or wellness programs.
Measuring employee engagement:
Regular surveys identify trends in engagement over time and support a consistent approach to workplace improvements.
By tracking engagement metrics, organizations can assess the effectiveness of their initiatives and quickly spot areas needing immediate attention.
This data-driven approach also enables companies to compare engagement levels across departments, helping to address unique team needs and create a more cohesive work environment.
Types of employee engagement surveys
Employee engagement surveys come in various forms, each tailored to uncover different insights into how employees feel about their work environment, leadership, and overall job satisfaction. Choosing the right type of survey helps organizations gather actionable data, whether they are looking for quick updates on morale or a deep dive into factors affecting retention and productivity.
Pulse surveys
These are brief, frequent surveys that capture current employee sentiment on key issues. By gathering real-time data, pulse surveys offer insight into engagement levels and allow managers to adjust strategies as needed.
Annual satisfaction surveys
Conducted yearly, these surveys delve into broader workplace aspects, including company culture, career development, and job satisfaction. With deeper insights, these surveys guide longer-term engagement strategies.
Onboarding and exit surveys
New hires and exiting employees provide unique perspectives on the company. Onboarding surveys reveal areas for smoother integration, while exit surveys help identify reasons behind turnover.
How to design an effective employee engagement survey
Creating a well-structured employee engagement survey is essential for gathering actionable feedback that can lead to meaningful improvements in the workplace.
When thoughtfully designed, these surveys provide insights into how employees feel and foster a sense of trust and openness. Here’s a step-by-step guide to creating an effective engagement survey that yields valuable information and encourages high response rates.
Step 1: Define the purpose of the survey
To create a survey that gathers relevant feedback, first clarify the survey’s purpose.
Are you looking to measure overall job satisfaction, gain insights into work-life balance, or understand how well employees feel aligned with the company’s goals? Defining a clear objective will help you decide on the types of questions to include and ensure that the survey remains focused.
For example, ask about career development and training access to assess professional growth opportunities.
Meanwhile, questions about communication, respect, and values would be more appropriate if your focus is on company culture. Pinpointing your purpose will keep the survey concise and relevant, increasing the chances that employees will provide honest and detailed responses.
Consider involving management and HR leaders in setting objectives, as they can offer insights into specific areas needing attention. Review previous survey results (if available) to identify recurring themes or trends that could guide your questions this time around.
Step 2: Include a mix of question types
To gain a well-rounded understanding of employee engagement, it’s beneficial to use various question types.
Start with multiple-choice questions to gather structured, quantitative data, allowing you to analyze responses quickly and compare them over time.
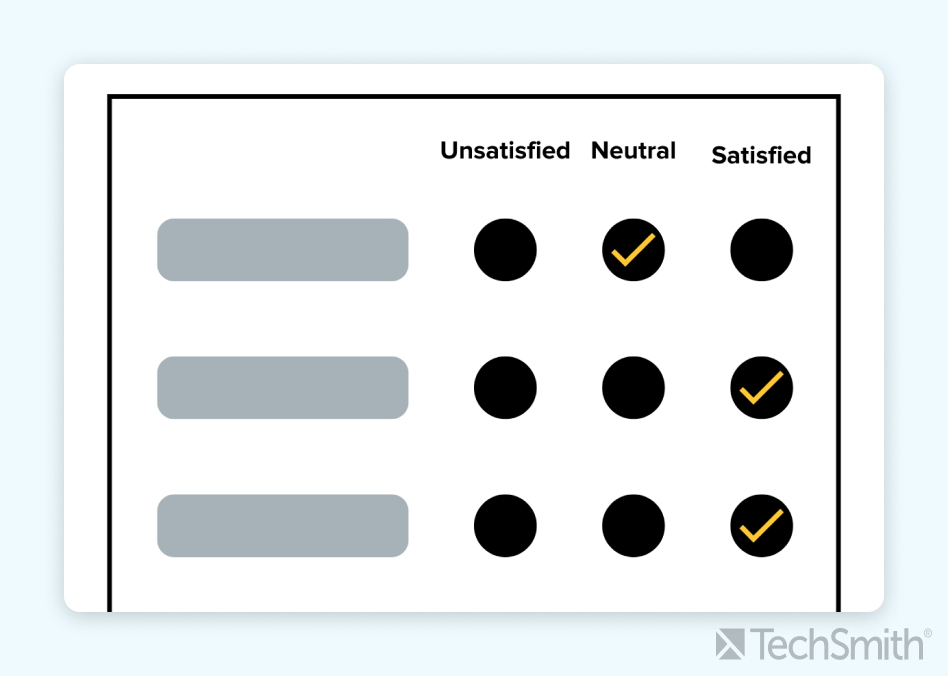
Rating scale questions (e.g., a 1-5 scale) are effective for measuring opinions on various topics, such as work-life balance, job satisfaction, or support from management.
Lastly, open-ended questions allow employees to elaborate on their thoughts and experiences, giving you more in-depth, qualitative feedback. By mixing these types, you create a survey that is both comprehensive and engaging.
Step 3: Ask clear and relevant questions
Clarity is key in survey design. Ambiguously worded questions can lead to misunderstandings, resulting in difficult interpretation of data. Keep each question straightforward and directly relevant to the engagement topics you want to measure to avoid misunderstandings.
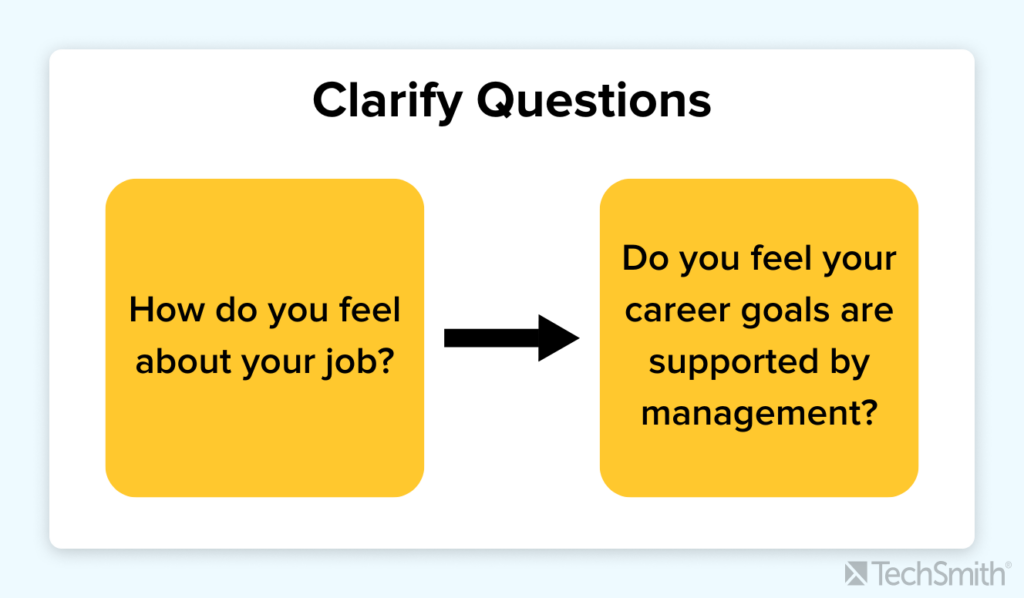
For example, instead of asking a broad question like “How do you feel about your job?” try something more specific, like “Do you feel your career goals are supported by management?” This phrasing clarifies that the focus is on career development support from leadership.
It’s also helpful to avoid jargon or complex language that might confuse participants. Employees are more likely to respond thoughtfully to questions they understand right away, which ultimately provides you with clearer, more accurate insights. You might even consider conducting a test run with a small group to ensure that questions are understood as intended.
Step 4: Keep it anonymous
Anonymity is one of the most critical aspects of any employee engagement survey. When employees know their feedback is anonymous, they’re more likely to provide honest responses without fearing retribution.
This is particularly important for questions related to sensitive topics, such as management practices or workplace culture. If employees feel their identities could be tied to their responses, they may avoid addressing certain issues or may sugarcoat their answers, leading to skewed data.
To reassure participants of their privacy, communicate the survey’s anonymity policy clearly in both the introduction and closing sections of the survey. Emphasize that the information collected will be analyzed in aggregate, with no identifying details attached.
Consider including a confidentiality statement at the beginning of the survey, reiterating that honest feedback will help improve the workplace for everyone.
Step 5: Use Tools for Clarity and Efficiency
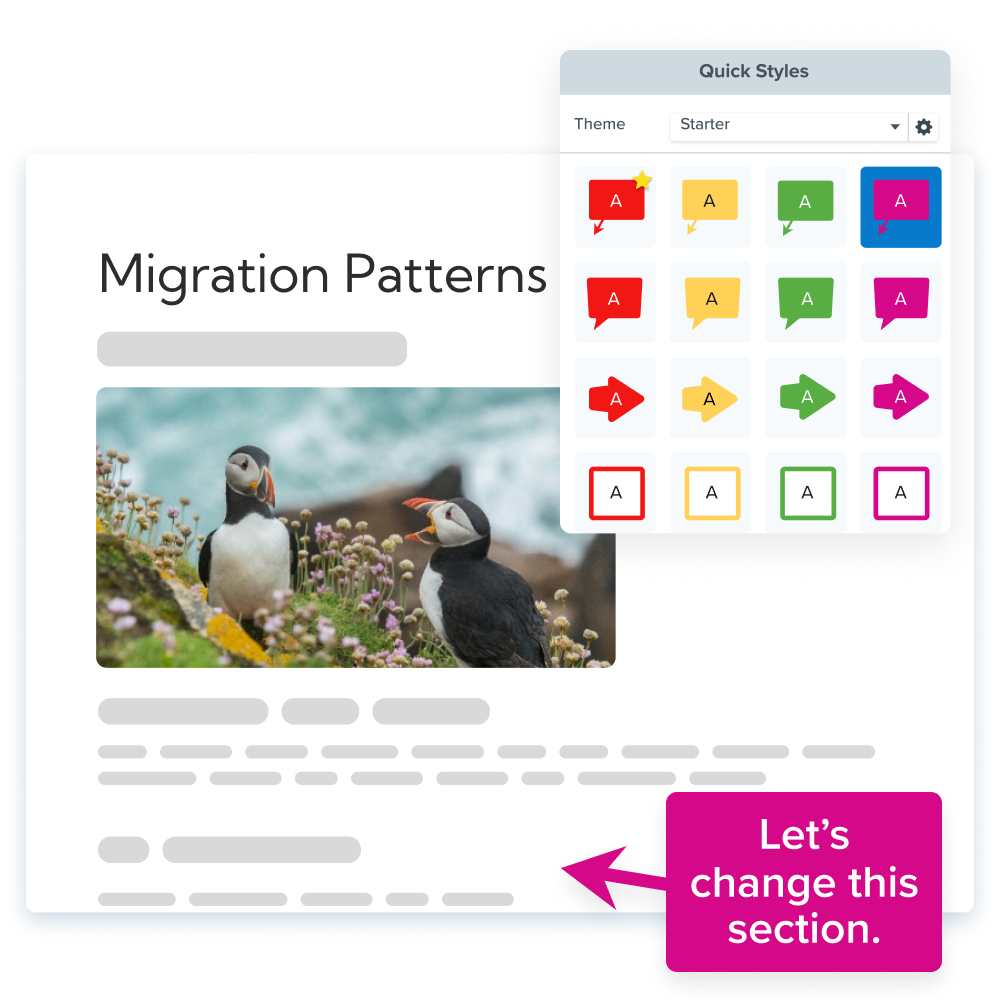
Implementing the right tools can streamline the survey design process and improve employees’ experience. Tools like Snagit are great for capturing important points in the survey or creating visual guides that help employees understand how to complete the survey correctly.
Visual cues, like step-by-step instructions or annotated screenshots, can clarify complex questions, making it easier for employees to participate without confusion. Camtasia is another powerful tool that can enhance clarity and engagement by allowing you to create video tutorials explaining the survey’s purpose and importance.
For example, you might record a brief video introduction from HR or company leadership, encouraging employees to participate and explaining how their feedback will help drive positive change.
This human touch can increase trust and motivate more employees to complete the survey thoughtfully. Tools like these make it easier for employees to understand and engage with the survey, ultimately leading to more accurate and actionable responses.
Annotate and edit screenshots with Snagit
Professional mark-up tools and powerful features make it easy to create helpful images.
Key questions to ask in an employee engagement survey
The right questions in your employee engagement survey can help you uncover what’s working well and where improvements are needed. Here’s a breakdown of some essential questions to include in your survey.
Questions to measure levels of engagement
Gauge how invested your employees are in their work with questions like:
“Do you feel motivated to go above and beyond in your work?”
“How aligned do you feel with the company’s long-term goals?”
These questions can help reveal whether employees feel driven and if they understand the company’s mission, which can be key indicators of long-term retention.
Questions on career development and professional growth
Employees want to grow within their roles. To understand if your organization is supporting this, ask:
“Do you feel supported in achieving your career goals?
“Do you believe there are ample opportunities for growth within the company?”
These questions can highlight if there’s a need for more training programs or clear career pathways.
Questions about work-life balance and well-being
A healthy work-life balance is essential for employee satisfaction and productivity. Consider asking:
“How would you rate your work-life balance?”
“Do you feel the company supports your personal and professional life equally?”
These responses can guide improvements in company policies or highlight the need for better resources to prevent burnout.
Questions to assess workplace culture and team dynamics
The way employees interact with their team can significantly impact job satisfaction. Include questions like:
“Do you feel comfortable sharing your opinions with your team?”
“How would you describe the team’s atmosphere for collaboration?”
You can foster a more inclusive and collaborative environment by identifying communication gaps or teamwork challenges.
Open-ended questions for deeper insights
To dive deeper into employee’s thoughts and ideas, incorporate some open-ended questions. For instance:
“What changes would improve your work environment?”
“How can the company better support your career and personal development?”
These questions can generate actionable suggestions that might not have been considered otherwise.
How to distribute employee engagement surveys
If your team members find it difficult or inconvenient to participate in your survey, you may not get the responses you’re hoping for. Follow these best practices to ensure a smooth survey distribution process.
Choose the right platform
Selecting the right tool can make all the difference in gathering useful data. Use a user-friendly survey tool like Google Forms, SurveyMonkey, or Culture Amp, allowing easy use and efficient data collection.
Communicate the purpose
Clearly explain why the survey is important. Use a screen recorder like Camtasia or Snagit to create a brief video announcement detailing the survey’s purpose and how it will benefit employees. This can motivate team members to participate.
Ensure accessibility on mobile devices
Make the survey mobile-friendly to enable completion on the go, which can lead to a higher response rate.
Keep it short and focused
Aim for a survey length of 10-15 minutes, especially for pulse surveys, to avoid survey fatigue and increase completion rates.
Analyzing employee engagement survey results
Once you’ve collected responses from your employee engagement survey, the next step is to analyze the data effectively. A thoughtful analysis can uncover key insights and lead to actionable improvements.
Review quantitative data
Analyze numerical data like satisfaction scores, ratings, and overall engagement. Tools like Snagit can capture and annotate data for efficient sharing.
Gather insights from open-ended responses
Look for patterns in open-ended responses, especially around issues like communication and career support, which are often highlighted in employee feedback.
Compare results over time
Tracking survey results over time reveals patterns, showing which areas are improving and which need further focus.
Create a report
Summarize your findings into a clear, concise report to share with stakeholders. Consider creating a video presentation of the results, which can be more engaging for team members.
Developing an action plan based on survey results
An effective action plan can turn survey results into a roadmap for positive change.
Identify key areas for improvement
Prioritize the main issues raised by employees, like work-life balance or professional growth.
Set clear, measurable goals
Establish SMART goals to address the issues identified. For example, “Increase work-life balance satisfaction by 10% within six months by implementing flexible work hours.”
Assign roles and responsibilities
Determine which departments or team members are best suited to handle specific action items, such as HR for growth programs or team leads for workload management.
Implement changes
Roll out initiatives based on employee feedback, such as flexible work options, training programs, or more frequent team-building activities.
Communicate progress
Keep employees updated on changes being made. Recording a monthly video update using Camtasia or writing an email newsletter can keep everyone informed and engaged.
Faster video creation with Rev
Make videos as easy as click, click, done! Camtasia Rev is so fast it’s like magic!
Using employee engagement surveys for long-term success
Employee engagement surveys are not merely a snapshot in time; they are essential for cultivating a culture of continuous improvement and responsiveness within an organization.
When used effectively, these surveys become invaluable tools for creating a thriving workplace, driving employee satisfaction, and enhancing productivity over the long term.
A commitment to regularly assessing employee sentiment demonstrates that their feedback is valued and used to effect positive change.
Reassess and adjust regularly
Employee needs, motivations, and experiences evolve over time, as do the workplace dynamics. Frequent reassessment through engagement surveys lets you capture these changes and respond proactively.
Rather than waiting until issues escalate, regular surveys can help uncover problems early, making it easier to implement meaningful adjustments before morale or productivity suffers.
Consider quarterly or biannual pulse surveys, which are shorter and more focused than annual surveys. These allow for quick temperature checks on employee engagement, job satisfaction, and specific issues like workload or work-life balance.
Feedback from regular surveys provides critical insights into emerging trends within the organization. Additionally, these surveys empower employees by reinforcing that their voices are heard consistently.
Adjusting policies, communication styles, or team dynamics in response to feedback promotes a more agile and adaptable workplace culture. Culture Amp suggests, “Don’t shy away if your employees are bringing up uncomfortable topics such as job security or the company’s growth and financials. Transparency builds employee trust and mitigates unfounded concerns.”
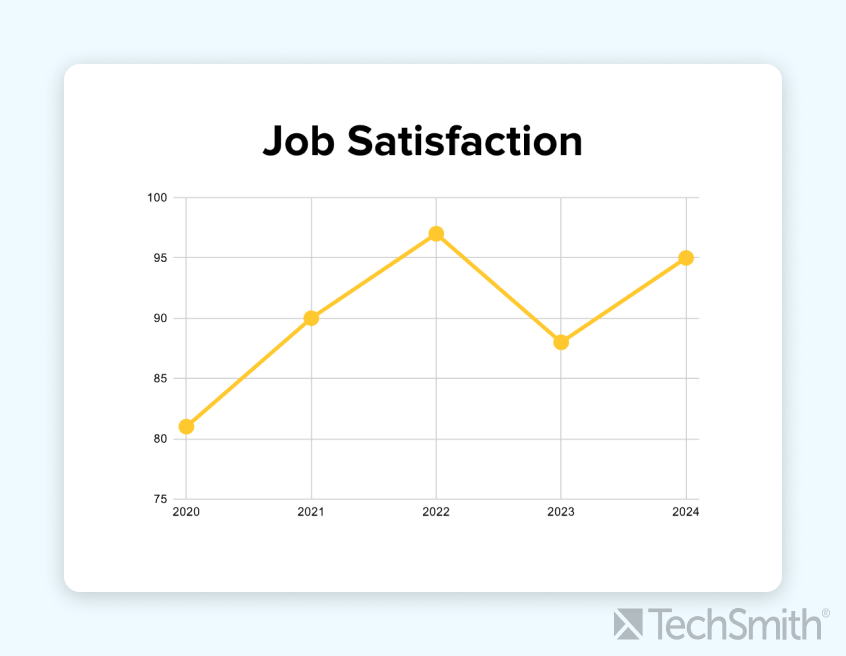
Measure progress over time
Tracking engagement over time is key to gauging the effectiveness of initiatives, as well as determining where further improvements are needed.
By measuring year-over-year data and comparing current results with past performance, you can identify patterns and assess the long-term impact of your engagement strategies.
Establishing benchmarks based on previous survey results allows you to set measurable goals, such as increasing satisfaction with career development opportunities or improving perceptions of management transparency.
Each survey provides a baseline for evaluating whether implemented changes resonate with employees. For example, if one survey highlights a lack of growth opportunities, HR might respond by introducing professional development programs or mentorship opportunities. Future surveys can track how employees’ perceptions of growth change in response to these new initiatives.
Build a better workplace with employee engagement surveys
Employee engagement surveys are essential for building a stronger, more positive work environment. They provide leaders with candid feedback, offering insight into employee satisfaction and the specific factors driving engagement or disengagement. This data allows companies to create actionable strategies tailored to real employee needs, fostering a sense of trust and openness.
Tools like Camtasia and Snagit make the process even smoother, facilitating clear communication from the survey rollout to the reporting stage. By continuously acting on survey insights, companies can maintain a cycle of improvement that enhances morale, productivity, and retention.
Make great training videos
Camtasia is the best way to make training and instructional videos that keep your viewers engaged.
TechSmith is the market leader in screen capture software and productivity solutions for daily in-person, remote, or hybrid workplace communication and customer-facing image and video content. Our award-winning flagship products, Snagit, Camtasia, and Audiate, empower anyone to create remarkable videos and images that share knowledge for better training, tutorials, and everyday communication.
Employee benefits management is an important part of any successful HR department. You need to design benefits that meet employees’ needs while also fitting the company’s budget.
Effective benefits administration—covering health, retirement, dental, and vision—helps businesses save money by simplifying processes, cutting unnecessary costs, and informing employees.
Simplify HR workflows with visual tools
Create clear, engaging training and documentation that helps your teams better understand company policies and processes.
What is employee benefits management, and why does it matter?
Employee benefits management involves creating, implementing, and maintaining an organization’s employee benefits program. This encompasses:
Selecting benefit plans
Administering open enrollment
Ensuring compliance with ever-changing regulations
Long-term planning
Employee education.
A traditional benefits package includes medical, dental, and vision coverage, paid time off, retirement plans, and other perks.
Benefits play a significant role in attracting and retaining top talent. A solid benefits package is a top requirement for many candidates and helps companies stay competitive.
To keep your employees, it’s important to make sure they feel valued and cared for. You can achieve this by offering the right benefits and ensuring employees understand them, leading to higher use and satisfaction.
Key components of a successful benefits program
A successful employee benefits package goes beyond basic health insurance to offer various options that meet employees’ needs.
Health, dental, and vision insurance are essential to a benefits program, but offering support for all areas of an employee’s life adds great value. Retirement accounts, such as 401(k) plans, provide employees with long-term financial security.
Paid time off, schedule flexibility, or even shorter work weeks can contribute to a healthy work-life balance. Life insurance helps employees establish a sense of security for themselves and their families. The list goes on.
Customization is important, and HR departments should tailor benefits based on employee needs when possible. Offering flexibility in enrollment options empowers employees to choose what matters most to them.
To achieve this, you have to understand what exactly your employees value and are utilizing. Having open lines of communication with employees through surveys, open-door policies, and well-established relationships coupled with regular reviews of benefit utilization data can help you keep a pulse on what employees like, what they need, and what might need to be changed.
How to simplify the benefits administration process
Managing the benefits administration process can be complex and is a common pain point for HR departments, but leveraging technology can streamline processes and improve efficiency.
Many HR software programs allow enrollments to be completed right through their benefits administration software, making this process faster for both employees and HR, less prone to human error, and simplifying the process of getting enrollment data to benefit vendors.
Screen recording and video editing tools like Camtasia can be invaluable for benefits administration, allowing HR to easily create clear, instructional videos that guide employees through the enrollment process and educational videos that help them understand their benefits and how to take advantage of them.
Utilizing video and creating engaging content is novel—especially for HR departments—and captures employees’ attention, making them a more active partner in the success of benefits programs.
Video is also an effective way to consolidate information and resources into a single, digestible place rather than having walls of text as the primary information-sharing method.
Similarly, a screen capture tool like Snagit can create visual guides for navigating benefit portals and quickly answer employee questions by showing rather than just telling.
The benefits of these tools don’t end at simplifying processes and improving the employee experience. Engaging, effective content eases the administrative burden on HR professionals by reducing the time spent answering questions or showing the same processes repetitively. This frees up time to focus on year-end tasks and strategic planning during some of the busiest times of the year, such as open enrollment.
Stop repeat questions
Create clear videos and guides with Snagit so you only have to explain tasks once.
Effective preparation, communication, and education are critical to successful open enrollment.
Communication can begin even before benefits renewals are solidified, starting with basic information such as deadlines and what resources employees can expect to receive.
Once the renewal is complete, transparency about changes is key. It can be useful to break communication about benefits into two parts:
A share out that focuses exclusively on what’s changing
At least one presentation that goes over the entire benefits package
If presentations are done live, they should be recorded and then shared with employees.
The next and arguably most critical part of open enrollment is ensuring employees can easily access all the necessary resources and information.
Even if you have an internal website where all benefit information, plan documents, and other resources are housed, if it’s presented as a wall of text with little to no visual aids, it’s overwhelming and not user-friendly.
It’s also important to proactively address frequently asked questions, which will allow employees to self-serve and get answers in a timely manner, ultimately freeing up time for the HR department.
How to save money on employee benefits
Balancing cost with quality is the never-ending challenge of employee benefits management. One strategy is taking a proactive approach to understanding utilization, needs, and alternative options.
Regularly reviewing utilization will tell you what’s underutilized, what benefits have the highest cost to your organization, and where your costs and utilization are compared to the rest of the market.
As mentioned earlier, giving employees a chance to provide feedback on their benefits package is an important part of ensuring that their needs align with the company’s offerings. Underutilization could point to misalignment with what your workforce needs and wants, or maybe it simply means the plan needs to be tweaked and made more accessible, or the HR department needs to educate employees about that benefit.
Shopping the market, even if you’re not necessarily unhappy with your current offerings, is also essential. Ensuring you’ve done your due diligence makes you confident that you have the best options for both employees and the company regarding quality and cost.
Utilizing a benefits broker is also a useful strategy, as they can assist with finding creative ways to build benefits packages, negotiating rates with benefits vendors on your behalf, providing expert guidance, and more. Furthermore, their commission is paid by the insurance companies rather than the employer.
Using visual tools to educate employees
Employee education is vital to a benefits program’s success, and engaging with employees in an accessible, digestible way is key.
Utilizing communication tools like Camtasia and Snagit can make it easier for employees to consume this information. These tools can be leveraged for everything from creating simple tutorials of enrollment systems to something more robust, such as a video “manual” in which everything employees need to complete open enrollment is housed.
Using Camtasia, you can make every resource—recordings of presentations, links to benefit websites or plan documents, secondary videos that take deeper dives into benefit content, etc.—accessible directly in the video or through a clickable hotspot.
Employees can use a video such as this as their guide while completing open enrollment, walking them through each step and allowing them to choose what content they need through the video’s table of contents.
When employees know that everything they need to make informed decisions can be found in a simple video that walks them through the enrollment process from beginning to end, they’re more likely to consume that content and feel confident in their decisions.
It’s also important to note that benefits education should be ongoing and not limited to open enrollment season. The more benefits are discussed and the more effort put into demystifying them, the more likely employees will utilize them.
Using Camtasia and Snagit, you can make an educational content series to highlight certain benefits, explore more complicated benefit topics in greater depth, and answer questions you get from employees throughout the year, so benefits are always at the top of your mind. Investing time into employee education improves their experience and shows a commitment to their well-being.
Video messages > meetings
Record your screen and camera with Snagit for quick updates and feedback.
Mastering employee benefits management requires strategic planning, ongoing education, and visual communication tools to streamline the administration process. All these factors ensure that you’re balancing the quality and financial needs of employees and the company, all while keeping employee well-being and education at the forefront.
Start leveraging technologies like Snagit and Camtasia to create a more effective and engaging benefits program, so your HR department can make benefits management more efficient and user-friendly.
TechSmith is the market leader in screen capture software and productivity solutions for daily in-person, remote, or hybrid workplace communication and customer-facing image and video content. Our award-winning flagship products, Snagit, Camtasia, and Audiate, empower anyone to create remarkable videos and images that share knowledge for better training, tutorials, and everyday communication.
What sounds more dry and boring than standard operating procedures? Even the acronym SOP doesn’t help the appeal.
But the reality is that relevant, well-written SOPs are foundational to business growth.
Smart, growth-oriented organizations are figuring that out. Searches for standard operating procedures have jumped up nearly 40% over the past five years alone. As companies put a new focus on driving operational efficiency, SOPs are proving to be a critical piece of the puzzle.
So forget about that dusty binder sitting on a shelf covered in cobwebs.
In this guide, we’ll show you how to create standard operating procedures that make a real difference to your business. And that your people will actually appreciate and use it.
We’ll dive into the what, why, and how—and even share tips along the way for how to level up your SOPs with visuals and videos (which is easier than you may think with Camtasia and Snagit).
What is an SOP (standard operating procedure), with examples?
Standard operating procedures go by many names and can even take different forms. Some know them as process documents, business playbooks, or even as old-school training manuals. However, people who use an SOP might call it their cheat sheet, job aid, or quick reference card.
At its core, a standard operation procedure outlines step-by-step instructions representing the ideal or optimal process for team members to complete a routine task.
SOPs encourage consistent, high-quality work regardless of who completes it.
In industries with many regulatory requirements or high-stakes environments, the SOP might include detailed steps. However, in many business settings, the SOP is more of a step-by-step guide than a script, leaving some room for interpretation—and even innovation—to improve the process.
Examples of standard operating procedures you might find in various departments:
HR: Hire and onboard a new team member
Accounting: Set up a new vendor in the billing platform
IT: Respond to a system outage
Marketing: Publish a blog post
Customer service: Process a refund
Sales: Nurture a lead from creation to close
Customer research: Conduct and summarize a set of customer interviews
Engineering: Complete a security audit
Why are standard operating procedures important for business operations?
Many teams and organizations discover their need for standard operating procedures in a moment of crisis. A long-time team member gives notice and years of process knowledge are about to walk out the door. The org hits hyper-growth, creating bottlenecks around the original team. Investors demand short-term profit growth, making it imperative to eliminate waste and redundancy.
SOPs can be a painkiller to help an organization scale operations up or down. But they’re better as a vitamin, implemented before a crisis, honing business operations with time and repeated use.
When SOPs are used as a vitamin, organizations benefit every day from increased:
Consistency: which improves quality and customer experience
Efficiency: which reduces waste and rework
Compliance: which reduces the risk of regulatory violations
Staffing flexibility: which reduces the cost of turnover or outsourcing
In short, the organization is stronger and more agile when the next crisis comes along.
Key elements of a standard operating procedure (SOP)
Components vary, but some of the most common elements of an SOP are:
Context and metainformation about the SOP:
What is this document intended to do?
What is it not intended to do?
What sections are included in the document (table of contents)?
Roles and responsibilities:
Who does what?
How often will they perform the steps?
What is the intended result?
Step-by-step instructions:
How do they do it?
What steps should they follow?
Tools and resources:
What tools and other materials will they use?
How to write an effective SOP
Step 1: Know your audience
It’s impossible to dial in the right level of detail in your SOP unless you know what your audience already knows and what they don’t know.
Assume they know too much, and you risk skipping critical steps. Assume they know too little, and you risk authoring a tedious, 100-page guide they never reference because they “already know this stuff.”
The curse of knowledge describes a universal human experience: once something becomes familiar to you, it’s hard to remember what it was like before you knew it.
The concept can be humorously illustrated by the Exact Instructions Challenge, which asks one person to document a series of steps that will be followed very literally by another person who seems to know nothing about the task.
Use research methods like conversation, observation, and surveying to put yourself in the shoes of your audience. Dispel the curse of knowledge as much as possible and provide instructions at the right level of detail.
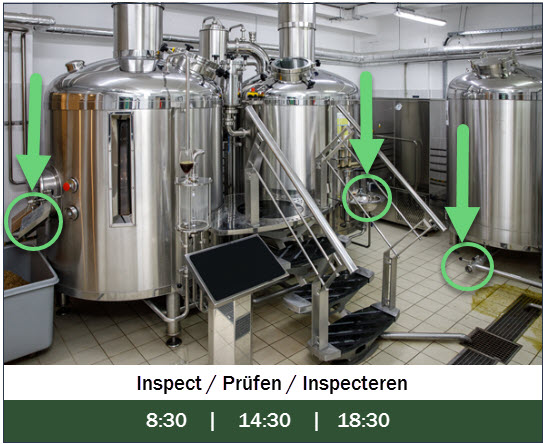
Pro Tip: Also consider where the procedure might take place. In industries like manufacturing or healthcare, addressing potential health and safety concerns in your SOP might be critical.
Step 2: Identify the task or process
Define the priority task(s) or process(es) you will cover.
A simple way to do this: talk with a manager or stakeholder accountable for business operations. Or talk with individual contributors who are responsible for doing the tasks. Ideally, you’ll want to consult both. Tasks that have a high error/failure rate and tasks that are infrequently performed (and thus easily forgotten) are often high-ROI places to start.
Even if you are handed a list of tasks to document, it’s wise to ask enough questions to build confidence that those tasks were validated as the ones most urgently needed. And fully understand the context in which the SOP will be used.
Step 3: Gather input from team members
If you are familiar with the procedure you’ll be documenting, create a rough outline based on your knowledge and validate it with team members who perform that procedure regularly. Insights from these subject matter experts (SMEs) can help ensure your SOP covers all necessary steps, doesn’t include a lot of extraneous detail, and adopts the language actually used in that functional area.
If you’re not familiar with the task, observe an SME performing the task and capture it using a smartphone camera or screen recorder. Build your outline by reviewing the recording and summarizing the steps taken by the SME.
Caution: don’t confuse the SME with your intended audience—remember that the SME suffers from the curse of knowledge, and they might even say things like “We all ignore the official instructions and do the task this way instead.”
So, cross-reference what SMEs tell you with what you learned about your audience in Step 1 and what you learned about management priorities in Step 2. Share your outline with stakeholders early and often, while it’s easy to edit.
Sometimes the very act of documenting standard operating procedures brings to light just how non-standard your operations really are!
Step 4: Create a clear, actionable format
Standard operating procedures come in many formats. But the most common are:
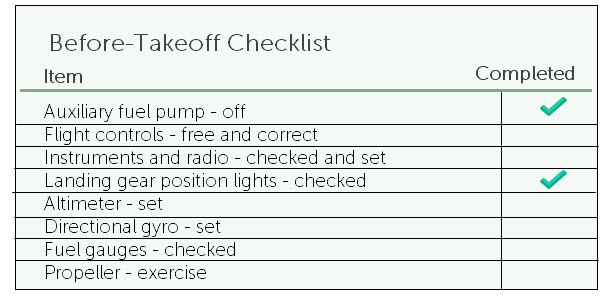
Checklist: best for tasks that do not have to be performed in a specific order
Numbered steps: best when the sequence of steps matter
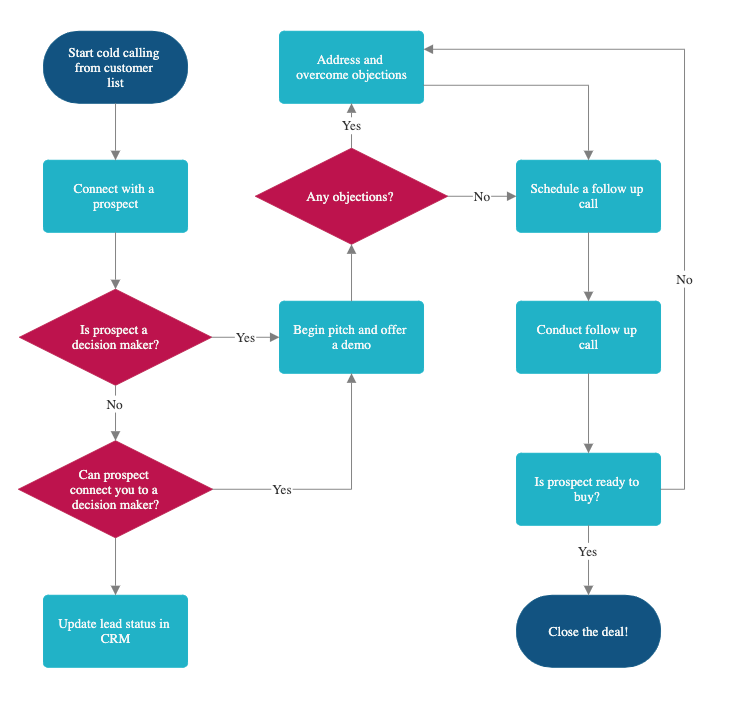
Flowchart: best for branching (if/then) scenarios
Use formatting like indenting, bullets, and bolding to emphasize the structure of the task and make the content easier to follow. Subtasks should be nested within the parent task via indenting. Bulleted and numbered lists help the reader keep track of where they are in a sequence. Bolding puts emphasis on key information.
Step 5: Include visuals for clarity
While creating your SOP as a wall of text might be tempting, research shows that visuals are a critical ingredient. Two out of three employees carry out tasks better when communicated visually vs. non-visually, and they absorb information 7% faster with visuals than without.
An easy way to include visuals in technical SOPs is to use Snagit to capture screenshots of software interfaces or process steps. You can even repurpose parts of the recordings from your SMEs during Step 3.
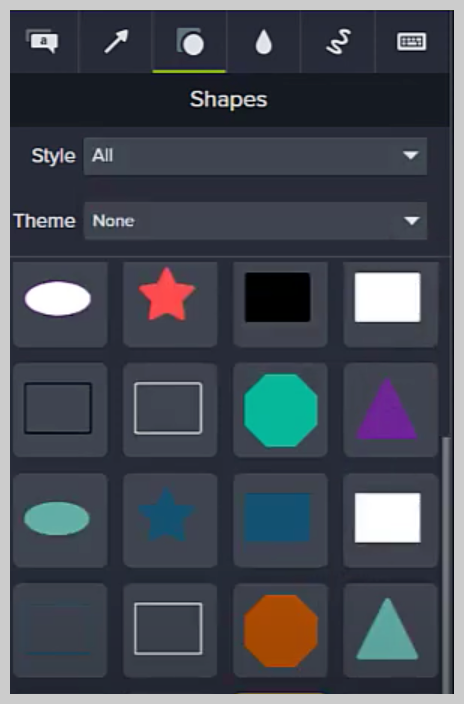
You can use Snagit to crop, remove sensitive information, mark up, and otherwise edit screenshots (or photos taken with your smartphone), then send them to your authoring platform or document editor of choice.
Or go a step further and use Snagit’s built-in layout tools and templates to generate simple SOPs in a variety of formats without leaving the tool. These SOP templates, designed by a professional information developer, can be shared digitally or printed and posted.
In some workplaces, like a shop floor, SOPs may need to be printed and referenced as a physical object. But in office environments where the operator is already seated at a computer… video tutorials are a practical format.
Not only are video tutorials well-liked, but they can visually show a process in its entirety, leaving less room for confusion or language barriers. We recommend Snagit to convert a series of screenshots into a video how-to and Camtasia for powerful, flexible training video creation.
The best snipping tool for Windows and Mac
Don’t let clumsy built-in tools hold you back. Take and edit screenshots with Snagit!
Flesh out the outline to become a rough text draft, plus visuals for your standard operating procedure document. Aim for clear, simple, direct language, free of jargon. Use the active voice (e.g., open the window) rather than the passive voice (e.g., the window should be opened).
If creating a video, first develop a simple storyboard that contains three columns:
A script of the narration that the viewer will hear spoken
Static screenshots or photos that represent the visualsthe viewer will see in each scene (again, Snagit is great for collecting these placeholder images)
A short description of the on-screen actionthe viewer will see unfold in each scene
Get input on this draft or storyboard from your key stakeholders, both management and SMEs. Be specific in your feedback request: what feedback you do/don’t need at this stage, where to leave it, and by what date.
Ideally, have all stakeholders review the same draft in a shared location where they can see and respond to one another’s comments and hopefully resolve conflicting feedback (so you don’t get stuck trying to resolve it all on your own). Once you feel confident that the draft is at least 90% gelled, produce your deliverable.
Step 7: Test the SOP and iterate
This is where it’s tempting to breathe a big sigh of relief and mark the project as done. But, like anything, it’s very unlikely the first version is the best. Plus, the procedure is likely to change over time!
So, put some mechanismsin place to evaluate the effectiveness of your SOP and gather additional information that will help you refine and update it. Regular audits help to identify areas where corrective action may be needed, ensuring ongoing compliance with SOPs.
That could mean setting a future checkpoint with the manager and team leads who use the SOP, including a URL or QR code to funnel feedback your way, or even making the SOP editable by the team using it.
SOP documentation best practices
If you are already familiar with the process you’re documenting, it can be very tempting to dive right in and start writing the SOP. But it really is better to pause and think about the best place to start and how to follow an efficient, scalable process that gives you the most bang for the buck.
If your organization has a practice of documenting SOPs, then start by auditing what you already have. Ask team members to share with you the SOPs they currently reference or send to a new hire or contractor. Review and update those documents as needed. Treat them as a foundation to build on so that new SOPs are consistent with the existing set already in use.
If you are starting from scratch, there are two main methods for deciding where to start: strategic and opportunistic.
Strategic method
Within a functional area, catalog tasks by frequency, difficulty, and criticality (level of risk if not executed properly).
If the people responsible for those tasks are mostly seasoned team members with low expected turnover, don’t start with the easy, frequent tasks. Team members should already have a handle on those! Instead, focus your SOP documentation efforts on any intermittent, relatively difficult, and high-stakes tasks they perform. Those tasks will most likely be a challenge every time they come up, and your SOPs can provide much value in ensuring consistent and accurate execution.
If, on the other hand, a functional area has a lot of turnover or outsourcing, it may be very much worth your time and effort to document even simple, everyday tasks to greatly speed up the onboarding of new full-time or contracted hires who need to start with the basics.
Opportunistic method
In many organizations, documenting SOPs is nobody’s job. In this case, “pave the cowpaths” may be the most practical approach.
As you field the next “how do I” question, onboard the next team member, put out the next fire, or roll out the next technology, allow those urgent demands to set the priority for your SOP documentation efforts. Reframe each incoming “request,” and instead of adopting a 1:1/disposable mindset, adopt a 1:many/evergreen mindset. Write SOPs not only for the one case in front of you but for that case and the next.
Make this method scalable by enlisting team members to take the same approach. To do this well, you’ll need easily accessible creation tools, SOP templates, established distribution methods, and buy-in from management. It takes a little more time per request to upcycle a one-off response into a persistent SOP, but those small investments pay off in the long run.
SOP templates: A time-saving tool
Benefits of SOP templates
Standard operating proceduretemplates reduce the time to generate documentation. Saving labor costs over time. Templates also ensure consistency in the presentation, format, and location of documents, which makes them easier to find and follow.
Where to find SOP templates
You can find dozens of free and premium SOP templates on the Snagit Asset service. These visual-first templates can be downloaded directly into Snagit and populated with screenshots, photos, and text titles and captions. Templates offer a number of content layouts built on information design best practices. They also include key metadata such as author and last revised date.
Some industries have adopted standard templates for SOPs (would that make them SSOPs?) that you can start with and customize as needed. It’s also worth creating read-only template files for Microsoft Word or Google Docs that can be duplicated and edited by team members to keep the format consistent.
How to customize a template
Tailor the template to reflect your company’s branding: logo, font, and any design elements. Beyond that, consider which specific elements to customize, such as departments, roles, and responsibilities, and document naming conventions. And, of course, the step-by-step instructions will be specific to your team and organization.
Implementing and reviewing your SOPs
Remember the visual image of a binder gathering dust on a shelf? Nobody wants that, especially after all the time you’ve invested to get this far. To ensure your SOPs generate value and remain dust-free, be sure to factor in time to launch new SOPs with intentionality and drive initial adoption before moving on to the next project.
Step 1: Share the SOP with your team
Create basic awareness that the new SOP exists, where to find it, and when and how to use it. Don’t assume that one communication about this is enough. You’ll need to reinforce the message by repeating it and enlisting managers and/or leads within the team to direct attention to the new docs.
Step 2: Train employees
Use existing team meetings or a dedicated session to walk team members through using the SOP. Start at square one: when [trigger event], pull up the SOP from [location], and follow [the steps].
It may be more efficient to do this training asynchronously, via a video created with Camtasia that covers everything you’d cover in a meeting but can be viewed and re-viewed on demand.
Make great training videos
Camtasia is the best way to make training and instructional videos that keep your viewers engaged.
Business processes, roles, and platforms evolve…and so should your SOPs. At least once a quarter, set aside time to review and update SOP documentation with any needed changes or iterations. Ask managers and individual contributors to flag SOPs that need a revision or rewrite.
Tip: Snagit is super helpful for grabbing new screenshots or screen recordings when a procedure changes.
How to ensure SOPs are followed consistently
Assign accountability
As part of the handoff, identify a designated owner for each SOP who is responsible for ensuring that it is followed and updated as needed. Ideally, list the name of that person on the document to avoid confusion later.
Monitor and measure
Track performance metrics to ensure that the SOP is achieving its goals. Depending on your organization’s approach to operations, this could be quantitative metrics like quality assurance measures or task completion rates, or it could be qualitative inputs such as feedback from managers, team leads, and individual contributors.
Act on feedback
Neglecting to update SOPs ensures their slide into irrelevance and disuse. When team members sense that nobody cares enough to update the SOP, they stop referencing it.
When an SOP owner acknowledges and responds to feedback (even if the feedback doesn’t result in a change to the SOP, which happens sometimes), it sends a strong signal to teams that the SOP still matters.
The importance of a well-written SOP
A well-crafted Standard Operating Procedure (SOP) ensures team members can complete tasks efficiently, maintain quality standards, and deliver consistent results. By documenting processes clearly with visuals, you’ll create SOPs that are easy to follow and maintain.
Stop repeat questions
Create clear videos and guides with Snagit so you only have to explain tasks once.
What’s the difference between an SOP and other business process documentation?
An SOP provides specific, actionable step-by-step instructions for completing a task, while other business documentation may focus on broader processes or policies.
How often should SOPs be updated?
Review and update your SOPs at least yearly—but quarterly is a better goal, especially if your business frequently changes processes, personnel, or tools.
How can I make SOPs more engaging and easy to follow?
Include visuals and videos! Tools like Snagit and Camtasia make it easy to create detailed instructions with supporting visuals like screenshots and video tutorials that improve understanding and engagement.
TechSmith is the market leader in screen capture software and productivity solutions for daily in-person, remote, or hybrid workplace communication and customer-facing image and video content. Our award-winning flagship products, Snagit, Camtasia, and Audiate, empower anyone to create remarkable videos and images that share knowledge for better training, tutorials, and everyday communication.
Distance learning has become a go-to method of education, opening up countless new opportunities and access to education that many didn’t think possible before the forced shift brought on by the changes COVID-19 thrust onto the world.
“Multiple studies suggest that most students are already confident that technology-enabled learning works, but this has probably been a difficult transition for some faculty members. I am hoping that universities and faculty members will embrace the challenge and adapt,” K. Holly Shiflett, Director of North American partnerships, FutureLearn, said in a recent interview.
The shift to online distance learning has been a transformative moment for many educators and students.
Unfortunately, it can be challenging for many educators to find the time to create effective online courses, and the continuous developments in the technology that supports it can make it difficult to keep up.
That’s why we’re here to help! This guide will help universities and faculty members understand and embrace the challenge of distance learning.
What is distance learning?
Distance learning refers to any education provided without the teacher and students being physically present together.
In the past, high schools and universities offered correspondence courses as a distance learning method. Course materials were often sent to a student by mail and assignments were completed online or returned to the teacher by mail.
More recently, distance learning programs are using the incredible opportunities afforded by modern technology and offer very intimate and effective learning opportunities in all manner of distance education courses. Effective distance learning is now a viable option from kindergarten to elementary school to university.
What’s the simplest way to explain distance learning?
In the simplest form, distance teaching and learning is like going to school no matter where you are in the world.
Students can watch lessons on their computers, join live video calls, and hand in all assignments through an online learning management system, which supports virtual learning tools.
Teachers can create on-demand learning opportunities or teach lectures live as they would in a traditional classroom.
Synchronous vs asynchronous distance learning
There are, of course, some significant differences between distance learning and traditional learning; the most obvious being the absence of a requirement for physical attendance in a specific location.
When participating in distance learning, students experience significantly more freedom in their approach to learning. This can be a positive aspect in that students can choose courses based on their own schedules, the teaching style offered, and the modalities used.
Non-traditional learners can create a learning environment that works well for them rather than having to fit themselves into the traditional educational mold.
On the flip side of that freedom lies the requirement for students to be highly disciplined with their studies. In the case of distance learning in a university context, the implications may be less severe but for elementary distance learning and especially distance learning for kindergarten there is a need for some level of adult supervision to ensure the best chance at success.
So, what are the differences between distance learning and regular learning?
Distance learning falls into two main categories:
Synchronous learning
Asynchronous learning
You should understand the difference between synchronous vs asynchronous. Different types of distance learning fall into one or both of these camps.
Synchronous learning
Synchronous means “at the same time.” It refers to a method of education delivery that happens in real-time. It requires live communication online. It uses technology, such as teleconferencing, to achieve this.
Synchronous learning proves less flexible than other forms of distance learning. After all, students must meet with their instructor and sometimes their classmates at pre-scheduled times.
This approach limits the student’s ability to learn at their own pace. It may frustrate some learners who crave the freedom of the asynchronous classroom.
Asynchronous learning
As for asynchronous distance education? Students receive clusters of weekly deadlines. They have the freedom to work at their own speed.
Asynchronous distance learning comes with more opportunities for student interaction.
Students can access course content beyond the scheduled meeting or class time and interact through online conversations, quizzes, or video comments on their own schedule.
Both faculty and students benefit from the flexibility of asynchronous learning as it allows them to create and consume content when it’s convenient for them.
Benefits of asynchronous learning
In today’s world, both professors and students realize that external factors contribute to odd hours and disjointed schedules.
The flexibility of asynchronous learning allows them to create and consume content when it’s convenient for them and learning materials can be accessed at any time, anywhere.
Reach and engagement
With hectic and unpredictable schedules, faculty can extend course content beyond the scheduled meeting and class time through pre-recorded videos and other content.
Faculty can leverage live recordings or create videos, and then get analytics, generate captions, have conversations, add quizzes, and integrate content right into a Learning Management Software (LMS).
Make great educational videos
Create engaging videos that drive student success with Camtasia’s easy drag-and-drop editing.
Asynchronous teaching methods help motivate students to review content on their own time and on whatever device they prefer.
Students can go at their own pace and when it’s convenient for them. Self-paced learning accommodates various learning needs and preferences and enhances student success.
Students can then refer back to the content to study for exams, have discussions, and consult the content beyond the confines of a live lecture.
Complement synchronous learning experience
There’s always a need for virtual, live interaction, but asynchronous communication complements that to extend live sessions beyond a singular class.
For example, rather than simply having a Zoom meeting, professors can do a lot more with a recording. They can:
Post the Zoom recording for rewatching
Interact around the content
Get analytics on participation
Generate captions for accessibility
Add quizzes
Integrate with an LMS
A tool like TechSmith Camtasia will save you steps and help create better content for online courses.nd help create better content for online courses.
What are the different types of distance learning?
Next, let’s explore various types of distance learning. These approaches to education can be synchronous or asynchronous. Some fall into both categories.
These types of distance learning include:
Video conferencing
Hybrid distance education
Open schedule online courses
Fixed-time online courses
Let’s dive into what each of these types of distance learning entails.
Video conferencing
Video conferencing is traditionally a meeting where two or more participants use video to connect over the internet. This is a form of synchronous communication. Using tools like Zoom, Blackboard Collaborate, Adobe Connect, or other conferencing software, teachers and students interact together no matter where they are located.
Video conferencing enhances student-instructor interactions and provides a structure for lesson planning. It remains a vital component of distance learning.
Hybrid distance education
Hybrid distance education combines synchronous and asynchronous methods. Students receive deadlines to complete assignments and exams. Then, they work at their own pace.
They submit assignments through online forums. They maintain contact with their instructor. Yet, they work at their own pace. As students progress, they gain access to new modules.
Who thrives with hybrid distance education? Students that love independence.
Open schedule online courses
Under the asynchronous category, you’ll find open schedule online instruction. Such courses provide students with plenty of freedom. To complete coursework, students receive:
Online textbook(s)
Bulletin boards
Email
And more
Students are given a set of deadlines. Then, the instructor lets them schedule at their own pace. Students who value learning independently excel with this format. It requires significant self-discipline and motivation, though.
Students who lack the right skill set may find this approach daunting. They may feel overwhelmed by the presentation of the material. They may lack the motivation to work through the course in an effective way.
Fixed-time online courses
What’s the most common format for distance learning? Fixed-time online courses.
How do they work? Students log in to the learning site at designated times. They must complete pre-scheduled classroom activities at a specific pace.
These activities often include chats and discussion forums. Fixed-time online courses encourage student interaction. But there’s little room for self-pacing.
Who uses distance learning?
Distance learning programs are used by a wide variety of people for many reasons. The two groups making up the largest segment of the distance learning population are students (from elementary school all the way through to university) and professionals.
Teachers and students
Distance learning courses are offered for students of all ages. High school students can take additional courses to speed up graduation, students in University or College can attend a school anywhere in the world without the relocation expense, and working professionals can enhance their skills by accessing distance learning programs.
Distance learning can make education more accessible for learners in rural areas or those who experience challenges with traditional education.
Make great educational videos
Create engaging videos that drive student success with Camtasia’s easy drag-and-drop editing.
Distance learning activities have been put to good use in the training and onboarding for many companies. For those that are spread out globally or who have remote workers, distance learning creates an opportunity for consistency in employee experience across the board. Full training regimens can be provided using distance learning programs.
What are the advantages of distance learning?
Of course, traditional, face-to-face learning is wonderful in many ways, but there are also a lot of advantages to distance learning.
Flexibility
One of the strongest advantages of distance education is the flexibility it offers.
Students can choose from structured distance learning opportunities with live teaching and real-time access to the teacher, or unstructured distance learning courses that can easily be adapted around a busy schedule.
Distance learning programs can be completed from anywhere in the world. There are formats to fit many different learning styles. Most students will find an option for distance education that matches their needs.
Easy Access
Distance education has created a new opportunity for students who may have had difficulty accessing education in its traditional format. Whether this was due to remote location, or disability, distance learning removes the barriers associated with attending in-person classes.
Ease of access to global learning opportunities has opened up as well, with distance learning in universities and colleges making international study an option for many more students.
It’s also created the opportunity for lifelong learners from all over the world to access courses and curricula presented by teachers they would not have had access to otherwise.
Money and time savings
Distance learning has rendered education much less financially draining and much more time-effective.
Accessing distance education programs for universities and colleges cuts tuition by 50% as compared to a traditional on-campus experience.
Because so many of the costs related to infrastructure and logistics are removed with distance education, the costs to access it are significantly lower than comparable traditional education models.
Additionally, there are savings related to time spent as well. Of course, travel time is relevant for students, but on the teachers’ side, the ability to record and repurpose lessons results in an impressive amount of time saved as well.
Adaptability and freedom
Unlike the traditional education model, distance learning is easily adapted to the lifestyle and learning needs of the student.
Lesson schedules, teaching methods and the learning environment are all adaptable to each individual student through distance learning courses in a way that is impossible within in-person education.
Students from kindergarten to elementary school to university can use the time, space, and pace-related freedoms of distance learning to find levels of success they may not have in a traditional structure.
Earning while learning
Working professionals of all ages can use distance learning to earn a higher degree of education, or an entirely new skillset while maintaining their day-to-day working lives.
Many Distance learning universities and colleges offer asynchronous programs, allowing degrees and certifications to be earned outside of an individual’s working time.
Subject Matter experts from across all topics offer self-paced distance learning courses that can enhance an individual’s knowledge and credentials without interrupting their ability to earn an income.
What are the disadvantages of distance learning?
The benefits of distance learning are clear, but there are some warnings when it comes to this learning approach, too. Let’s consider some of the disadvantages.
Lack of social interaction
The amount of social interaction offered in distance learning activities is far less than in the traditional education model.
Without the requirement to attend a brick-and-mortar location, students miss out on the ability to work directly with peers. This characteristic of distance learning can affect children most notably, particularly for children performing distance learning activities in elementary school when peer interaction is such a cornerstone.
One way that this potential disadvantage can be limited is in the use of video as a communication tool, particularly regarding the provision of feedback.
Receiving feedback (think a graded test, a written comment, a marked up essay, etc) as part of distance learning often happens without the familiar social cues that help one understand the context and can feel somewhat abrasive. It can leave a student’s mind swimming in questions and uncertainty – particularly when the feedback is not entirely positive.
However, when video is used to provide feedback, these social cues are present. Being able to hear the teacher’s tone and see their facial expressions can make a world of difference and can reintegrate some of the social interaction that may be lacking in a distance learning experience.
High chances of distraction
Distraction can be a challenge for students engaged in distance learning programs. This can show up in many ways.
For one, students face a higher risk of online distraction. Without face-to-face meetings, students can lose track of deadlines and motivation.
Students who work well on their own may easily surmount these obstacles. Students who have trouble prioritizing may stumble. So will those who lack organizational and scheduling skills.
Self-motivation and focus are essential skills for success in distance learning activities.
Complicated technology
Overdependence on technology is a challenge with distance learning.
Students must have reliable access to tools like a computer, webcam, and a stable internet connection.
Any malfunction of hardware or software on either the student’s or teacher’s end can result in learning coming to a complete standstill.
To be successful, students or their caregivers must have a moderate level of comfort with technology. This is a requirement for modern distance learning at any level.
Questionable credibility of online degrees
Many employers will not accept a degree or certification from a distance learning program. This is a result of a lingering stigma around distance learning.
Not all teachers are skilled or comfortable with teaching in an online environment. This contributes to inconsistency with course materials and areas of focus.
A perceived lack of proper assessment is another factor contributing to this challenge with the credibility of credentials gained through distance learning programs.
Hidden student costs
While the reduced overhead costs to institutions often result in a lower cost of learning for students engaged in distance learning, there are some hidden costs associated with this type of learning.
These expenses include:
Gaining access to a reliable computer
Having an internet connection
Buying a web camera (in some instances)
Computer maintenance
Utilities (e.g., electricity for internet services)
Not all students have access to these resources. Distance learning can put them at a distinct disadvantage.
Distance learning has gained widespread credibility and acceptance, too. Top online universities are comparable to their on-campus counterparts.
Nonetheless, students should still keep an eye out for scammers. Before closing a distance learning program, they should explore the institution’s accreditation.
What does accreditation look like? While it may vary, accreditation occurs at three levels:
Programmatic accreditation
Regional accreditation
National accreditation
Programmatic accreditation attests to the validity of certain programs of study.
Regional accreditation means regional agencies have endorsed specific fields of study.
National accreditation means the program meets federal accreditation requirements.
Does distance learning have value?
Absolutely. While distance learning was once considered an inferior substitute for traditional education, it is now considered by many to be outperforming traditional classroom instruction.
This is largely because of video technology. Video helps make distance learning feel personable and helps keep students engaged.
Not only are students more successful, but they prefer remote learning.
77% of academic leaders rate online education as equal or superior. And 69% of chief academic officers agree.
Distance learning is a vital part of long-term education strategies.
Make great educational videos
Create engaging videos that drive student success with Camtasia’s easy drag-and-drop editing.
Not all distance learning courses are created equal. There are some key factors to consider when searching for high-quality distance learning courses. Let’s look at what those are.
Proper pacing
The best distance learning courses are those that are well-paced.
Students should not find themselves bored or overwhelmed by the lessons, projects, or course material.
The distance learning activities should include large projects for which students have ample time to prepare, with smaller meaningful assignments peppered amongst them to retain engagement and interest.
Multimedia integration
Excellence in distance learning courses can be tied to the effective use of multimedia learning aids.
Integrating podcasts, videos, and interactive activities can be very engaging for students and serve multiple learning styles.
When purposefully used, distance learning activities that incorporate multimedia tools can assist with the retention of course material. In fact, research shows that two-thirds (67%) of people understand information better when communicated visually.
Quality content
Low-quality content, like endless textbook reading assignments, monotonous lectures, and stock assessments lacking creativity, results in low retention of distance learning course material.
Distance learning activities that center on high-quality content, like engaging videos, passionate lectures, and interactive websites help students to maintain interest, retain information, and find more success.
Self-directed learning
Distance learning courses that offer students the ability to make their own discoveries, complete projects in the way that works best for them, and focus on the areas of study that they find most interesting are the courses that lead to the highest success.
Community connection
Great distance learning programs recognize that students are often negatively affected by the lack of social interaction within this style of education and intentionally incorporate the community into their curriculum.
Effective courses include group projects where students have to work together and opportunities for classmates to connect using digital tools.
Multiple learning modalities
The best distance learning opportunities integrate a range of learning modalities to allow students to learn in the way that works best for them. Some students retain and engage with information best visually, while others need to hear information spoken out loud.
Modalities included in the best distance learning courses will include visual, auditory, and kinesthetic, among others.
Intuitive navigation
For students to see success, distance learning programs should be intuitive to navigate. Ideally, this will be vetted by a third party.
Students should be presented with well-laid-out course content that lets them easily see what to do and when. Access to required resources and information should never be a challenge within a well-formatted distance learning course.
Reliable technology
The most effective distance learning programs use technology that is as universally applicable as possible. Students should not have to download and learn new or unreliable apps, plugins, or extensions to access or engage with course material.
Flashy additions of technology, while potentially interesting, can negatively impact the student experience in distance learning courses.
Room for additional exploration
Striking a balance between providing students with opportunities to dive into additional resources and overwhelming them with too many exploratory opportunities is an important balance for distance learning programs to strike.
Clearly distinguishing required course material from optional enhancement activities is crucial to providing a compelling distance learning experience.
What is the future of distance learning?
While distance learning has been in use for centuries, it has had an intense increase in its adoption since 2020.
It has been clearly illustrated that physical presence in a classroom is no longer the only option for effective learning.
Distance learning for students from elementary school to universities and colleges has come a long way, with no signs of its growth slowing down.
With the rise of remote and hybrid work, workplaces have continued to adopt distance learning practices as well.
Learning Management Systems and easily incorporated tools for creating educational content like Camtasia have made it easier than ever to provide quality education in the workplace, regardless of distance. The great news is that this tool offers a free trial so you can start creating amazing learning resources right now!
Make great educational videos
Create engaging videos that drive student success with Camtasia’s easy drag-and-drop editing.
While distance learning is unlikely to replace in-person instruction fully it’s certainly an effective tool that will continue to be developed and integrated into an increasing number of scenarios.
Ryan Knott is a Marketing Content Strategist at TechSmith, where he creates content about easy, effective, and efficient video creation, editing, and tips and tricks, as well as audio editing for creators of all kinds. He/him.
A job aid, otherwise known as a “cheat sheet”, is any material that helps you complete a task.
Job aids are essential tools to empower people with useable information to perform tasks independently.
They don’t have to be formal or created on any special software. They just have to help the user through a process successfully and in the simplest way possible.
You’re probably already using job aids and don’t even know it.
A job aid can come in the form of a virtual sticky note on your computer screen, reminding you what your computer login password is. It could be the paper assembly instructions detailing how to build that new desk for your home office. It could be a checklist, an infographic, an app, a print-out, a note scribbled onto a piece of paper – all these have the potential to function as an effective job aid.
Stop repeat questions
Create clear videos and guides with Snagit so you only have to explain tasks once.
Job aids are used over and over again and provide value to a returning user. Designed to be deliberately easy to understand and quick to use. Most importantly, job aids should be convenient to access when needed.
What job aids are NOT
The key word here is “aid”. As in, assist or support. A job aid serves to assist or support staff in completing their assigned tasks by providing a quick reminder of how to do them. Anything that teaches someone how to do something new is a training tool not a job aid.
A job aid is not a training solution, but rather a reminder of something the employee has been trained on previously and may need a slight memory jog for in order to perform well.
Job aids are not tools either. Additions to an office that are meant to enhance comfort or efficiency are not job aids. An ergonomic mouse, state of the art lumbar support in an office chair and a standing desk are excellent supports in the workplace but they are not job aids.
5 job aid examples you can steal
There are several common examples of job aids:
One-pagers
Cheat sheets
Paper handouts
Instructional lists
Printouts
Performance support collateral
Checklists
Infographics
Videos
User manuals
But here are 5 examples of common job aid formats to consider:
1. Step-by-step instructions
Also referred to as the “cookbook” method, this job aid format breaks down each step and presents them in chronological order. This format is great for tasks that don’t lead to multiple outcomes, like how to access a shared network drive.
This familiar job aid from the World Health Organization shows employees how to properly wash their hands before and after handling food.
2. Flowcharts
Flow charts are an ideal format to use when creating a job aid for a task that has many possible outcomes depending on variables within the process. Users are guided through how to proceed by following the steps prescribed based on the preceding result.
Visually, these aids often use arrows or boxes to represent the different paths available. Flow charts work well for tasks like responding to a customer service request.
Decision tables present the user with a grid to help guide their decision making in processes influenced by multiple variables. Information is clearly compartmentalized and shared using very concise text so that decisions can be made without confusion. These types of job aids are excellent for use in quality control processes.
4. Reference guides
Reference guides can effectively be used to support more than one process or task. They serve as a collection of reminders or tips to help employees who are already familiar with the task at hand but who may need a resource to turn to for quick reference.
This job aid format is a good choice for things like brand guidelines and health and safety reminders.
5. Checklists
When writing a job aid for a task with lots of action items or requirements that don’t need to be completed in a particular order, a checklist can be very effective. This format presents all of the associated actions in a list format and users can check them off as they are completed. Checklists are good for use with tasks that need to be completed on a daily, weekly, or monthly basis like closing procedures for a retail store, or month end processes for bookkeeping.
Job aids can help ensure safety measures even when employees already have them memorized.
How to create job aids (step-by-step guide)
Just as you would when creating training material, creating job aids needs to be done with a clear goal in mind. It’s also helpful if you follow a structured process – this will create efficiency and consistency which are both very important variables for you and your team. When you have the right process in place, and you follow it carefully, you will be able to easily create effective aids that your team will be happy to put to use. The job aid creation process should look something like this:
Define the end user of your job aid
Gather the required information about the task you’re creating a job aid for
Decide on the best format to use
Draft your job aid
Test your job aid and gather feedback
Finalize and implement your job aid
Step 1. Define your audience
Like any effective communication tool, you need to begin the job aid creation process by clearly identifying who the aid is for. People with different roles, levels of responsibility and innate skill sets will require different approaches, for example you would take a much different approach to a job aid meant to serve a C-Suite executive than you would one for use in the mail room.
Consider interviewing or surveying the audience in order to get a very clear picture of what they need in order to be successful. Consider how they might best take in information, what the standard tools of their job are, and the level of education they will most likely have achieved.
Knowing your audience is a key factor in creating job aids that will actually be effective and well utilized.
The best snipping tool for Windows and Mac
Don’t let clumsy built-in tools hold you back. Take and edit screenshots with Snagit!
To create a job aid that is effective in reaching its goal, you have to become very familiar with the task you are creating the aid for. You will need to be sure to include all of the inputs needed to complete the task, but you can take it a step further as well.
Consult with people who do the task you are writing the job aid for. They will be able to provide valuable insight into any common pitfalls, tricky navigation or alternative methods, and potentially even share helpful tips and tricks to assist the end user of the job aid you are writing.
While gathering as much information as possible will help make sure your end result meets your goal, it’s equally as important to know what not to include in your job aid. Think about what information is needed for the task to be completed and resist the urge to add in any “fluff”.
Step 3. Select a format
Your job aid is only as effective as its presentation allows. There are many job aid formats to choose from and selecting the right one will go a long way in making sure the aid actually gets used.
If the content and visual presentation of your job aid are not spot on, your audience simply won’t use it. To avoid this, be sure to consider how the aid will be distributed and used, in addition to whether the information can be conveyed better in graphic form than simple text.
Step 4: Draft your job aid
Now that you have all the necessary information gathered and you have decided on the perfect format, you can begin to write your job aid!
It can be very helpful to begin with an outline, so that you make sure the information is organized well and you have the correct order in place.
Take your screenshots
Job aids that use more visuals than plain text are the most effective. This can feel intimidating but we’ve got an excellent solution. If you haven’t already, download your free trial of Snagit here.
All you have to do after downloading is push the big red button and select the area on your screen that you want to capture. If the task for which you are creating a job aid is more physical than digital in nature, you can take photos instead.
Make your annotations
Once you have your screenshots captured, add text, arrows, numbering, or highlights to help make the steps as clear as possible and draw attention to specific portions of the process. Snagit can help you do all of this, and even combine your various screenshots into one document easily. With tools like automated numbering you won’t believe how simple it can be to make clear and effective visual aids with Snagit.
With clear step numbers, this job aid walks through screenshots on how to pull customer reports in an account record system.
Pro tip:Use action verbs to describe procedures. They’re easier to follow, instill more user confidence, and encourage momentum. For example, you’d say “Open the latch. Remove the inner liner,” as opposed to “Once the latch is opened, the liner must be removed.”
If directions span multiple screens or photos, combine them into one document and add any text around or on top of the visuals.
Snagit lets you combine multiple images into one document, and drag-and-drop to move images around.
Have a consistent look
Be sure to use a consistent style for your job aids. Fonts, colors, and sizes should be consistent and any company branding should be incorporated whenever possible. You can easily create templates for job aids within editing programs to make your process as efficient as possible. If you keep reading you’ll find a free template we have created to help you easily make job aids with a consistent look.
Make it multilingual
Your job aid isn’t going to be effective if people can’t read it. Make sure to consider the languages spoken by the staff you are looking to serve with your job aid and have the resource translated into as many languages as necessary to serve effectively.
Job aids can give important reminders to staff across languages, as seen in the inspection reminder card for brewery equipment. Job aids that use pictures without any text can be even easier to use.
Step 5: Test your job aid and gather feedback
Now that you have created your job aid, there is one more step to complete in order to make sure it is effective. You need to test it!
Send your job aid to a few seasoned employees in the department that wil be using the aid and have them try it out. They will be able to identify whether any steps have been missed or a shorter path through the process is possible. Make any edits that are necessary based on testing before sending the job aid to your team.
Step 6: Finalize and implement
Your job aid is ready to be put to use! Distribute it to the team for use and provide clear instruction on when and how to use it.
Ask for feedback once it has been in use for a short time and make edits related to any valuable feedback you receive.
It’s also important to evaluate the aid’s effectivenes. Check in with managers to see if they are receiving less repetitive questioning, or if customer satisfaction rankings have increased – whatever metric makes most sense for the goal assigned to the job aid.
Annotate and edit screenshots with Snagit
Professional mark-up tools and powerful features make it easy to create helpful images.
Job aids and job training are both very important components of supporting employee success but the two serve very different purposes. Using a job aid for training is not going to give you the outcome you are hoping for. And using a training tool when what is called for is a job aid will prove ineffcient.
While job training is focused on guiding employees through policies, procedures, software overviews, and other lengthy procedures required to fulfill their job descriptions, job aids act more like refreshers for when an employee needs to complete a very specific task like performing a single operation within a software or having a particularly targeted conversation.
Job training sets the expectations for success in a role. Job aids help individuals complete specific tasks within their established role.
How do job aids improve performance?
Training only goes so far, and it only stays in a person’s memory for a short time. When the face-to-face coaching session from a few weeks ago is already growing stale and you hear, “How do I do that task again?”, that’s when job aids shine. They’re available on demand with exactly the information employees need, whenever they need it.
Both employers and employees have better days when answers are available right away. Instead of having to chase someone down for help, employees have a job aid that shows them the steps required to complete a process. No need to page through layers of documentation to find the exact instructions — a job aid is right next to their workstation so employees can complete the task correctly the first time.
Not only are job aids great at helping employees remember what they’ve learned from a training (such as processes they only need to do occasionally, and don’t need to memorize), they’re also helpful when something changes — for troubleshooting, for example, or to walk through steps of a slightly different workflow of new software versions.
These efficiencies add up. According to Peregrine Performance Group, companies they work with have replaced a one-week training course with one day of training plus a job aid. Not only is less training needed, proficiency increased by 50%. When you take the time to write an effective job aid, you can expect these types of benefits:
Save time by getting work tasks done more quickly
Avoid making mistakes, thanks to having clear directions
Less employee stress
Reduce unnecessary back-and-forth help requests
Better process/standards control by sharing the same knowledge with everyone all at once
Less training and re-training
Better employee and customer experience
Plus, they’re quick — job aides can be deployed 75% faster than traditional training, and at a much lower cost, for much better ROI.
Speed up your screenshot workflows
Stop wasting your time with built-in snipping tools, and try Snagit!
If you’ve worked on a team before, you know that at some point, without a doubt, tasks come up that are outside of the norm, or that need to be completed by someone who doesn’t normally do them. In these situations job aids make everyone’s life easier. They ensure productivity by taking the guesswork out of the task at hand and freeing up mental space for more pressing responsibilities.
1. Avoid communication problems
Communication challenges are a major factor impacting productivity. Whether it’s waiting for questions to be answered or looking up missing information, the impact that communication limbo has on productivity is very real.
Having a job aid to refer to means that employees can move forward with new or unfamiliar tasks without having to wait for responses or specific verbal instruction.
Creating job aids helps to reduce the development of silos and dependencies, and increase productivity and effectiveness.
2. Make knowledge-sharing faster
It happens on an ongoing basis. A new procedure is developed, a task gets passed from one staff member to the next, a new workflow comes into play or some other event requires a quick way to bring everyone up to speed.
Well, no one wants to spend their time (or their money) in a long training or watching over someone else’s shoulder to learn what to do. If a new policy gets rolled out, everyone needs to know about it of course, but it doesn’t have to take a large investment of time to make that happen.
Simply creating and sharing a job aid can make the knowledge-sharing process so much more efficient and in many cases, it is also more effective
3. Spend less time on training programs
Job aids cannot and should not replace training programs, but they can serve as helpful resources that reduce the amount of time spent on those programs.
Creating job aids can serve as a supplement to your training programs, providing the necessary information for completing specific tasks or processes without having to book time within your training curriculum to cover them.
Could a job aid be the learning solution that helps your business?
Empowering your employees with the information they need to level-up is an integral part of managing staff and running a successful business. When you identify problem areas or gaps in knowledge, it only takes a quick Google search to discover the variety of options available to educate your employees.
Online courses and eLearning are popular ways of training. But are they the most suitable for teaching the information you need your employees to know?
Training courses and eLearning solutions aren’t always the silver bullet. These are often costly, time-consuming answers to a problem, and depending on what your employees need to know, it could be a waste of time and money.
Before you invest in any learning solution, consider what your employees need to know. Could it be taught with some illustrative material? Do users need frequent access to easy-to-read materials rather than something they need to commit to memory?
If the answer to any of these is yes, what you might need is a job aid.
Job aids can be instrumental in helping people learn how to complete tasks. In this post, we will share our advice for creating job aids that will work best for your business.
You can watch the video on this topic at the top of this post, to listen to the podcast episode, hit play below, or read on for more…
Bonus: Snagit templates
Still unsure of how to get started with job aids? Let Snagit templates do the work for you!
First, click the Create button and choose Image from Template or select images from the Recent Captures tray, then right click and choose combine in template. You can select whichever templates best suit the needs of your job aid.
Then, simply drag and drop your images and adjust them within the template. It’s that easy! For a full tutorial on making a job aid with Snagit, watch this great video below:
Job aids FAQ
What software can I use to create job aids?
The simplest of tools can be the most useful! Powerpoint, Word, Docs, and Slides are great software options for creating job aids. Programs like Cava, Photoshop or Illustrator can also be used to create graphics. Of course, Snagit and Camtasia are also very useful tools in creating job aids.
How do employees use job aids?
Job aids are used by employees either to learn a new task or to access reminders about how to complete a task.
What is the difference between a job aid and a procedure?
Procedures are documents that follow a linear pattern to describ the step by step process of completing a task. A job aid presents information and instructions related to the completion of a task. A job aid, in fact, could be used to illustrate a procedure.
TechSmith is the market leader in screen capture software and productivity solutions for daily in-person, remote, or hybrid workplace communication and customer-facing image and video content. Our award-winning flagship products, Snagit, Camtasia, and Audiate, empower anyone to create remarkable videos and images that share knowledge for better training, tutorials, and everyday communication.
Top YouTube content creators can make hundreds—if not thousands—of dollars a day. But ironically, being successful and making money on YouTube has little to do with making videos.
So how DO you become successful on YouTube?
Today we’re going to share with you techniques from some of the top YouTubers that show exactly what you should (and shouldn’t) do for YouTube content creation.
Here’s everything, step-by-step, that you need to make a successful YouTube video:
Step 1: Create a basic YouTube video strategy
Find a valuable topic
Want to know the best-kept secret about being successful on YouTube (or any other content platform)?
It has little to do with you as the creator.
You can be charismatic, funny, and intelligent, but your videos are useless if you don’t provide value. Videos are not about you or what you can gain. You probably won’t be successful if you get on YouTube looking to get something out of it. You need to focus on your audience—not yourself.
Find your audience on YouTube
Before working on your first script or storyboard, you must answer this question: “Who is your audience?”
Knowing your target audience will guide nearly every decision about your video. Knowing general information is helpful, but think about your specific audience.
How does your video benefit them?
What are their problems or interests?
What do they need to know?
What will they learn from your video?
You need to dig deeper if you can’t answer these fundamental questions. The answers to these questions will guide you as you plan and create your video.
Experts’ Take
As you start looking at what your audience wants and needs, there are some things you can do to help As you start looking at what your audience wants and needs, there are some things you can do to help you narrow your focus.
Here’s advice from a YouTube expert who has learned (from a lot of practice and work) what you need to define your audience.
YouTube Marketing Consultant Owen Video says, “The first thing we do is run our clients through a questionnaire that helps them to get the biggest topics that the audience would be interested in.”
Once you have a sense of your audience, you need to create content that matches your persona. It doesn’t matter if your video doesn’t work for other groups or other personas.
When you’re just starting, you want your audience to be as specific as possible.
Focus your content on helping the viewer achieve their goals. If you’re selling software, you need to make sure your video helps the viewer learn exactly what they need to be successful.
Fernando Silva, former Account Executive for Wistia, emphasizes this need and suggests that we must “[get] a sense to what your audience is actually interested in and what they want to keep watching, or maybe what doesn’t interest them. It … helps you make better content in the future.”
If you work hard to understand your audience but aren’t sure of what you should create for them, Tyler Lessard, Vice President of Marketing at Vidyard, stresses that you should, “focus more on the quality of the content and how you deliver it. Making sure it’s relevant to your audience, and I think that’s a simple way to start.”
Don’t get stuck on perfection
Just start.
We know it can be tempting to watch the well-known YouTubers and think you have to create videos just like that and engage a massive audience all at once, but all those thoughts can be paralyzing.
Quote: “I personally believe that we’re all on the same plane, whether you’re a business or whether you’re an individual creator. Because we all start somewhere…” – Amy Landino, YouTuber and best-selling author of Vlog Like a Boss.
What should you do if you find yourself stuck on making it perfect?
Start by asking yourself a few questions:
Will my audience not clearly understand the purpose of the video if these changes aren’t made?
Will the video, as is, achieve your goal?
Does the video contain something incorrect that would seriously impact the viewer?
What is the worst that will happen if the current version is released as is?
Can the time that is used editing be put to better use on another project?
Once you answer these questions, give yourself permission to move on. If you focus too much on creating the perfect video, you will limit yourself in the long run.
Step 2: Find YouTube ideas and topics
Now that you know the basics, you may wonder, “What should I make a YouTube video about?” The good news is that there are many ways to find YouTube video ideas your audience is searching for.
Let’s say you run a home contracting business. You decide to target your channel toward current homeowners looking to spruce up their houses. Your initial video topics might include “How to Remove Popcorn Ceilings” or “How to Refinish Your Kitchen Cabinets.”
As you get more comfortable with your niche, you’ll be able to flesh out your videos more and more.
YouTube search
YouTube search is one of the best ways to find what people search for. When you develop a content idea, do a quick YouTube search and see what comes back. Look at the results and decide if it’s a saturated area or if there’s room to create a unique, valuable version.
You want to choose topics you’re passionate about and that are relevant to your audience. When you have a primary topic idea, YouTube can help you narrow it down. Search YouTube by typing some keywords into the search bar. The autocomplete feature will give you additional keywords that YouTube suggests.
You want to take those terms and write them down. After all your research, one video can cover many of the same topics, or you can create a series of videos. By creating a broad range of niche videos, you’ll be able to cover specific topics your audience is curious about.
Start Creating YouTube Videos Today!
Download Camtasia to make your own YouTube videos quickly and easily.
The comments section of videos and articles can be an excellent resource for YouTube video topics. Viewers often suggest additional topics or ask questions about areas of interest for creating additional content. So start by examining a competitor’s YouTube channel and mining the comments.
Communities and groups
Whether it’s X (formerly Twitter), a Facebook group, a subreddit, or a membership group, find like-minded people who will inspire you and help you out along the way. Don’t discourage yourself by assuming you must go at it alone. Find a group that you can bounce ideas from and ask questions. You might even come away with some different (and better) video topics.
Ask your audience
If you already have an audience (even a small one), it’s worth asking them what content they want to see. This is a surefire way to determine what your audience wants to know, learn, and watch.
Step 3: Do your research about SEO
A video can’t be successful if no one sees it. You must consider Search Engine Optimization (SEO) when you start creating your video.
As a new creator, there is a lot to learn and figure out, but mainly you want to get your content found by the people who are searching. Your audience is out there, and specific keywords will get them to find you.
Two key ways to rank your YouTube videos:
Make content that is good for the users.
Make content that is good for search engines.
You want people to find your content. SEO can be complicated, but you don’t have to do everything simultaneously. For your first few videos, write a straight-forward title that explains your video. You can have more information about the contents and niche in the description.
Search comparable videos and look at the specific words and descriptors they use in their titles and descriptions. By using those same keywords, plus some that are unique to you, you can lead your audience to your content.
After a few videos, YouTube Analytics is your best friend. It can help you uncover what’s working and what’s not, trends, and how your audience responds to your content. The creators we talked with made a few easy suggestions.
Andrew Kan of TubeBuddy recommends you make content focused on a specific topic and niches, which will help your content be more searchable. It also helps ensure that the right audience is finding your content.
“Many people spend time on broad terms that have so much competition they’re never going to show up for [in search],” he said. “If you show up on race day, and you’re [not] a runner, and you’ve practiced once, you can’t expect to win. So by practicing, by understanding that being more specific helps you be more discoverable, it helps you win.”
In addition to focusing your content on specific topics, Jeremy Vest recommends that you ensure your content is helpful and answers questions your potential audience is asking.
“Match that search intent with ‘how do I fix this blank,’ and you sell that blank,” he said.
“Instead of just talking about how good your widget is, be the answer to questions being asked…and being the answer to those is…one of the easiest ways for brands to start doing well in this environment and then from there beat that expectation. Provide things they’re not expecting. Have guests they wouldn’t expect to be on your program. And give more value than they can even believe.”
To make your content helpful and findable, consider your viewers’ questions and where they’re asking them. Then, you can create the right content and post it where they will find it.
Step 4. Understand YouTube equipment for beginners
It can be easy to get overwhelmed and feel like you don’t have the right tools to create your video. High-end equipment and tech is fun, and there is no question that better equipment can produce a better-quality video. Remember, too, that highly specialized equipment can be complex and requires considerable time and training. Especially as you’re starting, try not to worry too much about equipment.
First, learn to get good at creating the content and worry about leveling up your gear later.
You can do so much with screen recording software, a simple video editor, a smartphone, and creativity. These tools can help you learn the basics of video creation and help you practice good techniques that will be beneficial no matter what gear you use.
People create all kinds of videos on YouTube. The best video you can start with is aninstructional video. According to a recent TechSmith study, 66% of respondents watch an instructional or informational video at least once weekly.
A simple tutorial or how-to video is a great way to get your feet wet. A tutorial video simply answers a question someone asked. It could be “How to Freeze Panes in Excel” or “How to Change Your Oil.” Either way, you’re simply sharing your expert knowledge with others. These types of videos are all over YouTube, and with good reason.
These videos provide a great opportunity for you to share your expertise in any topic, no matter how niche!
Do you have dog training tips to share? Gather a list of all the questions a dog owner might have and create a series of how-to videos to give them answers.
If you are an expert in Photoshop and want to help others get better, a tutorial video or training video would be a great place to start.
And if you’re a business or entrepreneur, there’s no better place to start than a product demo video, podcast episode, or explainer video.
Social media content creator? Creating YouTube Shorts—short video snippets similar to a TikTok video or Instagram Reel—might be up your alley.
These videos will help potential customers see what your product or service does without reading much material. People look for video help every day. Learning and educational content alone drive over a billion views daily on YouTube. By the end of this guide, you’ll be able to make a high-quality YouTube video using screen-recorded content.
Step 5. Set up your video recording
Now that you know your audience, plan your topics, and understand what video to make, it’s time to start creating your video.
Write a script or outline
A script may seem pretty formal, but it’s a great tool to help you stay focused. Plan out the visuals in a shot list (shots, angles, graphics, etc.) and write a script to go along with it.
If writing a script seems like a tedious task, you can turn to AI-generated script writing tools to help you get a head start on the process.
Tools like Camtasia Audiate make it easy. Enter an idea, and a video script will generate for you in minutes. From there, tweak it to fit your brand, or use it as is. You can also use it as a rough outline for your video.
At any rate, a script or outline will make a huge difference in your preparedness and will reflect positively on your video.
Clean up your desk (and desktop)
One of the top mistakes to avoid when you record yourself is too much clutter, both on and off the screen. If you’re shooting a video at your desk, business, or home, you want your environment to be clean and presentable.
Next, you’ll need to adjust your camera and video lighting (if you have them).
Clean up your mess
If you’re getting shots of yourself, make sure anything that can be seen on screen is clean and free from clutter. A blank, single-color wall is a great background, but if you don’t have access to that, just ensure your setting is as free from distractions as possible. You want your viewers focused on you, not the artwork on your wall.
If your video includes a screen capture or screen recording, clutter on your computer screen is just as distracting. And there’s nothing worse than fumbling through unnecessary apps and programs to get what you want to show in your video. Make sure to close any unneeded programs and windows before you record.
Avoid recording in front of windows
If you record near a window, avoid recording in front of it. Position yourself next to the window or facing the window. This way, you won’t be washed out or become a silhouette. Pro tip: this is also a great way to enhance your lighting, though be careful, as it can be hard to control the amount of light.
Position your camera correctly
Tilt your webcam or camera so that it’s at eye level and your viewers don’t have to look up at you. Stick to the Rule of Thirds or position yourself in the center of the frame.
Step 6. Record your desktop
Pick your favorite screen recorder and walk through your script as you record your desktop. Here at TechSmith, we use Camtasia for our YouTube videos. Camtasia is perfect for anyone who needs to make instructional videos on YouTube, and we have many tutorial videos to get you started.
Your recording can be as simple or complex as you want. You can record on your webcam to give it some personality, create an intro or outro, add music, or simply hit record and share it.
Record your screen
To start a recording, click the Record button at the top of the tools panel. This opens the Camtasia recorder, which captures everything that happens on your screen by default.
Customize your settings
First, you’ll want to record the entire screen or select a custom recording region.
Next, choose other inputs to record along with the screen. Options include webcam, microphone audio, and system audio. Select the down arrow or double arrows next to each to choose a specific microphone or webcam.
Finally, click “Start Recording” to begin.
Finish recording
Windows:
When finished recording, click the Camtasia recorder icon in the taskbar, then the stop button. To re-record, choose ‘delete’ to start over.
Quick Tip: Press “F10” to stop a recording or “F9” to pause/resume a recording.
Mac:
To finish the recording, click the Camtasia icon in the Apple menu bar, then click “Stop Recording.” To re-record, choose “Start Over.”
Quick Tip: Press “CMD+OPTION+2” to stop a recording, or “CMD+SHIFT+2” to pause/resume a recording.
Step 7. Edit your video
Editing your video can be the most fun and time-consuming process. And for a beginner, it can be the most overwhelming. Here are a few simple edits you can use to get started.
Trim mistakes
Often, we record a little extra at the beginning and end of a recording. To remove the extra content, drag the end of the clip “in.” This is called trimming. If you trim too much, drag the video clip back to restore your video.
Note that any edits you make on the timeline won’t affect your original recording in the media bin.
Use cuts
Drag the red or green handle on the playhead to select the area to remove, then click the cut button to remove the section. A stitched line appears, showing you where the cut was made.
If you make a selection and want to bring the playhead back together, double-click the playhead.
Add titles, transitions, annotations, and more
Add a level of polish and professionalism to your videos with eye-catching titles, annotations, effects, and more. Click and drag them from the tools panel to the timeline or canvas.
Dynamic captions are also a great effect to make your content more eye-catching. As with the other effects, just drag and drop the captions onto your video, and Camtasia will automatically transcribe it for you—no other steps needed!
Video editing tips
Endless resources across the web can show you the intricate details of video editing. But you’ll need a few video editing tips to make a high-quality video without overcomplicating it. Let’s review other standard enhancements to make your video stand out.
Add a simple video intro
A video intro leads your viewers into your content. Keep your intro simple and to the point. Viewers want to get to the meat of your content.
They don’t value anything besides what you promised to teach them. You can use an intro throughout all the videos on your YouTube channel, a playlist, or just a single video.
Create lower-thirds
A lower third (also called a chyron) is placed on the screen’s lower third portion (usually to the right or left) and is a simple way to provide your audience with information. Usually, they display a name, place, or other helpful information.
Click for sound
These shouldn’t cover up your visual and are meant to complement your primary subject.
Add music
Finally, you’ll want to add music to your new video. Choosing the music you like will probably take longer than adding it to your video. For most purposes, your best bet is to use music from a premium royalty-free music website. While the music won’t be free, it’s typically inexpensive, and you’ll have a broader range of high-quality music.
Where can you find music for videos? You can access a massive library of free and premium music tracks right in Camtasia. No need to download music from the internet or leave the editing software; Camtasia’s extensive asset library has everything you need.
Focus on good audio and voice overs
Poor audio can sink your video. For recording voice overs, you can use Camtasia. However, for the most straightforward voiceover experience, we highly recommend TechSmith Audiate.
Audiate transcribes your voiceover as you speak. You can then edit your audio just like editing text. No more searching through the waveform to find your mistakes. Audiate even lets you quickly find and delete your “ums,” “uhs,” and other mumbles and hesitations.
Plus, if you hate the sound of your voice, Audiate can generate audio from a script automatically. This means that you’ll get a great YouTube video with a perfect voice over without having to speak!
If you have music in your video, ensure it doesn’t overpower you with your voice over. Don’t be afraid to add those phat beats, but remember that your audience is here to learn from what you’re saying.
Pay special attention to your final edit by focusing on the sound. Close your eyes and just listen to your video. If it sounds off, you should adjust it, regardless of how unique your footage or screen content is.
Quote: “My editing style has always been to keep our content as concise as possible. I want people to get what they need from my videos as fast as possible. And to keep our videos on brand, we always use the same font, brand colors, and tone of music—which creates consistency and familiarity.”- Sunny Lenarduzzi, Founder of YouTube for Bosses
Create a compelling video outro
A YouTube outro is where you can add specific calls to action to your video. This is also called the end screen, or the last part of your video.
Four different content types are available for use on your end screens on YouTube called elements. These four elements are:
Video or Playlist: This allows you to link to a different individual video or a YouTube playlist of multiple videos.
Subscribe: This allows you to link to your YouTube channel, where a viewer can click to subscribe.
Channel: This allows you to link to a different YouTube channel.
Link to Approved Website: This allows you to link to a website outside YouTube.
The easiest way to edit videos
Stop wasting time and discover how Camtasia makes creating incredible videos easier than ever.
Uploading to YouTube is simple. If you use Camtasia to create your YouTube video, you can share it directly to YouTube from within the product. You’ll simply have to log into YouTube and connect your YouTube account to Camtasia. Or you can save your video to your hard drive and upload videos with the YouTube platform.
How to optimize your video for YouTube
As you start making your own video, you’ll want to focus on specific areas to ensure your video performs well on YouTube. By being strategic while you make your video, you’ll give yourself a better shot at ranking on YouTube.
Video Production Optimization
Target relevant keywords that list videos on Google
Have you noticed more videos popping up in your search results? Google processes 3.5 billion searches per day, and many how-to-based searches now include YouTube videos directly in the Google search engine results.
These online videos show all sorts of searches. Simply type in “how to fix my fridge” or “how to change spark plugs,” and Google will give you the top YouTube videos based on your search.
Cater video length to your goals
Generally speaking, longer videos perform better on YouTube than shorter ones because they have an increased watch time. More watch time leads to higher rankings, which can attract new viewers to come check out your videos. Plus, videos over 10 minutes can have more ad placements, which increases revenue.
However, shorter videos produce higher retention rates. Basically, this means that people are more likely to watch the whole video and not click off prematurely. This is great for engagement and SEO.
No matter the length, YouTube will push videos higher in the ranking if they provide value and keep people on the site as long as possible. So, as you brainstorm and plan your videos, think about how you can expand on them. Rather than just adding filler content, think about how to dive deeper into your topic to create an even more helpful video.
Make sure you speak your keyword in your video
YouTube transcribes your content, so say your main keyword 1-2 times in the script.
Make a unique introduction
Retention is everything on YouTube. Incentivize users to watch as long as possible in your first 10 seconds. Teach them what you will discuss and give them a reason to stay and watch your video.
Tell users to comment, like, and subscribe
If you don’t tell your viewers to engage with your YouTube channel, they probably never will. And if you create supportive, helpful content, they will be more likely to interact with your YouTube channel.
YouTube Ranking Optimization
Now that you’ve created an optimized video, it’s time to optimize within the YouTube platform. You don’t want to overcomplicate this. It isn’t about stuffing keywords into places and trying to trick YouTube into ranking your video. You want to be strategic in what you do and, above all else, provide value to your audience.
Update your title, video description, and thumbnail
Get your SEO keyword in the title and YouTube description, preferably at the front, but don’t forget to make it compelling and click-worthy. Worry less about trying to stuff keywords in and more about letting viewers know that your video will help solve what they are looking for.
Pro tip: Be honest in your title and description. People stop watching videos that don’t deliver on their promises.
According to YouTube, 90% of the best-performing videos on YouTube use a custom thumbnail. Try to make your YouTube thumbnail exciting and different from everything else in the search results. Make your video worthy of a click.
To make an easy thumbnail, take a screenshot of an important frame of your video. You can use a screen recording tool to make that process super easy to capture. Then, add a short title to your thumbnail image and make it pop with some effects.
Leverage your current audience to build video velocity
The first 48 hours your video goes live are critical. This is where leveraging your current audience plays a large part. You can create a more substantial buzz, and your views will begin to climb through your existing base.
Owen Video likes to create video velocity by acquiring views before a video is public and rewarding his followers with exclusive content. As a result, YouTube sees the video as more valuable and is more likely to appear high in search results. Here is one of Owen Video’s most successful strategies for YouTube video promotion. Mirroring his strategy with your videos will help you improve their performance early on:
Owen Video’s video promotion strategy example:
The first day he publishes a video, he leaves it unlisted (the video can’t be searched or found by the public without a link).
The link to the unlisted video is distributed on social media platforms.
The link to the unlisted video is emailed to applicable mailing lists.
The audience gets early access to new content and feels rewarded for maintaining a relationship with Owen Video.
Then he makes the video public. When the video goes live, there are already views, which helps build traction for the video.
This is video velocity; essentially, you’re getting a head start on YouTube.
Quote: “So what happens is, you create velocity with your video…people are watching it before it’s even public yet. Having that distribution or pre-promotion plan is going to set [you] apart from your competitors who are just figuring this stuff out.” Owen Video
What’s next?
We’ve covered a lot in this step-by-step guide. Whether you’re just getting started or a video veteran, you’ve learned some critical tools and strategies to create successful YouTube videos.
We built Camtasia for anyone who needs to make any kind of video. We offer a ton of helpful tutorials to get you started. And, for the record, we produce 100% of our tutorials and other screencasts using Camtasia.
Frequently Asked Questions
How do you make videos on YouTube?
To make your first YouTube video, start by getting a simple video editor like Camtasia and just try making a few videos on topics you’re an expert on. If you know much about a particular product or service, try putting together a quick tutorial. Many people are searching for help across YouTube, and you could be their answer.
What should I make a YouTube video about?
Explore multiple approaches to find YouTube video ideas your audience values. Three of my favorites are YouTube searches, comment sections, and communities.
YouTubers use different programs to edit their videos, but at TechSmith, Camtasia is the perfect video editing software for beginners. To learn more about Camtasia and its simple video editing functionality, check out this quick video from Tim Schmoyer of Video Creators.
How to make a YouTube video without a camera?
Recording your screen is a great way to make a YouTube video without a camera. When you choose screen recording software, pick a tool with built-in recording, editing, and sharing features. Combined recorders/editors will save you time and let you do all your work in one tool.
What equipment do you need for YouTube?
It can be easy to get overwhelmed and feel like you don’t have the right tools to create your video. Start with your phone or screen recorder and a simple video editor. Then, move to professional gear.
Editor’s Note: This post was originally published in May 2019 and has been updated for accuracy and comprehensiveness.
Ryan Knott is a Marketing Content Strategist at TechSmith, where he creates content about easy, effective, and efficient video creation, editing, and tips and tricks, as well as audio editing for creators of all kinds. He/him.
Effectively communicating policy changes to employees is important for several reasons. First, it ensures that everyone understands and supports the changes. When employees understand, they are more likely to follow and adopt new policies, which is key to successful implementation.
Clear communication reduces confusion. Without it, employees might misinterpret the changes or not know how they impact them, leading to inconsistent application. This inconsistency can create problems and inefficiencies across the organization.
When employees are clearly informed of expectations, they know what’s required of them, which helps with accountability.
Consistent, open communication fosters trust and transparency. When employees feel informed and that their concerns are addressed, it builds trust in leadership, contributing to a positive work environment.
In the end, effective communication boosts employee engagement and morale. When employees understand the reasons for changes and feel involved, they are more engaged, productive, and satisfied, which strengthens the organization as a whole.
What to include when communicating a policy
When communicating a policy change to employees, it’s important to include key details to ensure understanding. This requires carefully considering your communication methods.
Purpose and context: Start by explaining why the policy is changing. Share the reasons, such as current challenges, goals, or external factors, to help employees understand the bigger picture.
What is changing: Clearly explain what’s changing. Outline the specific details of the change and provide examples, so employees know how it affects their daily work.
Why it’s changing and the benefits: Describe why the change is happening and highlight its benefits. Whether it’s improving efficiency or employee well-being, make sure to explain the positive impact on both the company and employees.
Timeline, steps, and support: Share the timeline for the policy change, key dates, and steps for implementation. Let employees know what resources and support, like training or points of contact, are available to help them adjust.
How to share feedback: Encourage employees to ask questions and share concerns. Explain how they can provide feedback—through meetings, surveys, or directly with managers.
Address feedback: Be open to feedback and respond thoughtfully. Acknowledge employee concerns, provide solutions, and communicate updates if issues take time to resolve. This builds trust and shows a commitment to improvement.
Who to contact: Clearly state who employees should reach out to for questions or clarification. This ensures they know where to get help.
Summary and thank you: End with a brief summary of the key points—the purpose, what’s changing, the benefits, and the timeline. Thank employees for their attention and cooperation to keep the tone positive.
Using video and images to communicate policy changes
Using video and images to communicate policy changes can significantly enhance the effectiveness of your message. Tools like Snagit and Camtasia are particularly useful for this. Snagit allows you to capture and edit screenshots and create quick videos easily, making it ideal for creating quick, clear visual aids. Camtasia offers more advanced video editing capabilities, enabling you to produce high-quality videos that can explain complex policy changes in an engaging and understandable way.
Wall of text? Next!
Snagit makes it easy to communicate more effectively with visuals.
Engaging content is crucial when communicating policy changes. Videos and images can capture attention more effectively than text alone, making it easier to convey important information.
By incorporating visuals, you can make your content more dynamic and interesting, which helps to keep your audience engaged. This is particularly important in today’s fast-paced world, where people are often inundated with information and may not have the time or inclination to read lengthy documents.
Improved retention of information is another significant benefit of using videos and images. Studies have shown that people are more likely to remember information that is presented visually. By using tools like Snagit and Camtasia to create visual content, you can help ensure that your audience retains the key points of your policy changes. This can lead to better understanding and compliance with the new policies.
Consistent messaging is essential when communicating policy changes, and videos and images can help achieve this. Visual content can be carefully crafted to ensure that the message is clear and consistent across all platforms. This helps to avoid misunderstandings and ensures that everyone receives the same information. By using Snagit and Camtasia, you can create standardized visual content that can be easily shared and distributed.
Clear information is vital to alleviate misunderstandings. Videos and images can break down complex policy changes into more digestible parts, making it easier for your audience to understand. Visual aids can highlight the most important aspects of the policy changes and provide examples or scenarios that illustrate how the changes will affect them. This helps reduce confusion and ensures that everyone is on the same page.
Flexibility and accessibility are also important considerations. Videos and images can be accessed on various devices and platforms, making it easier for people to view the content at their convenience. This is particularly useful for reaching a diverse audience with different needs and preferences.
Tools like Snagit and Camtasia allow you to create content that is accessible to everyone, including those with disabilities, by adding captions, transcripts, and other accessibility features. This ensures that your policy changes are communicated effectively to all members of your audience.
The easiest way to edit videos
Stop wasting time and discover how Camtasia makes creating incredible videos easier than ever.
Use multiple channels and repeat messages: Share policy changes through various platforms like email, team meetings, and intranet. Repeating the message helps ensure everyone receives and understands it, accommodating different communication preferences.
Be clear and concise: Keep your message simple and to the point. Use straightforward language and bullet points to highlight key information, avoiding jargon to prevent confusion.
Personalize content: Tailor your message to different departments or roles to make it more relevant and relatable to specific groups.
Encourage two-way communication: Create opportunities for feedback, questions, and discussions about the changes. This fosters inclusion and helps resolve concerns.
Use visuals:Include infographics or videos to simplify complex information and make the message more engaging and easier to understand.
Be transparent: Explain why the policy is changing, its benefits, and any challenges. Transparency builds trust and helps employees understand the reasoning behind the decision.
Conclusion
Effectively communicating policy changes is crucial for ensuring understanding, compliance, and support. Clear, consistent information helps minimize confusion and foster trust. Involving employees through face-to-face communication and feedback strengthens engagement and morale. Utilizing multiple communication channels, personalized content, and visuals further enhances the message’s effectiveness.
These strategies apply beyond policy changes—whether launching new initiatives, sharing updates, or introducing procedures, clear communication across various channels is key to building a cohesive, efficient organization.
By adopting these best practices, you can ensure that all communications are effective, inclusive, and well-received by your employees. Watch our webinar where we show you how TechSmith uses our products to communicate a policy change.
TechSmith is the market leader in screen capture software and productivity solutions for daily in-person, remote, or hybrid workplace communication and customer-facing image and video content. Our award-winning flagship products, Snagit, Camtasia, and Audiate, empower anyone to create remarkable videos and images that share knowledge for better training, tutorials, and everyday communication.
If you’ve searched for a screen recorder tool before, you may have heard of Zight. But you’ve probably also seen there are many alternatives.
In this article, we’ll take a look at Zight and some of its alternatives and try to help guide you through the process of picking the best screen capture tool for you and your team.
What is Zight?
Zight is a relatively powerful tool available on a variety of platforms–Windows and Mac both, of course, but it also appears to be available as a Chrome plugin and on iOS. Zight offers both screen capture and screen recording options via a number of capture ‘recipes’–more on that below. Once captured, you can share an image or recording a few different ways, including by using their own hosting solution.
Download and install
They offer lots of ways to get started from their website. In the end, they all led to a download, which was relatively quick and painless to get installed. But they do also require you to log in prior to downloading. We just met! You want that level of commitment already? Hey, we both have ‘Z’ names, so I figured I’d give it a chance.
Screen capture process
As far as the capture process, I found it a little intimidating at first. Zight presents separate options for ‘Screenshot’ from ‘Annotate’. I was worried–will I always have to know up front whether or not I want to annotate? As it turns out, my fear was unfounded.
Essentially, those are just shortcuts to either let you take a screenshot and get to immediate sharing or a screenshot that first lets you annotate before sharing. Actually, it’s kind of cool!
Moreover, I was pleasantly surprised to see that even with just the ‘Screenshot’ option, once I accessed the screenshot from their site, I found further annotation options online–that’s pretty neat.
Screen recording process
I also gave Zight’s screen recording capabilities a whirl. The main recording option exposed from the widget, ‘Record’, gives you options to either record your screen only or your screen plus your webcam.
There is a separate option to record ‘Camera Only’, which offers not only the ability to record your camera alone but once again offers the screen only and screen+webcam options. Depending on which option you begin with (‘Record’ or ‘Camera Only’), you get a different recording experience, even if you pick ‘Screen + Camera’ in both.
However, all paths offer up some lightweight annotation tools to markup your screen while you record. However, your interactions with those tools appear in the end result, and I could not find an option to exclude them from the recording.
Editing tools
As far as the editing capabilities, for screen captures, the basics are there–free hand draw, lines, single-headed arrows–and are reasonably robust. Maybe it’s a classic ‘first world problem’, but I find myself oddly disappointed by single-headed arrows.
That said, regardless of whether you annotate on your machine before uploading or on their site after uploading, pretty much the same list of annotation options is there. For screen recordings, however, the editing options are much more limited. Yes, there are a number of tools for annotating while you record, but once the recording is done, you don’t have much flexibility.
First, there’s no option to edit before upload–on completing your recording, it’s straight to their cloud. Once uploaded, you have some editing options, such as trim and split, along with the ability to crop, rotate, or add filters to the video.
Sharing
While Zight doesn’t seem to offer many integrated sharing options to various destinations, its captive hosting option allows you to easily grab a link to any capture, which you can then share in a variety of places on your own. Simple, and it works.
One delight as far as sharing was the ‘Drag Me’ button from the ‘Annotate’ capture option. I didn’t know what to expect, but it made it quick and easy to drag a capture into a document. Now, as someone who is trying to grow my knowledge of Accessibility, I know that click+drag motion it requires isn’t the most accessible choice, but fortunately you can also copy the image for pasting.
However, that does first upload the image, regardless of whether you pick ‘Copy Content’ or ‘Copy Link’. I guess that’s their choice, but if I can drag and drop an image without it uploading, I’m not sure why I can’t just copy the image without uploading. Other than that, though, there weren’t any integrated sharing destinations–it’s the Zight-way or the highway, apparently.
Consistent and reliable?
Overall, aside from a few areas where the Zight approach was confusing to me, I didn’t encounter any bugs or crashes. I tried to find a version history to see how frequently it’s being updated, and that was disappointing. I couldn’t find anything like that on the main site, but I thought perhaps their support information would have the answer.
Searching ‘version history’ just got me an article on the latest Mac update, to version 8. The article says a window update was coming early 2024, but my current version is 6.7.3. Is that the same update? Hard to say as version history information wasn’t readily available.
Customer support and training
When you encounter glitches, bugs, or want more in-depth guidance on using Zight, they offer several resources on their main website. However, most of these resources seem to focus on the types of tasks you can accomplish with Zight rather than providing detailed instructions on how to perform them. Jumping into their support site, I found more of the content I was looking for with a lot of how-to-type help content.
Should I use Zight?
Zight is an option, but it’s not the only nor the best option. It did offer some pleasant surprises, like the online annotations and the ‘Drag Me’ feature, but in the end it just wasn’t my cup of tea, nor did it have all the features I needed.
If Zight isn’t the best option, what is? Keep reading for some intel on alternatives and our recommendation for the best screen capture tool out there.
Annotate and edit screenshots with Snagit
Professional mark-up tools and powerful features make it easy to create helpful images.
Decent for quick videos but lacking in export capabilities and image capture
Loom is an efficient screen recorder and an early frontrunner in simple video message creation. While their cloud-based platform does in fact make it quick and simple to hit record and create a video, that’s pretty much the full extent of their story.
Key capabilities of Loom include video recording, editing, instant sharing, and viewer analytics – but no image capture, editing, or annotation capabilities. Even for screen recorder and video messaging tasks, you may be disappointed. There are limited capabilities for annotating your video, and perhaps the ultimate deal breaker for corporations or any organization concerned with protecting proprietary data or PII (personally identifiable information) is that Loom forces you to share your content on their cloud server.
Pros
+Cloud-based and available on any platform
+Has a browser plug-in-based light recording option
+Offers analytics on how your videos are being watched
+Solid option if all you want is to rip off a quick video to colleagues
Cons
−Free users have storage limits (25 videos) and recording limits (5 mins per video)
−’Walled garden’ only shares to Loom’s proprietary space
−The cloud recording option has limited options compared to the installed client recorder
−Videos have only very basic annotation options while recording
−Cloud-based, so it only works when you have an internet connection
−More advanced capabilities are only available in the paid ‘Business’ versions
-The button you would expect to launch a ‘Search’ of your library instead takes you to a page asking you to upgrade
4. Greenshot
Decent screen capture, but more ads than updates
Greenshot is a basic screen capture and edit tool. Greenshot doesn’t offer any screen recording capabilities.
As far as captures go, Greenshot has a variety of annotation capabilities, some more customizable than others. Additionally, Greenshot offers the ability to add a number of plugins to export your screenshot directly to a number of destinations, some very software development-specific like Jira and Confluence. It’s a nice idea, but given the core software hasn’t been updated since 2017, I’d be skeptical of the functionality of those plugins.
As far as the general experience, the Greenshot site from which you get the downloads and help is fairly ad heavy. Mind you, I use ad blockers, and it’s still ad heavy! Regardless, both the site and the app itself have a fairly dated appearance and difficult navigation, which for me resulted in a less than delightful experience.
Pros
+Available for Windows and Mac platforms
+Has optional plug-ins to add additional outputs
+Smallest download among the options
Cons
−Windows release version hasn’t been updated since 2017
−Has only very basic annotation and editing capabilities
−Ad heavy site is off-putting
−Antiquated interface design is less than user friendly
3. Screenpresso
Capture widget make captures easy to start; extra downloads make videos hard to finish
Screenpresso, like many of the competitors here, offers a free version. And, unlike some competitors, it offers both screen capture and video recording, which is part of what lifts it as high as third position here. Unlike Loom and Greenshot, which you would need to pair in order to replace Zight.
That said, when it comes to video recording, unlike the other recording competitors, it requires a second download. And that second download gave me a negative experience. It didn’t warn me it required an additional download until I tried to record a video, and then there was basically no way to break out of a loop of messages telling me I needed that download. I wanted to just exit that loop and try another screen capture instead, but ultimately I ended up having to uninstall just to break the loop and do another screen capture.
When I reinstalled, it forced the second download right away. OK then! Given I ended up doing the second download, I decided I may as well check out the screen recording capabilities. Well, it seemed rather slow to start the recording process, and when I finished my recording, I found no editing capabilities–not even a trim option!
I decided to try it again to see if I was just having one of those days, and then I discovered the ‘Zoom’ feature they offer during recordings. It even tracks your mouse so you can change what part of the screen is being zoomed in. It’s not perfectly elegant–it randomly zooms a portion of the recording area, and you have to move your mouse back towards the recording widget to turn it off, so you end with a random zoom as well, but it was pretty delightful really.
Pros
+Capture widget, once discovered, makes it easy to start a capture
+Supports a variety of sharing destinations
+Reasonable array of annotations for screen captures
+Really nice ‘Zoom’ feature during screen recordings
Cons
−Windows only
−Second download required for video recording that you can’t escape
−Other than the ‘Zoom’ during recording, there are no options to enhance or edit your screen recordings
2. ShareX
Solid contender for screen capture but lacking in video capabilities
Like Zight, ShareX is free. However, whereas Zight uploads only to its proprietary location, ShareX allows you to upload your screen capture to a vast number of destinations.
Key capabilities of ShareX include some of its more advanced screen capture features, such as scrolling capture, delay capture, and OCR, along with its fairly deep set of annotations. However, ShareX offers little when it comes to video recording, with no annotations or editing capabilities and a rather puzzling workflow to start and stop recording.
Pros
+Has a decent array of editing capabilities
+Can be fairly well customized with workflow features
+Outputs to around 50 destinations including places like Google Drive, Dropbox, and more
Snagit offers a deep list of capabilities unrivaled by other screen capture platforms and works on both Windows and Mac. Snagit’s powerful capture capabilities allow you to snag a screenshot—whether it’s a region, window, or scrolling region—and provides many robust options for annotation to effectively get your point across.
More than just screenshots
And for when a static image isn’t enough, Snagit also lets you create animated GIFs and even video content. Snagit’s video capabilities have greatly expanded over the past two years, driven by an increased user need to create quick and simple video messages.
Snagit’s video capabilities include essential functions like full-screen webcam recording, screen recording, and picture-in-picture recording. Additionally, Snagit allows you to combine videos, draw and annotate on your videos, trim clips, create videos from images, and much more.
Dozens of export options with Snagit
Unlike Loom, Snagit gives you just as many options for how to share your captures. This includes saving to over 20 file formats, simple copy+paste, to using TechSmith Screencast to immediately share a link to a number of integrations, including popular team collaboration platforms such as Slack and Microsoft Teams, which send your screen capture right to where you need it. And when I say ‘immediately,’ I mean it—Snagit’s images and even videos are just a quick click away from being shared.
Customize your Snagit experience
You might think that a tool this powerful would be hard to learn and use, but the truth is, Snagit’s interface is well-designed and even allows for some mild customization through the use of favorites for both tools and styles.
And believe it or not, nearly anything you could ever imagine wanting to do with a screenshot is supported—and if you can’t find something, Snagit’s onboarding and help content will get you up to speed quickly and easily.
Record your screen with Snagit
Snagit makes it easy to share quick updates and how-to’s by capturing exactly what’s happening on your screen.
+Numerous onboarding, training, and certification options
+Can be individually customized or deployed with consistent customizations across your organization
+Seamlessly integrates with all your favorite apps and sharing destinations
+Essentially every capability you could want–image capture, scrolling image capture, animated GIF, even video!
Cons
−Free trial available; but not a free tool
Summary of screen capture options
There are numerous alternatives to Zight. If you’re looking for a screen capture tool that is not only easy to use but also offers multiple sharing destinations and powerful editing options, look no further than Snagit.
Whether you need to communicate with customers, users, or team members, Snagit has the capabilities to effectively help get your point across. And while Snagit is not free, its robust features and unparalleled support make it a true bargain at its price. Download a free trial of Snagit today–get the best, don’t settle with the rest!
TechSmith is the market leader in screen capture software and productivity solutions for daily in-person, remote, or hybrid workplace communication and customer-facing image and video content. Our award-winning flagship products, Snagit, Camtasia, and Audiate, empower anyone to create remarkable videos and images that share knowledge for better training, tutorials, and everyday communication.
Adding text to a video can add more clarity, help identify what you’re trying to show, and inject life into your explanation.
But how exactly do you add text to video? Well, the good news is, it’s incredibly easy. And the other good news is we’re going to show you how to add text to a video in this post.
One of the best things about TechSmith’s Camtasia is that, unlike other video editing tools, it’s quick and easy to add text to any video.
Step 1: Choose annotations
With Camtasia open, head to the Annotations tab in the menu on the left-hand side of the editing suite.
Step 2: Pick your style
To add your text to a specific time in the video, choose the style of annotation you want to add, then drag-and-drop it to the Timeline where you want it to appear.
Step 3: Place the Playhead
Place the Playhead over the area on the Timeline where your annotation appears.
Step 4: Position your text box
On the Canvas, click and drag your text box to the position where you want it on the screen, and use the handles to make it bigger or smaller as needed.
Step 5: Add your text
Double-click in the text box and add your text.
That’s it. That’s how to add text to a video in Camtasia. It really is that simple.
From there you can change the type of font, style, font size, color, and more.
And to make your life even easier, this works regardless of whether you created your video in Camtasia or imported it from another source.
Stardom awaits!
Camtasia is the perfect way to create exciting content for YouTube, TikTok, Instagram, and more!
Video has proven to be an incredible learning tool because it provides everything your viewers need to see on one screen. You can literally show people what you know, so why would you need to add text?
Well, there are a lot of reasons, such as:
Show your video’s title
Identify something or someone on the screen
Provide more context as to what’s being shown
Draw attention to a detail that might go unnoticed
Show a series of steps
We could go on, but these reasons alone should be more than enough to show how important it can be to add text to videos, and the role it plays in ensuring your audience get the information they need.
To be clear, when we talk about adding text to a video, we mean adding dynamic text that’s actually part of the video. You could add a static image of text onto the screen, but it’s much easier and more efficient to do it right in your video editor.
By using your video editing software to add text when you’re actually editing your video, you’ll be making it much easier to update and edit the text in the future.
Lower thirds from TechSmith Assets for Camtasia
Camtasia comes bundled with a cool selection of free assets, such as intros and outros, music, icons, and loads more.
As well as the usual assets, Camtasia also comes with a nice selection of lower thirds. Also called chyrons, these are the combinations of text and graphics often used to identify people speaking on screen. If you’ve ever watched a TV news broadcast, then you’ll have seen a lower third in action.
While you can certainly use plain text instead of a lower third, using one of these from the vast TechSmith Assets Library will add style and finesse to your video.
To insert a lower third into your video, go to the Media tab in the left-side menu and click on the Library icon, which looks like three books standing next to each other. Scroll down to the Titles folder and click on it. This is where you’ll find Title assets, including lower thirds.
Next, select the one you want and click and drag it to where you want it to appear on the canvas. You can also drag it directly to the timeline, which will make itl appear on the lower-left of the canvas by default.
But don’t worry, you can customize these as much as you want by opening the Properties pane.
Keep accessibility in mind
As with any content, whenever possible, videos should be accessible to people with disabilities or who may use accessibility tools.
While a person who is blind or visually impaired may not be able to see your video, they may be able to learn through the audio portion of the video along with an audio description. That description should include anything that is only presented visually, including any text that appears on the screen.
Text matters
While a video without text can be impactful, interesting, and effective, adding text can enhance understanding and bring more clarity. In fact, nearly all videos can be improved with some added text — even if it’s just to highlight the title of your video.
Ryan Knott is a Marketing Content Strategist at TechSmith, where he creates content about easy, effective, and efficient video creation, editing, and tips and tricks, as well as audio editing for creators of all kinds. He/him.
Using a webcam recorder to add webcam footage to a video is an easy and effective way to increase engagement and help viewers better connect with your content.
Whether you’re trying to record webcam footage and add it to the corner of a training video or you want to start a video with a live introduction, this post will walk you through the steps to create a video from your webcam.
What is the best webcam recording software?
A webcam is a valuable and versatile tool in your video creation toolbox. You can use it to make YouTube videos, create instructional videos, and add personality to any other type of video.
When choosing software, you have two options: a dedicated webcam recorder, or a screen recorder. Now, we may be biased but we’d argue that a screen recorder is the better choice.
That’s why we suggest using high-quality screen capture software, like TechSmith’s Camtasia, which comes with a full suite of editing tools, making it perfect for creating all types of video content.
Because Camtasia is both a webcam recorder and a screen recorder, we’ll be using it throughout this step-by-step guide. If you haven’t already installed Camtasia, you can download a free trial here.
Easily Record your Webcam with Camtasia
Capture every move with our online webcam and screen recorder. From your browser – record yourself and your screen.
How to record video from webcam (on Windows or Mac)
Step 1: Set up your space
Whether you have an external webcam to install or a new microphone to plug in, make sure you have all of your gear ready before you record.
Clear out your desk from any clutter or distractions so your viewers can focus on the important information you’re sharing instead.
Step 2: Record your video
Open Camtasia and choose New Recording.
Choose whether you want your screen, system audio, and microphone on for the video or a combination of them. Then, hit the red record button to start recording.
Step 3: Position your media
Now you need to make a decision. Do you want your webcam footage to appear at the beginning of your video, or do you want it to appear on top of your video, using the Picture-in-Picture feature?
Don’t worry, we’re not going to force you to make that decision right now, but we are going to show you how to do both!
Webcam first, video second
Start by dragging your webcam footage from the Media Bin to the Timeline. Then, drag your other video files to the Timeline and make sure they’re positioned directly after the webcam footage.
When Camtasia produces the video, the videos will appear in the order shown on the Timeline. Remember, Camtasia will only produce videos that are on the Timeline, so be sure not to leave any footage behind.
Picture-in-Picture
To create that cool Picture-in-Picture effect, start by dragging the video to the Timeline. Then, drag the webcam footage to the track above the video.
It might help to think of these tracks as pictures in a stack. The topmost track is at the top of the pile, meaning that anything underneath can be covered by what’s on top.
Once you’ve added the webcam footage, you can resize and position the Preview Window on the canvas to make it look just how you want it.
As cool as this is, we’re not evening scratching the surface of things you can do in the Camtasia video editor. If you want to learn more about Camtasia’s editing tools, as well as tips and tricks on how to use them, be sure to check out our video tutorials.
Easily Record your Webcam with Camtasia
Capture every move with our online webcam and screen recorder. From your browser – record yourself and your screen.
Once your webcam footage is set, export your video by clicking the green Share button. This produces your video and allows you to choose the format and where you’d like to save it.
3 tips to make your webcam recording awesome
Now that you know how to record webcam video, here are a few things to consider when creating your content:
1. Focus on your set-up
Tilt your webcam so that it’s at eye level, this way your viewers won’t feel like they’re looking up at you. You should also position yourself in front of a solid-colored wall or hang a sheet behind you. Busy backgrounds can be distracting, so this is a great way to help your viewers stay focused on what’s important: You!
Stick to the Rule of Thirds (which you can learn more about here) or position yourself in the center of the frame. If you need to check your position you can do so by hovering your mouse over the webcam view in the recording toolbar.
As a final tip, try to avoid making any quick movements while recording to ensure you don’t draw the eyes of your viewers away from your content.
2. Use proper lighting
Lighting can make or break a webcam recording, so be sure to pay close attention to your video lighting.
If you record near a window, try to avoid recording directly in front of it. Instead, position yourself either next to, or facing it. This will ensure you’re not washed out and will stop you from turning into a silhouette.
Ready to Embrace Asynchronous Communication?
Text: How do we have fewer, better meetings? We decided it was time to reboot our meeting culture and communication norms at TechSmith.
If you’re using the webcam built into your computer, there’s a good chance it will default to the computer’s microphone, which may not be the best quality. For the clearest audio, you might want to consider setting up a DIY recording studio.
However, if time and resources make that impossible, using an external microphone will make a huge difference in the quality of your audio. It doesn’t have to be expensive, even the mic built-in to your headphones will likely be better than the one on your laptop.
Just remember to check that Camtasia is recording your audio from the right source and always make sure you test your external microphone before recording your voice over.
Doug Brunner is an Instructional Designer at TechSmith. Fun Facts: • He's run a 52.4 mile race • Traveled to 11 different countries • Played drums in a Celtic band • Sings in his local community choir
Blurring parts of your videos can be a great way to add privacy, eliminate distractions, and enhance the audience’s focus on your content. It’s also the best way to ensure you’re complying with privacy laws when showing content that includes sensitive information.
Note: If you’re trying to find out how to fix a blurry video, click here.
Why blur your videos?
There are more reasons to blur a video than simply wanting to hide someone’s identity or sensitive information. In fact, blurring can be a powerful tool in editing, offering several aesthetic and practical benefits.
Whether it’s to maintain focus, ensure privacy, or add a professional touch, being able to use the blur tool properly can transform your content, here’s how:
1. You have a busy background
It’s an easy thing to overlook, but having a busy background can detract from the primary subject of your video. However, by blurring out distracting elements, you can keep your viewers focused on what matters.
Whether it’s a cluttered room or an unorganized desktop, a blur effect helps maintain the audience’s focus on the content, ensuring your message is heard loud and clear.
Easily and quickly blur your videos!
Ready to create some professional-looking videos with blur effects?
Photobombs are the worst. Whether it’s an email notification popping up while you record your screen, or someone unexpectedly appearing in your shot, your viewer’s eyes will be drawn to these distracting intruders.
However, blurring these elements allows you to keep your content professional and focused without needing to start recording all over again. It’s an easy fix for those unforeseen intrusions that can occur while filming.
3. You need to protect privacy
Protecting privacy is crucial, especially in today’s digital age. Blurring videos is key when displaying faces, license plates, emails, or other sensitive information that should be kept private.
Blurring sensitive data isn’t only the right thing to do, it could well be a legal necessity, especially if your video will be available to the public. It’s not just about protecting the person’s details — it’s about protecting yourself from a lawsuit should anything go awry.
How to blur videos with Camtasia
Step 1: Record or import your video
If you want to know how to make a video blurry, then you probably have some footage already. But if you don’t, we’ll show you how to import or record a video too.
When you finish recording, click Stop, and your video will automatically appear on the Timeline, ready for editing.
You can also import a previously created video by clicking on, File > Import > Media and selecting the video you wish to import. You can also use this method to import other assets such as images, presentation slides, and video clips.
When you have all the files you need inside the video editor, simply drag them from the Media Bin to the Timeline. We told you it’s easy!
Step 2: Add the blur effect
To blur a part of your video, click the Annotations tab and then the Blur & Highlight tab.
Next, drag-and-drop a blur annotation to the Canvas. From there, you can adjust the size and position of the blurred area to cover the desired section. You can also change the intensity of the blur to make it more or less blurry.
How to completely block something in a video?
If you need to completely cover a piece of information, we recommend using the Shapes feature. Simply click and drag a shape to the canvas and adjust its size and position until what you’re trying to cover is completely hidden.
There’s a wide variety of different shapes that you can use, and you can change the color of each one to suit the style you’re looking for. For more information about Annotations, Callouts, and Titles, check out the tutorial below.
Step 3: Share your video
Once you’ve blurred all the information you need to hide, it’s time to share it with the world. Camtasia will give you the option to export your footage to a range of the most popular sharing destinations, including YouTube, Vimeo, and Screencast Classic — to name a few.
And that’s all there is to it! You now know how to blur a video like a pro! No more worries about privacy issues or viewers seeing a part of your screen that isn’t relevant.
In our FREE ebook, we’ve put together practical strategies to get out of the woods and create engaging, powerful video content on your own that reaches your audience.
With Camtasia, you can easily drag a blur effect to any image in your video that you’d like to hide. You can also adjust the blur effect to cover as large or small of an area as needed.
How do I blur someone’s face in a video?
If you’re looking to hide someone’s face, Camtasia makes it easy to click and drag either a blur or shape effect to cover the person’s image and protect their identity.
It’s no surprise that, according to a study by Google, users are three times more likely to watch a tutorial video on YouTube than read written instructions for a product.
Why would anyone want to drudge through paragraphs of dense text when they can watch step-by-step instructions that visually guides them through the process?
Tutorial videos, instructional videos, training videos, and explainer videos have all become an integral part of the digital learning experience.
Make your own tutorial videos today!
Download Camtasia and FREE templates to quickly and easily make your own tutorial and training videos.
But what is it that makes a tutorial video truly stand out? What elements need to be incorporated to ensure that the video is not just informative, but also engaging and easy to follow? In this guide, we’ll delve into the essentials of creating good video tutorials, and show you how to make a tutorial video, step by step.
Whether you’re an entrepreneur looking to explain your product, an educator aiming to make learning fun, or simply someone trying to share your skills with the world, we’ve got you covered.
But before we dive into the how, it’s important to understand the what. By knowing exactly what a tutorial video is, you’ll have a stronger foundation to build on and be in a better position to fully grasp the key components of creating a fantastic tutorial video.
What is a tutorial video?
At its core, a tutorial video is a multimedia resource that is specifically designed to teach or guide viewers on how to complete a task, understand a concept, or use a product or service. It’s a dynamic digital tool that provides clear, concise, and visually engaging instructions to help viewers learn at their own pace.
The true magic of a tutorial video lies in its ability to answer the ‘how-to’ question in the most efficient way possible. Tutorial videos do much more than just deliver information, they walk viewers through processes one step at a time. By providing practical insights, this thorough approach reinforces the learning experience and delivers real value to the viewer.
From how to send an email, to how to send objects into space — there’s no limit to what a video tutorial can teach.
How to make a tutorial video: A step-by-step guide
To create tutorial videos, there are steps you need to take to ensure the content you create is the best it can be. Essentially, this all boils down to providing value to your viewers.
As a concept, putting your viewers first is simple, but there are some best practices to follow that will help ensure you’re keeping your content focused on providing the right information in the best possible way.
Let’s take a look at the key steps to producing a good tutorial video.
Step 1: Define your audience
To start, ask yourself three questions, which you’ll find at the top of the script template:
Who’s my audience?
What specific problem will this tutorial solve?
What will the audience be able to do after watching?
You want to develop an understanding of your target audience’s general skills and get a sense for their comfort level with the content you’re teaching. You don’t want to make a tutorial full of advanced instructions and long winded explanations if your viewers are just getting started.
After you have a clear sense of your audience, focus on the specific problem the tutorial will help them solve.
Each video should help solve one problem, and only one problem.
For example, showing users how to add a follower in our project management software. I’m not giving an entire overview of the project management software, I’m just showing how to add a new follower.
If you have more subjects to cover, consider making more than one video to keep each tutorial well-focused.
Step 2: Set clear goals
Then, define the goals for the video. Think about what you want a person to be able to do when they’re finished watching and then write it down. An example might sound something like this: “After watching this video, a user will be able to add a new team member to a project management board.”
It’s clear and the goal is simple. This goal statement will provide the foundation for the rest of your content.
Step 3: Write a script
When you’re finished with your goals, it’s time to move on to the next key step in making a tutorial. Scripting. Writing a script is an opportunity to test out what you plan to say, so that you can revise and improve the narration before you record.
This might sound like a lot of work up front. Because it is if you start with a blank screen. We’ve eliminated that pain and included a fill-in-the-blanks script template that you can use to quickly start writing.
This is just a starting guide. After you fill in the blanks, read it out loud, and if it doesn’t sound like something you’d say, it’s okay to change it.
In our template, there are two columns you’ll use to write the script.
The left side is for visual cues (what will be on screen). In the template, we’ve made it so that you can see the narrator at the beginning and at the end of the video, but the rest is mostly screen-recorded content, but this can be adjusted to your liking.
The right side of the script is for your narration. Starting with the obvious, your introduction. We cut past a lot of fluff to just immediately let your viewer know they’re watching the right video.
Make your own tutorial videos today!
Download Camtasia and FREE templates to quickly and easily make your own tutorial and training videos.
At TechSmith, we find success in recording narration first. So if you’ve listed your steps as having screen recording as the visual element on screen, we’d recommend you record those bits of audio first. You can leave the camera off and even use Camtasia Audiate, our software that makes editing your audio as easy as editing a text document.
It transcribes your narration as you speak. If you hesitate or say, um, too many times, it marks those for you to easily remove all at once when you’re finished. Once you’ve cleaned up your audio, export it into Camtasia, where you’ll record your intro and outro on camera for that personal touch.
Step 5: Record your screen
Once you’ve completed recording on all of your audio, the next step is recording your screen.
Start by minimizing distractions. Clean up your desktop screen by hiding your icons, choosing a neutral colored background or a branded wallpaper. Close any applications you don’t need, and turn off any notifications that might pop up, including on your phone next to you.
Then, open the application that will be the subject of your tutorial, and practice walking through the steps you’ve listed in your script.
Practice a few times until you can comfortably make it through the entire workflow, with minimal mistakes. This will make for less editing in the end, and better recordings. When you’re comfortable with your walkthrough, open the Camtasia Recorder. Select the region or window you want to record, turn on system audio if your demo has sound, Otherwise, you can leave that off and hit the red start recording button.
Keep in mind, you can edit the recording when you’re finished. So if you make a mistake, simply pause and then start at the place in your script, right before the mistake happened. Removing mistakes is simple and quick with Camtasia. Which leads us to the next key step in making a tutorial, editing the video.
Step 6: Edit your video
Editing a video, huh? If that sounds intimidating, don’t worry. It’s a skill anyone can build with a little practice. But to get you started, we have a free template pre-built tutorial video template with almost everything you need to start your video immediately.
Best of all, it will match up with the script you just completed, so all you need to do is fill in the blanks.
We’ve built in placeholders for your footage, title cards, lower thirds, and more. Everything in this template is totally customizable, from the duration of each section, to the colors and fonts used.
Don’t like the music? Right-click and convert it to a placeholder, and you can bring in your own royalty-free song that will retain all of the properties for fading in and out that we’ve included, which, again, are still totally customizable themselves.
When I say editing, I mean a few different things.
Remove mistakes and extra footage from the screen recording.
Sync the narration with the video so that what you’re saying lines up with what you’re showing.
Use animations and annotations to call viewers’ attention to important elements.
Add any other finishing touches you want to make your own.
Remove mistakes
Let’s start with removing mistakes. Once you’ve added your screen recording to the placeholder line of the template it belongs in, If you want to remove a mistake from the middle of a recording, hover over the front of that mistake with the playhead and click cut. Move to the end of the mistake and again cut.
You can do this as many times as you need and if you make a mistake while editing, simply click undo. To remove mistakes or trim off extra footage from the beginning or end of your recording, click and drag the end of the clip in.
Cutting and trimming this clip probably will adjust the other assets in your template, leaving gaps. Just make sure to tighten everything back up when you’re finished cutting.
Sync your audio and video
Now let’s focus on syncing your audio and video. Start by clicking and dragging your audio narration to the timeline, lower placeholder, cleverly labeled audio narration, and drop. Once there, use clip speed and extend frame to sync the video to your audio.
What I mean is if the narration takes more time to explain the concept than the screen recording takes showing it, split the video clip and use extend frame, which is option click on Mac or alt click on windows. and drag it out to essentially pause the video as you continue your narration. Or, if you want to speed up a part of your recording, maybe you’re showing a longer process that you want to sum up quickly.
Make your own tutorial videos today!
Download Camtasia and FREE templates to quickly and easily make your own tutorial and training videos.
Once you have your audio and video synced up, let’s work on focusing your viewers attention. To do this, use animations to zoom in on your screen and annotations to point out or highlight important information.
For example, here I show some information that’s a little hard to read, so I’ll add an animation, then make sure the playhead is after the animation arrow, And then scale up in the properties, essentially zooming in to show detail. Next, I’ll add a highlight annotation to feature only the setting I want to highlight.
Do this throughout your video, when you need your viewer to focus on something important.
Add your final touches
When you’re done with that, it’s time to edit those finishing touches. All of the graphics in this template are totally customizable. If you start with the intro transition, just click on the group, and the properties panel show you that all of the colors can be changed.
All that said, I know that editing is no easy task, and to help you along, we have free tutorials to help you get started quickly.
Step 7: Save and share
The last step in creating a tutorial is to save your video.
Think about where you want this video to be watched, and either choose a shared destination like YouTube, Vimeo, or Google Drive, or choose to save the video as a local file on your computer. As an extra last step, we recommend you save your Camtasia project. So if you need to go back and make some edits, it’s quickly on hand.
Selecting the right tutorial video equipment
High-quality videos also depend significantly on the technical aspects, namely the equipment you use and how you use it.
While we don’t believe that the quality of a video rests solely on expensive equipment, making sure your video has good audio and visuals can make it more engaging and professional, ensuring your message is delivered effectively.
Microphone
The importance of clear, crisp audio in a tutorial video cannot be overstated.
TechSmith’s Video Viewer Study shows that viewers are more willing to suffer through blurry video than poor-quality audio.
If you can, it’s worth investing in a good-quality microphone that can capture your voice without any distortion or background noise. But, you don’t have to spend a fortune. You can get some very good quality microphones for less than $100.
Position it close enough to capture your voice clearly, but far enough to avoid any harsh sounds. Be sure to run a few mic checks to ensure the sound is just right.
Webcam
Before you push the record button, be sure to place your webcam at eye level. This will make your video feel more natural as it gives the impression that you’re speaking to your audience face-to-face. You should also ensure your background is free of clutter, and ideally a neutral color.
Lighting
Getting the perfect lighting in your video is arguably much more important than getting the best webcam. With good lighting, you’ll add depth to your footage and ensure you and your products are clearly visible.
Natural light is always best, but if your busy schedule keeps you busy in the daytime, then you might want to consider getting a ring light or softbox.
Be sure to face your source of light and make sure it evenly illuminates the area you’re recording to reduce harsh shadows and overexposed areas.
9 tips to make a great tutorial video
So now you know the basics of how to make a tutorial video, and where to publish it. While you’re probably raring to get started — and practice is the best way to hone your video making expertise — there are a few more things we think you should know.
In this section, we’ll explore some tips that will help your video tutorials go from good to great.
1. Pick a good title for your tutorial video
Giving your video the right title is more important than you might think. As it’s the first point of contact between your video and potential viewers, the best titles intrigue users and encourage them to click on your video. Meanwhile, a poorly chosen title may cause users to scroll past it, even if the content is top-notch.
Compelling titles are concise, descriptive, keyword-rich, and should give viewers a clear idea of what to expect from the video. Include keywords that your audience might use when searching for the information your video provides. This will improve your video’s visibility not only on YouTube but also on Google.
It might be a relatively simple step, but it’s not one that you can afford to miss. If you do plan on uploading your video to a platform like YouTube, you should also spend some time working on a good video thumbnail to further entice potential viewers.
2. Use both video and narration
Leveraging video and narration in your tutorial is a powerful way to deliver information more effectively. This dual-channel approach caters to different learning styles, ensuring your tutorial can be understood and appreciated by a broader audience.
Video visuals provide a concrete demonstration of the steps or processes being taught. Seeing the steps in action can make the procedure much easier to follow, especially for complex tasks.
Meanwhile, the narration provides essential context and explanation that visuals alone can’t deliver. It offers the opportunity to explain why certain steps are taken, provide background information, and give additional tips.
However, it’s vital that the video and the narration work together in harmony. What’s shown should align with what’s being said, with each element reinforcing the other.
3. Add a table of contents
Including a table of contents in your tutorial video helps viewers navigate your content with ease and find the parts of the video that they’re most interested in. This is especially useful for longer videos that answer multiple questions or explain processes with several steps.
Some tables of contents will simply display the timestamps of different sections at the very beginning of a video. However, with tools like Techsmith Camtasia, you can easily create interactive tables of contents that allow users to quickly jump between sections at the click of a button.
4. Highlight/emphasize important aspects
Emphasizing key points or steps in your tutorial helps viewers recognize the more important aspects of your video without getting lost in the details.
A great way to highlight important parts of a presentation or screen recording is to make the most of Camtasia’s cursor effects. By enlarging, highlighting, or creating a spotlight around your cursor, you can effortlessly draw the viewer’s attention to specific on-screen actions, making complex processes easier to follow.
5. Add some background music
Adding music to your video can go a long way to making your tutorial more engaging. While the right music can help set the tone and fill in any silence, it’s important to make sure it doesn’t distract from the visual content or your narration.
If the background music is too loud, or too “in your face” (or ears!), it can do more to detract from your video than add to it. With this in mind, you might need to adjust the volume of the music and make the actual video louder, to maintain the right balance between audio tracks.
Camtasia offers a massive library of royalty-free music, categorized by genre and mood, that you can use as the background to your video.
6. Add captions
By adding captions to your videos, you ensure that your content is accessible to the widest possible audience. From people with hearing impairments to those watching your video on their phone in a public space, captions help ensure that everyone can follow along with your content no matter who or where they are.
Captions also improve comprehension as it’s easier to follow along and digest information when it’s being read as well as said out loud. Tools such as Camtasia, and TechSmith Audiate, can help you create captions for your videos automatically — so there’s really no reason not to include them in your video!
7. Number each step
If your video contains a lot of different steps, we’d recommend numbering each of them as you go along, as this will help viewers follow along more effectively. Numbers provide structure to your content and can make complex procedures easier to understand — a bit like numbered subtitles in a how-to guide.
Make your own tutorial videos today!
Download Camtasia and FREE templates to quickly and easily make your own tutorial and training videos.
Including a table of contents in your tutorial video helps viewers navigate your content with ease and find the parts of the video that they’re most interested in. This is especially useful for longer videos that answer multiple questions or explain processes with several steps.
9. Invest in a good microphone
Sound quality plays a significant role in the overall impression and effectiveness of video content. Poor audio can distract from your message, make your tutorial harder to follow, and even cause viewers to click away.
On the other hand, the best microphones for recording video will capture sound more accurately and deliver clearer, more professional-sounding audio. They reduce background noise and enhance the clarity of your voice, making your narration more engaging and easier to understand.
So, naturally, investing in a professional microphone will make a huge difference to the quality of your audio and will work to keep your audience focused and engaged. That said, it’s important to note that while a good microphone can improve your audio quality, it’s not a necessity for creating a video tutorial that stands out.
Making tutorial videos, the FAQs
How long should a tutorial video be?
The ideal length of a tutorial video depends largely on the topic. However, it’s generally best to keep videos as short and sweet as possible. Aim for between 3–5 minutes for simple topics and up to 15–20 minutes for more complex subjects, always focusing on clarity and value.
Can I make a tutorial video for free?
Yes, you can! There’s a wide range of free software for making video, screen recording, and video editing, though they usually offer limited functionality. For anyone looking to create a lot of videos, more powerful software, such as Snagit and Camtasia’s video editor, can be well worth the investment — and both offer free trials!
How do I record my computer screen for a tutorial video?
Software like Camtasia or Snagit allows you to capture your entire screen, a selected area, or a specific window, and have the ability to capture audio and webcam footage simultaneously.
Do I need fancy software or equipment to make tutorial videos?
Not necessarily… While professional video editing tools can enhance your video quality, you can create effective videos with basic software, recording equipment, a thought-out plan, and good lighting. The most important element is clear, helpful types of videos that provides value to your viewers.
Final Cut Pro revolutionized professional video editing on a personal computer. Its popularity among independent filmmakers and Hollywood production houses created a new market, prompting Adobe to overhaul Premiere Pro completely. When it seemed like the competition had caught up, Apple reimagined Final Cut Pro with a controversial but innovative magnetic timeline metaphor.
Over a decade later, this reimagined version has evolved from contentious to beloved, with many competitors emulating its design. Final Cut Pro is one of the leading professional video editing platforms on the market.
If you own a high-end Mac, have pro-level video editing needs, and are willing to embrace its steep learning curve—Final Cut Pro might be for you. But what about the rest of us? You know, the folks who need a straightforward, easy-to-learn video creation solution. The type of users who rely on built-in laptop webcams, need to record presentations, want to capture web app workflows, or need to teach our colleagues how to change email settings.
If that sounds like you, Final Cut Pro is likely overkill as an editor and is flat-out missing key recording capabilities.
Don’t have a Mac? You are out of luck, my friend—Final Cut Pro isn’t available on non-Apple hardware. No worries, though. There are many options if you need a user-friendly or Windows-compatible solution. Let’s explore seven powerful Final Cut Pro alternatives.
Tip: There is no such thing as Final Cut Pro for Windows.
Camtasia: Best user-friendly alternative for professional video editing
Camtasia is, pound-for-pound, the best alternative to Final Cut Pro. Camtasia is rated higher than Final Cut by customers. It strikes a delicate balance between power and accessibility, offering a simple user interface that doesn’t skimp on robust editing features. Whether you’re a noob just dipping your toes into video editing or a seasoned pro, Camtasia has something to offer.
What sets Camtasia apart is its industry-leading screen and webcam recording capabilities. It’s like having a TV studio baked into your computer. And do not forget the insane number of free, customizable assets it comes with—perfect for elevating your projects without breaking the bank.
Key features of Camtasia
Camtasia is a cross-platform video platform on Mac or Windows operating systems. It has a wide array of features designed to make ordinary users look like pros:
Built-in recorder. The industry’s leading multi-track screen and webcam recorder comes with Camtasia.
Camtasia Rev . Choose any layout, background, and FX package with a single click.
Camtasia editor. A powerful multi-track editor is chock-full of free, customizable assets.
Customizable assets. Drag and drop templates, transitions, effects, animations, callouts, + more.
Camtasia Audiate. Deep integration with AI-infused text-based video editing workflows.
Camtasia’s built-in, industry-leading recorder delivers a one-click recording of your screen or webcam. Whether recording or importing footage, Camtasia Rev makes you look like a professional designer. Its combination of layouts and visual effects elevates the ordinary to extraordinary.
Camtasia’s powerful multi-track NLE includes thousands of customizable motion graphics assets. You will find plenty of video templates, animations, title sequences, and transitions to help take your video project to the next level. It’s all drag-and-drop, with easy customization options at your fingertips.
Additionally, Camtasia’s tight integration with Camtasia Audiate lets users edit videos like a text document. The automatic speech-to-text (STT) allows users to scan the transcription and delete, copy, and paste text. Every text edit turns into a non-destructive video edit fully modifiable in Camtasia.
Best suited for:
Camtasia is ideal for creators, marketers, and trainers who don’t want to compromise. It’s easy to use and powerful, perfect for users who want an integrated recording solution. It also offers many customizable templates for different looks.
Pricing and plans
Camtasia operates under a subscription model with three flexible plans to suit different user needs:
Free Trial: $0/year
Camtasia has a free trial that can be extended for unlimited days. Video files shared or exported in trial mode will have a small, tasteful watermark added to them. It is an option if you are looking for a free alternative to Final Cut Pro.
Camtasia Essentials: $179.88/year
This plan provides access to core video editing features. It’s perfect for users who want an easy-to-use multi-track non-linear editor (NLE). The base plan includes thousands of free, customizable transitions and assets.
Camtasia Create: $249/year
This plan includes everything in Camtasia Essentials plus Camtasia Audiate. It is perfect for users who want fast and easy AI-infused, text-based video editing.
Camtasia Pro: $499/year
This plan includes all the features of Camtasia Create plus premium Assets for Camtasia. Users can access over 100 million stock images, videos, audio files, and customizable assets.
Camtasia Pro users also receive Screencast Pro. This product offers unlimited screenshots and video sharing, comments and reactions, and AI-assisted tools.
AI translation and additional AI capabilities. Synthetic Avatars are the next prominent feature coming.
Stardom awaits!
Camtasia is the perfect way to create exciting content for YouTube, TikTok, Instagram, and more!
Adobe Premiere Pro: The industry standard for professional editing
Adobe Premiere Pro is the 100-pound gorilla in the pro video editor market. It’s easily the most widely adopted pro tool and is especially popular in the film and television industry. Its rich feature set and integration with Adobe’s Creative Cloud make it an excellent choice for advanced creators. This is especially true for those already using one of Adobe’s expensive plans.
Key features of Premiere Pro
Adobe Premiere Pro is a powerhouse video editor. It boasts advanced color grading, multicam editing, motion tracking, and green screen effects.
It seamlessly integrates with Adobe Creative Cloud tools like After Effects and Photoshop, making it a favorite among ad agencies and production houses. It also supports many HD and UHD formats, which is great for 4K video projects. Adobe Premiere Pro’s wide range of tools and customizable workspaces make it a strong choice for complex editing tasks.
Best suited for:
Adobe Premiere Pro is perfect for professional editors, filmmakers, and content creators. It offers a high-performance editing platform. However, users should be ready to tackle its substantial learning curve.
Pricing and plans
Adobe Premiere Pro is a standalone subscription app that costs $275.88/year. It also comes as part of Adobe’s All Apps bundle, which costs $719.88/year.
Davinci Resolve: Best free alternative with advanced color grading
DaVinci Resolve is a powerful, free alternative to Final Cut Pro. It’s known for its best-in-class color grading capabilities. It is available for Mac and Windows, making it a great choice for users seeking professional-grade video editing software without the high cost.
Key features of Davinci Resolve
DaVinci Resolve offers advanced color correction and color grading. Its capabilities are so impressive that many production houses use it regardless of which NLE they edit in. DaVinci Resolve is closely integrated with Blackmagic Design’s pro camera solutions.
This makes it a great option for filmmakers who use Blackmagic hardware. It is also well known for its multi-user collaboration tools and node-based workflows, which appeal to advanced users.
Best suited for:
DaVinci Resolve is excellent for professional editors and filmmakers. It is also perfect for users who need advanced color grading and prefer node-based workflows.
Pricing and plans
DaVinci Resolve has both free and paid versions to choose from:
DaVinci Resolve: A free alternative to Final Cut Pro with robust core video editing capabilities.
DaVinci Resolve Studio: $295 perpetual major version license.
Ads AI capabilities, stereoscopic tools for improved color grading, Fairlight FX plugin, and more FX filters.
Lightworks: Best open source video editor for professional use
Lightworks is a professional-grade, open-source video editor known for its rich feature set and flexible editing workflows. It is available for Mac, Windows, and Linux, making it accessible to a wide range of users. Lightworks is a great alternative to Final Cut Pro if you are short on cash or don’t trust corporate overlords.
Key features of Lightworks
Lightworks advanced editing capabilities include:
Multicam editing allows seamless editing of footage from different cameras or camera angles.
Real-time effects that provide instant feedback and speed up the editing process.
Support for a wide array of video formats, including 1080p HD and 4K UHD.
A flexible interface that can be customized to the tastes of pro editors.
Best suited for:
Lightworks is the ideal solution for Linux users. It’s also great for hardcore professional video editors who are passionate about using open-source software and want a free Final Cut Pro alternative.
Pricing and plans
Lightworks offers a free version and three paid subscription choices:
Free: $0/year
A core video editor that targets beginners and users with limited needs.
Create: $139.99/year Offers additional advanced features and flexibility.
Pro: $279.00/year
Comprehensive tools, FX, and configuration, plus premium support.
VEGAS Pro: Best for user-friendly professional editing
Vegas Pro is another solid alternative to Final Cut Pro. It provides a powerful, user-friendly interface for professional video editors. Available for Windows, it has long been hailed for its intuitive workflows and mature feature set.
Key features of VEGAS Pro
VEGAS Pro includes motion tracking, 4K video editing, and advanced color grading. Its integration with sound editing tools enables smooth audio-video synchronization, and its timeline-based editing is also simple for pros to understand and use.
Best suited for:
Vegas Pro is designed for Windows users who need professional video editing tools. Its gentle learning curve makes it a good choice for those who need to hit the ground running.
Pricing and plans
VEGAS Pro supports a one-time purchase model with paid upgrades or subscription plans.
Vegas Pro 365: $95.88/year
Delivers its core video editing experience.
Vegas Pro Suite 365: $119.88/year
Core video editor plus Sound Forge Pro, Vegas Mocha, Acid Pro, and content pack.
CyberLink PowerDirector 365: Best for social media creators
CyberLink PowerDirector is a budget-friendly alternative to Final Cut Pro Windows—remember Final Cut Pro doesn’t exist on Windows. It has a wide assortment of advanced features and is regularly updated. It’s especially good on Windows, which has a much richer feature set than its Mac version.
Key features of CyberLink PowerDirector 365
CyberLink PowerDirector 365 includes video stabilization, loads of stickers, and a slew of slick visual effects. Its focus on eye-catching motion graphics makes video shorts pop on YouTube and TikTok.
Best suited for:
CyberLink PowerDirector 365 is a good choice for Windows users who need to create videos for social media. Its updated sticker packs, fun transitions, and cool visual effects will help social creators stand out.
Pricing and plans
CyberLink PowerDirector 365 is offered as either a monthly or annual subscription.
Monthly Plan: $19.99/month
Annual Plan: $74.99/year
Audiate: Best for enhancing audio and video synchronization
Audiate’s AI-driven workflows and strong integration with Camtasia make video creation easy. If you can edit text, you can create, modify, and arrange video. Audiate is very flexible. Its automatic speech-to-text (STT) feature lets you edit video like a text document.
Audiate also makes it simple to generate a script and create natural-sounding audio. You can translate your audio into multiple languages with just a few clicks. The best part is that all your edits are non-destructive and can be used in Camtasia.
Key features of Audiate
Audiate’s audio editing and AI-infused workflows help users achieve great results quickly. If you’ve never edited a video using text, you owe it to yourself to try Audiate out. Its deep integration with Camtasia provides flexibility and control, no matter which app you use. Critical capabilities of Audiate include:
Generate scripts from prompts (AI): Create scripts quickly and easily.
Generate audio from text (AI): Turn your text into natural-sounding audio.
Speech-to-Text automatic transcription (AI): Transcribe audio and video automatically.
Automatic filler word and pause detection (AI): Remove “umms” and “ahhs” with ease.
Multi-language translation (AI): Translate your audio into several languages with just a few clicks.
Text-based video editing: Edit videos in a document-style view.
Waveform editing: Fine-tune audio with a waveform editor.
Audio FX: Enhance your audio with noise removal, equalization, leveling, and more.
Caption generator: Automatically create captions for your videos.
Full integration with Camtasia: Enjoy seamless workflows between Audiate and Camtasia.
Best suited for:
Audiate is perfect for video editors who need powerful pro audio editing capabilities and want to leverage AI workflows and text-based video editing to improve their creation speed while elevating quality.
Pricing and plans
Audiate is available as part of two Camtasia packages:
Camtasia Create $249/year.
Camtasia Pro: $499/year.
Choosing the right Final Cut Pro alternative for your needs
Choosing the suitable Final Cut Pro alternative depends on your specific needs—user-friendliness, pro-level features, built-in recording, AI workflows, or compatibility with your operating system.
Camtasia strikes the right balance, hitting the Goldilocks zone between advanced features and ease of use. Its deep integration with Camtasia Audiate’s AI-infused text-based video editing workflows takes it to a new level that’s tough to beat.
The easiest way to edit videos
Stop wasting time and discover how Camtasia makes creating incredible videos easier than ever.
TechSmith is the market leader in screen capture software and productivity solutions for daily in-person, remote, or hybrid workplace communication and customer-facing image and video content. Our award-winning flagship products, Snagit, Camtasia, and Audiate, empower anyone to create remarkable videos and images that share knowledge for better training, tutorials, and everyday communication.