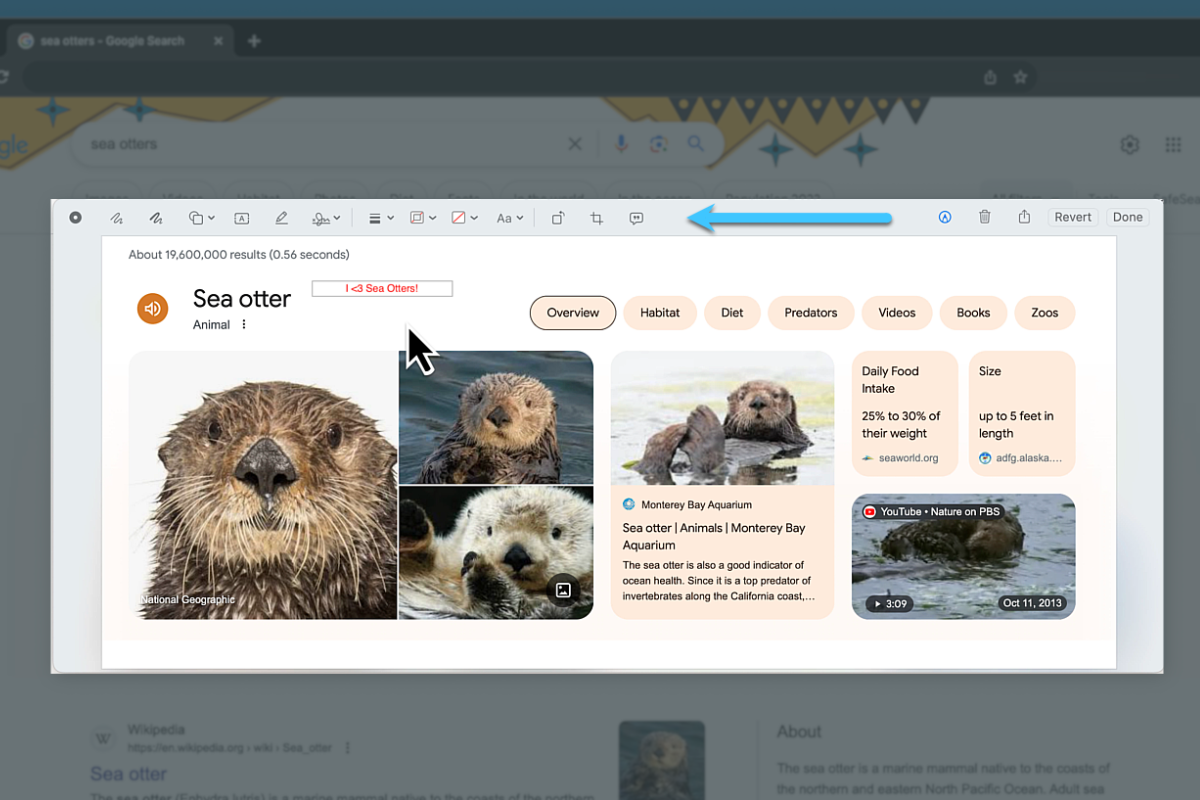
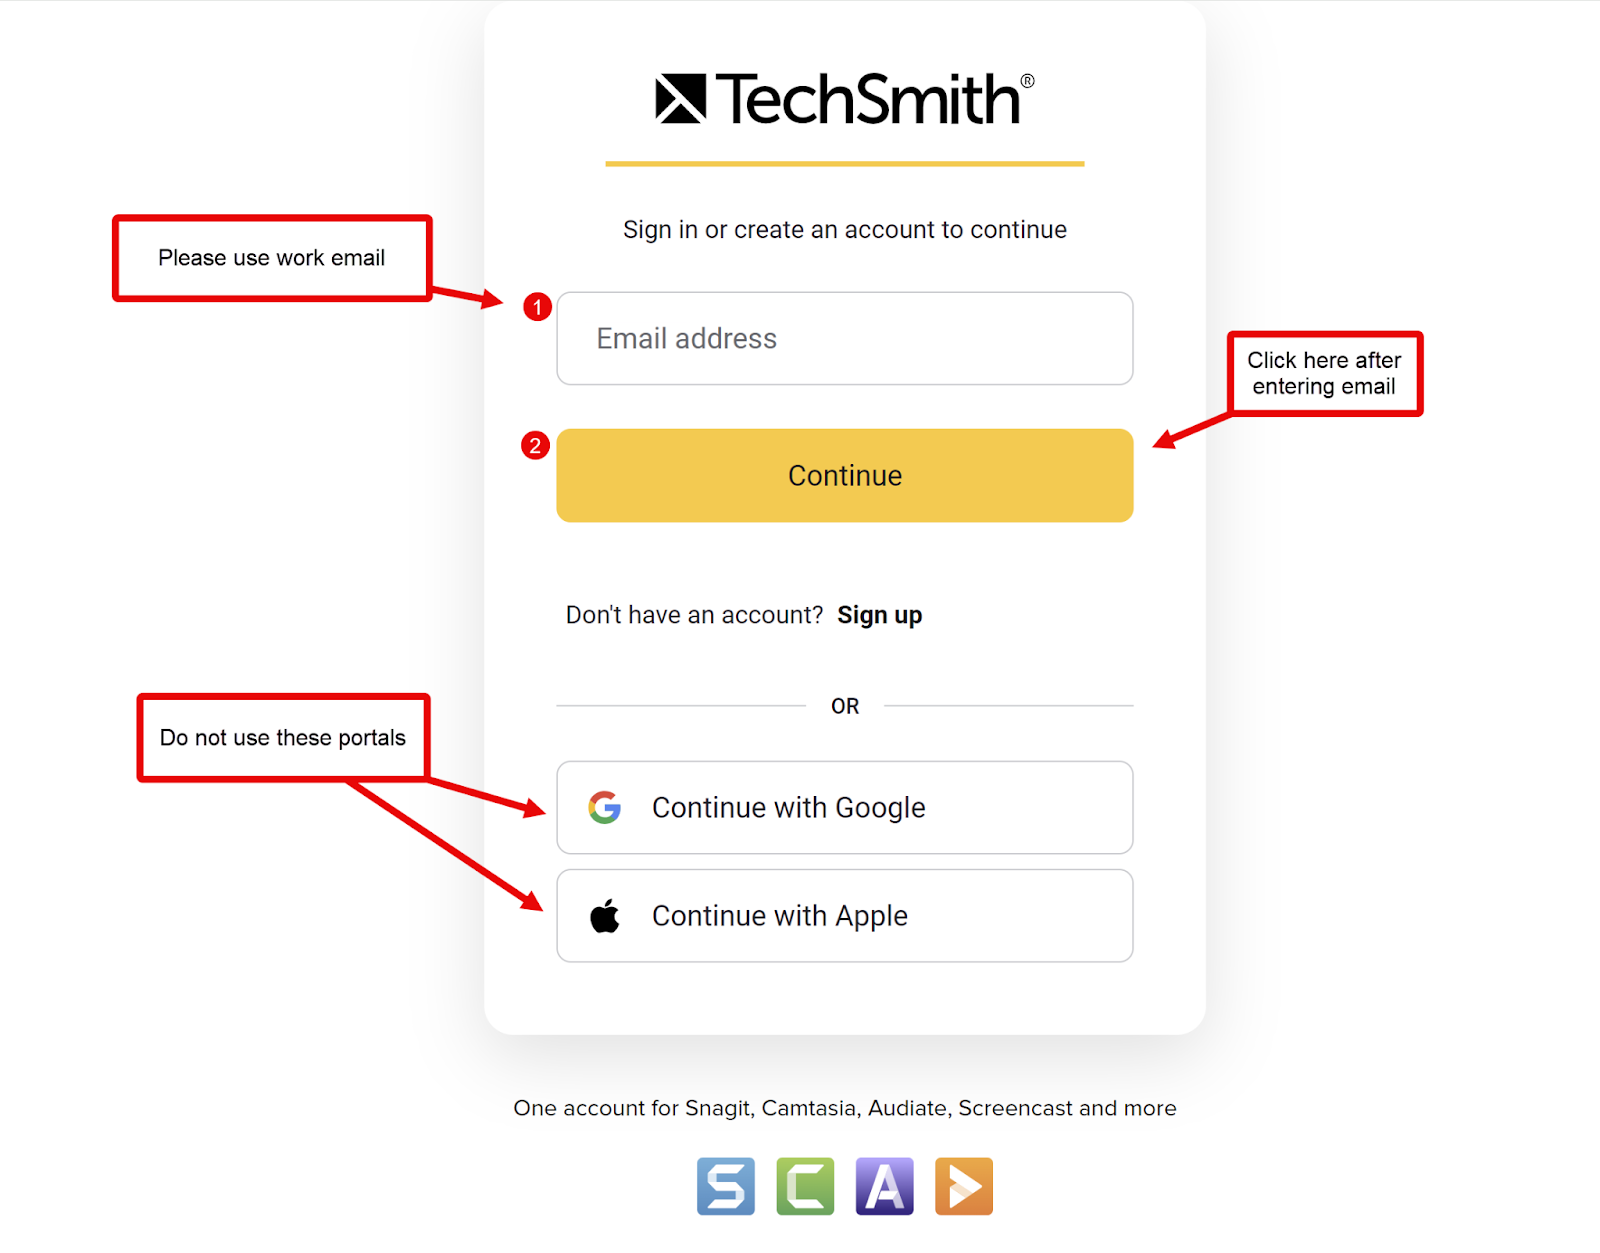
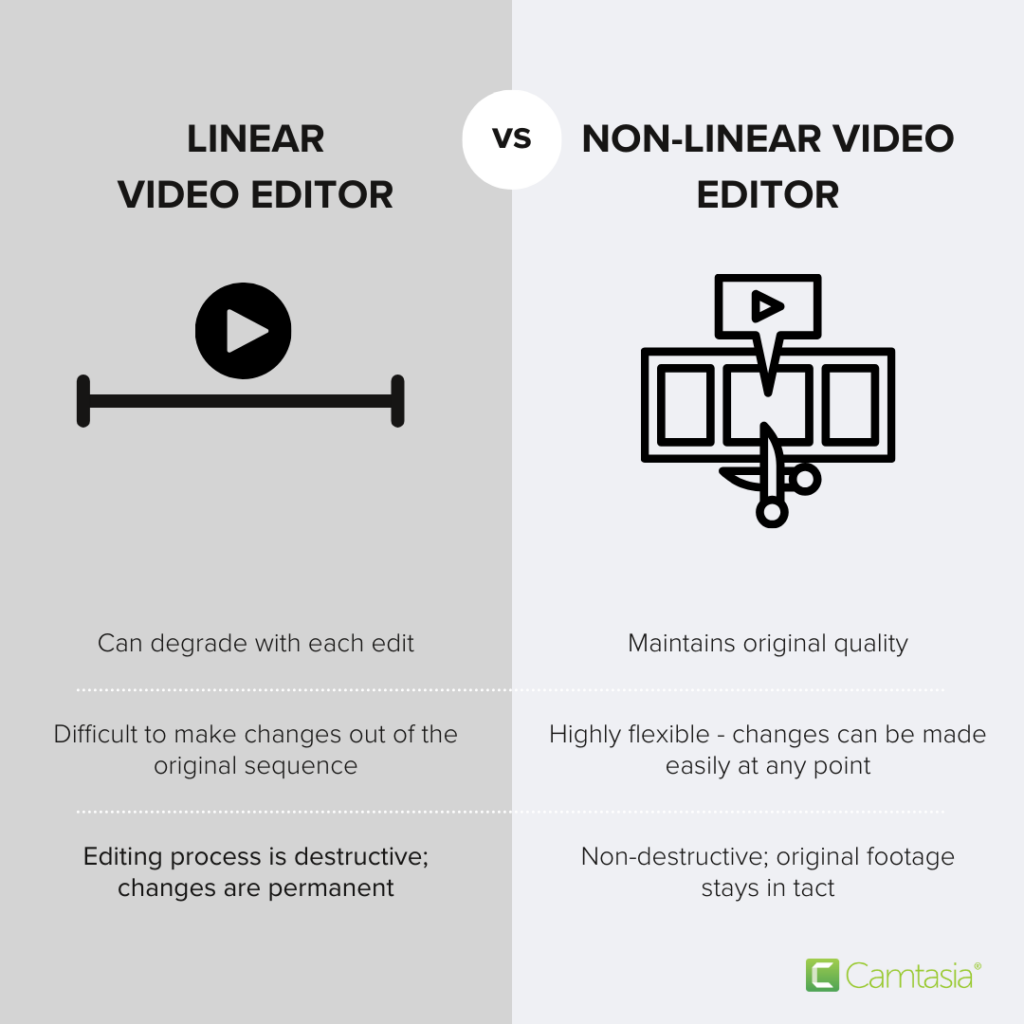
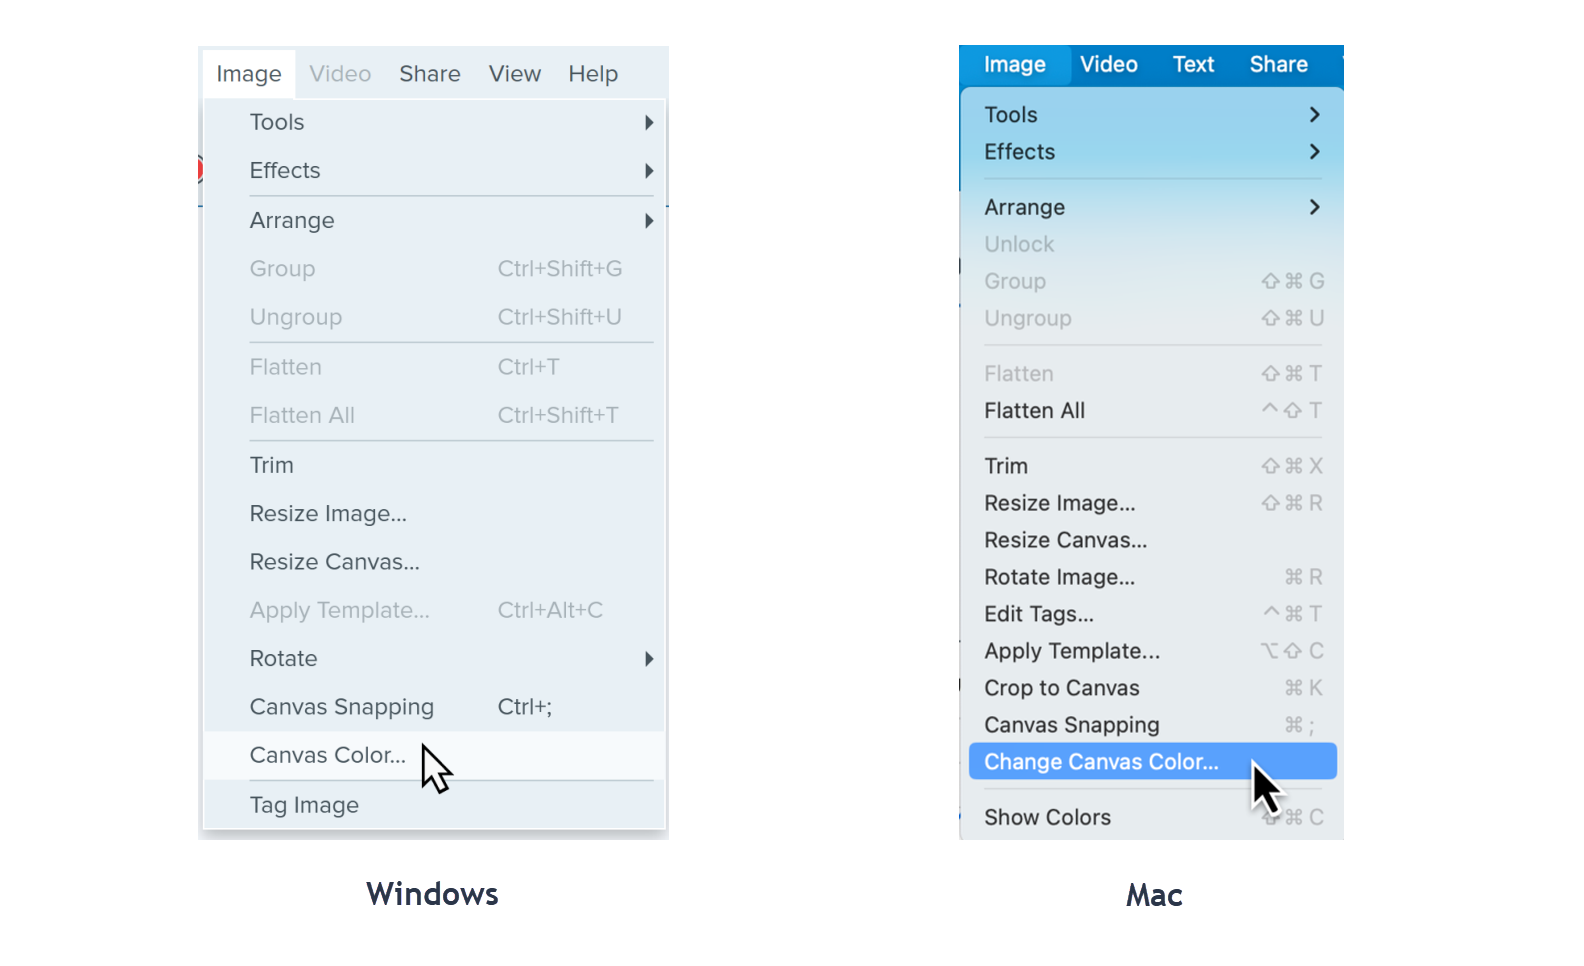
Greenshot has been a go-to free tool for screen capture, but it has not seen a major update in more than seven years. If you’re not familiar with Greenshot, it allows you to capture your screen, whether it be a selected region, window, or full screen. It includes basic annotation tools and allows you to share your captures to a variety of destinations.
A lot has changed in the last seven years, so let’s take a look at three potential Greenshot alternatives.
Why Snagit is the best alternative to Greenshot
TechSmith’s Snagit has been a leader in screen capture for many years. It’s available on both Windows and Mac platforms and has the highest user satisfaction for screen and video capture from G2. Here are five reasons you may want to explore Snagit as an alternative to Greenshot:
1. You need more professional and consistent screenshots
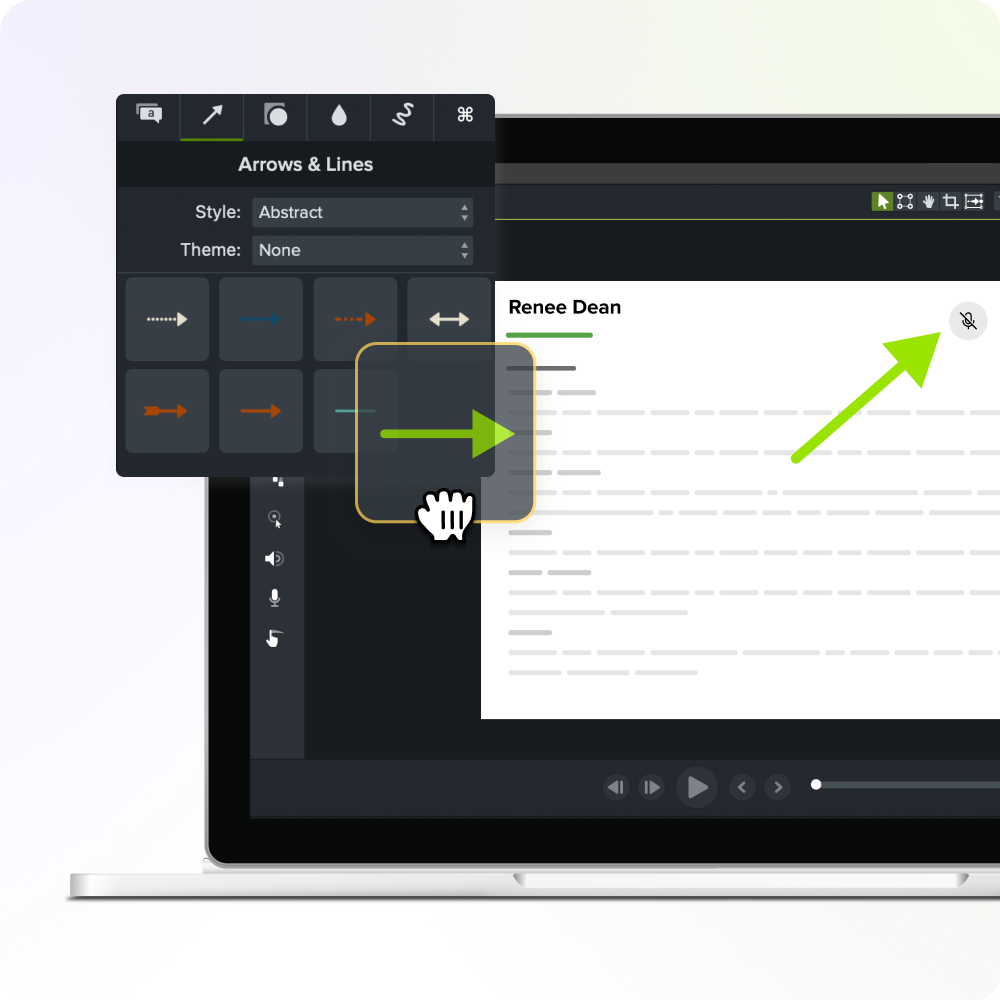
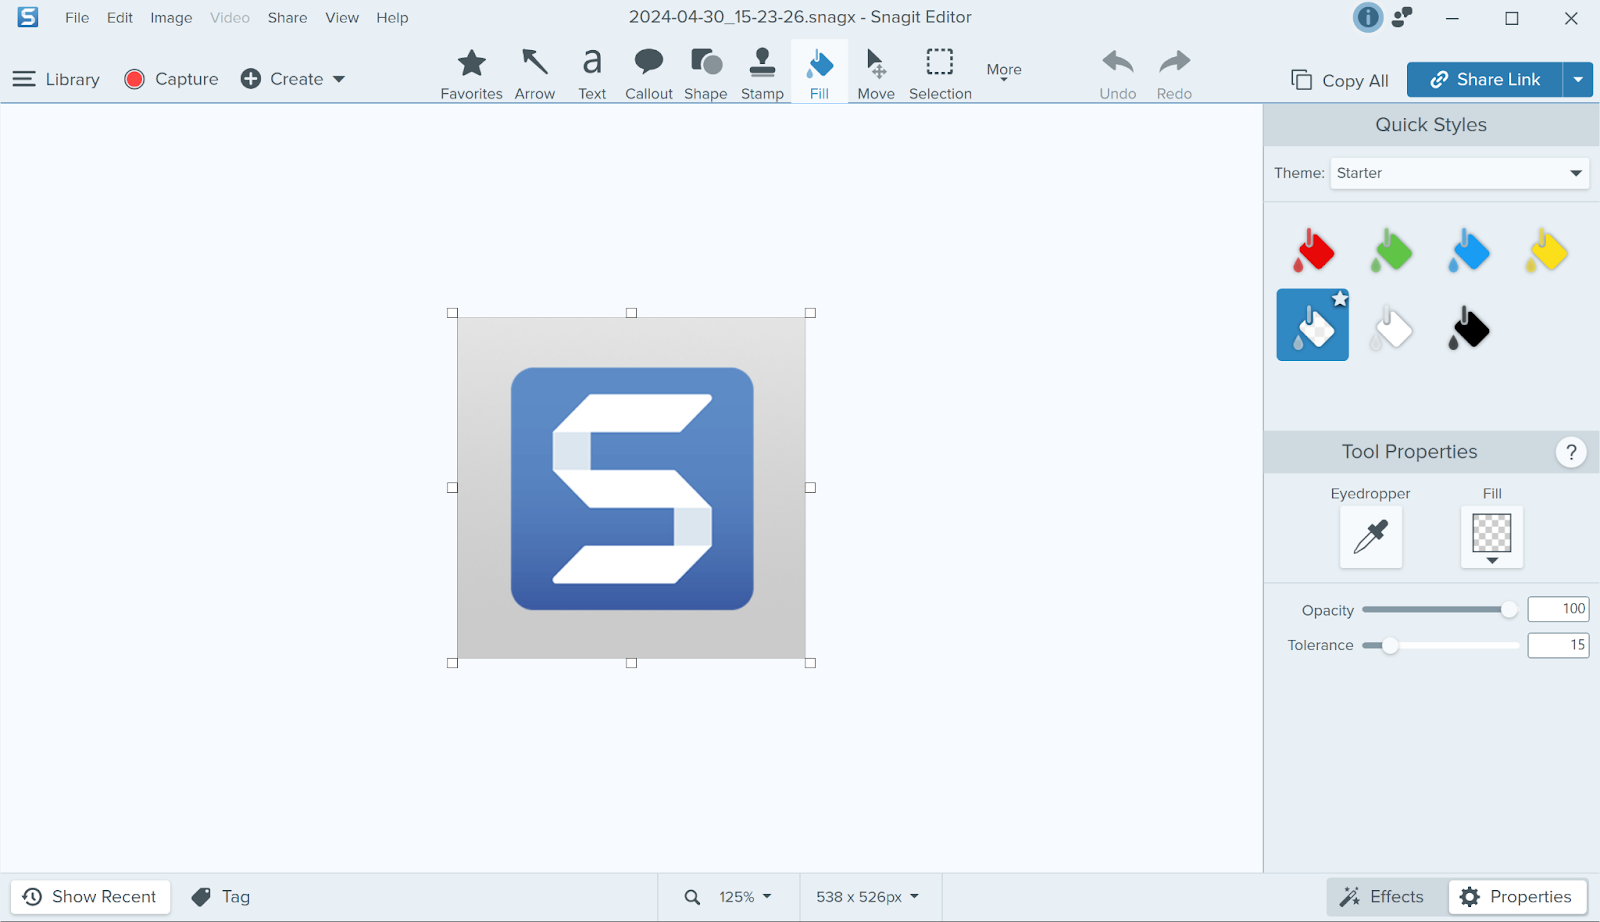
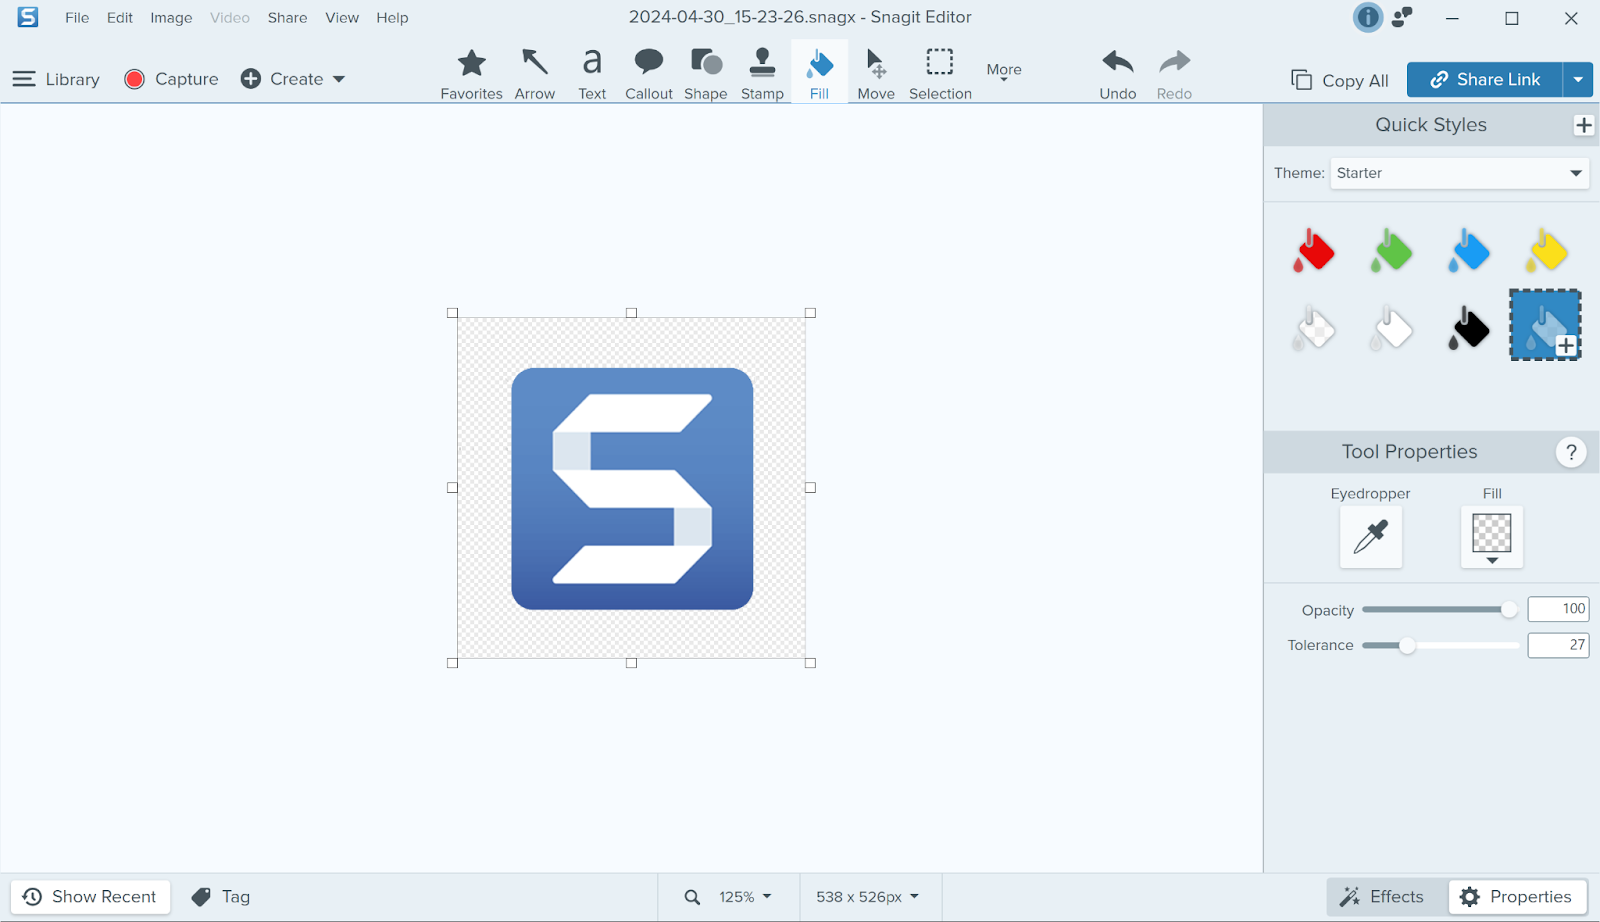
Snagit has a fantastic set of professional annotation tools, but what takes it to the next level is customization and themes. Snagit allows you to input your brand colors and build themes so your arrows, text, speech bubbles, cursors, and more stay on brand! You can add your most commonly used annotation tools to your Snagit favorites for easy access.
2. You’re capturing screenshots more frequently
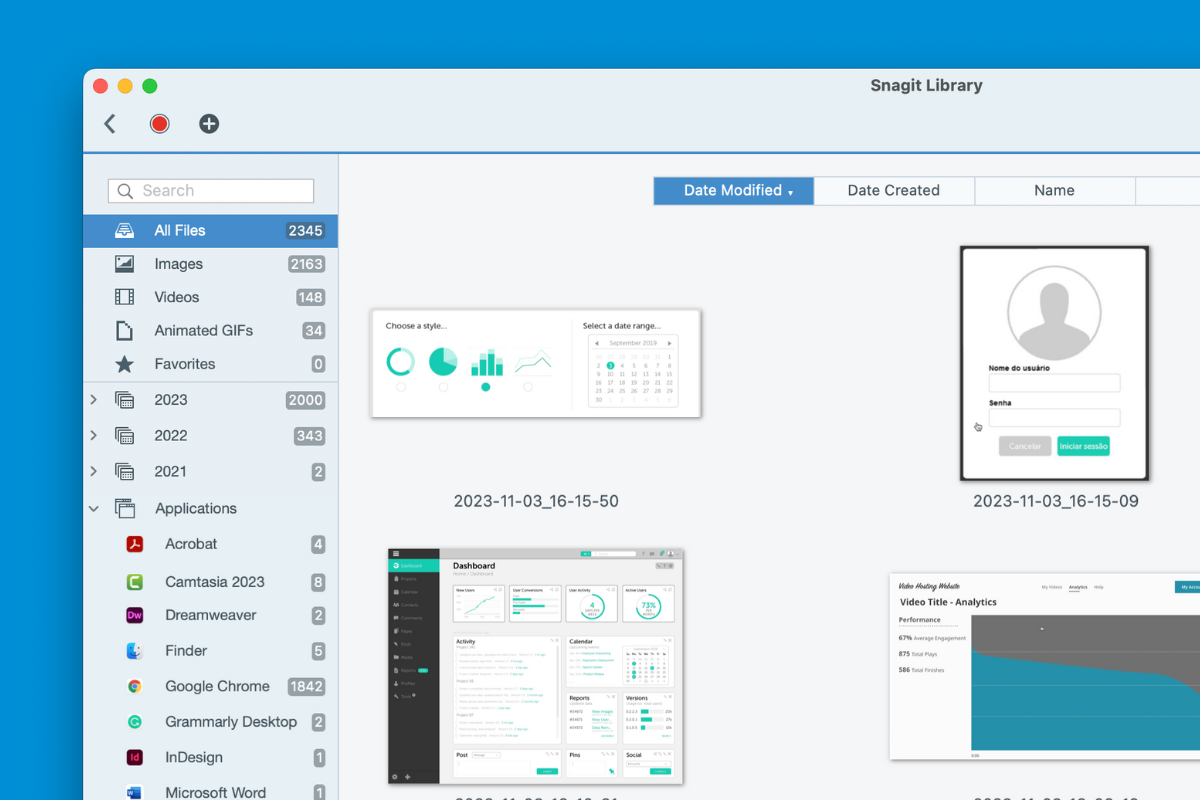
The value of Snagit grows the more you use it. Snagit captures are stored in a library for future access. This library is searchable and sortable by date of capture, application, website, and tag. I find the library extremely helpful when gathering screenshots for a presentation or report. Snagit’s library gives my brain a break by holding onto my assets until I’m ready to assemble them.
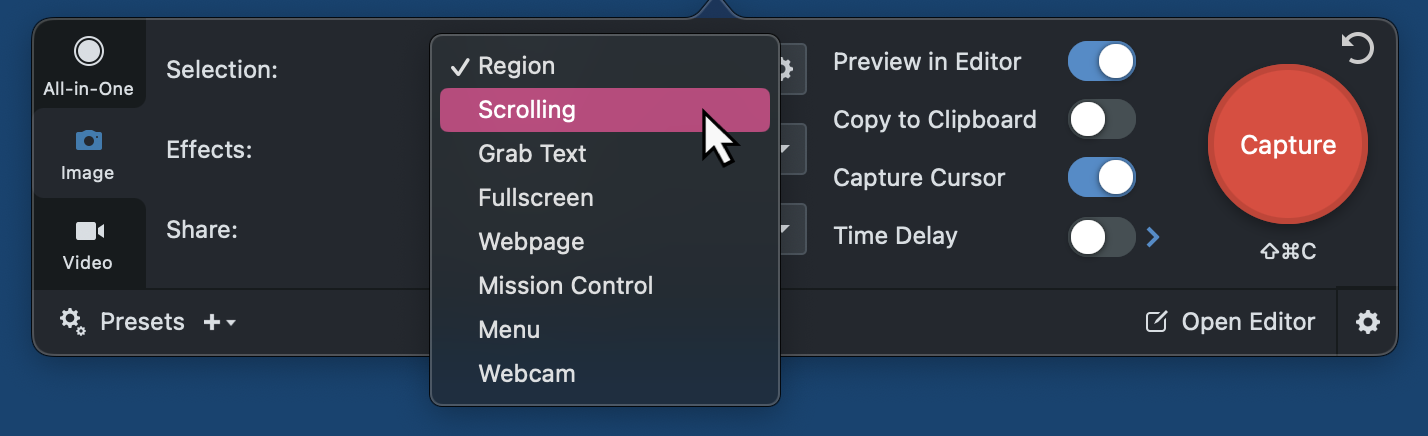
3. You need to capture long/scrolling screens
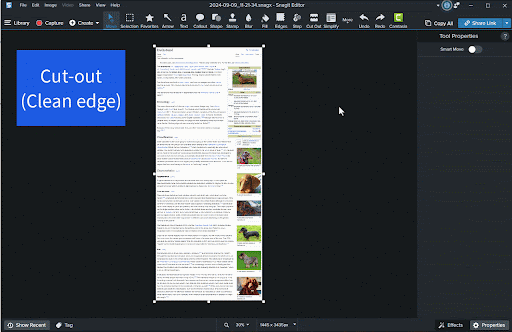
Have you ever needed to capture more than what is on the screen? Greenshot technically has the ability to capture scrolling windows, but only in Microsoft’s unsupported Internet Explorer browser. Snagit has expanded the capability of its scrolling capture and kept up with modern browsers.
The Snagit Editor’s Cut Out tool takes scrolling capture to the next level, allowing you to instantly remove the unwanted sections of your capture, with options to make a clean cut to make it look like nothing was ever there or torn-edge markers to show that something has been removed.
4. You need to record your screen and/or create an animated GIF
You’re probably already using screenshots to replace long blocks of text in email/messaging applications, but screen video and GIFs can be even more efficient! Snagit allows you to record your screen, along with your webcam and microphone audio.
When you’re finished recording, you can quickly cut out mistakes or unwanted parts of your recording. Then you can save an MP4 video or animated GIF—or directly share to a variety of hosting destinations like Google Drive, Slack, Teams, YouTube, and more. Snagit videos can also be imported into TechSmith’s Camtasia for more advanced video production.
5. You need to collaborate with your team
For team collaboration, Snagit is one of the best Greenshot alternatives. It allows you to capture both images and videos, annotate them with detailed instructions, and share them easily across your organization. It also integrates with popular cloud storage platforms, making collaboration seamless.
6. You have security concerns
It has been more than 7 years since we’ve seen a new version of Greenshot. Snagit released version 2024 in October of 2023 and has already released 10+ updates on both Windows and Mac since then. These updates fix bugs and add functionality, but they’re also critical for the safety and security of your machine/network. You can view Snagit’s update history here:
A free Windows Greenshot alternative – Windows Snipping Tool
If you’re looking for a free alternative to Greenshot on Windows, then the Windows Snipping Tool may be a good option for you. Here are a few pros and cons of the Windows Snipping Tool.
Windows Snipping Tool Pros:
Free
Built into the Windows operating system
Simple interface
Annotation tools have been recently updated to allow arrows, boxes, etc…
Ability to record basic screen videos
New “Quick Redact” feature allows you to automatically block out phone numbers and email addresses
Windows Snipping Tool Cons:
The overall set of tools compares favorably to Greenshot but is limited when compared to Snagit
Minimal share options/cloud integration
Lacks the ability to capture scrolling windows
Video recording lacks editing capabilities, sharing options, and webcam
No library for storing and organization of captures
Lacks themes, favorites, and other customization options that you find in tools like Snagit
A free Mac Greenshot alternative – Flameshot
If you need a free alternative to Greenshot on the Mac, then Flameshot provides similar functionality. Here are a few pros and cons of Flameshot.
Flameshot Pros:
Available on MacOS (there is also a Windows version)
Free and open-source
Highly customizable
Cloud sharing option (Imgur)
Contains a basic set of editing tools
Command-line interface available for more technical users
Flameshot Cons:
Like the Windows Snipping Tool, Flameshot lacks some of the advanced capabilities when compared to Snagit
Limited support options
Has not been updated in over two years (last update July 2022)
Lacks breadth of sharing options (Imgur only)
The user interface relies heavily on shortcuts, and it can be easy to accidentally lose your captures before sharing or saving
Which Greenshot alternative is right for you?
If you’re seeking alternatives to Greenshot, you have some great options to choose from. If you’re looking for a screen capture tool that does more than just take screenshots and actually boosts your productivity and ability to communicate, give Snagit a try.
Record your screen with Snagit
Snagit makes it easy to share quick updates and how-to’s by capturing exactly what’s happening on your screen.
TechSmith is the market leader in screen capture software and productivity solutions for daily in-person, remote, or hybrid workplace communication and customer-facing image and video content. Our award-winning flagship products, Snagit, Camtasia, and Audiate, empower anyone to create remarkable videos and images that share knowledge for better training, tutorials, and everyday communication.
There comes a time when you will need to take a screenshot on Mac for one reason or another.
You can use screenshots to demonstrate a process at work and share feedback with your team members. And who doesn’t like to send funny memes and gossip about the latest celebrity feuds?
Computers have built-in screenshotting functions that make it super easy to take a basic capture of your screen. Third-party applications take more advanced captures that you can edit and share quickly.
Now, let’s learn how to screenshot on Mac.
What is a screenshot?
A screenshot, is a still image that displays the exact contents of a computer display. They can be edited and are usually shared with others or stored away for future reference.
They are helpful in many situations, which makes them an essential part of people’s workdays. In all, screenshots are an easy way to show something that would be incredibly difficult to put into words.
Different methods to screenshot on Mac:
Let’s dive into the options available to capture that perfect screenshot.
The best snipping tool for Windows and Mac
Don’t let clumsy built-in tools hold you back. Take and edit screenshots with Snagit!
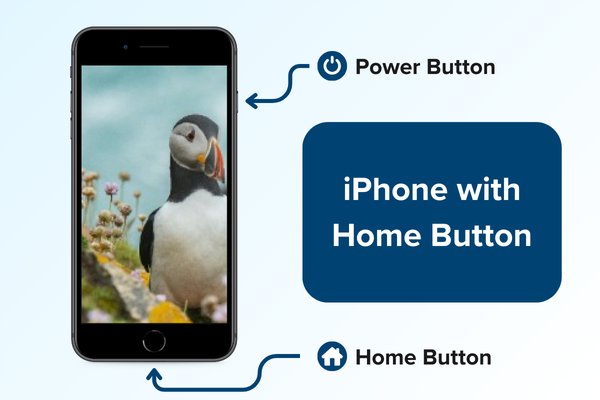
Screenshot on Mac with the built-in screenshot tool
To use the keyboard shortcuts, press and hold the following key combinations:
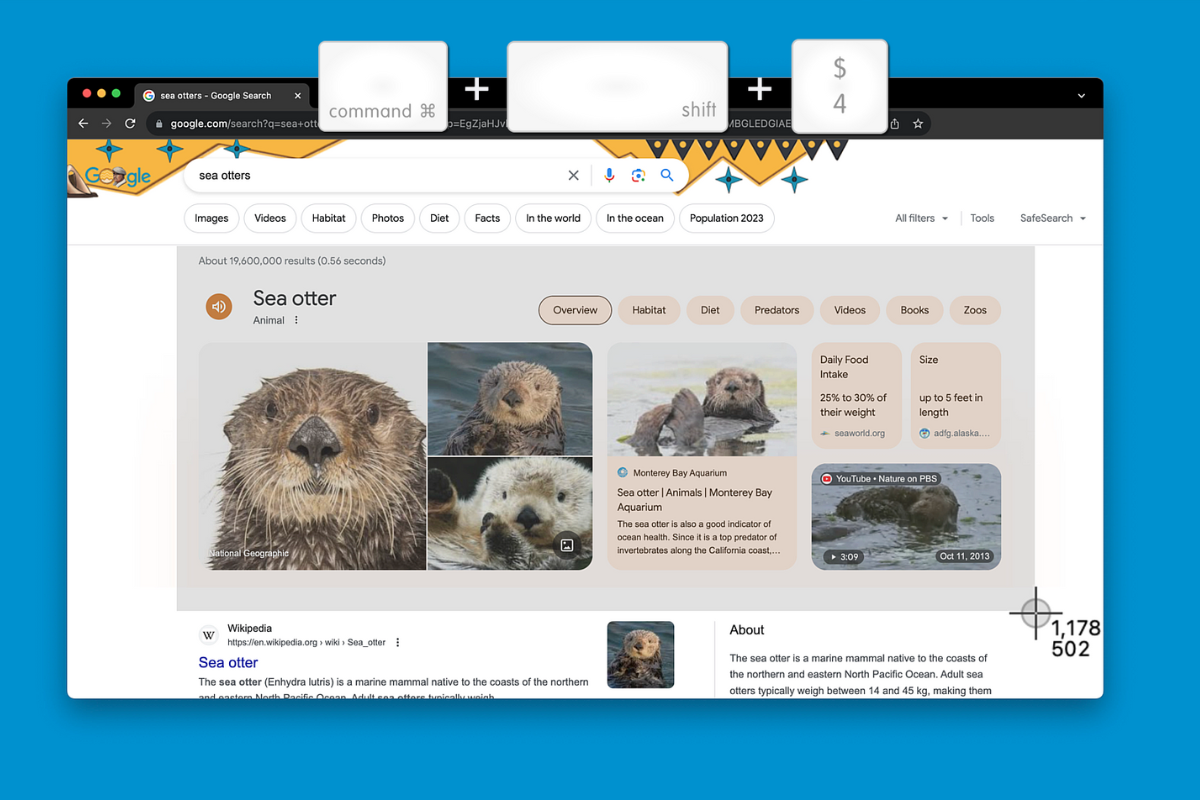
Shift Command 3 is the most straightforward option. This keyboard shortcut captures a screenshot of your entire screen and automatically saves it for you.
Shift Command 4 turns your cursor into a crosshair. From there, you can click and drag the crosshairs to the desired dimensions. Once you release the mouse button or trackpad, your Mac will instantly capture the selected area.
Macs have a built-in screenshot app that allows you to take more precise and curated captures than the keyboard shortcuts above.
Command Shift 5 will pop up a small screen-capture window. This is the screenshot app. Three screenshot buttons will let you carry out these options:
Your captures will be saved to your desktop for easy retrieval. However, they will not be copied to your clipboard at that time.
Expert tip: By pressing the Control (Ctrl) button at the same time as your keyboard shortcuts (for example: Shift Command 3 Control), your screenshot will be copied to your clipboard. However, it will not be saved to your desktop.
How to screenshot on Mac with a third-party application
Do you use screenshots more than just a few times per year? If so, you would benefit from trying out an advanced screen capture and screen recording tool.
Snagit is super simple to use. Download a free trial today, then open the Snagit menu.
From there, select the type of screenshot you want to take.
Snagit provides users with advanced features that are easy to use, like scrolling capture. This allows users to take a screenshot of a full, scrolling web page without the hassle of stitching together multiple screenshots.
You can also create videos from images to explain processes quickly and easily. Record your screen, camera, and microphone audio to create quick, informative videos.
These, and countless other features, make Snagit an must-have tool for visual communication
Annotate and edit screenshots with Snagit
Professional mark-up tools and powerful features make it easy to create helpful images.
Add context and clarity to your screenshot by editing it!
Once you take a screenshot on your Mac, a preview will pop up in the bottom right corner of your screen. Click on the icon to open Apple Preview with your screenshot inside.
The expandable toolbar allows you to edit the screenshot. Add shapes, change color composition, incorporate text, draw on the screen, and more. When you’re done, save your screenshot by clicking “Save as” and filing it in the appropriate folder.
However, there is a good chance you will need to edit screenshots through a third-party app for the best results.
If you regularly need to edit screenshots, a tool like Snagit will save you a lot of time and get you more professional results.
Snagit is full of helpful features like the Simplify tool that lets you block out unwanted text to keep information secure and your screenshots less cluttered.
You can even move elements of your screenshots around with the Smart Move tool. It makes it easy to rearrange information, show potential edits, and alter workflows.
Organizing and managing screenshots on Mac
The first step in keeping your captures organized is to name them. By default, your Mac screenshots are saved with the name “ScreenShot” with the date and time attached. To make retrieval quicker, use file names you can easily remember!
Snagit’s library organizes screenshots like your Mac but also uses an advanced filing system. Your captures will automatically be managed by application, website, and month.
This neat feature lets you find your screenshots in multiple places. Without any work on your part, your screenshots are organized and ready for you to refer to easily.
For more advanced screen capture, we recommend you to look into third-party applications. They can take your screenshots to the next level.
The best snipping tool for Windows and Mac
Don’t let clumsy built-in tools hold you back. Take and edit screenshots with Snagit!
What is the difference between capturing the entire screen, a selected area, and a specific window?
Capturing the entire screen screenshots everything you see on your display, while capturing a selected area lets you choose a portion of the screen.
Capturing a specific window captures just the content of the currently active window. Snagit allows you to specify your capture window down to the pixel, so you get the exact screenshot you need every time.
What mac systems can I screenshot on?
These shortcuts work for any mac systems, even macOS Mojave and Catalina
Can I use the touch bar?
Yes, for Mac computer’s with a touch bar, you will see instructions and details shown on the touch bar after you open the screen shot tool.
How can I annotate or edit a screenshot on my Mac?
You can use the built-in Preview app to annotate and edit your screenshots. Snagit also includes original stamps, a blurring tool, a step tool, and much more for a finer editing process.
It seems like we hear about video everywhere these days–how it’s the most engaging way to deliver information, and we should all be making them regularly.
But what if you’re new to video creation and you don’t have an established workflow yet? What tools should you use to make your video?
In this article, we will explore all the options of how Clipchamp compares to other video platforms to help you show what you know, both inside and outside your company.
The easiest way to edit videos
Stop wasting time and discover how Camtasia makes creating incredible videos easier than ever.
Clipchamp is a video editing software tool delivered by Microsoft 365 that has a downloadable app (for computer or mobile) and a browser based version.
Pricing Breakdown
Everyday you, as a consumer, will come across companies who say they are free and talk a lot about features that areactuallybehind a paywall. We’re going to give you an accurate pricing breakdown below.
Premium Personal = $119/a year
Premium Work/School = $7/a month per user*(Check with your organization for confirmation)
So which features are behind the paywall and does it matter if I am on a premium work account versus a premium personal account?
Let’s think about the input, the base layer of what your videos will be. What will the primary input be for your video?
Input Type 🎬
Mobile Recording = Maybe. While there is a mobile app, Clipchamp mobile has not integrated enough features to make this your primary choice.
Professional Camera = No. If you have a nice enough camera to be recording with, invest in software with a non-linear video editor to max out your efforts.
Audio Narration / Voice Only Recording = Yes. You may have heard of “text-based video editing” with companies like TechSmith’s Camtasia that allow you to remove um’s and ah’s and pauses with a click of a button. While Clipchamp isn’t as powerful as Camtasia, they are still giving away a lot of free helpful audio features like text-to-speech with AI Voices and removing pauses.
Screen & Webcam Recording = Maybe. Anything you like about Microsoft Teams, you will find in the webcam of Clipchamp, like blurring your background or setting the virtual background. However, the green screen and these fun features disappear the moment you start sharing your screen. Womp, womp, womp. Also, you can’t switch back and forth from full screen webcam to just sharing your screen, so that makes for a less engaging video.
Video Type📽
What if you don’t know about what will go in your video yet? I am a researcher for a video editing software company, so I watch at least 200+ customer videos a year, so here is my educated guess if the type of video you are making will work well in Clipchamp.
Academic Videos = Acceptable. It’s hard to beat free. Make your beautiful presentation slides and then bring them into Clipchamp.
External Training Videos = Bad. If you are an Instructional Designer or someone who makes training materials that are public-facing, Clipchamp will be a rough experience for you. The amount of media asset types you need (screen recordings, images, music, professional camera input, etc.) is not catered to a corporate environment.
Internal Training Videos = Awful. Yes, it gets worse than bad! Basic screen recordings can be done, but the moment you need to zoom in on a specific portion of your screen, want to annotate with an arrow, highlight, blur sensitive information, or anything that you know…actually helps you see what is on the screen, you will quickly find yourself needing to upgrade from Clipchamp to something else.
Marketing Videos = Good. If you are a small business and on the premium plan, they have adequate social media advertisement templates. Their templates are not as aesthetically pleasing as say Canva’s, but the pricing is fair. Keep in mind they have no animation except for what is in the templates, so if you are looking for dynamic movement of texts or images, Clipchamp is not for you.
Sales or Business Development = Excellent. Sales people are wonderful presenters. Take advantage of going full screen with Clipchamp and make a quick, easy-to-use video editor to get your point across. When your video crosses over into a demo of what is on your screen, you may fall into the problems mentioned above about screen recordings.
Workplace Communication = Excellent. Making a quick video to show your colleague how to do something is still worth it, to avoid having to talk to your coworker for an extra 30 minutes about their favorite snack from Trader Joe’s. (Psst, it’s me, I am that coworker. Stay away! Buy the Fancy Cheese Crunchies!)
Clipchamp Pros
Friendly Recording Process – if you can use Teams, you can make a Teams-esque video in Clipchamp and this even has a teleprompter with a Virtual Speech Coach.
Powerful Audio Editing for Free – seriously, check out that text-to-speech and how easy the captions are!
Ease of Use – with less features, it feels simple. There’s helpful onboarding messages and things are just a click away.
Clipchamp Cons
No Precision Editing – it has different tracks, but you can not fine-tune audio or any type of key-frame editing which is important for any movement.
Stagnant Videos – think no animation, no moving text, no usable zooming in and out.
No Customization with a Paid Account and No Templates for Work/School Accounts.
The color of the assets (think like an arrow to drop on the screen) cannot be changed.
There are no handy pre-built templates for work or school accounts. 😥
The easiest way to edit videos
Stop wasting time and discover how Camtasia makes creating incredible videos easier than ever.
Camtasia is easy enough for beginners to polish up their videos better than in Clipchamp, but advanced enough to grow with you. When on the Create Plan, enjoy powerful text-based editing with Audiate, intuitive timeline editing, and a library that allows you to easily customize assets to your company’s brand guidelines. Get that precision editing you are missing from Clipchamp by zooming in on the screen or adding a blur on your screen recordings.
Price Breakdown
Camtasia Essentials Plan: $179.88/ a year (no AI audio features)
Camtasia Create Plan: $249/ a year
Camtasia Pro Plan: $499/ a year (includes 100+M premium and customizable assets like stock footage, background music, and AI generator)
Camtasia Pros
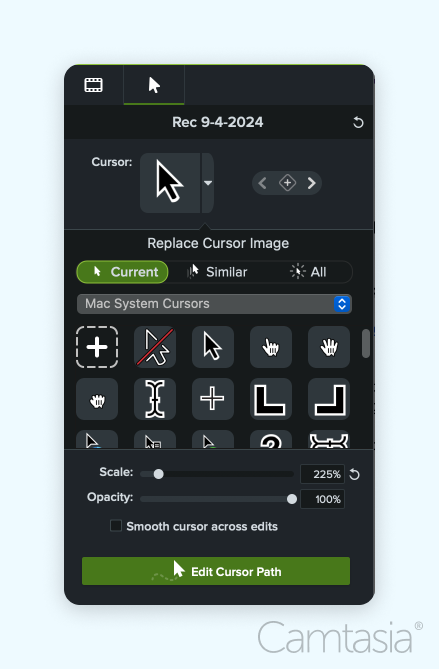
Screen is King. If you use screen recording in your content, you should be using Camtasia. Seriously, ask any trainer you know, and they’ve heard of it. Zoom and pan with ease, blur what you need, annotate your content with customizable arrows and callouts. Highlight your mouse, enlarge or change the mouse shape with automatic smoothing (or edit the path!). Dream what you could add to a screen recording and they got you.
Affordable AI features compared to competition. Text based editing with video avatars plus a customizable library of assets? A lot of competitors say they have that, but then bait and switch you with multiple add-ons that once you really use them, aren’t as usable as you think.
Learning Content & Friendly Technical Support. This established midwest American company sure knows how to make you feel at home, so check out their extensive training content and live webinars.
Camtasia Cons
Does not have a mobile app
Downloaded app that must meet these requirements for your machine
Limited number of template videos
Want to try Camtasia for free? You can use the free trial forever, just know without purchasing, your video will have a watermark on it at export.
Filmora
If you are making more personal content or are an influencer, you may want to check out Filmora. Explore their library of more than 200 presets and over 10 billion free stock assets to assist with content creation at an additional cost. As a young company, they are quickly expanding their feature set.
Price Breakdown
Filmora Perpetual Plan: $79.99
Filmora Annual Plan: $49.99/ year
Filmora Annual + Assets: $70/ year
*While Filmora claims to be free, there is a large watermark on whatever you export, so view this as a free trial.
**Also, not all features will be available and based on your “AI Credits”. 😳
Filmora Pros
Affordable pricing for any influencer or hobbyist
An extensive list of features
Perpetual option for a one-time purchase
Filmora Cons
Sneaky subscription pricing – hop over to any Reddit thread to see the lack of refunds and then feel sad when you can’t use any of the AI features you were promised.
Features that overpromise and underdeliver – we got a saying called “all horse and no cattle” and well, that would be the story of Filmora, partner. Mosey on back to the other options. They have also been known to take away features and then bring them back a few versions later, marketed as new, so buyer beware.
Unreliable support – If you have to fight with someone to get a return when a sneaky add-on cost goes through on your card, have limited training, and take days to respond to your technical support ticket after their software crashes, please rethink purchasing this software.
DaVinci Resolve
If you are making high quality content for television production or cinema, you may be familiar with DaVinci Resolve. While you don’t have to be a movie star editor, you will have to spend some time learning DaVinci’s Adobe Premiere-like user interface. After putting the time in to learn this software, you will be impressed at all the features at your fingertips. Who knows, maybe you will be making the 117th Marvel movie in no time!
Stunning color correction and adjustment tools for your footage
Cloud Collaboration for shared groups – Some competitors claim to have cloud collaboration (cough, cough, looking at your Capcut Business). Clipchamp had this feature before phasing it out, but DaVinci has thought through the process by adding safeguards like timeline locking bins (allow only one editor in on that track) and intuitive file management.
AI Tool for tracking – Want to add lipstick to your face? Done. Want to remove an object from the background? Done. Any type of scaling, tracking, and masking can powerfully be done in this program. I’m shook. 🤯
DaVinci Cons
Welcome to the ecosystem, buy all the gear – Remember the days when you couldn’t buy an Apple phone charger off Amazon? It’s like this to the 12th degree. Blackmagicdesign, the parent company, is playing the long game by hoping you will buy their expensive keyboards, color panels, and Fairlight consoles.
Learning curve – I mean, you think I am joking about making Marvel movies, but there’s a reason this is one of Hollywood’s favorite tools. They do offer some training available in English, German, and sometimes Spanish or Portuguese.
Ready to get started making videos?
Now that you’ve had the chance to read through some of your video editing options beyond Clipchamp, you should give Camtasia a try. With a full library of instructional tutorials to help get you up and running, and a free trial available, you can get started today!
The easiest way to edit videos
Stop wasting time and discover how Camtasia makes creating incredible videos easier than ever.
TechSmith is the market leader in screen capture software and productivity solutions for daily in-person, remote, or hybrid workplace communication and customer-facing image and video content. Our award-winning flagship products, Snagit, Camtasia, and Audiate, empower anyone to create remarkable videos and images that share knowledge for better training, tutorials, and everyday communication.
Microlearning is presenting information in short, succinct bursts to enhance engagement in the content. This is most commonly thought of as video content, but can also be infographics, learning aids, written instructions, and many other forms of content delivery.
According to the American Psychological Association, attention spans have shrunk to 47 seconds in the past few years and are still on the decline. With the reduction in attention spans, microlearning is more important than ever—people are cramming more tasks into each day, with still only 24 hours to get it all done. The days of double-digit page job aides and day-long in-person training sessions are over.
But how do you get started with microlearning? By using visual communication tools such as Snagit, creating content in short and easily digestible segments is made simple. Snagit can help create screenshots, infographics, templated documents, and quick videos to take the place of long-winded, text-based learning tools.
Record your screen with Snagit
Snagit makes it easy to share quick updates and how-to’s by capturing exactly what’s happening on your screen.
As defined by The Association for Talent Development, microlearning “enhances learning and performance in the most efficient and effective manner possible through short pieces of content.”
There isn’t a specific time limit on how long the content should take to consume, but the general rule is only as long as it needs to be. Focus on sharing information that is “need to know” rather than “nice to know”. This will save your audience time on consuming the content and will boost engagement with them, which in turn leads to absorbing or acting upon the information presented.
These bite-sized learning experiences can take many different forms—short videos, visual documents such as infographics, job aides, templated screenshots, and more. The goal of microlearning as a content delivery method is to effectively and efficiently train others.
In any situation where an employee needs to learn a topic, microlearning can be appropriate. Showcasing how to set up a new email account? A visual step-by-step guide will work. Teaching a new employee how to use the espresso machine? A quick video tutorial will show them. Want to make sure your team is within compliance? Microlearning can help with that!
Key characteristics of microlearning
Some key characteristics of microlearning are
Short (in length)
Focused (in content)
On-demand (at your pace)
Easy accessibility on various devices
To make sure your content is accessible to viewers, take some time to think about the format you choose to create your content in. Test your video on a computer and a mobile device. Open the image in several different internet browsers.
Emphasis on specific learning objectives
Making content short is meaningless if it’s focused on the learning objectives. Efficiency is great, but not without effectiveness in achieving the goals of the content. Taking a long piece of content and chopping it up won’t do. Creating fresh new content with goals and brevity in mind is a better approach.
Identifying the learning need
How to divide complex topics into microlearning segments
Outline your goals and objectives for your topic; make sure to focus on just one learning objective for each piece of content.
Know your viewers. Make sure you understand who is going to be consuming your micro content, the level of knowledge they already have on this subject, and where they’re going to be consuming the content.
Keep it short. There is no set length, but a study by ATD states that learners feel 10 minutes is an ideal length for a microlearning segment, but 2–5 minutes is the most effective length for microlearning. Add relevant examples. Considering your knowledge of your audience, include real-world examples that can illustrate your point and relate to the viewer’s perspective.
Include engaging visuals. These may be images, videos, graphics, branded assets, music, quizzes, games, or any other on-screen elements that keep your viewer’s attention.
How to use Snagit to capture and organize learning content effectively.
After defining your audience and learning outcome, Snagit can help with the remaining steps above to create the most effective learning content.
Keep it short. There is no set length, but a study by ATD states that learners feel 10 minutes is an ideal length for a microlearning segment, but 2–5 minutes is the most effective length for microlearning. With Snagit’s video recorder, you can ensure that your videos are short and to the point. If you opt for screenshots or templated graphics, both can be created within Snagit.
Include engaging visuals. These may be images, videos, graphics, branded assets, music, quizzes, games, or any other on-screen elements that keep your viewer’s attention.
Adding images or videos to your microlearning truly enhances your learners’ experience by keeping your learners engaged with the on-screen content. Including visuals can break up the monotony of text or instruction and increase visual interest on screen. You can even use corporate branded colors, fun stamps, or redact any sensitive information quickly to have endless options for visuals.
Creating microlearning content
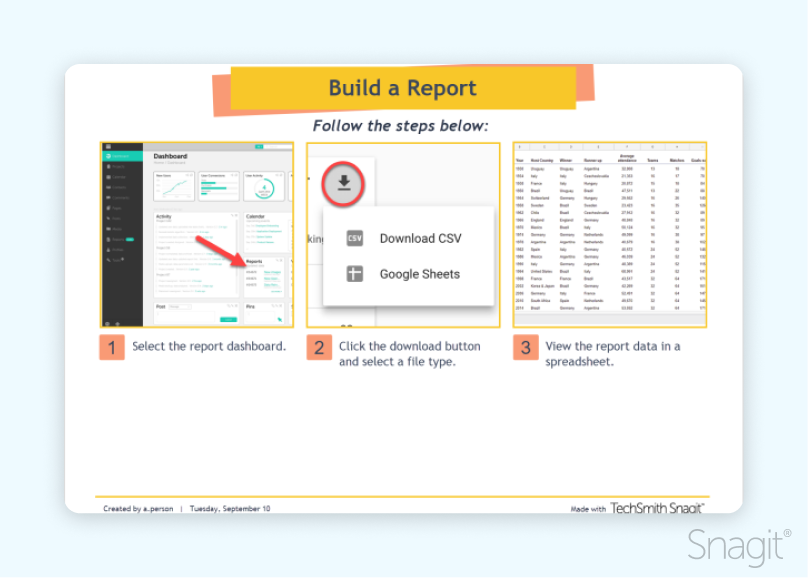
When keeping up with the above microlearning best practices for creating effective microlearning content, Snagit is useful in helping to create visuals that engage and educate your audience. If you’re planning on still screenshots, try a template to organize your content and provide context within the captions. Or tweak your learning strategy to a more step-by-step approach and try Snagit’s step tool.
Take it one step further and record a quick video showing how to complete an action. Not feeling like recording your screen in one take? Try the Create Video from Images feature in Snagit; you can capture and edit the screenshots to perfection, then narrate or screen draw to explain.
Why should you implement microlearning?
Benefit 1: Enhanced knowledge retention
Microlearning improves retention through repetitive, focused sessions. Within those short bursts, the mental fatigue is reduced and allows the learner to absorb and retain the knowledge. Findings from a 2018 study show an 18% improvement in knowledge retention among students taught using microlearning principles.
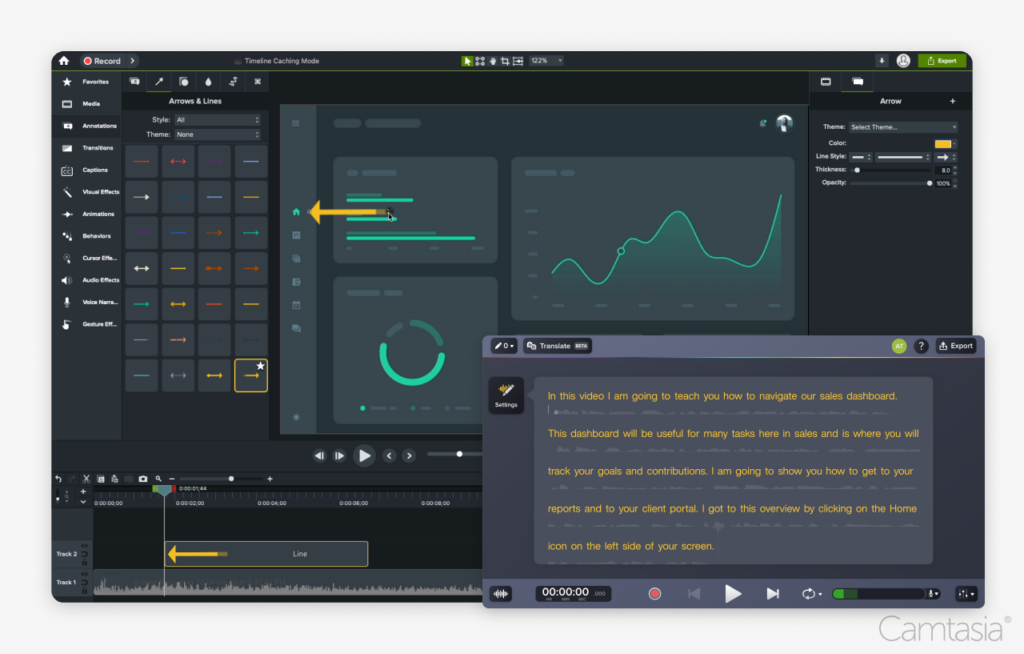
Here’s an example of how to create a short (3:07) tutorial video on how to record a video with Snagit. The video covers everything you need to know to record your screen. There are engaging visuals, step-by-step instructions, clear narration, and only one learning objective to take in.
With shorter, focused content, engagement may seem like a no brainer. BUT – it takes planning to ensure that you include elements that will actually keep your learners engaged. Including interactive elements like quizzes, or games, and using crisp visuals, your employees will continue to keep their eyes and ears on the screen.
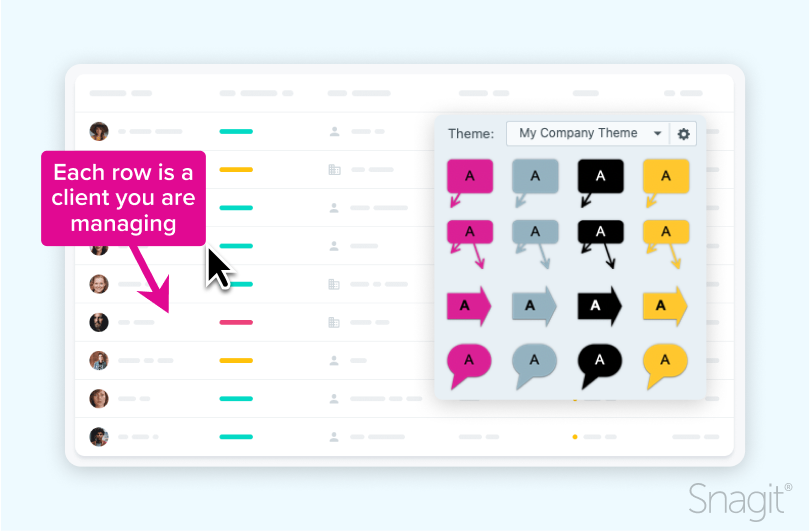
There are many ways Snagit can make your learning modules ‘pop’. Using Snagit’s visual elements like shapes, callouts, and text, you can both emphasize parts of your content as well as make them more visually appealing for your learners. You can even add custom elements to a theme to incorporate standard fonts and colors to stay within your organization’s branding guidelines.
Check out this post on making PowerPoint presentations less boring and more exciting for your learners.
Benefit 3: Flexibility and convenience
One of the biggest benefits of microlearning is that it is on-demand viewing for the learner. With the increase in remote work, tasks, responsibilities, and doing less with more, having content available when you have time to consume it is paramount.
Large in-person training sessions or long-form learning modules are becoming a thing of the past. Allow your viewers to catch up on their learning modules while commuting on the train, before winding down for bed, or while eating lunch at their desk. With microlearning modules available on the learner’s schedule, they can choose a time when they are able to focus and consume the content in a short amount of time.
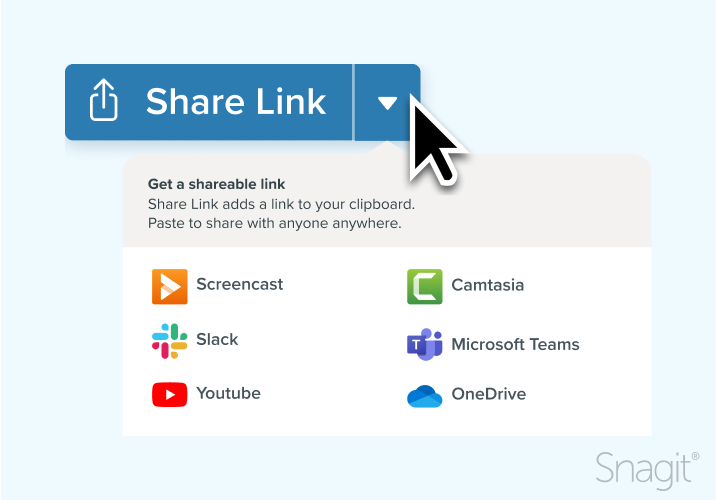
Snagit’s flexibility to share content with a variety of different sources makes it a great choice for microlearning content. Sharing videos to Screencast or YouTube, captures to Google Drive or Slack, and even saving them locally or customizing your sharing destination to a location of your choice makes Snagit the most flexible way to get the microlearning content to your viewers. Learn more about customizing your sharing setting here.
Looking to start with microlearning?
Snagit can help you create engaging content to share with your micro learners through the use of callouts, arrows, and text on screen. If your content is more suited to videos, Snagit can record your screen and voice, trim, and share to your preferred destination.
If you’d like to start using Snagit for microlearning, check out these quick tutorials that will help you get started capturing your screen, or our YouTube channel for more content.
If you’d like to learn more from our blog, take a look through the posts here
Annotate and edit screenshots with Snagit
Professional mark-up tools and powerful features make it easy to create helpful images.
There is no set length, but a study by ATD states that learners feel 10 minutes is an ideal length for a microlearning session, but 2-5 minutes is the most effective length for microlearning.
Can microlearning replace traditional training methods?
Microlearning can certainly replace some traditional training methods if the content and audience allows. Microlearning can replace content that needs to be delivered quickly and can easily be broken into smaller sessions for delivery.
Microlearning should not replace training on complex topics or topics that require complete mastery over a subject. These require in-depth study and practice and should be shoehorned into a micro learning module.
What tools are needed to create effective microlearning?
Many tools can be used to create microlearning content – PowerPoint, Snagit, and other microlearning platforms can be helpful in creating content. To look for more industry-leading tools, reach out to these associations, which promote and educate people on the benefits of microlearning.
The easiest way to edit videos
Stop wasting time and discover how Camtasia makes creating incredible videos easier than ever.
TechSmith is the market leader in screen capture software and productivity solutions for daily in-person, remote, or hybrid workplace communication and customer-facing image and video content. Our award-winning flagship products, Snagit, Camtasia, and Audiate, empower anyone to create remarkable videos and images that share knowledge for better training, tutorials, and everyday communication.
While YouTube’s terms of service generally prohibit downloading videos, there are legal avenues available, such as leveraging the fair use doctrine for educational or transformative purposes, using YouTube Premium for offline viewing, or downloading Creative Commons-licensed content.
YouTube’s download prohibition
YouTube’s Terms of Service explicitly prohibit the use of third-party download services to obtain content from the platform. These services, which include tools like YouTube-DL, 4K Video Downloader, and YTD Video Downloader, violate YouTube’s terms by accessing content through unauthorized means 12.
The terms state that users may not “access content through any technology or means other than the video playback pages of the Service itself, the embeddable player, or other explicitly authorized means YouTube may designate” 1.
Using such services can lead to account termination and potential legal consequences, as it often infringes on copyright laws 23.
While these tools may seem convenient, they undermine content creators’ rights and YouTube’s business model. Users are advised to utilize official methods like YouTube Premium for offline viewing or seek explicit permission from content owners to ensure compliance with both YouTube’s policies and copyright laws 34.
YouTube Premium offers a legal way to download videos for offline viewing on mobile devices and select desktop browsers. To download a video using YouTube Premium, sign in to your account, navigate to the desired video, and click the “Download” button below the video title 12.
On mobile devices, you can find your downloaded videos in the “Downloads” section of the app 1. Videos can be played offline for up to 29 days before requiring an internet connection to verify your subscription 1.
YouTube Premium also includes features like ad-free viewing, background play, and access to YouTube Music 3. While this method doesn’t allow you to save videos permanently to your device’s storage, it provides a convenient way to watch content offline within the YouTube ecosystem 45.
Creative Commons licenses provide a legal framework for creators to share their work under specific conditions, allowing for more flexible use of copyrighted material.
YouTube offers a search filter for videos licensed under Creative Commons, making it easier to find content that can be legally downloaded and reused. Here’s an overview of how to find and use Creative Commons-licensed videos on YouTube:
Feature
Description
Search Filter
Select “Filters” and choose “Creative Commons” under “Features” to find CC-licensed videos 1
License Type
Most CC-licensed videos on YouTube use the CC BY license, requiring attribution to the original creator 1
Usage Rights
CC-licensed videos can be downloaded, modified, and reused according to the specific license terms
Attribution
Credit the original creator and provide a link to the license when reusing CC-licensed content
Verification
Always verify that the uploader has the rights to license both audio and video under CC 2
When using YouTube’s Creative Commons filter, it’s crucial to ensure that the uploader actually has the rights to license the content under CC. In some cases, you may need to remove the audio when uploading to other platforms to comply with licensing restrictions 2.
Creative Commons licenses on YouTube typically allow for more flexible use compared to standard copyright, including:
Downloading videos for offline use
Incorporating clips into your own projects
Sharing and distributing the content (with proper attribution)
Creating derivative works (depending on the specific CC license)
However, it’s important to note that not all Creative Commons licenses are equal. Some may restrict commercial use or require that derivative works be shared under the same license terms. Always check the specific license details for each video you intend to use.
For educational purposes, Creative Commons-licensed YouTube videos can be particularly valuable. They provide a legal way to incorporate multimedia content into lessons, presentations, and research projects without the need for explicit permission from each creator. 3
While Creative Commons offers more flexibility, users should still be cautious and respectful of the licenses. Misuse or misattribution can lead to copyright infringement claims. When in doubt, it’s best to contact the content creator directly for clarification on usage rights.
Permits limited use of copyrighted material without needing permission from the copyright holder.
Purpose
Balances the interests of copyright holders with the public interest in wider distribution and use of creative works.
Scope
Broader in the US than “fair dealing” rights in most countries with English Common Law heritage.
Legal Test
Based on a flexible proportionality test, examining purpose, amount used, and impact on the market of the original work.
Origin
Evolved from common law during the 18th and 19th centuries to prevent over-rigid application of copyright law.
Legal Codification
Enshrined in statutory law with the passage of the Copyright Act of 1976 in the US.
Recent Major Decision
Google LLC v. Oracle America, Inc., 2021 – a major U.S. Supreme Court decision clarifying the doctrine.
The fair use doctrine provides a legal framework for limited use of copyrighted material without permission from the copyright holder. This can potentially apply to downloading YouTube videos in certain circumstances. Here’s an overview of how fair use may relate to YouTube video downloads:
Fair Use Factor
Application to YouTube Downloads
Purpose and character of use
Educational, research, commentary, or transformative uses are more likely to be considered fair use
Nature of copyrighted work
Using factual content is more likely to be fair use than using highly creative works
Amount and substantiality used
Using small portions or clips is more favorable for fair use than downloading entire videos
Effect on potential market
Downloads that don’t negatively impact the original video’s market are more likely to be fair use
Fair use is a complex legal doctrine that is determined on a case-by-case basis. When considering fair use for YouTube downloads:
Educational and research purposes are generally viewed more favorably. For instance, a teacher downloading a short clip to use in a classroom presentation may have a stronger fair use argument than someone downloading full videos for entertainment 1.
The transformative nature of the use is important. If you’re downloading a video to create a critique, parody, or commentary that adds new meaning or expression, it’s more likely to be considered fair use 2.
Using smaller portions of videos, such as short clips, is more likely to fall under fair use than downloading entire videos 3. However, in some cases, using an entire work may be necessary and still qualify as fair use.
Consider the potential impact on the market for the original work. If your use doesn’t substitute for the need to view the original video on YouTube, it’s more likely to be considered fair use 4.
It’s crucial to note that fair use is an affirmative defense, meaning it’s used to defend against claims of copyright infringement rather than a blanket permission to use copyrighted material 2. The burden of proving fair use falls on the person claiming it.
While fair use can provide a legal basis for downloading YouTube videos in certain situations, it’s not a guarantee. Each case is unique, and there are no hard and fast rules. When in doubt, it’s best to seek permission from the copyright holder or consult with a legal professional.
Screen capture as an alternative to illegal downloads
Screen capture and recording tools can potentially strengthen fair use arguments by allowing users to limit the amount and substantiality of copyrighted content used.
By capturing only specific portions or brief clips of videos, users may be more likely to fall within fair use guidelines. For example, taking a screenshot of a single frame for commentary or criticism purposes uses far less of the original work than downloading the entire video 1.
Similarly, recording short segments for educational use or analysis could be seen as more transformative than reproducing full videos 2.
The “amount and substantiality” factor is one of the four key considerations in fair use determinations 1. By using screen capture tools to extract only the minimum necessary content, users can potentially bolster their fair use position.
However, it’s crucial to note that fair use is determined on a case-by-case basis, considering all four factors holistically 2. Even small portions could be problematic if they constitute the “heart” of the work. Users should carefully consider their specific use case and consult legal experts when uncertain about copyright implications 34.
Best screen capture tools for capturing YouTube videos
Several screen capture tools can be used to record YouTube videos, though it’s important to note that this should only be done in compliance with copyright laws and fair use principles. Some popular options include:
Snagit: This versatile tool offers both screenshot and screen recording capabilities, with features like scrolling capture and video trimming. It’s available for both Windows and Mac, making it a flexible choice for various users 1.
CleanShot X: Designed specifically for Mac, CleanShot X provides a range of capture options, including full screen, selected area, and specific window recording. It also offers cloud uploading for easy sharing 2.
Lightshot: A lightweight and user-friendly option, Lightshot allows for quick captures of selected areas. While primarily a screenshot tool, its simplicity and cross-platform availability (Windows and Mac) make it popular among users 3.
macOS built-in tools: Mac users can utilize the native screenshot and screen recording features. By pressing Command + Shift + 5, users can access a variety of capture options, including video recording of selected areas or specific windows 4.
When using these tools, it’s crucial to consider fair use guidelines. Capturing only the necessary portions of a video and using the content for purposes such as commentary, criticism, or education is more likely to fall under fair use.
However, users should always be cautious and respect copyright laws when capturing and using content from YouTube or any other source 56.
TechSmith is the market leader in screen capture software and productivity solutions for daily in-person, remote, or hybrid workplace communication and customer-facing image and video content. Our award-winning flagship products, Snagit, Camtasia, and Audiate, empower anyone to create remarkable videos and images that share knowledge for better training, tutorials, and everyday communication.
In social media and online entertainment, video gaming content reigns supreme. Platforms like Twitch and YouTube showcase stellar gameplay alongside polished, engaging, and narrative-rich content that you can only craft with skillful YouTube video editing. If you need a professional video editor with years of experience, convenient screen recording and video editing software like Camtasia can help boost video quality quickly and easily.
So, what do YouTubers use to edit their content? Let’s discuss how using Camtasia has evolved the video production process and impacted growing YouTube channels.
Stardom awaits!
Camtasia is the perfect way to create exciting content for YouTube, TikTok, Instagram, and more!
Camtasia allows YouTubers to take their content to the next level without spending countless hours learning complex editing software. As a creator, it’s all about efficiency. With so many other responsibilities, you can only afford to spend as much time as necessary on the editing process.
Camtasia streamlines the workflow and allows you to experiment and grow your skills as a content creator without overwhelming you with the extensive features that more advanced software might have.
Focusing and experimenting with ideas
A YouTube video starts with an idea. To organize your ideas, we recommend keeping track of different video games in your niche, your ideas for exciting video game tutorials and gameplay footage, and your rating on how difficult it would be to make a video on them.
Finding that sweet spot where what you want to make attracts an audience can be challenging, but this process can help. Then, take those thoughts and start on your video script.
Writing a script and workflow optimization
Having a plan and a script is vital. By creating a script template, you can speed up the process tremendously. The script is the backbone of YouTube videos, guiding you through the recording and editing phase. As you work through the script, continue to fine-tune your video idea and think about what the video thumbnail should look like.
Using Camtasia’s features and recording
The next step is to open a new Camtasia project immediately and title it. By working on the beginning of your video early on—even before you start recording—you can help determine its style and pace.
Then, it’s time to record! If you’re going to record a no-facecam video without a webcam, record gameplay footage and then use Camtasia’s voiceover narration tool to create an audio recording on the back end. The process changes a bit if you show your facecam footage in the video.
For Mac users, we recommend recording yourself through your iPhone, which automatically connects with a Mac, and Camtasia then will record audio and video simultaneously. Feel free to add color filters to your facecam through Camtasia to make the lights or scenery in your background pop.
Many YouTubers use the free screen recorder and open-source tool OBS Studios to record game footage. Then, you can go into the game, get a collection of video clips, import those into Camtasia, snip them, and edit them the way you want for your finished YouTube video.
This might be a different process for someone with a PC or Android phone using a different operating system like Windows 10 to screencast and record. You can’t edit on OBS, and the software is highly complicated, so using it for the raw video capture file and the MP4 you need and then uploading those into Camtasia is a solid solution.
The easiest way to edit videos
Stop wasting time and discover how Camtasia makes creating incredible videos easier than ever.
Overcoming time constraints and striving for social proof
For a YouTuber, time is always a challenge. You may always ask yourself, “What’s the most useful thing I can do with the time I have for my YouTube channel?” The solution is to make the whole process standardized as much as possible.
With Camtasia, you can create a library of assets to represent your visual brand in every video. From different arrows that come up on the screen to sound effects to textiles, saving branded assets in Camtasia in your assets library so they can easily move from project to project can save you a ton of time.
Another big hurdle YouTubers face is coming up with new content regularly. There’s a lot of pressure to keep up a consistent uploading schedule, especially early on in a YouTube career.
However, the biggest challenge is establishing social proof. If you’re just starting out and only have a small amount of subscribers and video views, people might automatically disqualify your video. You need to build your credibility in other ways in the beginning.
With good video editing through Camtasia, you can give yourself an element of social proof to make yourself look more professional or more prominent than you are. How you add transitions or do your cuts—all these little subtle things you can do can help make your videos stand out and make you look like you know what you’re doing. Eventually, you’ll get those subscribers and those views.
Tips and tricks for content editing with Camtasia
You need to have a few Camtasia video editing tricks under your belt. As previously stated, we recommend building a library of elements outside the software, such as Canva for custom arrows, watermarks, intros, outros, and other visual aids, and then importing them into Camtasia, saving you time on repetitive tasks.
Leveraging Camtasia’s behaviors and animations and understanding how and when to use them can also drastically improve the professional look of your content. Camtasia has predefined animations where you can automatically zoom in on stuff, but the custom animations are slightly more flexible if you’re recording yourself. You can use custom animations to zoom in on your video gradually. It’s a very subtle movement that brings people in.
On the other hand, behaviors are a great way to add words, annotations, subtitles, and screenshots that pop out in your videos. One example is taking a screenshot of your video game recording with Snagit and copying and pasting it into Camtasia to add a behavior to make it more active and engaging.
Lastly, investing in a high-quality external hard drive for storage and a good lighting setup is invaluable for maintaining a smooth editing experience. Camtasia video project files can be large, so when you’re done with your Camtasia project, make sure to zip it up so it keeps the project intact, save it on an external hard drive, and then you can get rid of all the other video files on your computer. This can help you save a ton of storage space.
Stardom awaits!
Camtasia is the perfect way to create exciting content for YouTube, TikTok, Instagram, and more!
When you have your finished file, it’s time to optimize and upload your video. The first step is keyword research. Do a quick Google search to see what your audience is searching for and integrate those keywords into your video titles, video descriptions, and tags.
It’s essential to stay on top of industry trends and popular searches within the gaming space—it’s a fast-moving, saturated market, and staying ahead can give you a significant advantage.
Impact on content quality and audience engagement
The polished look Camtasia gives YouTube videos makes them more professional-looking and engaging. Gaming is all about visuals; every second counts in a space where attention is the ultimate currency.
Camtasia allows YouTubers to keep the audience’s attention with a visually stimulating presentation. Higher-quality videos see increased watch time and higher interaction rates.
With help from Camtasia’s full-screen capture and video editing software, you can confidently create video tutorials that are insightful and compelling from start to finish.
Comparing other video editing apps
There are numerous video editing programs available for YouTubers to experiment with. We’ve broken down the pros and cons of some of the top programs, so you don’t have to.
Apple iMovie
Pros
User-Friendly: Extremely intuitive interface, making it ideal for beginners
Free for Apple Users: Comes pre-installed on Mac OS
Efficient: Offers robust performance without a steep learning curve
Cons
Limited Editing Features: Less advanced editing capabilities compared to professional software
Mac-Only: Not available for Windows users
Final Cut Pro / Final Cut Pro X
Pros
Professional Quality: High-end editing capabilities suitable for professional content creators
Optimized for Mac: Smooth performance and fast rendering times on Apple hardware
Powerful Tools: Advanced features like multi-cam editing, motion graphics, and color correction
Cons
Expensive: High upfront costs might be prohibitive for some users
Mac-Only: Exclusively available for Mac users
Adobe Premiere Pro
Pros
Industry Standard: Widely used in the professional film industry
Cross-Platform: Available on both Mac and Microsoft Windows
Extensive Features: Comprehensive toolset for color grading, special effects, and audio editing
Cons
Steep Learning Curve: Can be challenging for beginners
Subscription-Based: Requires a monthly or annual Creative Cloud subscription
DaVinci Resolve
Pros
Professional Color Grading: Unparalleled color correction and grading tools
Free Version Available: Offers a robust free version with plenty of features
Cross-Platform Compatibility: Available for Mac, Windows, and Linux
Cons
Complex Interface: May be overwhelming for less experienced users
Resource-Intensive: Requires a powerful computer for smooth operation
Adobe Premiere Rush
Pros
User-Friendly: Simplified version of Premiere Pro, perfect for quick edits
Mobile App: Edit on the go with its mobile application
Cross-Platform: Available on Mac, Windows, iOS, and Android
Cons
Limited Features: Not as feature-rich as Premiere Pro
Subscription Costs: Requires an Adobe subscription
Lightworks
Pros
High-Quality Tools: Professional-grade video editing capabilities
Multi-Platform: Available on Mac, Windows, and Linux
Free Version: Offers a free version with essential features
Cons
Complexity: Steep learning curve, not ideal for beginners
Export Limitations: The free version has restrictions on export video formats and resolutions
PowerDirector
Pros
User-Friendly: Intuitive interface suitable for both beginners and advanced users
Fast Rendering: Efficient performance with quick rendering speeds
Affordably Priced: More budget-friendly than some competitors
Cons
Windows-Only: Limited to Windows users
Occasional Bugs: Some users report instability issues
ShotCut
Pros
Open Source: Completely free to use without any subscription or license fees
Cross-Platform: Available on Windows, Mac, and Linux
Advanced Features: Offers features like video transitions, audio filters, and a multi-track timeline for extensive editing
Cons
User Interface: Can be less intuitive and polished compared to other paid software
Learning Curve: It may require some time to master all features and functions
Filmora
Pros
Easy to Use: Simple, user-friendly interface makes it accessible for beginners
Affordable: Reasonably priced with various plans available
Built-In Effects: Comes with numerous presets and effects for creative editing
Cons
Limited Advanced Features: May not meet the needs of professional editors
Watermark in Free Version: Adds a watermark in the free version unless upgraded
Adobe After Effects
Pros
Advanced Effects: Industry-leading motion graphics and visual effects tools
Integration: Seamlessly integrates with other Adobe apps like Premiere Pro
Versatile: Ideal for creating animations, titles, and complex effects
Cons
High Learning Curve: Requires significant time to master
Subscription-Based: Continuous payment is required for use
In conclusion, each video editing software has strengths and weaknesses, catering to different needs and skill levels. For YouTubers who prioritize ease of use and integrated screen recording capabilities, Camtasia is a top choice.
Taking the leap into content creation
If you’re a beginner wanting to enter the video game content creation space, our advice is to jump in and start recording and experimenting with computer screen recording tools. The best way to learn is by doing, and beginning with Camtasia can make the process far less intimidating than working with more complex software.
Don’t be afraid to make those first few videos that might not be perfect—each one helps you become a better content creator. There’s less of a learning curve with Camtasia than with another video editing tool. It’s a lot easier to grow in Camtasia than it would be to grow with other software.
User-friendly recording options like Camtasia can enhance your content, but your unique voice and ideas will genuinely capture an audience. Happy creating!
The easiest way to edit videos
Stop wasting time and discover how Camtasia makes creating incredible videos easier than ever.
TechSmith is the market leader in screen capture software and productivity solutions for daily in-person, remote, or hybrid workplace communication and customer-facing image and video content. Our award-winning flagship products, Snagit, Camtasia, and Audiate, empower anyone to create remarkable videos and images that share knowledge for better training, tutorials, and everyday communication.
OBS Studio, while celebrated for its capabilities in live streaming and screen recording, lacks built-in video editing features, necessitating the use of external tools such as DaVinci Resolve, Shotcut, or Adobe Premiere Pro for tasks like trimming, adding effects, and refining recordings to a professional standard.
OBS editing capabilities
OBS Studio, while powerful for live streaming and screen recording, has inherent limitations when it comes to video editing capabilities. The software is designed primarily for capturing and broadcasting content in real-time, rather than for post-production work. 12 As a result, OBS lacks built-in features for tasks such as trimming footage, adding complex effects, or creating polished final products. Users looking to edit their OBS recordings will find that the software’s functionality is focused almost exclusively on the capture and streaming process. 3 This specialization allows OBS to excel in its primary role, offering high-quality video and audio recording from multiple sources, but it means that post-production editing is beyond its scope. For those requiring more extensive editing capabilities, it’s necessary to look beyond OBS’s native features to complete their projects.
While OBS Studio doesn’t have built-in video editing capabilities, several plugins can help streamline the recording process and reduce the need for extensive post-production editing. The Source Clone plugin allows users to create multiple instances of a single source, enabling real-time adjustments without affecting the original 1. This can be particularly useful for applying different filters or effects to the same source during live recording.
For those looking to enhance their recordings with interactive elements, plugins like Live Polls and Pixel Art can add engaging visual content directly within OBS 2. The Local Vocal plugin offers seamless live transcriptions, which can eliminate the need for adding captions in post-production 2.
Additionally, the Ashmanix Countdown Timer and OBS Graphics Clocks plugins provide customizable on-screen timers and clocks, reducing the need for adding these elements during editing 2. While these plugins don’t replace full video editing software, they can significantly reduce the amount of post-production work required by incorporating many desired elements directly into the live recording.
Post-production editing can significantly enhance OBS recordings, making them more engaging and professional. Here’s a list of recommended features and editing actions to improve your content:
Audio enhancements
Clean up background noise
Adjust volume levels for consistency
Add background music or sound effects
Balance audio between different sources (e.g., voice and game audio)
Visual improvements
Add dynamic captions or subtitles
Highlight cursor movements for tutorials
Implement screen zooming to focus on important areas
Incorporate annotations to clarify points
Insert animations to maintain viewer interest
Use custom cursor designs for visual appeal
Engagement boosters
Create intro and outro sequences
Add lower thirds for information display
Implement picture-in-picture effects
Insert transitions between scenes or segments
Include progress bars or timers for time-sensitive content
Content organization
Trim unnecessary footage
Rearrange clips for better flow
Split screen to show multiple perspectives
Add chapters or timestamps for easy navigation
Visual enhancements
Color correction and grading
Apply visual effects or filters
Add overlays or watermarks
Implement green screen effects
Accessibility features
Add closed captions
Implement audio descriptions for visually impaired viewers
Ensure proper contrast for text elements
By focusing on these post-production elements, you can create more polished and professional recordings that keep your audience captivated and coming back for more. Remember to tailor these enhancements to your specific content type and audience preferences for maximum impact.
Avoid online products when editing OBS videos to retain quality
When editing high frame rate OBS recordings, it’s crucial to consider the potential impact of online video editors on video quality. While these platforms offer convenience, many compress uploaded videos to facilitate smoother online editing, which can be particularly detrimental for high-quality OBS recordings.
Popular online editors like Kapwing and FlexClip, for instance, may automatically compress videos upon import to reduce file size and improve loading times 1. This compression can result in a noticeable loss of quality, especially for high frame rate or high-resolution content.
Similarly, YouTube’s built-in editor, while convenient for quick edits, applies its own compression algorithms that may further reduce video quality 2. Even professional-grade online platforms like Adobe Creative Cloud Express can introduce some level of compression during the upload process.
For projects where maintaining the highest possible quality is paramount, local editing software remains the preferred choice. These applications allow direct manipulation of the original OBS recordings without the need for initial compression. However, if online editing is necessary, it’s advisable to carefully review the platform’s specifications regarding file size limits and supported formats to minimize quality loss 12.
These tools provide robust editing capabilities for OBS recordings without the quality loss associated with online editors. They allow users to work directly with high frame rate and high-resolution files, preserving the original quality of OBS captures throughout the editing process.
Here is a list of recommended paid desktop video editors for OBS recordings, with Camtasia listed first and considering the previously mentioned features:
Camtasia
Specializes in screen recording and video tutorials
Offers a wide range of built-in assets like animations and transitions
Includes features for cursor effects and zoom-n-pan
Provides audio editing tools and voice narration capabilities
Supports interactive quizzes and closed captions
Available for Windows and macOS
Adobe Premiere Pro
Professional-grade video editing software with a comprehensive feature set
Offers advanced color correction and audio mixing tools
Includes motion graphics templates and visual effects
Supports multi-camera editing and VR video editing
Integrates seamlessly with other Adobe Creative Cloud apps
These paid desktop video editors offer robust features that align with the previously mentioned editing enhancements, including audio improvements, visual effects, engagement boosters, and content organization tools. They provide professional-grade capabilities for editing high-quality OBS recordings without compromising on video quality or frame rates. 1234
Camtasia offers powerful features for editing OBS recordings, making it an excellent choice for post-production work on screen captures and tutorials. Here’s how to edit OBS videos with Camtasia, along with some key features:
Importing OBS recordings
Rename the OBS file extension from .mkv to .mp4 before importing into Camtasia. 1
Camtasia supports direct import of the renamed files without quality loss.
Cursor effects
If OBS recording doesn’t include cursor footage, Camtasia allows adding custom cursors. 2
Options include highlighting clicks, customizing cursor appearance, and adding cursor paths.
4K video support
Camtasia can edit and produce 4K resolution videos (3840×2160). 3
Supports frame rates up to 60 fps for smooth high-quality output. 4
Screen recording-specific features
Zoom-n-pan effects to focus on specific screen areas.
Callouts and annotations to highlight important information.
Transition effects designed for seamless cuts between screen captures.
Audio enhancements
Noise removal to clean up background sounds.
Audio leveling for consistent volume across clips.
Voice narration tools for adding commentary.
Visual improvements
Color correction and filters to enhance video appearance.
Green screen effects for removing backgrounds.
Motion graphics and animations to add visual interest.
Engagement tools
Interactive quizzes to boost viewer participation.
Closed captioning for accessibility.
Customizable intro and outro sequences.
Efficient editing
Multi-track timeline for complex edits.
Ripple editing to easily adjust clip durations.
Library of assets including music, sound effects, and graphics. 2
Export options
Multiple format choices including MP4, AVI, and WMV.
Customizable export settings for resolution and quality.
Direct upload to platforms like YouTube and Vimeo.
By leveraging these features, Camtasia provides a comprehensive toolkit for transforming OBS recordings into polished, professional-quality videos suitable for tutorials, presentations, and other screen-based content.
TechSmith is the market leader in screen capture software and productivity solutions for daily in-person, remote, or hybrid workplace communication and customer-facing image and video content. Our award-winning flagship products, Snagit, Camtasia, and Audiate, empower anyone to create remarkable videos and images that share knowledge for better training, tutorials, and everyday communication.
A screenshot, sometimes referred to as a screencap or screengrab, is an image that shows the contents of a computer screen. These captures let you snip exactly what you see on your screen and are often shared with others or used as a reference point later on.
But how can a simple picture of your screen be so vital? Well, screen captures often act as an artifact. They serve as a way to prove to others that you are seeing the crazy stuff you’re seeing.
Not only do they help you share visuals, but they also help you archive the past. For example, they can help you capture what a website looked like before the latest brand refresh, that weird error message you got a couple of months ago, or even a juicy gossip article you don’t want to forget.
The best snipping tool for Windows and Mac
Don’t let clumsy built-in tools hold you back. Take and edit screenshots with Snagit!
Screen captures are useful in countless ways. For example, you could use them to break up long Word Docs and add context to PowerPoint presentations.
If we were to list every way you can use captures in your day-to-day, this article would be much, much longer. No matter how long a web page is, with the advanced screenshotting tools of TechSmith’s Snagit, you can capture a page as long as your arm with just one scrolling screenshot.
However, screen snips are more than just handy tools. They provide a revolutionary way to get more work done faster. A picture is worth a thousand words, after all!
3 ways screenshots can help you get more work done faster
1. Collaborate with others
Does your coworker want your thoughts on a new webpage they’ve created? Or do they need you to look over a brochure they’re having printed? Instead of writing a lengthy email detailing your edits, you can take a screenshot to provide efficient feedback.
With Snagit’s easy-to-use features, you can leave feedback on virtually anything. Use Callouts, Stamps, and other advanced features to share your thoughts! This makes it easy for anyone to illustrate their ideas.
Editing a screen capture to mark up design concepts onscreen is faster and more effective than writing a wordy email
2. Demonstrate how to perform a function
Why tell someone how to do something when you can show them?
You can easily demonstrate a process with images. Since a capture is a more accurate way to show exactly what you mean, there’s less chance you’ll be misunderstood. Less confusion means less time wasted explaining, and more time for you to focus on what’s important.
Let’s say you want to show a new employee how to log into a platform. You could schedule a Zoom call to walk them through the process, but a quick screenshot will save everyone some time.
Once you’ve taken your capture, use annotations and other editing tools to help the other person understand what they’re looking at. Snagit’s Step Tool makes it super simple to indicate the steps of a process.
A screenshot with numbered steps is quick to make and easy to understand
Using images or recordings to show a process is incredibly efficient. Do you get the same question a lot or are the go-to for a specific function? You can send the same file multiple times instead of repeating it yourself.
Plus, people can refer back to the content if they forget something instead of asking you again.
3. Show exactly what’s happening
If you’ve ever contacted your IT or Web Support Team to report a bug, you’ve likely been asked to provide a screenshot. That’s because not everyone’s computer is the same.
Depending on your machine, the operating system, and the browser you use, the way something looks for you could be completely different for someone else.
Providing a visual example of what you’re looking at helps others see exactly what’s going on and, in this case, identify what could be going wrong.
A screenshot of an error message helps avoid confusion by showing someone exactly what you’re seeing
You should say: “A screenshot.” The use of “a” or “an” before a noun (at least in English) depends on the sound that follows. The fact that the word “Screenshot” starts with a consonant means that “a” is the right article to use.
What is the definition of a screenshot?
The definition of a screenshot — also known as a screen grab or screen capture — is an image that captures the current display on a computer, phone, or any other digital device. No matter the different words, they all refer to a snapshot of the same information shown on the screen at a specific time.
Screengrab vs screenshot, what’s the difference?
Despite what they’re called, screengrabs and screenshots are essentially the same thing: an image that captures the screen of your computer, phone, or digital device at any given moment.
What are screenshots used for?
Screenshots have lots of different uses. They can be used to capture and share error messages for troubleshooting and save memorable moments from a video or game. Or, provide step-by-step guides and tutorials and to document important information that can’t be easily saved in other ways.
Essentially, what screenshots are used for is to capture a visual record of the contents on a screen at a specific moment.
What happens when you take a screenshot?
When you take a screenshot on a phone, tablet, or computer, your device captures a static image of whatever is currently showing on your screen. This image is then saved to your device, usually in a dedicated folder. Once it’s saved, it can be viewed, shared, or edited — just like any other photo or image. This is what happens when you take a screenshot on most computers, phones, or other digital devices.
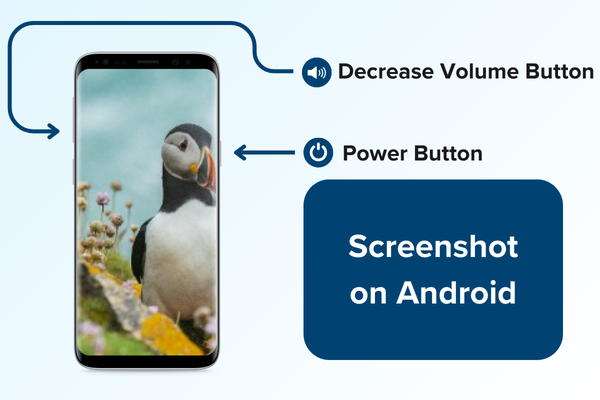
How do I take a screenshot on Windows?
Depending on your hardware, press the Print screen key or Windows key to capture screenshots with the Snipping tool. Then, drag the crosshairs to select a part of the screen you want to capture.
How to take a screenshot on Mac?
Press the command shift 3 buttons at the same time to capture your entire screen with a keyboard shortcut. Your capture will automatically save to your desktop.
Do you often need to save or share what you see on your computer screen? While mobile and desktop operating systems offer basic screen capture tools built-in, most have limited functionality.
Do you find that the built-in tools on your devices don’t offer as many functions as you’d like?
That is why there are also third-party apps, like Snagit. Snagit is the perfect tool for people who take lots of screenshots and need more robust tools than the ones built into their devices.
In this blog post, we’ll show you how to take a screenshot on both Mac and Windows! We’ll be using built-in tools like the Windows Snipping Tool and third-party programs like Snagit.
The best snipping tool for Windows and Mac
Don’t let clumsy built-in tools hold you back. Take and edit screenshots with Snagit!
To capture the entire screen, simply press the Print Screen button (PrtSc). This will copy the screenshot to your clipboard. You can then open any program that allows you to insert images, such as Paint, Microsoft Word, or PowerPoint, and paste the screenshot by pressing Ctrl-V.
The downside to this capture is that it screenshots everything you can see on your monitor.
If you only want to capture the window you currently have open, you can hold down the PrtSc button at the same time as the Windows key Alt.
Capture parts of the screen on Windows
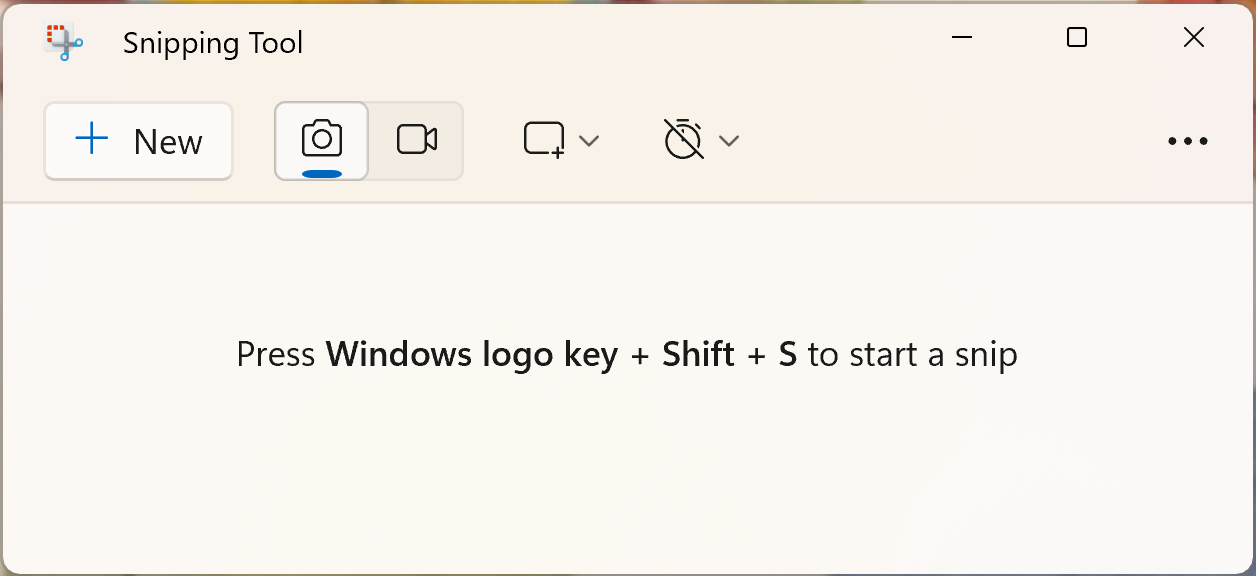
The Snipping Tool (available on Windows 7 and later versions) allows you to select the area of the screen you want to capture, as well as add notes and save the image in different formats.
You can open the Snipping Tool by searching for it in the toolbar search. Use the Windows-S shortcut to open Windows search and type in Snipping Tool.
Just follow the instructions, and take as many screenshots as you need!
How to take a screenshot on Mac
These methods work with versions of macOS–10.10 (Yosemite) or higher.
Press the Shift+Cmd+3 to screenshot your full screen.
Next, you can either click on the preview that appears in the corner of your screen or open the capture from your desktop to edit and/or share it.
Capture parts of the screen on Mac
Shift+Cmd+4 turns your mouse into crosshairs. From there, you can select a specific window or drag and drop the crosshairs, selecting the area you’d like to capture.
To capture a screenshot on a Mac, press Shift+Cmd+5 simultaneously to open the screenshot tool.
With the screenshot tool open, you’ll notice several new options for taking different types of screen captures, including recording the entire screen and recording a portion of the screen.
Expert Tip: If your MacBook has a Touch Bar, you can capture it in your capture by pressing Shift+Cmd+6.
To copy a capture of your entire screen to your clipboard you need to press Shift+Cmd+Ctrl+3 at the same time.
How to take a screenshot on Chromebook
Press the screenshot key to take your capture.
Without a screenshot key, press Shift + Ctrl + Show (the key that looks like a rectangle beside two vertical lines) or Shift + Ctrl + F5 if you do not have the Show key.
Your capture is saved to your downloads folder. To access it, open your launcher and click on Files, My Files, and Downloads.
How to take a screenshot on iPad
Without a home button: Press the power and one of the two volume buttons at the same time.
With a home button: Press the home and power buttons simultaneously.
Either way, your screenshot appears in the bottom left corner of your screen and is saved in your pictures app.
How to take a screenshot on iPhone
Without a home button: Press the power and volume up buttons at the same time.
With a home button: Press the home and power buttons simultaneously.
With either method, your screenshot appears in the bottom left corner of your screen and is saved in your pictures app.
How to take a screenshot on Android
Press the volume down and power buttons at the same time.
Your capture will be saved to your photo library.
Screen capture using Snagit
With Snagit, you have way more possibilities for capture. The software offers precise capture, image editing, free cloud-sharing, and so much more.
Step 1: Open the capture window
Open Snagit from your menu. If you’re in the Snagit editor, click the Capture button in the toolbar to bring up the Capture window.
Click the Capture button on any tab in the Capture window to start your screen capture. You can also start a capture by using the keyboard shortcut Shift+Cmd+3 or PrtSc keys.
Step 4: Click and drag the crosshairs to select parts of your screen
Your capture is automatically saved in the Snagit library. Use Snagit and Screencast’s Share Link feature to share your screenshot with anyone!
No matter which method you choose, taking a screenshot should be fast and convenient for you.
Annotate and edit screenshots with Snagit
Professional mark-up tools and powerful features make it easy to create helpful images.
Ever wondered what it’s like to experience a viral moment firsthand? Or perhaps you’ve simply wanted to share your unique perspective on a piece of content. That’s where reaction videos come in.
These clips, where people share their real reactions to something new, have become a key part of online entertainment. Although they originated on Youtube, reaction videos today extend far beyond Youtube reaction videos and can now be found across nearly every social platform. With the right tools and a touch of creativity, anyone can create their own captivating reaction video and connect with a global audience.
What is a reaction video?
A reaction video (or react video) is a type of video where one or more people record themselves watching or listening to a piece of original content for the first time. The purpose of the video is to capture their thoughts and emotions in real time, so the audience can see people react to the content as it plays. These are often hosted on YouTube, and some creators have even made an entire YouTube channel from reaction videos alone.
Anything can be the focus of a reaction video, but here is a list of some common content types:
Movie trailers
Songs
Music videos
Video game gameplay
Fail videos
Funny videos
Television
Opening gifts
Commercials
Reactions to current events
Gender reveal videos
Unique uses for your reaction videos
Reaction videos are not just for entertainment. They can be added into professional and academic realms too.
Reaction videos can help generate ideas and share perceptions of what the original creator has posted. They can be used by marketing to get reactions to marketing strategies and create buzz about new announcements and products.
Teachers can use reaction videos to help provide feedback on assignments and spark student brainstorming sessions, collaboration, and engagement. This is also a fun way to get quieter students to break out of their shell.
Why create your own reaction video?
Reaction videos are a very popular genre of internet media and are likely to be a mainstay of content creation. TechSmith products make it easy to record your reactions and even incorporate screen recordings to share them with the world. Here are the leading reasons why you should create your own:
Viewers love them
Reaction videos became an internet sensation in 2007. But this fad didn’t fade. They have since become an internet mainstay and are so popular that countless content creators have dedicated their entire channel and brand to exclusively producing reaction videos. The REACT! YouTube channel has more than 20 million subscribers.
Tara Purswani calls reaction videos “the secret sauce for getting more views, attracting more followers, and boosting engagement.”
If utilized properly, reaction videos can help you gain subscribers, publish great content, and express yourself.
Nostalgia
A twist ending of a movie
A buzzer-beating shot
Meeting your puppy
Discovering a new song
These are first experiences that can only be lived once. However, reaction videos are the closest someone can get to reliving an experience. The viewer gets to relive the shock or joy of that first experience through someone else’s eyes. Reaction videos offer the audience a chance to reminisce on their own life experiences.
Community
Have you ever shown a friend or family member a funny clip and waited for their reaction? Why do we do that? It is about social connection.
Reaction videos create social bonds through a shared emotional experience with people they might never encounter otherwise. Also, a video’s comment section allows the audience to engage with each other and connect over discussing the original content and the creator’s reaction.
Discovery
Reaction videos are a great way to introduce viewers to content they might not normally consume.
Reaction videos are really interesting to me because they tap into the archival capacity of the internet.
Content that was once forgotten or lost is being reintroduced to society through reaction videos.
They are also a great way for viewers to discover alternative interpretations and engage with new perspectives. The audience gets to see how people from other generations, cultures, and economic classes may view content differently or similarly to their own views.
They’re fun!
Reaction videos are great entertainment. If you are having fun while creating your reaction video, your audience will too.
What makes a reaction video successful?
The success of your video is solely dependent on the personal goals and ambitions you set. It is completely subjective. Some content creators gauge success on analytics like views, watch time, replays, and likes. Others just want to create fun and engaging content.
Choose your content wisely
Pick something that will keep your viewers engaged. Consider your video’s purpose and how you’ll measure success.
Write a catchy title
Your title should be informative and grab attention, enticing viewers to click.
Be bold and expressive
Let your personality shine through. Your genuine reactions are what viewers want to see.
Be transparent and genuine
Don’t overthink your reactions. Let your natural emotions flow.
Use contrasts to your advantage
A reaction to an aria in a beautiful opera will surely differ from seeing Rachael Gunn’s (aka Raygun) breakdancing performance in the Paris Olympics for the first time.
Consider what your audience may expect. Play around with making your reaction contrast the content to see if that works for you.
Be creative. Try to surprise the viewer to keep them interested. Once your video becomes predictable, it may become boring.
Keep it concise
The length of your video should generally match the length of the original content.
Prioritize good sound
Edit out unwanted noise and filler words for a professional feel. Any recording will naturally have unwanted pauses and blemishes that Camtasia Audiate can fix. TechSmith’s Camtasia Audiate makes editing audio easier than ever. It will improve the quality of your project drastically by removing unwanted pauses and filler words (like um and uh), reducing background noise, dampening plosive sounds, and so much more.
Polish your recording
Use Camtasia to make edits and improve the quality of your project. Try adding emphasis with close-ups. Add text. Highlight key words. Add dynamic captions. Edit the cursor path and cursor effects. The Camtasia tutorials library offers many tutorialvideos and articles to help you make desired changes.
Also, use Camtasia Assets to your advantage. Add stamps, backgrounds, or templates to your project. TechSmith offers many starter assets for free. Full access to the Camtasia Access library can be gained with an annual subscription or is included with Camtasia Pro.
Stardom awaits!
Camtasia is the perfect way to create exciting content for YouTube, TikTok, Instagram, and more!
To make the most of your reaction video, start by outlining your goals, approach, and optimal screen layout. Many reaction videos show the original content being played in a large window on the screen, so the audience can watch and listen to the content along with you and better understand your reactions.
Most creators display their image to the side or in a smaller window, known as picture-in-picture video recording. However, other reaction videos focus solely on the person reacting. Camtasia Rev helps you choose your desired format accordingly before getting started.
Also, consider pauses for dramatic effect to discuss your thoughts. This is a normal practice in reaction videos. It ensures that you (or the audience) don’t miss anything while you are expressing your thoughts.
It might be helpful to predetermine whether you’d like to do this, but you can also just decide in the moment. A little planning helps, but remember that a great reaction video is about letting what happens happen.
Step 2: Nail your intro
An introduction is a great way to lead into the content naturally and build audience anticipation. Before jumping in, consider describing the content you will be reviewing to your audience, your expectations, the reasons you chose this particular video or song, and some background information for context.
Avoid the temptation to completely script this because it won’t feel natural. Jot down a few notes so you can start your video with confidence, then move on.
Step 3: Hit the record button and leverage AI with Camtasia Rev
Camtasia is the best screen recorder and video editor to create your reaction video. The Camtasia Rev workflow makes it simple to format, style, add custom effects, and apply backgrounds to create engaging content. And it only takes a few clicks of the mouse. This will significantly cut down editing time, so you have a professional-looking, polished video right after recording.
Camtasia really, for me, is the easiest, most efficient way for me to do reaction videos. Without Camtasia, I don’t think I would be doing reactions at this level.
Once you’ve created your reaction video, it’s time to share it with the world. Camtasia’s versatile export and share options make it easy to not only share videos on YouTube but also to repurpose your content for various platforms.
You can choose from a variety of file types and sizes, ensuring your video is optimized for different social media platforms, websites, and devices. Whether you want to share your reaction on YouTube, TikTok, Instagram, Facebook, or Twitter, Camtasia has you covered. This flexibility allows you to reach a wider audience and maximize the impact of your video.
Ready to create your own reaction videos with Camtasia?
So, what are you waiting for? With the power of TechSmith tools like Camtasia and Camtasia Audiate, creating your own reaction video has never been easier. Whether you’re a seasoned content creator or just starting out, the possibilities are endless once you start recording.
So grab your camera, choose your content, and let your personality shine. Remember, the most successful reaction videos are those that are authentic, engaging, and, above all, fun. You don’t need to create a viral video to successfully engage with an audience authentically. Happy creating! Download the free trial of Camtasia here.
Faster video creation with Rev
Make videos as easy as click, click, done! Camtasia Rev is so fast it’s like magic!
TechSmith is the market leader in screen capture software and productivity solutions for daily in-person, remote, or hybrid workplace communication and customer-facing image and video content. Our award-winning flagship products, Snagit, Camtasia, and Audiate, empower anyone to create remarkable videos and images that share knowledge for better training, tutorials, and everyday communication.
Are you struggling with choppy video playback while editing high-resolution videos? You’re not alone. Few things can be more tedious and time-consuming than constantly waiting for your video editor to become unstuck so you can continue editing your content. Fortunately, proxy videos can help alleviate issues surrounding video editing performance.
Proxy files are lightweight, low-resolution copies of your original video designed to help improve the editing experience in your chosen video editor.
Because of their smaller file size, you can edit these proxy videos with fewer hiccups than you might with your larger, high-resolution original recordings.
This guide will give you a greater understanding of proxy videos, including when to use them, how to create them, and some of the considerations to remember when working with them.
What is a proxy video?
Proxy videos improve editing performance because they are low-resolution and lighter copies of your original media; these less cumbersome files should be more suited to an editing environment than the original raw files.
Proxy files are often substitutes for high-resolution files from DSLR cameras, smartphones, and digital cameras, or screen recordings and other video files greater than 1920×1080 (including 2K and 4K videos).
Most video editing software has predetermined settings that ensure your media is the most efficient. This, in turn, will help ensure you don’t suffer from choppy or sluggish editing.
It’s important to note that proxy video files are typically specific to both the editor you’re using and the project it’s associated with.
Some video editing software will have proxy videos that stay with and follow the original media; this means you can load the raw files into a new project and shouldn’t need to go through the steps to proxy your video. TechSmith Camtasia allows you to use the same proxy media in multiple projects (so long as you don’t empty your Proxy Videos folder).
Why use proxy videos?
Proxy files being lower in resolution than the original files help ensure the smoothest editing experience in your video editor by temporarily sacrificing quality for speed.
Heavy video files, such as those from digital camcorders, DSLRs, HDR-enabled media, and 4K media, to name a few, aren’t well-suited to editing on their own, and that’s where proxy videos come into play.
Even media files loaded from cloud and/or network locations, while not recommended when you’re actively editing, are subject to being proxied (which means a duplicate version is created). In doing so, the performance will be improved while editing files from those locations.
Once your media has been proxied, most editors with proxy video features will temporarily substitute the proxy file for the original media, and your editing should be smoother.
With a smoother editing experience, you’ll be able to be a more efficient editor. You’ll spend more time editing and less time waiting on your computer while it works with the heavier video files.
What are some downsides to using proxied videos?
The benefits of proxied media outweigh the negatives, but there are a few things to keep in mind. A proxy video may appear blurry in your editor’s preview window, making it difficult to discern fine details.
Reading text is another example of something that may become difficult with proxied videos. In addition, you may not be able to see fine details on a person’s face, see colors as vibrant as the raw files, or, in some cases, the motion could become slightly blurred due to the lower resolution of the proxied video.
Additionally, proxy files take up a small amount of hard drive space. This can be a concern when using proxy files on systems with small primary hard drives or with projects stored in external locations. Because of this, most video editing software can manage the size of the Proxy Videos folder. Even though files are relatively small compared to the original videos, proxy files can still take up space, so space should be considered.
How do I know if my media has been proxied?
The telltale sign that your media has been proxied will most notably be seen in the preview window.
The heavier, more complex original media will be transcoded into a smaller, lower-resolution video that is far easier for most editors to work with. The tradeoff for the speed and efficiency of a proxy video is a temporary drop in visual quality.
It’s important to remember that proxied files are only low-resolution in your editor and should not affect the overall quality of your finalized video.
Some editors, such as TechSmith’s Camtasia, have an indicator icon on the video thumbnail. In Camtasia, a yellow dot is in the bottom right corner of your media’s thumbnail in the Media bin. This helps you quickly identify whether there is a problem with your source files or if it’s simply the side effect of being a proxy video.
How do I create a proxy video?
The creation of proxy videos will depend greatly on your chosen editing application.
Some editors, such as Adobe’s Premiere Pro, can create proxy files when you load them into your project. As soon as you import your media into the project, Adobe will start transcoding the original media into the lighter-weight proxy media format.
TechSmith’s Camtasia is similar in that it will detect whether your original media is high resolution, such as 2K, 4K. The process also begins whether it is a heavy video codec such as AVCHD or HEVC, or if it’s stored in a location that’s not recommended to edit from, such as external hard drives or cloud storage.
This method is called “ingesting” or “autoproxy” and can be helpful in streamlining the editing process. There are other methods of creating proxy files, though most will be unique to your preferred video editor.
Some tools, like Apple’s Final Cut Pro and TechSmith Camtasia, have right-click menu options that allow you to quickly select the option to create (or delete) a proxy file if one wasn’t already created.
The easiest way to edit videos
Stop wasting time and discover how Camtasia makes creating incredible videos easier than ever.
The only types of files you might consider proxying are video files (such as the MP4 and MOV extensions).
Can I use a proxy video in more than one editor?
Proxy files are typically unique or specific to the project with an editor; for example, TechSmith’s Camtasia proxy files are stored locally in a hidden system folder. They are not part of the project and can only be utilized properly within Camtasia.
Advanced Tip: Some editors may allow you to edit with a placeholder instead of the original media; if your editor supports this method, you can use a third-party utility like Handbrake to manually transcode a lighter, easier-to-work-with file and use that in place of your raw files.
My project looks blurry while editing. Will my final video look blurry, too?
No, it should not. Video editing software that uses proxy videos will do so only in the context of editing. Once you have finished editing and are ready to produce/render your final video, the software will use the original raw files instead of the proxy videos.
Advanced Tip: After you have produced your final version of your video and you no longer need to make changes to your project, you may want to delete the proxy file(s).
The video in the project’s preview window should then appear crisp, clean, and without any blurring; this should be a near-identical approximation of the quality you should receive in your final video (though results may vary depending on your production settings).
Proxy videos make your video editing experience smoother and less prone to performance issues. Proxy files are beneficial for projects containing high-resolution videos (such as 2K, 4K, and 8k resolutions), HDR-enabled videos, DSLR and smartphone movies, or large screen recordings. They are created by importing large videos into a project or created through options found in your video editing tool.
Finally, proxy files have a few inherent elements that may trip unsuspecting editors up: They are blurrier than the original media and take up additional space on the hard drive.
TechSmith is the market leader in screen capture software and productivity solutions for daily in-person, remote, or hybrid workplace communication and customer-facing image and video content. Our award-winning flagship products, Snagit, Camtasia, and Audiate, empower anyone to create remarkable videos and images that share knowledge for better training, tutorials, and everyday communication.
Should that pesky mouse cursor be included in your final video?
If you’re like me, this question is one of those finer details of video editing that is not at the forefront of your project planning. However, choosing how best to represent the mouse cursor adds a subtle but professional touch to your final video.
Why you might want to keep or remove the mouse cursor from videos
We have all heard the old saying, “Negative attention is still attention,” and we want to avoid that perception when it comes to our video projects.
In the age of utilizing video communication to create a visual representation of a subject matter, the mouse cursor is seemingly minor in the recording process. However, the same mouse cursor plays an essential role in the final video by either enhancing the steps for the viewer or, negatively, turning it into a distraction.
When creating a tutorial or step-by-step guide with our videos, we can take advantage of Camtasia by applying mouse click enhancements called Cursor Effects. These show the viewer where our clicks happen and allow the mouse cursor to stand out from the screen background. Camtasia 2024’s editing process makes editing easy by adding visual cues along the track for smoother editing.
With a Cursor Effect added, the visual for the viewer adds context to the mouse click, and you can see some of the options available with Camtasia 2024’s Cursor Effects:
Not every video needs a mouse cursor, and the mighty little arrow can detract from an otherwise flawless presentation. For example, you put some time and effort into creating an engaging PowerPoint presentation and record it to share. Then, you realize that the mouse cursor is hanging out on stage right, and it looks like amateur hour.
Tips for better screen recordings with or without a cursor
Some additional tips as you embark on your video editing journey:
Pro Tip 1
Plan your recording ahead of time. Create a Video Storyboard to prepare for your recording project.
Pro Tip 2
Use shortcuts to enhance the recording efficiency. Utilizing the shortcut options within Camtasia or applicable shortcuts within other programs will give you a cleaner recording.
Pro Tip 3
When possible use keyboards or touchpads during recording. Not all applications have shortcuts for all tasks. Most computer mice make a heavy click sound. This noise is often captured during recording and can distract the viewer.
Pro Tip 4
Practice makes perfect! Before you hit that record button, run a complete practice through your presentation in its entirety so that you do not fumble through the actual recording.
Can I remove the mouse cursor while creating the recording?
The Camtasia Recorder cannot remove the mouse cursor while the recording is in progress; this step must be done during the editing phase.
How can I remove the mouse cursor for Snagit videos?
Removing the mouse cursor is specific to Camtasia-created videos (.trec files) and does not apply to Snagit-created videos or videos created by non-TechSmith software.
What if I only want to hide the mouse in certain parts of my video?
You can remove the mouse cursor from a portion of your video by making that section of the video its own clip. This is done by splitting the video using the split feature. Once the part of the video you want to remove the cursor from is its own clip, you can then follow the steps to remove the cursor.
TechSmith is the market leader in screen capture software and productivity solutions for daily in-person, remote, or hybrid workplace communication and customer-facing image and video content. Our award-winning flagship products, Snagit, Camtasia, and Audiate, empower anyone to create remarkable videos and images that share knowledge for better training, tutorials, and everyday communication.
Almost everyone has a desire to make clean, professional video content, but must weigh how much time they spend on it. Thankfully, the days of having to rely on the restrictions of linear video or audio editing are behind us.
Instead of working with projects in a set sequence that restricts creativity and chews up valuable time, Camtasia’s non-linear editing (NLE) empowers flexibility.
You can use just what you need from a library of audio or video clips, utilizing the parts you need and discarding the rest without altering the source files.
How does a non-linear editor work?
Would you like to use the same video in multiple projects? You can, because you never actually change the original. Do you just need a ten-second sound bite from the middle of a five-minute speech? Pull that out but don’t let the other four minutes and fifty seconds slow your editing process down.
Non-linear editing essentially assembles the perfect puzzle but is composed from the pieces of your choosing. This is incredibly powerful when making a series of videos with shared elements such as specific key graphics or the intros or outros (sometimes called bumpers) at the beginning and end of your videos. These give your series some connective tissue while still enabling you to convey unique content in each video.
Cut, copy, paste, slide, speed up, shorten whatever piece of media you want, place it where you want, and reuse it as many times as needed. Your project should work on your terms – not the other way around. Non-linear editing software allows you to experiment, iterate, and get the best possible results in the least amount of time without loss of quality.
The easiest way to edit videos
Stop wasting time and discover how Camtasia makes creating incredible videos easier than ever.
Step 1: Setting up your non-linear editing workflow
This is a two-part process. The first is identifying the media you want to bring into your presentation. This can be images, videos (both clips and longer pieces), and audio.
Once you’ve decided what you want to use, you need to bring the media into your project. You can learn more about how easy it is to import your desired media with Camtasia here.
Step 2: Editing with a non-linear editor
This is where an NLE gets to flex its digital muscles for you. Now that you know what media you want to use, you can put it together and polish it up in whatever order you like.
Want to pull in a bunch of content at once and start laying it out on your timeline to get a feel for the overall flow of your video? You can do that, but if you prefer to just bring in a single clip and start editing it to make it more concise, or perhaps add special effects? You can do that too.
The timeline is where this heavy lifting happens, and it’s best described as a visual representation of your future video. Here you can see thumbnails for your images or videos and the waveforms for your audio that are represented in a way that makes them easy to identify and work with.
A great benefit of using an NLE is flexibility. You move clips and pieces around as you need them, where you want them, without having to always just work with a single massive file.
You can have a large three-hour recording as your base, but most of the time you will want to break it up, take out the stuff that’s not needed, or draw attention to specific details in that video in a way that allows you to highlight the content you want to without drowning the view in stuff they don’t need.
Benefit 2: Streamlined workflow
These editing features provided by Camtasia are fantastic, but perhaps the most important part of video creation: getting the video made and shared. You don’t want to spend your time editing a video only to have it be such a laborious process that the finished content sits in a project file and never sees the light of day.
Camtasia assists this streamlined process in multiple ways. For one, there are plenty of options within the timeline that speed up the editing process, from magnetic tracks, to grouping media and numerous shortcuts within the software that respect your time by simplifying tasks.
Camtasia also provides assets and templates that work well with your content to provide polished, professional content without creating everything from scratch. Transitions are as easy as clicking and dragging your desired effect to the timeline between your two clips.
Effects such as transitions, blurring, animated text, and zooming into important areas of the screen are quick and easy to apply and can elevate even the simplest of images or videos into something high-quality and engaging for your audience.
Templates provide a framework for your videos that streamline the process of video editing by providing placeholders for your media. Similar to the aforementioned intros and outros, learning how to leverage templates can provide consistency between your videos. This is particularly useful if the end goal is to provide a series of videos and not just a one-shot production.
Ready to give non-linear video editing with Camtasia a try?
Getting started with Camtasia can be surprisingly simple. Camtasia has numerous tutorials available, and they cover a diverse range of topics. The structure within the software provides guidance for new users, but a wealth of options also gives users a reason to dig deeper as they get more comfortable with non-linear video editing.
The easiest way to edit videos
Stop wasting time and discover how Camtasia makes creating incredible videos easier than ever.
What’s the difference between linear and non-linear editing?
Simply put, a linear editor has you working in a left-to-right fashion, often with a single large piece of media. Non-linear editing provides a less structured approach that encourages experimentation and flexibility, which provides plenty of polish.
Is Camtasia a suitable video editor for beginners?
Absolutely. The software provides plenty of guide rails for new users, an intuitive interface and numerous tutorials that teach the basics, while still providing opportunity to learn more for those who want to explore Camtasia’s many features.
What features should I look for in a non-linear video editor?
With features such as drag-and-drop editing, provided assets such as transitions, the flexibility to use a variety of image, video and audio media and templates, Camtasia provides easy access for beginners and a wealth of options that experienced editors should expect as well.
TechSmith is the market leader in screen capture software and productivity solutions for daily in-person, remote, or hybrid workplace communication and customer-facing image and video content. Our award-winning flagship products, Snagit, Camtasia, and Audiate, empower anyone to create remarkable videos and images that share knowledge for better training, tutorials, and everyday communication.
Video has revolutionized the delivery of information and training content.
Whether you’re teaching people through online content or training internal coworkers, using video to share knowledge is becoming an expectation.
Don’t make folks spend their time pouring through long, wordy training manuals or documentation to learn a skill, new process, or gain knowledge. In fact, 83% of people prefer watching videos to accessing instructional or informational content via text or audio.
The type of content you create matters just as much as the information you are trying to share, this includes video.
The problem is many companies struggle with how to create and deliver engaging and effective instructional videos that viewers will actually watch.
TechSmith conducted research to learn more about people’s viewing habits and preferences around instructional and informational videos.
We wanted to know: how we can ensure that people start – and continue – watching videos?
Highlights
– 83% of people prefer to consume instructional or informational content by watching a video.
– People watch videos because they want to. Only 16% of respondents said they watched a video because they had to.
– 87% of viewers prefer a real person vs. an animated character or AI avatar.
– People prefer longer videos than in the past. 10-19 minute long instructional or informational video being the most popular time frame, a distinct change from previous surveys, which showed viewers’ inclination to watch shorter videos.
– Nearly a third of respondents said videos over 20 minutes are too long.
– By using AI tools strategically and selectively, creators can leverage audiences while keeping humanity at the forefront.
– People believe that a quality speaker and audio matters more than conciseness, level of interest, and even clarity.
– 2/3s of those surveyed watch at least one instructional or informational video per week.
People prefer videos
Video has emerged as one of the most powerful and widely used formats for delivering training and instructions, regardless of your intended audience
The acceptance and consumption of video (including mobile video) continue to grow across most departments, segments, and demographics.
This should come as no surprise.
As employees, students, and customers increasingly expect information to be available in video format, businesses are embracing video for its benefits, visual appeal, and effectiveness. In fact, 83% of people prefer watching videos to accessing instructional or informational content via text or audio.
The big question is no longer “Should I create a video?” it’s “How do I create effective videos that people actually watch?”
Learn more in the report
Dive into the insights and advice about 2024 video viewer trends and habits.
About 50% of the video content accessed by respondents is made up of informal or formal training videos and live streams or webinars.
Respondents could select more than one option, and on average, people chose 2.4 different types of videos, and 71% chose at least two video types. This further suggests that a one-size-fits-all approach to video isn’t ideal. Different videos serve a specific purpose for varying situations and viewers tend to watch a variety of video types.
How (often) do viewers watch videos?
61% of respondents watch videos on YouTube or another public video site.
Putting instructional and informational videos on YouTube is a helpful way to make content available to a broad audience. If you want your videos to succeed, get watched, and reach new audiences, you should pay attention to what about the content draws in viewers.
People aren’t always accessing information through internal resources, and there is a reason for that. Researching the videos watched by your audience and trying to mimic the style and quality can be worthwhile.
Short-form instructional content on social media platforms can also reach a wide audience. 44% of respondents watched tutorials and how-to videos on a social media platform.
Why do people watch videos?
People watch videos because they want to. There is a bigger emphasis on using videos for knowledge and skill acquisition and a lesser focus on using them to solve immediate problems.
The key takeaway here is that YouTube has become one of the world’s leading destinations for informational and instructional content — and that most of that learning is self-directed. People are learning because they want to.
Only 16% of respondents said they watched a video because they had to.
How do people choose which videos to watch? Our data shows that many factors influence their choice.
54% of respondents simply saw a description that matched their needs. That’s a 14% increase since our 2021 study, when under 40% of respondents relied heavily on description. 35% of respondents chose a video because of an interesting or intriguing title, compared to 25% in 2021. In other words, if you want people to watch your videos, make sure they have accurate and engaging titles and descriptions.
Titles and descriptions that get noticed
With titles and descriptions being such an important factor for viewers choosing your video, it’s more important than ever to get them right.
Best Practices
Attention-grabbing titles are key. You want your video to stand out among the rest so it gets noticed.
Skip the “how to.” Jump right into the title and drop those two words.
What can you do for them? Explain what your video can do for them in the description. You’re competing with hundreds of other videos. Why is your video the best option?
We’ve all heard that shorter is better, right? Apparently, wrong!
Respondents shook up preconceptions with 25% preferring a 10-19 minute informational or instructional video respectively.
Combined, 30% and 35% of viewers still preferred either 3-4 minute or 5-6 minute long informational or instructional videos respectively.
These responses are on trend with the vast current consumption of short social media videos and people’s desire to be efficient with their time.
When it comes to required videos, about 60% of respondents prefer short videos, under one minute. This follows the idea that viewers are more likely to spend time on a topic that is directly relevant to their skillset or interest rather than required “homework.”
Viewer’s interest patterns
57% of respondents answered that “it is easy to follow” is the video element that keeps them most interested. Respondents want a comprehensive solution that informs them without being complicated.
Relatable and current content is almost as important with 55% of respondents answering that it keeps them interested in the video.
Content is the most important
The most important quality for a video to have is … content! Of course, viewers want to watch videos that are relevant to their interests or the problem they are trying to solve.
People noticed that a quality presenter and audio as an aspect of the video they found engaging.
Viewers also crave relevant professional-style graphics, style, and lower thirds, which is an interesting pattern given the prevalence of informal training videos.
Stand-out professional graphics.
42% of respondents ranked professional graphics as one of the top three content characteristics they felt was most important in a video.
Graphics aid the viewer by adding information that is beneficial for the viewer.
Visuals that add value
Lower-thirds add the speaker’s name and, usually, occupation at the bottom of a video clip. This gives viewers insight into who is speaking and their relationship to the material that is being presented.
Infographics collect key takeaways for the viewer in one convenient space. Make it downloadable so that viewers can save and share the main points with others.
Videos are meant to be watched all the way through, so what compels viewers to click off prematurely?
For 33% of viewers, they simply got the information they needed before the video ended. After all, that is the aim of most tutorials and once the task is done, the need to keep watching is gone. If people stop watching your videos because they got the information they needed, you should make sure you’re only covering what’s necessary.
22% of respondents reported the video to be boring or uninteresting. We get it. Not all topics are extraordinarily exciting and interesting, but there are a number of ways you can keep your viewers interested. Even just varying the tone of your voice or introducing more motion can make a drab topic seem more exciting.
Lastly, 9% of respondents stopped watching videos because of poor quality. Of those respondents, poor audio and blurry footage were tied for the top spot, followed by insufficient explanation.
What did we learn from this? Be engaging, lively, and concise in your videos.
Don’t be boring
Entertainment value keeps viewers engaged and watching videos. 22% of respondents answered that they stopped watching the most recent instructional or informational video because it was boring or uninteresting.
The top four reasons? Monotone speech, not concise or efficient, video length, and off-topic rants.
Monotone speaker
Liven up! Viewers are here to learn new information from this content, and they want to be excited about it. Lean into creativity and humor to grasp and retain viewers’ attention.
Get to the point quickly. Introduce important information and requirements right away. Don’t spend too much time on your introduction, telling a story, or giving background information.
Problems come in many ways and so can solutions. Find the best solution for your audience’s problem and explain it thoroughly but concisely.
Balance video length
More respondents preferred a 10-19 minute video than a 3-4 minute video. However, longer is not always the key. The majority of respondents would not watch a video 60 minutes and longer. Balance is key here. Ultimately, we always say that your video should be as long as it needs to be.
Shorter videos are a popular choice, especially on social media, so leverage the platform you’re on. Shorter video lengths may perform better on certain platforms over others, so keep experimenting. Experiment and consider offering shorter as well as long, more in-depth videos on key topics.
Stay on topic
Create a script and stick to it. You can be intentional with the information included and focus on the problem-solving at hand.
Be purposeful with what is included. What you find interesting is not what everyone else finds interesting. Small anecdotes that you enjoy but don’t have a specific purpose may detract from your video more than anything.
If you find yourself trying to cover too much, remember that creating more than one video is an option.
Learn more in the report
Dive into the insights and advice about 2024 video viewer trends and habits.
Videos with blurry or shaky footage can be unwatchable for some viewers. After all, how are they supposed to learn a new skill or acquire new knowledge if the video can’t show them exactly what they need? To the respondents who stopped watching a video due to poor quality, blurry footage is the biggest deal breaker, tied with poor audio quality.
This is an interesting find as it hints that some types of production quality are valued and expected. Videos need to be, at the very least, put together in a high-quality, understandable way to invite viewers to continue watching.
35% of respondents agreed that high-quality and easy-to-hear audio narration keeps them interested and watching.
On the flip side, fuzzy audio is tied as the top reason respondents stop watching a poor quality video. This means that ensuring that video audio is clear and crisp is key in keeping your audience engaged and interested. Audio needs to be, above all, understandable.
The rise of AI avatars
87% of viewers prefer a real person vs. an animated character or AI avatar. Although viewers are watching videos online, the human connection aspect seems to be inherently important to video creation.
This indicates that picture-in-picture recordings of informational and instructional videos may be here to stay. Viewers prefer to hear and see a real person explain new information to them rather than an AI-generated avatar.
AI’s Helping Hands
75% of respondents indicated that they are very receptive or somewhat receptive to watching instructional or informational video content created with the help of artificial intelligence.
Respondents seem to find a line of demarcation between AI that you can see or hear and AI that simply helps the creator find the content they need.
But AI content does not come without concerns. 90% of respondents have concerns about receiving video content created with AI. Of those concerns, 45% of respondents worry the accuracy of the content may not be up to par.
These concerns, although understandable, can easily be remedied by fact-checking AI content before creating a video. Although respondents seem to be wary about the credibility of AI, you can uphold personal credibility that will shine through content.
By using AI tools strategically and selectively, creators can leverage audiences while keeping humanity at the forefront.
The future of video in the workplace
So much is clear videos are here to stay, but do they have growth potential?
It seems so. Respondents are inclined to make video a bigger part of their workday. 38% of respondents would prefer it if coworkers shared knowledge in the form of more videos. Only 10% of respondents would prefer fewer videos.
Even though only 19% of respondents tried creating an instructional or informational video in the past year, almost half of respondents received screen recording share-outs or content from their coworkers in the past year.
People want videos but are reluctant to make them themselves. We understand – talking to a camera can be uncomfortable – but people are so receptive to them.
The TechSmith Academy has plenty of free resources to create your first tutorial video and screen recording to share with your team. It’s easy to get started, and your coworkers will thank you!
Learn more in the report
Dive into the insights and advice about 2024 video viewer trends and habits.
People want to watch instructions and informational videos, that much is clear. Understanding viewer’s preferences and habits around videos provides insight into how to create content that will resonate with an audience. Viewers watching instructional or informational videos want easy-to-follow, relevant content that will help them achieve their goals.
Recently, viewers’ focus has shifted from informal to more polished videos. Plus, although AI can be a helpful tool for content sourcing, viewers are not receptive to its blatant presence, as with AI avatars. Viewers want human-centered content that is engaging, easy to follow, and that meets their needs.
Picture this: you’re working on a presentation, but you need your pictures to have a transparent background. Now that’s a problem. You need to remove the background from those images!
Sound familiar?
We’ve all been there! And we know how frustrating it is when you have a clear idea of how you want your presentation to look but can’t figure out how to delete the background from an image.
Fortunately, learning how to make an image transparent isn’t as tricky as it sounds. By using a handy tool like TechSmith’s Snagit, there’s an easy way to make backgrounds disappear without convoluted design tools.
In fact, Snagit makes it easy to remove the background from pictures in just a few clicks, so you don’t need to be a graphic designer to reach your goals!
How to make a picture’s background transparent with Snagit
Step 1: Insert the image into the Snagit editor
Start by taking a screenshot with Snagit, or uploading an image from the File menu. Images that have white or solid color backgrounds or high-contrast backgrounds usually work best.
Step 2: Next, click the Fill button on the toolbar and choose Transparent
To add the Transparent Fill option to your Quick Styles for the first time, it’s pretty simple. All you need to do is click the Fill Color option in the Tool Properties and select Transparent Fill.
Then, click on the background of your picture and Snagit will automatically remove the pesky background for you. No fancy editing tools required!
Step 3: Adjust your tolerance as needed
If you find that the Fill tool is removing too much, or not enough, of your background then you might need to play around with the tolerance settings.
Adjusting the tolerance is easy with the slider. If you’ve got a complicated background with lots of colors and shades, it might be a little trickier.
For example, if you have an image with lots of similar shades and gradients in the background you may end up with some bleeding around the parts of the image you want to keep.
When adjusting the fill tolerance, keep in mind that 1% is the most strict setting, and 100% means it will pretty much wash out your entire image.
Meanwhile, adjusting the opacity will dictate how transparent you want your fill to be. The more opaque, the less transparent it will be. In other words, to erase the background from your image completely, go with 0%.
Pro tip: You can also add a new background color!
Step 4: Click the background areas you want to remove
If you’re editing a screenshot or a PNG image, any background you remove will become transparent by default. However, if you’re working with a different file format, like a JPG, you’ll need to adjust your background color in the Snagit editor, or it will default to a white background rather than transparent.
To do this, simply click Image > Canvas Color (on Windows) or Image > Change Canvas Color… (on Mac).
Step 5: Save your image as a PNG
Once you’ve finished making the transparent background on your image, make sure you export it as a PNG file.
Each file format is different so it’s worth taking the time to understand image file formats, but PNG is one of the few formats that supports transparent pixels.
And that’s all there is to it! You now know how to use a simple background eraser tool to remove image colors from the background of a picture in just a few steps. This is a great skill to ensure a seamless look for your process documents, social media marketing materials, and presentations.
The best snipping tool for Windows and Mac
Don’t let clumsy built-in tools hold you back. Take and edit screenshots with Snagit!
Danielle Ezell is a Marketing Content Strategist at TechSmith, where she writes about effective workplace communication, offering tips and strategies for using images and videos to collaborate more effectively in hybrid and remote environments.