Not only does the ADA Section 504-refresh highlight the need for audio descriptions in higher education videos, but it’s also an accessibility best practice that has the potential to benefit all students.
Learn the different types of audio descriptions, how they work, and how to create them so your institution stays compliant.
Are audio descriptions like captions?
Sort of. Here’s the difference: captions use text to describe what’s being heard on-screen. Audio descriptions (AD) talk through what’s being seen. Put another way, captions help people who are hard of hearing, while audio descriptions help people who have difficulty seeing.
Audio descriptions are also sometimes called ‘video descriptions’ or ‘descriptive narration tracks.’ They all refer to the same thing – an option that gives you all the information from a video without ever opening your eyes.
You’ve probably watched movies that have embedded audio descriptions, even though you didn’t use them yourself (or even know they were there!). Ever see the AD symbol on a DVD? That means the movie has an audio description track that can be turned on as needed. Many movie theaters offer audio description support, too.

An example – what they sound like
Although visuals are a core strength of video’s ability to convey information, it can be difficult for people with sight loss to understand what’s going on based on standard audio alone. Audio descriptions bridge the gap by narrating what occurs on screen so everyone can understand the meaning.
Here’s an example that demonstrates how audio descriptions can describe important on-screen action that makes the video easier to understand for sight-challenged viewers.
In higher education, audio descriptions are important and providing them is legally required. This is good news because it makes crucial on-screen visuals in online and blended courses available to every student.
Audio descriptions help many types of learners
Audio descriptions help people with a visual disability (more than seven and a half million adults in the United States alone) as well as students with lesser degrees of vision loss.
They can help other students, too. Some people learn better with both audio and visual inputs or are primarily auditory learners. Non-native speakers may like hearing audio descriptions to better understand the language. Students on the autism spectrum can benefit from hearing social/facial cues read aloud.

Some students turn on audio descriptions simply because they prefer to hear the video lesson. Whether they’re jogging, reviewing a video lesson at night with headphones while their roommate sleeps, or watching videos on a jostling bus, there are many reasons why having the option to treat the lecture like a podcast makes sense.
How to add audio descriptions
There are two main ways to add audio descriptions:
- Embedded voice descriptions – In this method, audio descriptions are their own separate digital “track,” behind the scenes. They can be turned on as needed. This is the most advanced and versatile method because all students have the same version of the video, and only listen to audio descriptions if they need them.
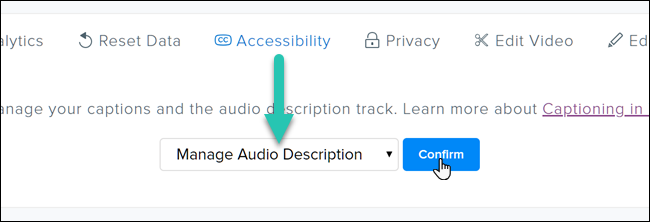
The best of today’s accessible video platforms now offer features that make it easy to add audio description tracks to videos. In TechSmith Knowmia, formerly TechSmith Relay, you simply log in, go to your video, click on the ‘Accessibility’ tab, and then ‘Manage Audio Description.’

Then, upload your audio description track, which can be an Mp3 or M4A file type. Once your video has an audio description track, students can easily turn it on by clicking the AD Track button on the video player.

- Separate video – Usually only used when embedded tracks are not available, this involves creating a duplicate video with audio descriptions permanently part of the audio, or “burned in.” There’s no option to turn on or off the audio description narration with this method. While this is great for students who always use the narration, having two copies of every video can be confusing and double bandwidth and storage costs.
Create audio descriptions yourself, or outsource
The easiest way to create audio descriptions is to outsource it to a company who does this as a service. Many of the same vendors who create captions can also create audio descriptions and usually charge about $15-$30 per minute.
Another option is to create audio descriptions in-house. It’s more affordable, and you retain complete control of the wording and phrasing.

Before you begin, learn from those who have done this before and can share best practices. There are a number of preferred ways to explain what’s happening on-screen. It’s helpful and will save you time when you understand common practices. One great resource is the Described and Captioned Media Program (DCMP), which has a handy description key and other resources with tips and techniques that will make your audio descriptions easier to create and understand.
When you record your audio descriptions, keep in mind that they don’t need to synch perfectly with the visuals. As long as they are approximately nearby the on-screen action, they will be effective.
Another tip is to time your narration so that it doesn’t interfere with on-screen dialogue or other audio in the original video. Record audio descriptions in the empty spaces in between the existing audio. You don’t need to verbally explain every single thing that happens on the screen, as long as you describe the gist of what’s happening.
Alternatives to audio descriptions
An annotated transcript is an alternative to audio descriptions. Instead of narrating what’s happening visually, you write it out and provide it separate from the video.
For example, if a complicated chart is shown in a health sciences video, an annotated transcript would include an extra section that describes what the chart looks like, in detail.
Create automatic transcripts with Audiate
Audiate automatically transcribes your audio into text.
Try Audiate for FreeOne benefit of this method is that deaf and blind students can use assistive devices to ‘read’ these transcripts, whereas audio descriptions are only helpful to those who can hear. Extended transcripts may also help other types of students who want to review material through written words, or struggle to process visual information for other reasons. Cons include extra time creating the transcript and maintaining another resource.

A final alternative to audio descriptions is simply to verbally describe all visuals within your original video. This takes the concept of providing an AD track and makes it part of the video itself. This method works particularly well for educational videos and demonstrations where descriptions of on-screen action are a natural addition.
For example, if you’re making a video lesson with a chart, verbally explain the main points. If you’re hand-writing a calculus proof, talk through it as you go. Demonstrating a chemistry experiment? Describe what you’re doing along the way, so students have the audio and visuals.
There’s a lot to understand about audio descriptions. This topic will continue to grow as more video platforms offer this functionality, and more colleges and universities begin including audio descriptions alongside video captions as standard accessibility accommodations.


Share