Ever wonder why some videos are stretched or have black bars on the sides? Of course, that’s not how we want videos to look unless it’s intended. The problem might be the aspect ratio, which is a concept that plays a role in video production.
Let’s explore how it works and how to avoid common issues.

Understanding aspect ratio
An aspect ratio refers to a proportional relationship between an image’s width and height, typically written as multiplier numbers separated by a colon (for example, 16:9). It dictates the frame size and, ultimately, how your video appears to viewers.
Common aspect ratios
There exists several common aspect ratios, each with its own history and purpose. Some of the most common include:
16:9 Aspect ratio (Widescreen)
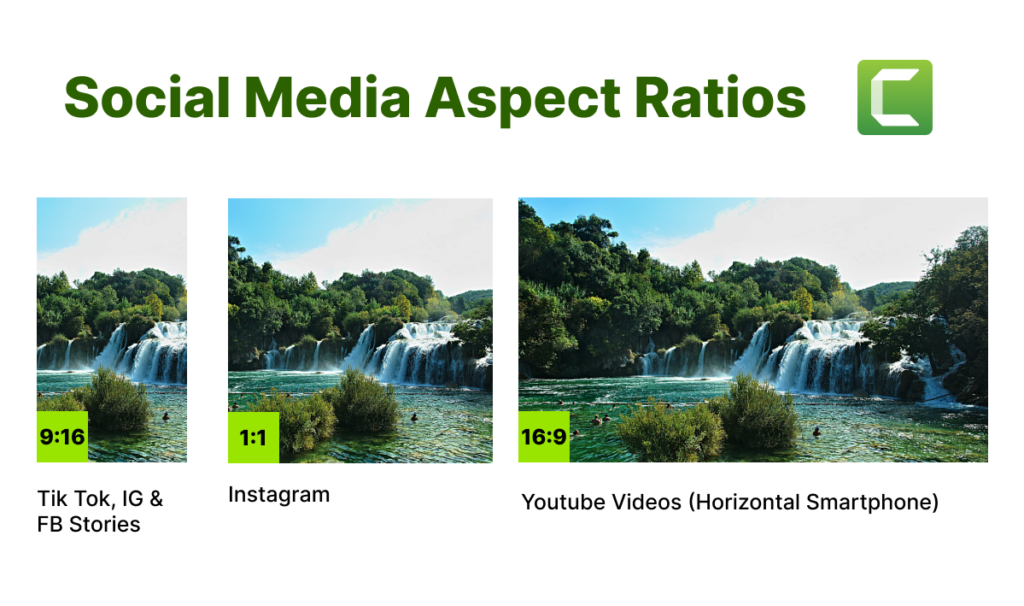
The 16:9 displays a widescreen aspect ratio, the current industry standard, and is perfect for high-definition (HD) televisions and YouTube videos. Its wide frame offers a landscape view and is often used for presentations, gameplay recordings, and tutorials.
Square format (1:1)
This format has gained popularity on social media platforms like Instagram. It focuses on a central subject, and it’s often used for showcasing products, portraits, and quick snippets.
9:16 Aspect ratio (Vertical)
The 9:16 aspect ratio, commonly used for vertical video, is perfect for social media platforms like Instagram Reels, TikTok, and Snapchat. This format is optimized for mobile viewing, filling most of the screen when held upright, providing an immersive and engaging experience for viewers.
4:3 Aspect ratio (Fullscreen)
This format, often used as a Standard Definition or Fullscreen format, dominated television screens before the digital television revolution that converted the standard to a widescreen format in 2009.
2.35:1 Aspect ratio
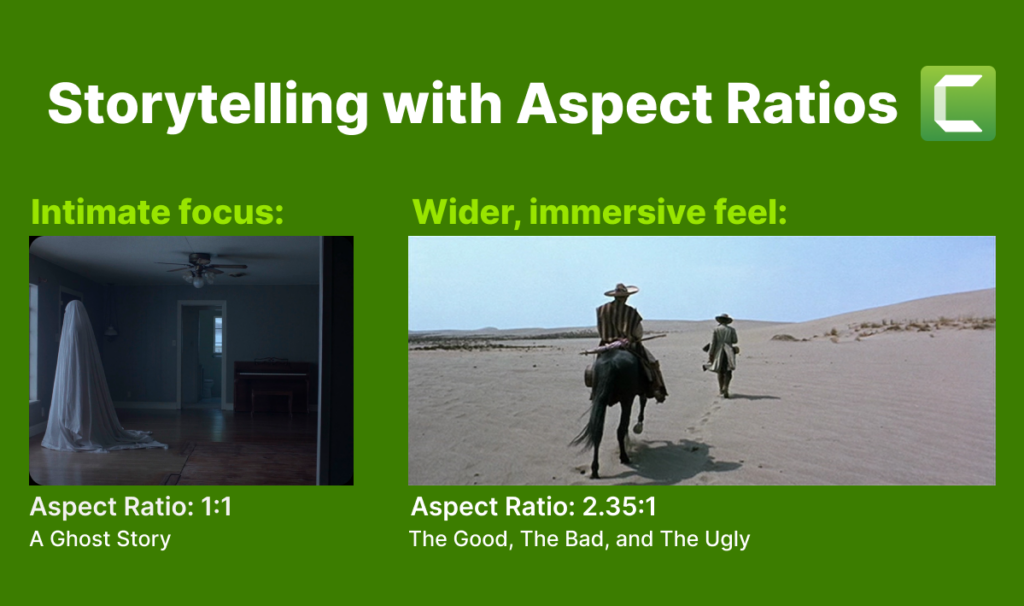
Often associated with cinematic movies, this film aspect ratio offers a wider, panoramic viewing experience commonly used as the feature film format.
Choosing the right ratio
Selecting the best aspect ratio depends on your content’s destination and message.
Let’s consider your target audience. Are you creating a video for a professional setting (16:9) or a social media platform (1:1 or 9:16)? If you’re considering the cinematic impact, a wider format (2.35:1) can create a more impressive experience for films.
Or maybe you’re creating videos that will be viewed on mobile devices. With the popularity of mobile viewership, consider formats optimized for smaller screens (9:16, or 16:9).

Camtasia: Your aspect ratio solution
Camtasia, the all-in-one screen recorder and video editing tool, offers exceptional flexibility regarding aspect ratios.
You can choose the aspect ratio before you start recording. When you’re selecting your screen to record, three’s a dropdown that offers most of the default standards mentioned in this article, but also the ability to choose whatever region or aspect ratio you need.
This way, your recording will perfectly fit it’s intended destination, no matter if it’s a widescreen presentation (16:9), an Instagram story (1:1), or other formats like TikTok or YouTube Shorts.
You can also adjust the aspect ratio of your video after you’ve finished recording inside of the editor. It’s easy – just right-click the canvas, then select Project Settings, and from the “Dimensions” drop-down you can change the aspect ratio.
You can even select “Fit to Visible” and your Camtasia project will automatically be the same size as your recorded content (though you may still want to choose a standard aspect ratio, before exporting to your final destination).
The best method for you depends on your video content and preferred outcome.
The easiest way to edit videos
Stop wasting time and discover how Camtasia makes creating incredible videos easier than ever.
Try Camtasia FreeResizing for different audiences
When you’re watching a movie at home and see black bars on the top and bottom of the screen, it’s intended to fit a cinematic film (2.35:1 for example) onto a widescreen TV (16:9). To fill that additional space, they add what’s known as ‘letterboxing’ to it.
To avoid letterboxing on your videos, here are three methods within Camtasia that you can use to change from one aspect ratio to another.
Method 1: Re-Position
Cropping a video removes unwanted areas. If you’re creating a square video (1:1) from a vertical video (9:16) you will need to reposition the top and bottom, because something has to get cut off to fit.
In Camtasia’s editor, select your media on the timeline or canvas, and drag it up or down depending on what’s happening on the video.
If the footage is a person speaking, you want to make sure the majority of their face fits in the frame as looking at that person is how viewers will engage with your content. Having the top of their head cut off will look strange.
If the video cuts to text on screen that starts up high, you may want to use the split tool to cut your footage, then realign the new clip so that the text is now fully on-screen. And so on throughout your formerly vertical footage, until all of it is aligned to fit your new, square video.
Method 2: Crop
If your video was created with the black letterboxing already and you’re trying to remove those boxes, you can use the crop tool in Camtasia’s Canvas Toolbar to remove just the portion you want.
It’s worth noting, in Camtasia, anything that is outside the viewable area on the canvas, will not appear on your final exported video. You as the editor will still be able to see it, but your audience will not. So if those black bars are removed by changing the Dimensions (or aspect ratio) in the Project Settings, you don’t need to do any cropping.
However, with the crop tool selected, drag the center points of the canvas (either top/bottom or left/right, whichever is needed to be cropped) in until it meets the edge of your content.
Method 3: Add a background
If you followed Method 2 and cropped your video but it didn’t fill the canvas space, and you don’t want to scale it up, then adding a Dynamic Background is a great option for avoiding empty black space.
In the media bin, select the Assets tab (center) up top. You’ll see a category labeled “Dynamic Backgrounds. Click “See All” and choose the one you like.
Dynamic Backgrounds can easily be shortened or extended without copying/pasting because they loop infinitely. Simply drag the background on the timeline to be the same length as your video.
You can customize the colors, and other sliders like speed, size, etc., all from within the Properties panel.
Bonus: we mentioned earlier that adding a background works if you don’t wish to scale up your media. Which is true.
If your content is already at a Scale of 100% this is a great solution. However, if your video is smaller on the canvas, but only at 50% scale (or any number less than 100%), you can use the Scale slider in the Properties panel to make it larger without sacrificing high resolution quality. Once you go over 100% however, it will start to blur or pixelate.
Now, you have no problem getting rid of awkward sizes with Camtasia.
Storytelling with aspect ratio: guiding the viewer
Aspect ratios can influence more than just the image size. Different ratios can affect the story your video is telling.
For instance, use the wider, immersive feel of 2.35:1 for cinematic, almost epic-inspired videos. Or use the intimate focus of a square format to demo products on your social media channels.
Examples of 2.35:1 include action films like “Baby Driver” or musicals like “West Side Story” Use a smaller frame (1:1 or even 4:3) to garner a more intimate focus similar to movies like “A Ghost Story” or “The Grand Budapest Hotel” (since the scenes film to show the 1930’s and imitate the look of old film).

Whether you’re producing social media content, a feature film, or a slideshow transformed into a movie, you should be aware of the variety of aspect ratios available to you, and what each one means for your story, and might imply to your audience.
The easiest way to edit videos
Stop wasting time and discover how Camtasia makes creating incredible videos easier than ever.
Try Camtasia Free


Share