

Having captions is crucial to a great video. You might wonder how to add closed captions to a YouTube video, or to add captions in a video itself. Regardless, it’s time to make captioning a key part of your video workflow!
While adding captions and subtitles goes beyond the basics of video creation, doing so has never been easier. These days you can even turn screenshots into videos in just a few clicks! Captions and subtitles will also make a video stand out and ensure your audience gets the most out of your content.
Captions and subtitles make your videos accessible to a larger audience. This not only gives you a better ROI, it allows you to help more people with your videos.
Whether you do it yourself before exporting, or use an auto-transcription tool, it’s super simple to make sure your audience has easy access to your great content!
Easily add captions to your videos !
Download a free trial of Camtasia to seamlessly add subtitles to your video.
Download NowLet’s get started.
How to add captions to a video
Most video editors, including Camtasia, have captioning capabilities and fortunately for you, captions and subtitles are super-easy to create. Let’s take a look at four ways you can add them to your videos, both manually and automatically.
Option 1: Add subtitles and captions to a video with Audiate
TechSmith’s Audiate makes adding captions to a video easier than ever. What’s Audiate, you ask?
With Audiate you can record and import audio to get an immediate transcription. But this isn’t any old transcript. This is a transcript where you can edit the audio like text. Then. turn the final transcript into captions for your video.
Yes, it’s exactly as awesome as it sounds, and here’s how you do it:
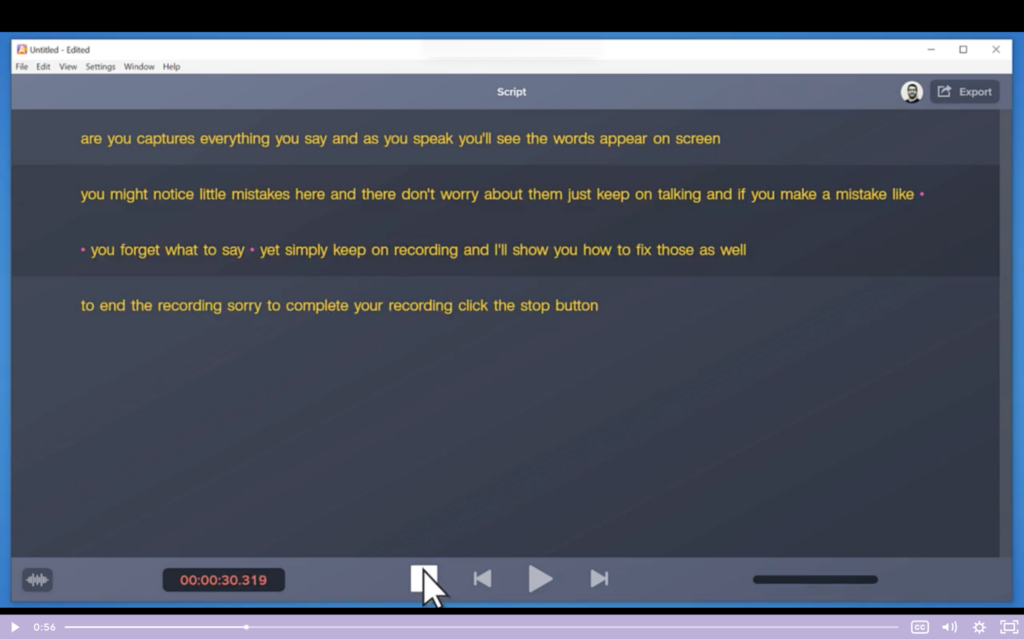
First off, you’ll want to open Audiate and import your audio, or record it if you haven’t done so already.
To import, click File and then Import Audio. Then, all you have to do is choose the audio file you wish to import and click Open. Audiate could take anywhere from a few seconds to a couple of minutes to transcribe your audio file.
If you need to record your voiceover, choose an audio input device in the Settings menu before clicking the Record button. When you’re done, click the Stop button.
Edit closed captions with Audiate
Once you’ve got your transcription open, you can make edits to your voiceover, just as you would a text document. For starters, delete words and sentences by highlighting them and hitting the Delete or Backspace button on your keyboard.
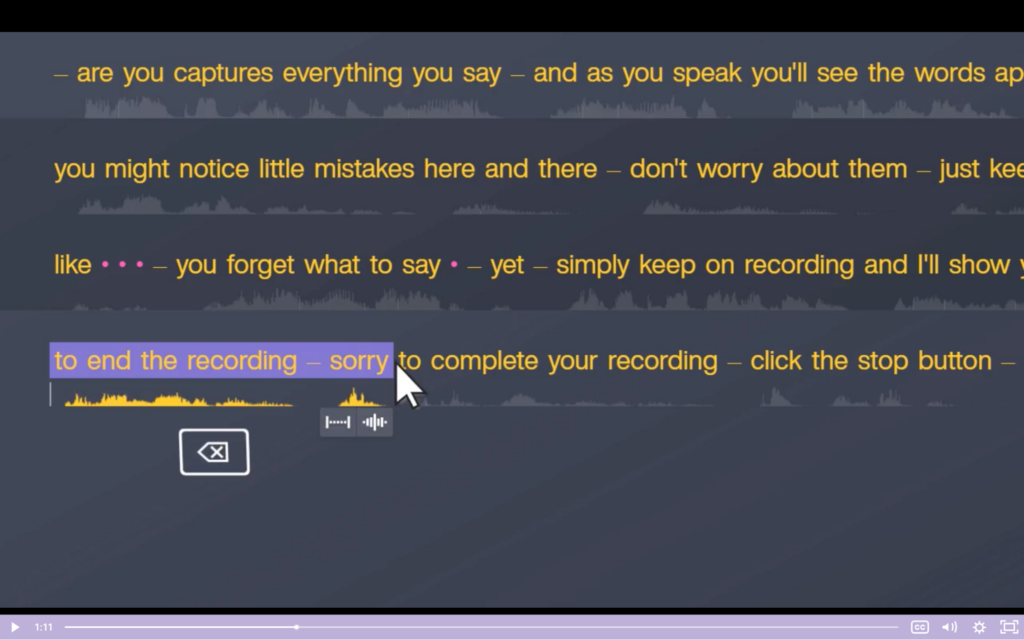
You can also delete any hesitations in your audio, such as ‘ums’ and ‘ahs’. Audiate will display these hesitations as little purple dots. You can delete them individually, or all at once by going to Edit and clicking on Delete All Hesitations.

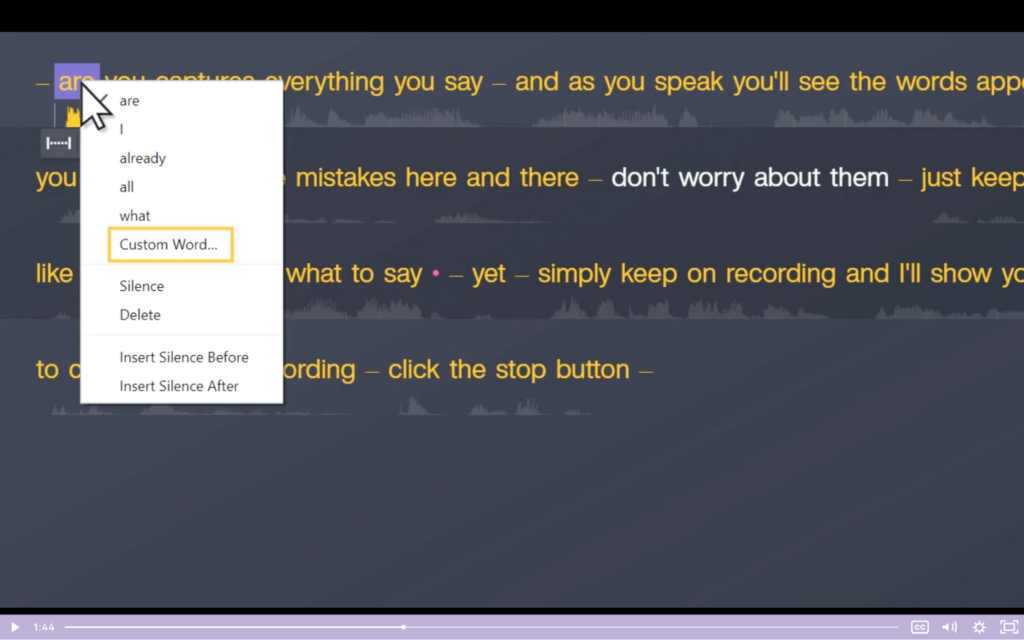
If at any point you notice that Audiate wasn’t quite accurate in transcribing a word, you can easily edit the transcript. First, select the word that needs changing, Right-Click, and select one of the alternative suggestions.
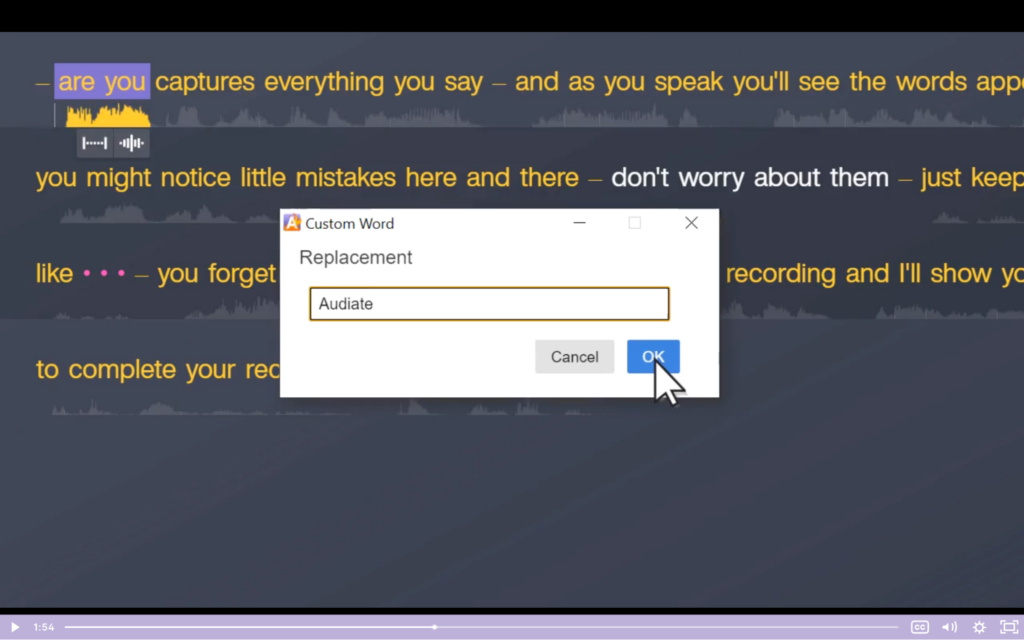
If the suggestions aren’t quite right either, you can click on Custom Word to add your own.
If Audiate accidentally turned one word into two, then you can fix that in just a couple of clicks. First, select the series of consecutive words, Right-Click, and select Combine into Custom Word.
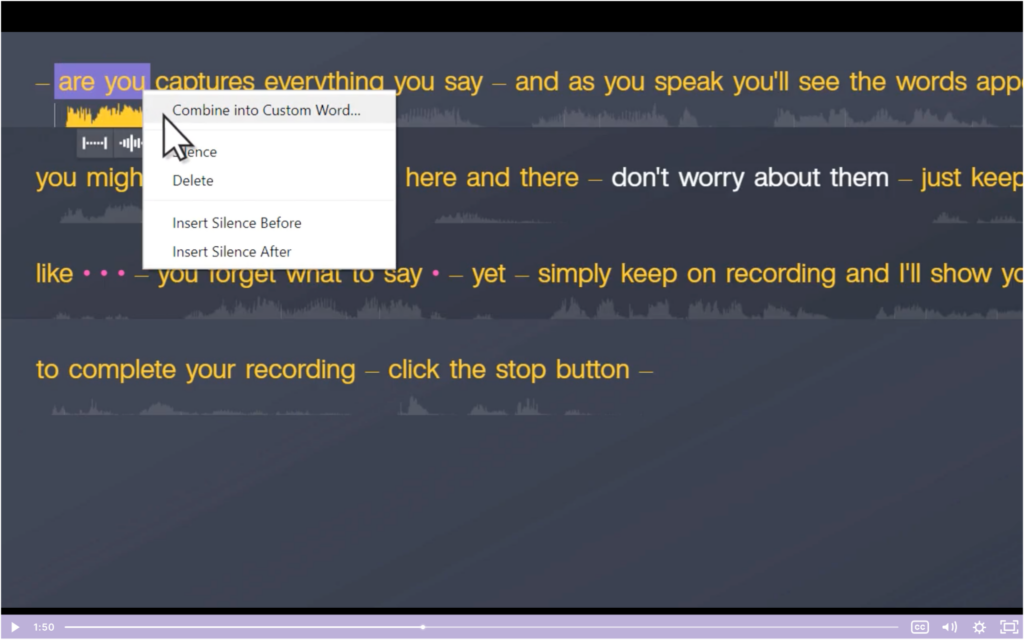
After you’ve written the correct word, click OK to replace the mistake. We told you it was easy!
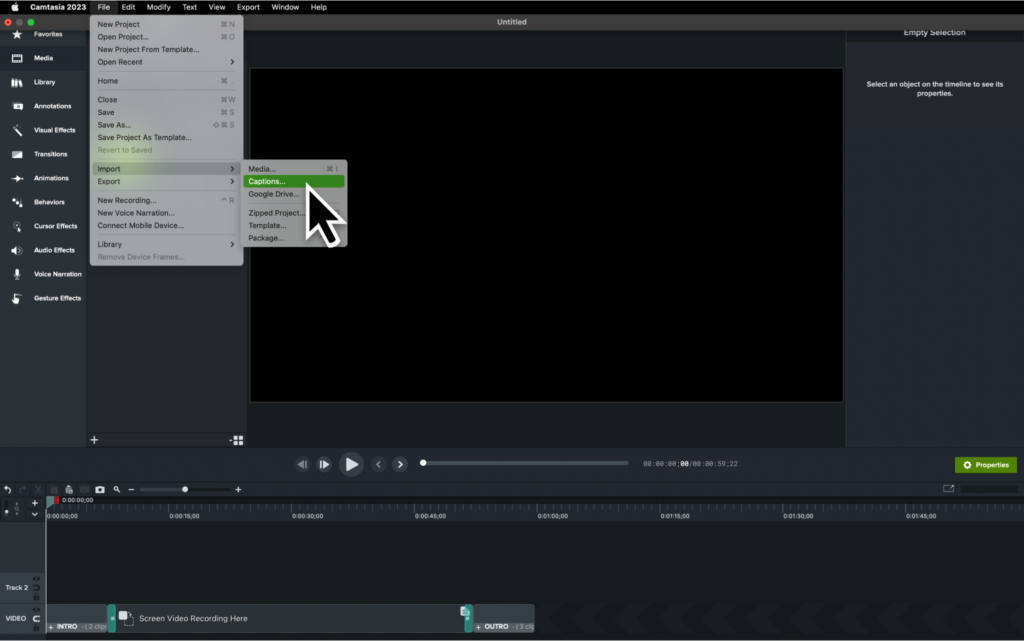
Once you’ve perfected your transcript, go to File and click on Export Script. This will create an SRT file that you can then import into Camtasia, ready to be used as captions.
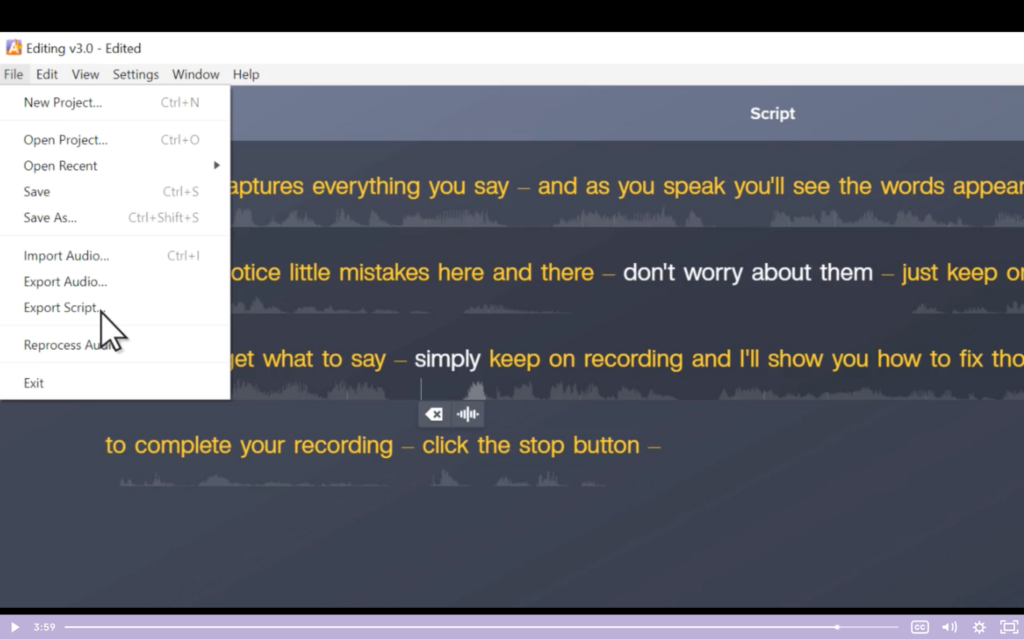
Now to actually add captions to your video, you’ll need to head back to Camtasia and import your SRT file. To do this, open your video in Camtasia, click on File, go to the Import menu, and click on Captions.
If you recorded your voiceover directly into Audiate, you’ll need to import the audio file as well. But don’t worry. Camtasia makes it really easy to synchronize audio and video sources!
You might spend some time adjusting the timing of your captions so they’re aligned with your audio. Audiate makes this pretty straightforward and editing captions shouldn’t take too long!
Option 2: Add captions to a video with Camtasia
It’s possible to add captions to a video with Camtasia both automatically and manually. Let’s take a look at each method!
Manually add captions
In Camtasia, you can add captions to your videos by going to Audio Effects in the side panel. There, you’ll see the option to add Captions!
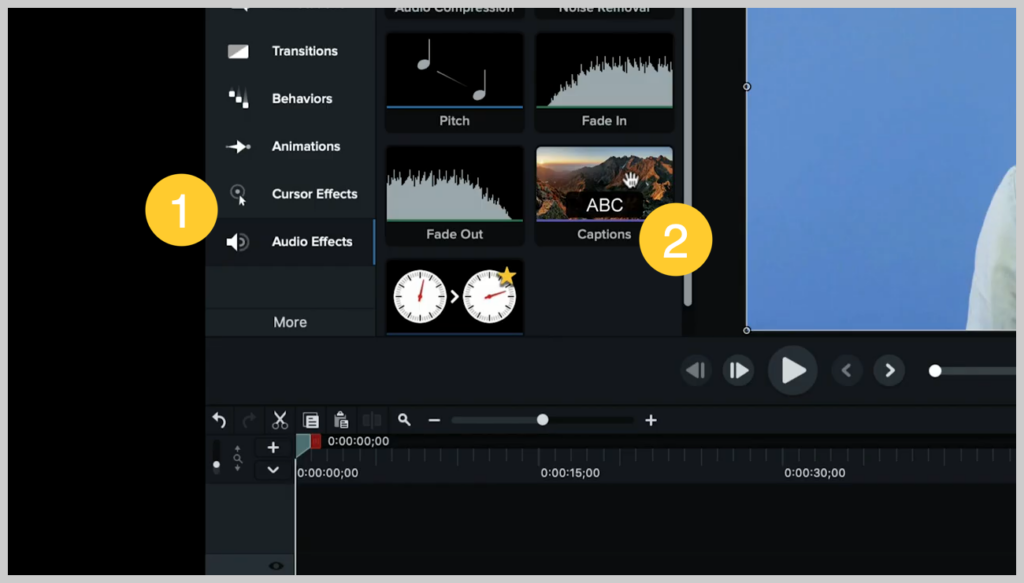
Click the Captions square/thumbnail and drag it down to your audio track. This is also the video track in the example screenshots. The Captions track will then automatically show you the waveform and split the captions (or subtitles) into four-second increments.
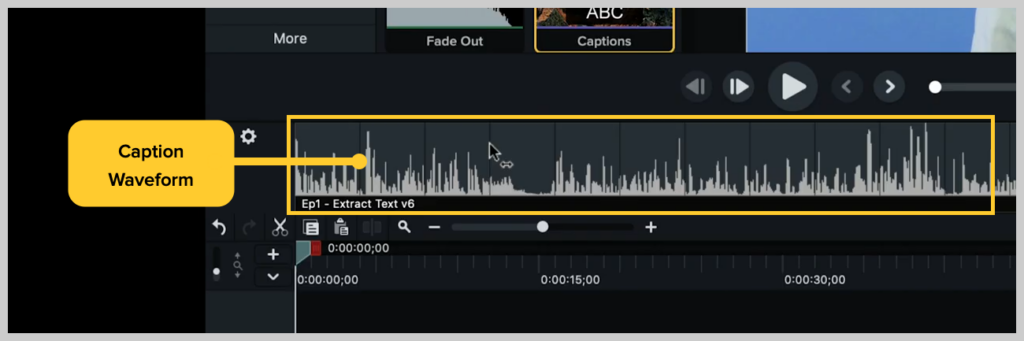
You can adjust the length of each four-second caption to ensure that each caption or subtitle is in sync with your audio. All you have to do to add captions is click on the first four-second increment and start transcribing the audio. It really is that simple!
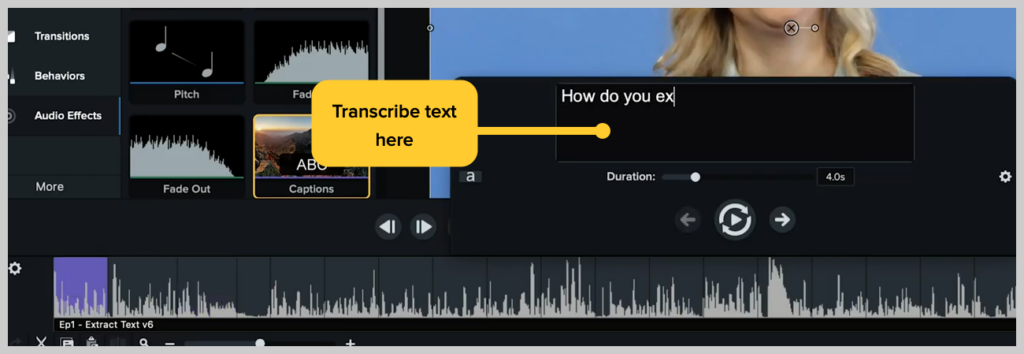
Next, go through the entire video clicking on each caption that you want to add.
Maybe you aren’t the fastest typist. You want to keep up with what your speaker says, but it just goes by too fast!
To add captions throughout your video, just click through each four-second increment. Then, transcribe the audio for each caption you want to add!
Automatically add captions
Note: The second way that you can add captions inside Camtasia is only available on the Windows version.
Over here in Camtasia’s side tab, go to More, then Captions.
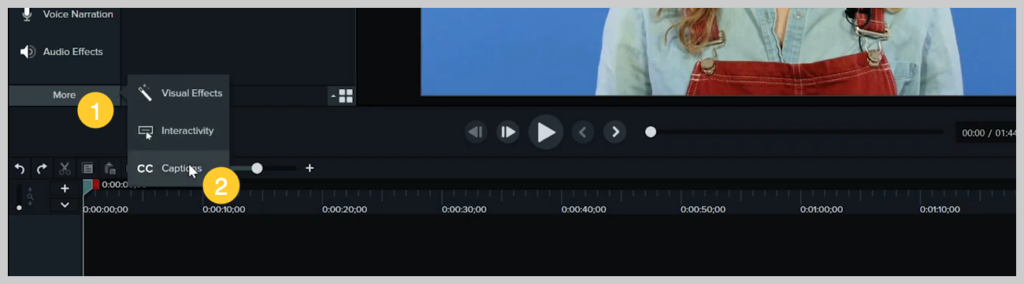
This brings up this window on the left. Here, you can either import your script, or click Add Captions.
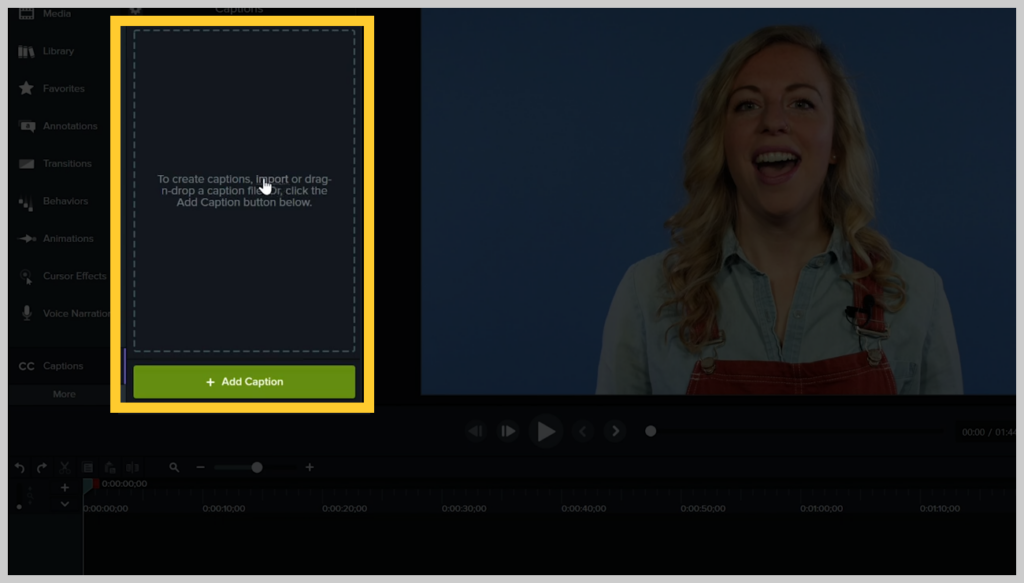
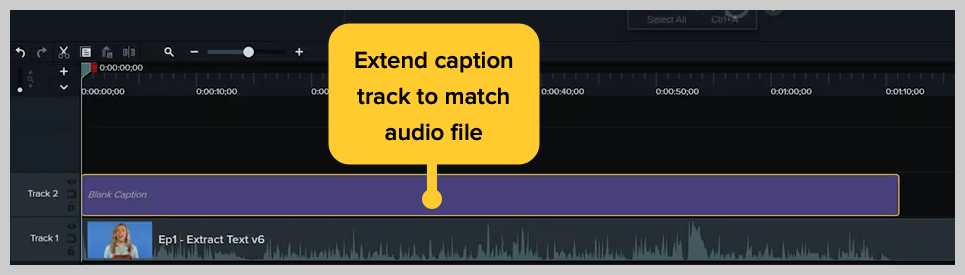
Once you’ve done that, stretch the Caption track as far as the audio goes on the timeline. Then, click in the text box.
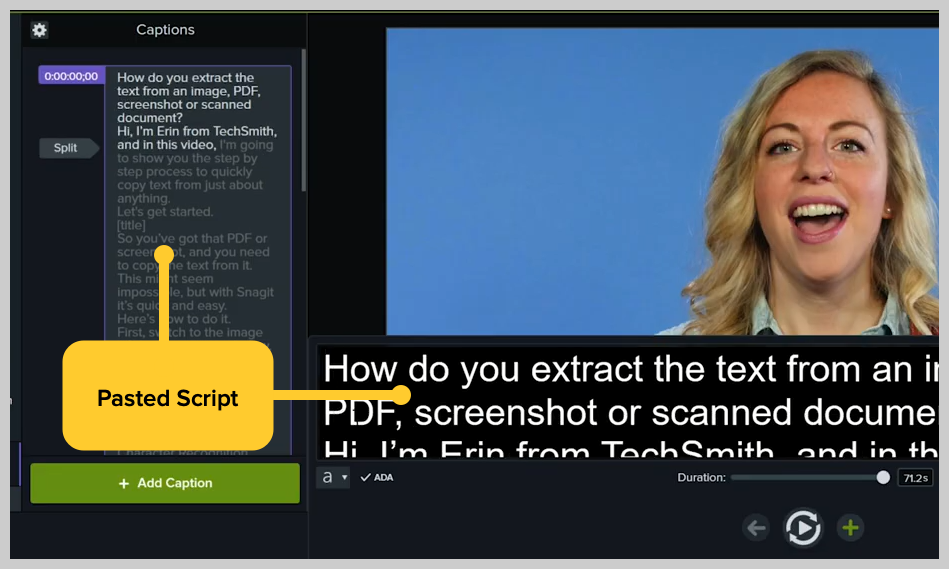
If you already have a script, you can simply paste it right into this window.
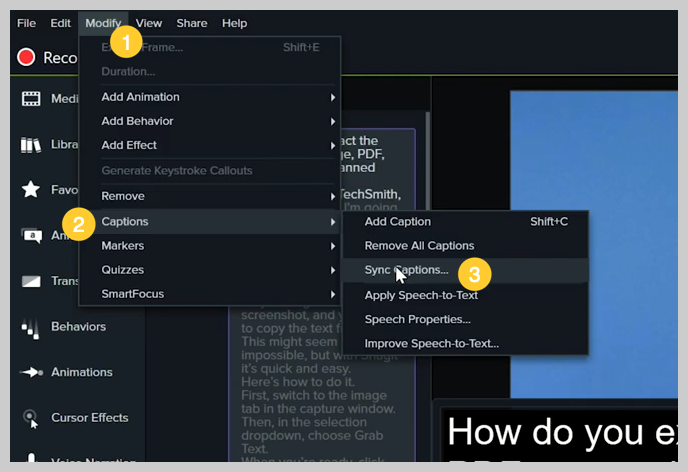
To modify your captions choose Sync Captions, this will allow the video to play as you tell it what words are said in the video.
If you already have a written script, this is a great way to add captions. We find that working from a script can save you a ton of time!
Tips for adding captions to a video
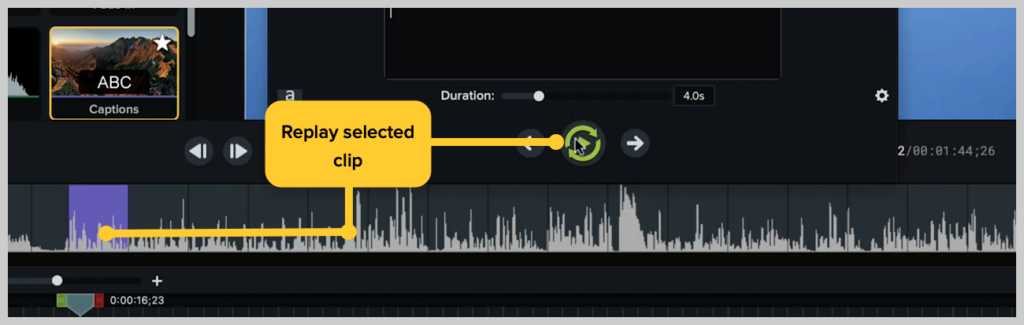
Camtasia makes it easy to ensure you never miss a beat. Whenever you click the caption you want to add, you’ll be given the option to listen to the same clip until you finish writing the captions. To do this, click the Play button surrounded by looping arrows.
This is a great way to add captions for anyone who isn’t a super-speedy typer. It makes it easy to keep up with the person speaking in your video!
As you continue addingthem throughout your video, remember to adjust the duration of each caption. You want to make sure you don’t have one on-screen any longer than it needs to be.
And just like that, you can make and add captions to your videos in Camtasia.
When you’re done, you can go to Share and click on Export Captions. This will open the window for you to save them. It’s good practice to name it the same as your video.
Easily add caption to your videos!
Download a free trial of Camtasia to seamlessly add captions to your video.
Download NowOption 3: Add captions to a video with YouTube
One of the most obvious ways to add captions involves using the world’s largest video platform — YouTube!
Once you make a YouTube video, upload your video file and head over to the YouTube studio editor. From there you can go to the captions panel and choose to add new subtitles or closed captions.
For this example, we’ve already added two different languages but now we’re going to look at adding English captions as well.
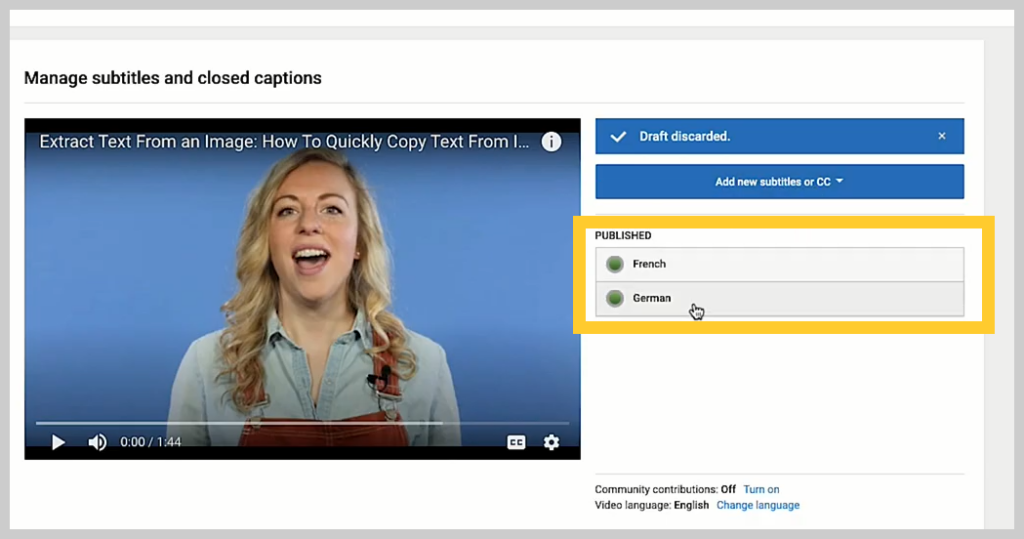
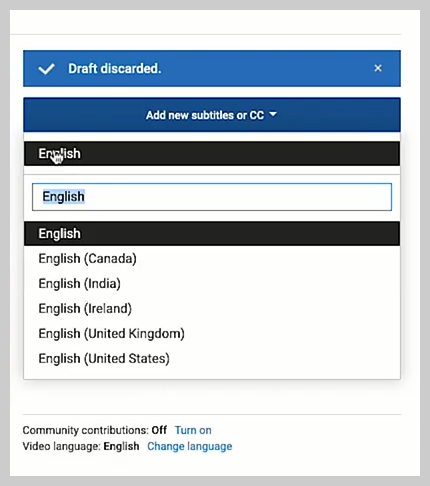
To add English captions (or for any supported language), you can either search for English in the language search bar or make a selection from the dropdown menu.
The first option, ‘Upload a file’ allows you to add premade captions by uploading an SRT file. Then the ‘Transcribe and auto-sync’ option allows you to manually add your them by typing along as your subject speaks.
Finally, the ‘Create new subtitles or CC’ allows you to see YouTube’s auto-transcription and edit what they’ve already done.
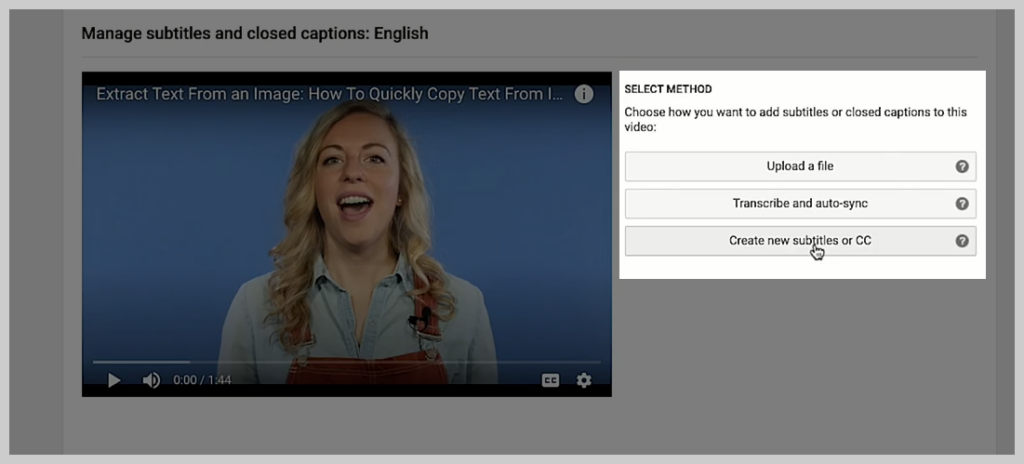
If you’ve already created a caption file, click ‘Upload a file’.
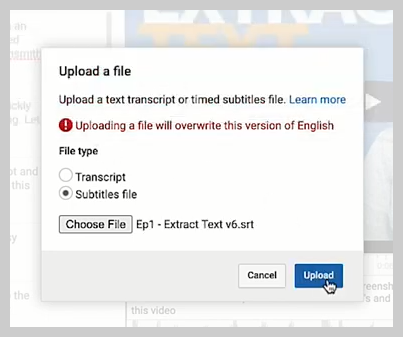
Once you’ve chosen and uploaded your file, you might notice that Youtube auto-transcribes your captions in the background. While YouTube’s transcription is usually pretty close, it’s better to use your own in order to guarantee their accuracy.
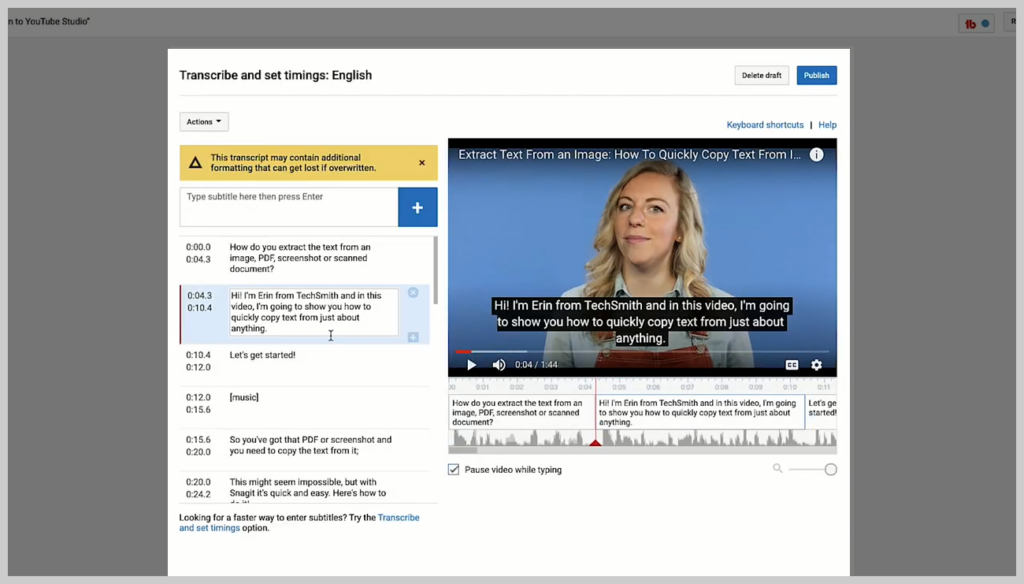
And if you want to edit it you can go through and click on any one of them to make changes.
It’s that simple.
If you choose to use YouTube’s auto transcription it’s very simple to go in and make any edits you need to once it’s finished.
Easily add captions to your videos now!
Download a free trial of Camtasia to seamlessly add subtitles to your video.
Download NowCaptions vs subtitles, what’s the difference?
While the terms “subtitles” and “captions” are often used interchangeably, there are some important differences.
What are video captions?
Captions convey dialogue and/or narration plus any other audio effects that may be present in a video.
This includes when (and what type of) music is playing and any background noises such as loud crashes, cars honking, or dogs barking that may be integral to understanding what’s happening on the screen.
In fact, to meet accessibility standards, captions must include those elements.
One of the most widely-known uses for captions — closed captioning — is a way for people who are deaf or hard of hearing to be able to access and understand the audio portions of a video. Remember, to be considered accessible to people with disabilities, your video must have closed captions.
What are video subtitles?
Subtitles convey only the dialogue or narration happening in a video. Subtitles do not meet standards for accessibility for people with disabilities, but have other uses.
Subtitles used for translating one language to another would likely also include translations of any foreign language text shown on the screen.

Benefits of adding subtitles and captions to your videos
While there are many advantages of adding captions and subtitles to your videos, one of the greatest benefits is how it makes your content accessible to a larger and more diverse audience.
For example, for people with impaired hearing, closed captions ensure they can understand and enjoy your video content. Even for those who aren’t hearing impaired, captions can significantly improve comprehension, which is especially true when there’s background noise in the recording.
Captions can also boost your video’s search ranking. Search engines rely on metadata when trying to understand the content of a video, this includes titles, descriptions, and — you guessed it — captions. By adding captions, you provide search engines with more information, which increases the likelihood of your video ranking higher in search results.
Captions can also help to increase engagement with your video. In noisy environments or public places, viewers might be unable to turn up the volume of their device to hear the video’s audio. However, with captions, they can easily follow and engage with your content, no matter where they are.
If you found this guide helpful, you might also enjoy learning how to record the perfect live streaming video, how to fix blurry video, and how to make a video template.
What type of videos need captions?
The shortest answer is: All of them!
The way people consume media has changed a lot and it’s important not to make any assumptions about who your audience are, where they are, or the device they’re using. For every video you create, there is always a chance that it will be viewed on desktop computers and handheld devices, in home offices, cafes, and on public transport.
As you can’t predict where you’re audience will be watching from or what device they’ll be using, you need to prepare for all possibilities, and adding captions to all your videos is one of the best ways to do exactly that.
By ensuring your videos can be enjoyed by everyone, you’ll be increasing the chances of your content being both discovered and engaged with.
Captions for social media
On many social media platforms, including Facebook and Instagram, videos will — by default — play without any sound. Many users will even watch a social media video without turning up the volume on their device. As such, having captions on your video is essential to capturing a viewer’s attention and ensuring your content is accessible.
Captions can also be translated into different languages and help non-native speakers better understand your video and digest the information you’re trying to convey.
Captions for educational videos
Captions are equally important when it comes to creating educational videos. By making it easier to follow and understand what’s happening on screen, reinforcing key concepts, and improving knowledge retention, captions can enrich a pupil’s learning experience. Plus, closed captions are essential for accessibility, ensuring all students have equal access to the information provided.
Furthermore, students who might struggle to follow spoken lectures can read along with the text, ensuring that they don’t miss any important information. Closed captions translate into different languages, making educational videos more inclusive and accessible for international students.
Captions for business videos
Captions in business videos can increase engagement and retention among employees and customers, making the content more memorable and impactful. Whether it’s a video for internal communication or technical communication, including captions in your business videos will ensure your message is accessible to everyone, no matter where they are, or what device they’re watching on.
Captions also help reinforce key points and ideas. They make it more likely that people remember the information. Adding them to business videos is a simple and effective way to ensure that messages are communicated clearly and effectively to all audiences across a range of formats and platforms.
Your video isn’t really done until it has captions
Captions on videos help viewers understand not just what’s being said onscreen, but also the context around what other audio may be happening in your video. They’re important for helping people who are deaf or hard of hearing access your content, but also help anyone who may be in a situation where they choose to turn down the audio.
Regardless, including captions in your videos is an essential part of ensuring its success.
Easily add captions to your videos now!
Download a free trial of Camtasia to seamlessly add subtitles to your video.
Download NowAdd captions and subtitles to videos, FAQs
With TechSmith’s Capture app, available in the App Store, you can easily record your iPhone screen and import media from Photos. From there, quickly transfer your video to Camtasia to add captions.
Yes! Here’s how to add captions to a video automatically with Camtasia. Simply use the “Speech-to-Text” function (currently only available on Windows), which generates captions by transcribing the audio in your video. Once they are created, you can easily edit and customize them.
Share