

Need to quickly capture a video of your screen? If you’re on a Mac, then you’re in luck.
QuickTime is Apple’s built-in screen recording tool for Mac users, designed for capturing tutorials, presentations, and meetings with ease.
While it’s straightforward, new users often find it confusing, particularly when it comes time to stop the recording. The lack of clear controls can lead to frustration, especially if you’re not familiar with the menu bar options. Understanding how to navigate QuickTime can help streamline the recording process and make it more enjoyable.
In this guide, we will break down the entire process of recording a video using the app.
Step-by-step guide: How to stop QuickTime screen recording
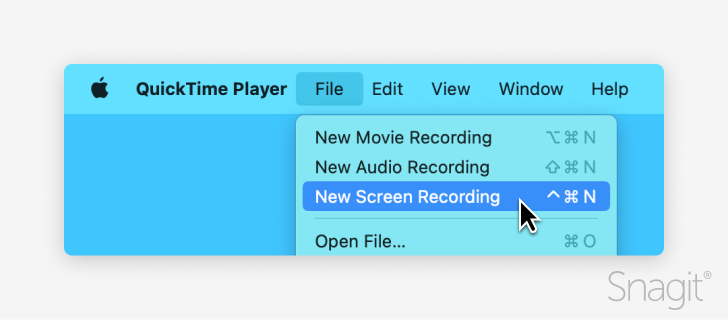
Step 1: Start a QuickTime screen recording on Mac with File: New Screen Recording
First, select QuickTime Player from your Applications folder or the dock. Once you open QuickTime Player, start by clicking on “File” in the top menu. Then, select “New Screen Recording” from the drop-down menu to start a new recording in QuickTime. From there, you can choose to record your entire screen or just a specific portion of it.
The red recording button will appear on the right side of the options tray. In addition, there is a small arrow that opens up access to the recording settings. Once you have selected the best recording option to suit your needs, you will click the record button.
As another option, you can also click on the screen when a camera icon appears, and it will start the recording for you.
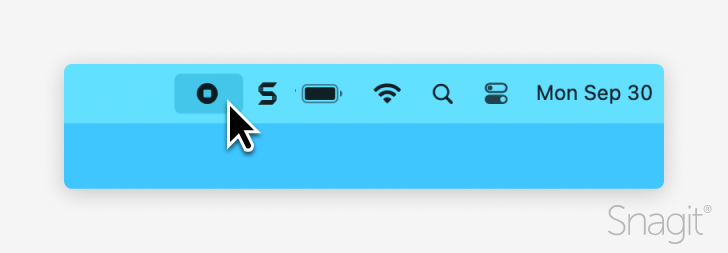
Step 2: Stop the recording with Control + Command + Esc
To stop the recording, locate the stop button in the menu bar at the top of the screen after the recording begins. Click the square stop button whenever you are ready to end the recording. It appears as a small square icon and will only be visible while you’re recording.
You can also use the keyboard shortcut Command + Control + Esc to end the recording.
Tip: If QuickTime Player becomes unresponsive, you can use the Activity Monitor to force quit. Select QuickTime player and click the “Quit” button. However, this will not save your recording.
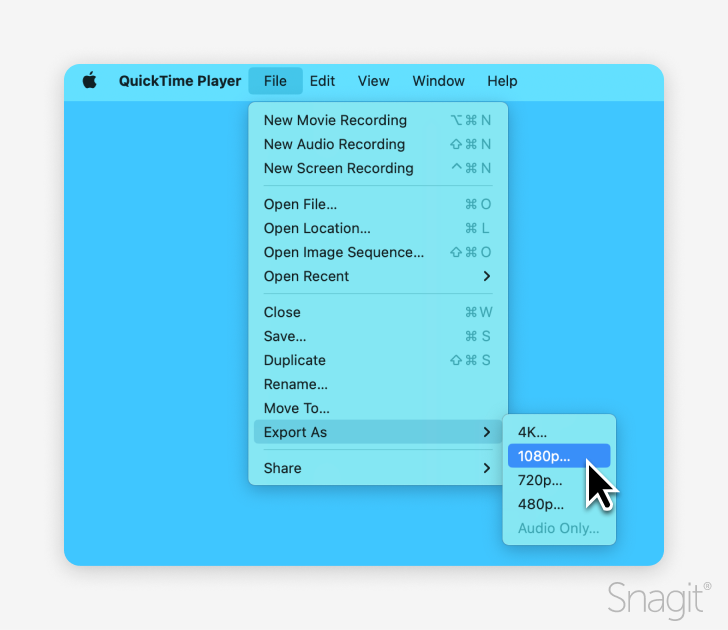
Step 3: Save the recording
Once you hit the stop button, QuickTime Player will automatically open to show you your screen recording. But it has not been saved just yet!
Click on File in the menu bar at the top of your screen, then select Save or Export As if you want to choose a specific format or resolution. A dialog box will appear, allowing you to enter a name for your file and select a location on your computer where you want to save it. After you’ve chosen your file name and location, click Save. Your recording will now be saved and ready for you to access whenever you need it.
Tips for editing your QuickTime screen recording
While QuickTime Player is a versatile tool for media playback and screen recording, its video editing capabilities are quite limited. For users looking to make substantial edits to their videos, QuickTime’s basic features might not be enough. For anything beyond the most straightforward edits, users will need to turn to more powerful video editing software like Camtasia.
Using Camtasia for quick and advanced editing
Need to go a little more in-depth and add some pizzazz to your screen recording? Camtasia is what you’re looking for! With Camtasia, you can add transitions, captions, and visual effects to your recorded video. These features go far beyond what QuickTime can offer.
Camtasia’s extensive library of transitions enables you to create smooth, professional transitions between scenes or clips, whether you want a simple fade or a more dynamic swipe or zoom effect. For clarity, you can easily insert captions or subtitles to improve comprehension, especially in instructional videos or presentations.
Additionally, Camtasia offers a range of visual effects, such as highlighting key areas of the screen, adding shadows or reflections, and even applying animations or zoom effects to focus attention on important elements. These tools make it easy to turn a basic QuickTime recording into a polished, engaging video with just a few clicks.
The easiest way to edit videos
Stop wasting time and discover how Camtasia Editor makes creating incredible videos easier than ever.
Free Download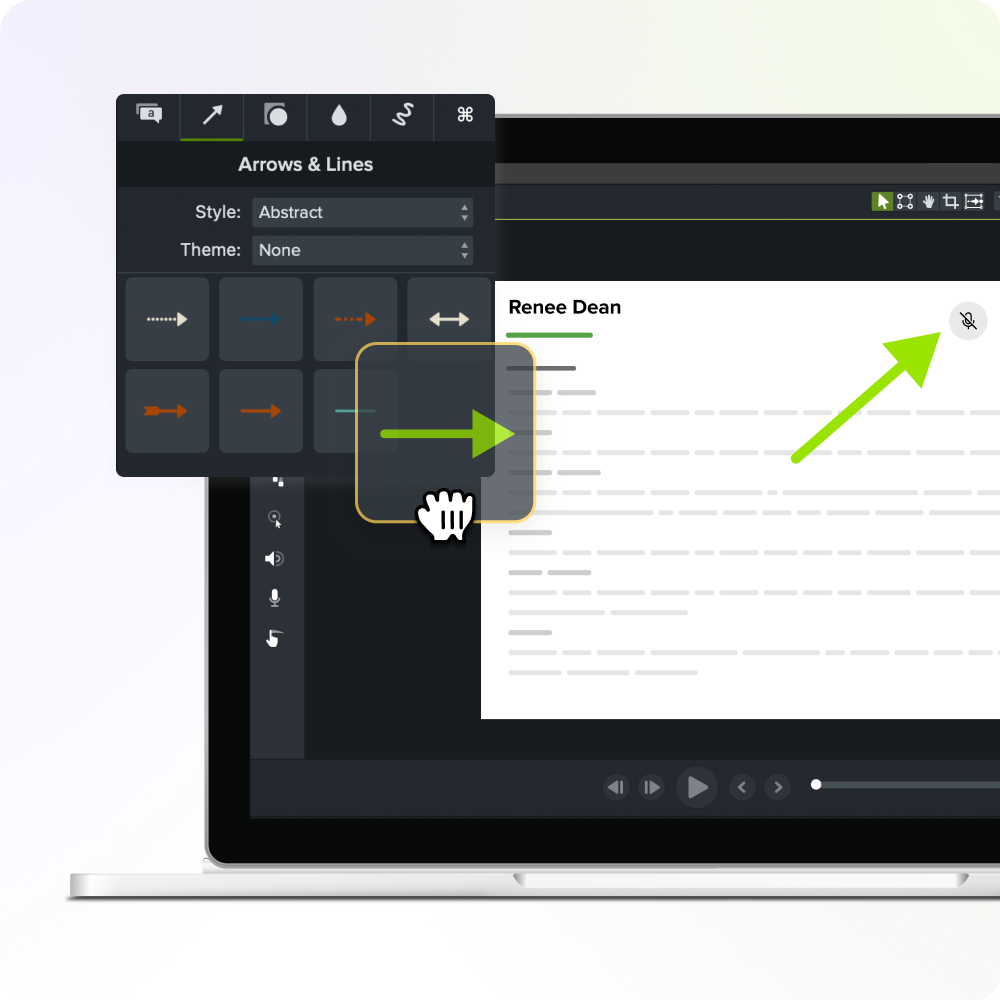
Conclusion
With Apple’s QuickTime Player, it is easy to start and stop a screen recording. Whether you are recording a tutorial, presentation, or meeting, having a powerful screen recorder is great for virtual communication.
If you’re looking to edit together a video, screen recordings are a great place to start. With Camtasia, you can bring your screen recordings to life with full effect.
Share