

How often do coworkers interrupt you for help?
Did you know that 46% of workers are interrupted more than six times a day? In our study of workplace flexibility, these employees reported decreased productivity or higher stress.
Improve everyone’s quality of life with a little documentation. Here is everything you need to create step-by-step how-to instructions comfortably and confidently.
The opportunities to share procedures, explanations, and methods are everywhere.
- Do you train team members on a new process?
- Onboard customers to your commercial product or service?
- Facilitate open enrollment on the new HR software?
- Instruct how to empty the coffee grounds?
- Contribute to the customer knowledge base?
Let’s learn how to make a how-to guide.
Stop repeat questions
Create clear videos and guides with Snagit so you only have to explain tasks once.
Try it Free
Step-by-step instructions are one part of an internal knowledge base
A quick tutorial is a step-by-step guide for completing a specific task.
- Clear – Readers should be able to follow the steps. Often, this means combining text with pictures or videos.
- Engaging – Organize the guide to hold readers’ attention and help them save time.
- Relevant Information – Provide context and use cases that help the reader understand why it’s valuable to them.
Other important parts of a knowledge base differ
- Training manual – Don’t try to replace in-depth training or a certification course.
- Reference guide – Focus on one specific goal your audience can accomplish.
- User manual – Include a few tips, caveats, or good-to-knows, not every edge-case scenario.
- Blog Posts – Simplify content for customer-facing marketing strategies and marketing campaigns. Or replace with case studies or bulleted lists to help with purchasing decisions.
Step 1: Understand your target audience’s pain points
Before you begin, identify your target audience, their goals, and their pain points or knowledge gaps to be addressed with your guide. It may be helpful to:
- Conduct surveys
- Peruse online forums
- Solicit customer feedback
Tailor your guide to your audience’s skill level and point of view
You’ll also want to know your readers’ comfort with the topic. Different audiences have different skill levels. An excellent how-to guide is suited to the technical abilities of the target audience, whether beginners or experts.
Review search terms and feedback on existing training or educational materials. Talk to your customer support team for insight into the customer experience. Understand the keywords your audience uses—for example, in internet searches. What language do they use to describe the topic, their trouble, or points of confusion?
Step 2: Structure your guide
Create step-by-step numbered lists and bullet points
Unsurprisingly, numbered lists are more accessible to follow than a dense wall of text. Break down your guide into discrete steps or manageable chunks.
Remember that your audience may switch back and forth between your guide and the task as they read. Numbering or lettering the steps helps the audience follow along.
Follow a guide template
If your organization creates multiple guides or a series, consider using a guide template. Consistent guides built from the same template help your readers know what to expect. It also makes writing instructions and creating guides much faster and easier for others in your organization!
For example, consider including in your template an introduction to identify:
- The intended audience for the guide.
- The guide’s goal, or what a reader can expect to accomplish.
- Software, tools, or resources needed to complete the process.
- Contact information or help resources in case the reader gets into trouble.
Consider a conclusion in your template:
- To recap the purpose or goal of the guide, what should your reader be able to do now?
- Next steps or follow-on guides in the series
- Contact information or help resources
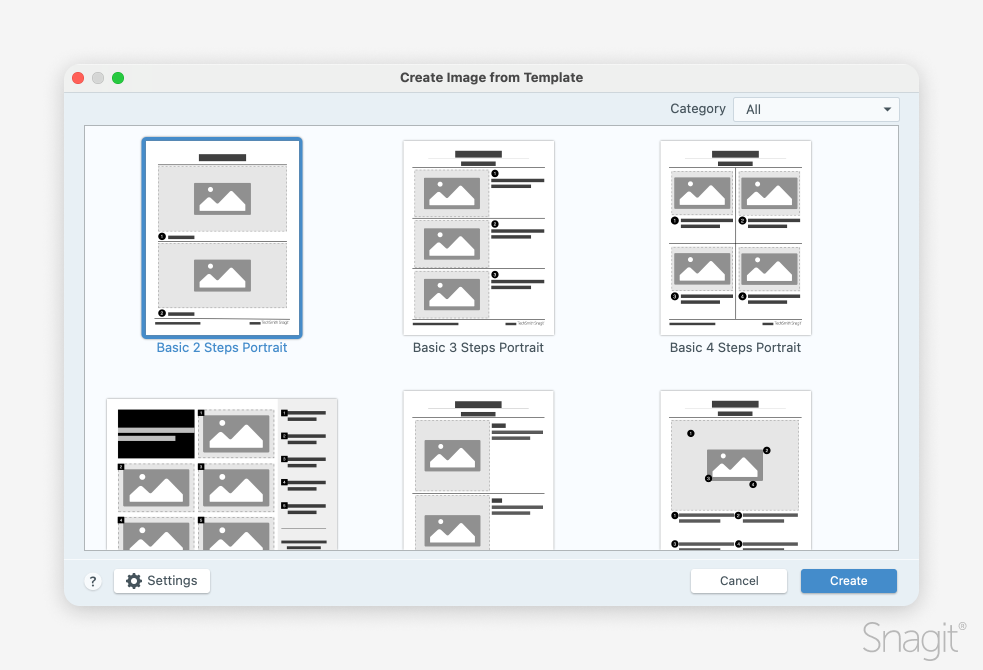
Be sure to check out Snagit’s ready-made, professionally designed templates. We even have a category of “Steps” templates designed to fit 2-6 steps on a single page. These templates can also be modified to add additional steps on more pages as needed!
Step 3: Write step-by-step instructions
Create clear and concise steps
Now it’s time to write!
Rather than relying on my memory (admittedly poor), I first walk through the task myself, taking note of each step as I go. Especially for familiar tasks I do regularly, it’s important to observe potential stumbling blocks for new users.
Ensure that the language and terms used in your guide are consistent with what the user sees on their screen.
Watch out! Ask yourself if there are points where what you see may differ from what your audience sees, or where steps may vary. For instance, is it possible that your reader is using a different software version, operating system, or browser?
Add images
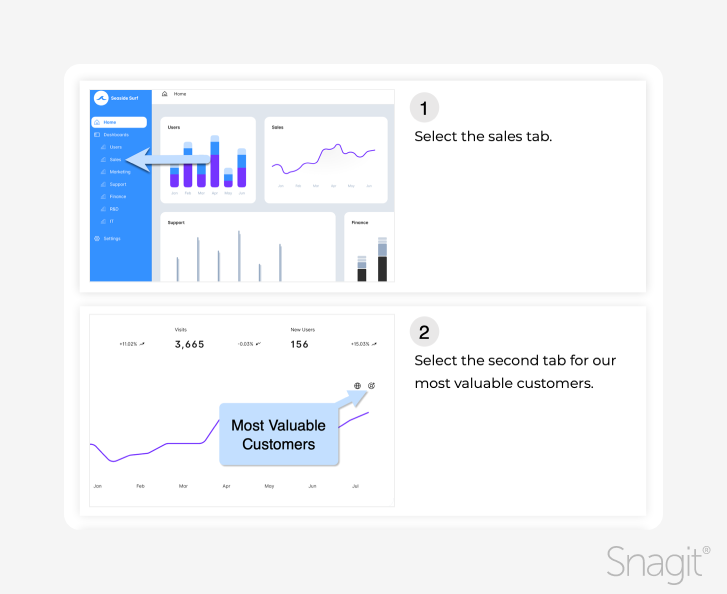
I take screenshots or photos in real-time while walking through the task.
Images help to illustrate a step or provide context. They help ensure that your guide is easy to understand and that your audience can follow regardless of their skill level.
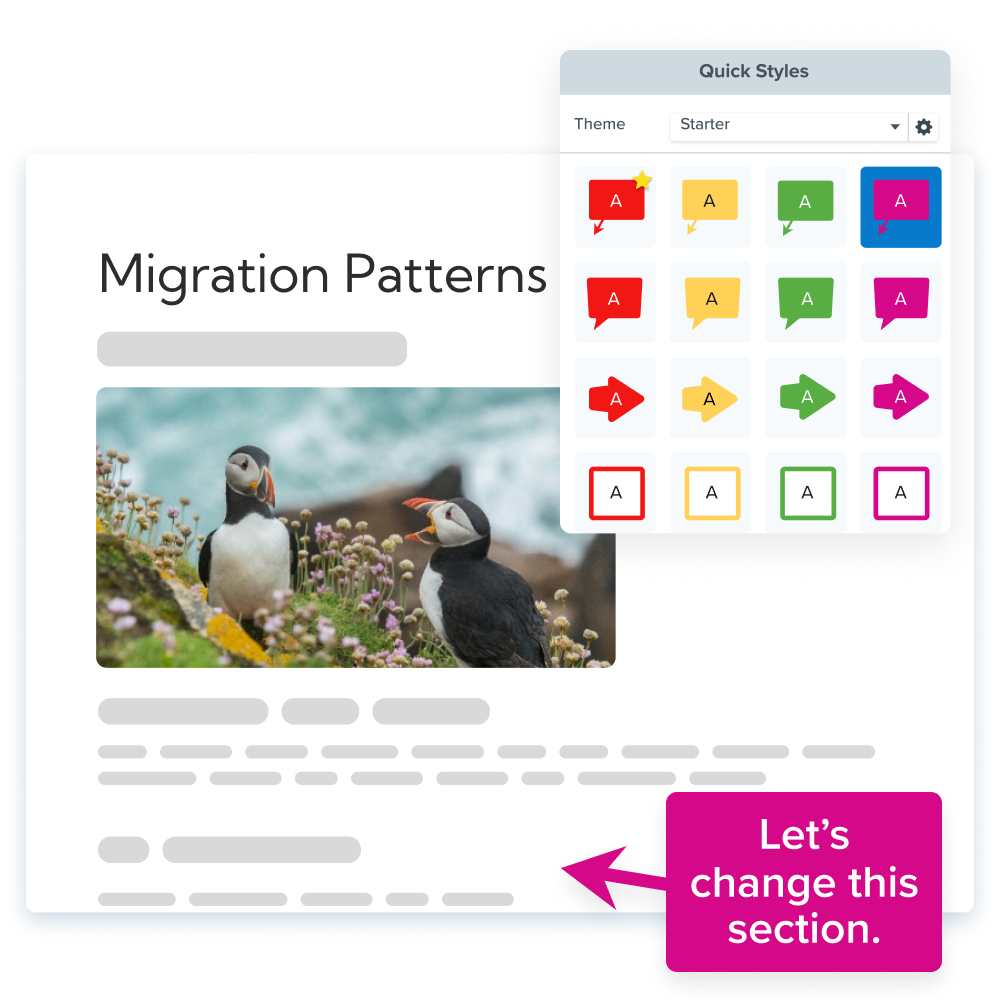
Annotate the images with arrows, comments, or labels. These types of visuals ensure your reader connects the text and the image.
Be sure to remove extraneous details from the images that could confuse or distract your reader from the focal point.
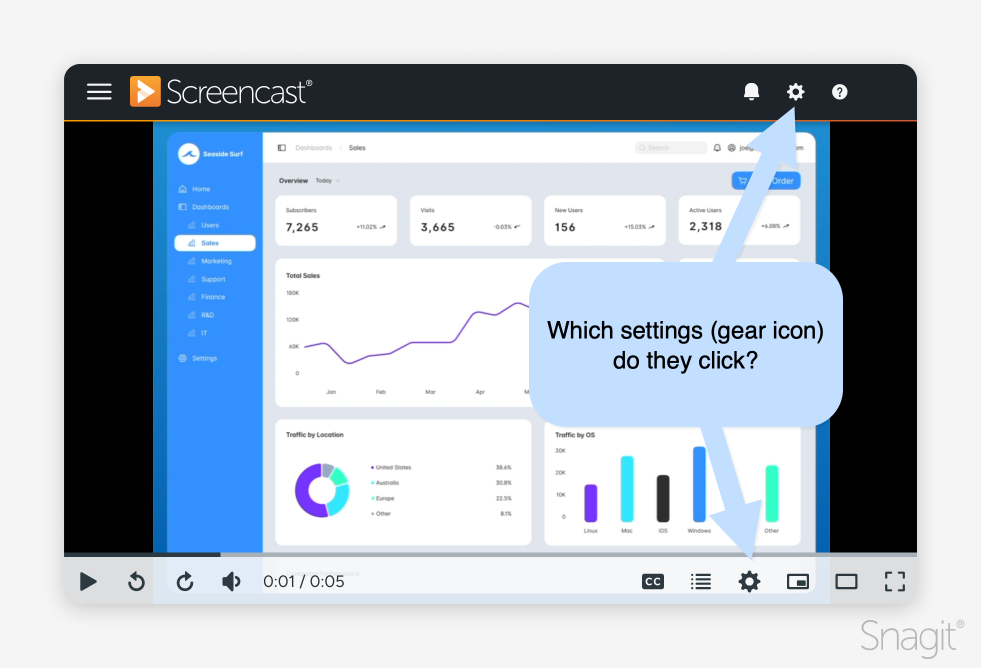
Remember the audience you identified in Step 1 and their level of familiarity? Do you need to explain where you can find each item on the screen?
For example, it may be helpful when you tell someone to click the “Settings” button to explain that it looks like a gear. You may also need to emphasize the locations of easily-missed icons or duplicate elements on the screen.
Step 4: Add additional information and resources
Include relevant links and resources
If the task documented in your guide requires or can be supplemented with additional resources, be sure to include them. These might be project source files or links to related or more in-depth tutorials.
This may include download links for other products. Your how-to guide shouldn’t be a sales or marketing page in disguise. If another software suits your audience’s needs better, offer guidance, especially if free options exist.
Provide context and background
Help your readers understand why your guide is of use to them. Include relevant examples or what they should be able to do once they’ve followed the guide.
In a complex process, providing background information in the guide can justify the necessity of specific steps. This extra context can help users grasp the reason behind the process, especially if it is unfamiliar.
Annotate and edit screenshots with Snagit
Professional mark-up tools and powerful features make it easy to create helpful images.
Try it Free
Step 5: Test your how-to guide
Ensure accuracy and usability
Once the written list of steps with supporting visuals is assembled, review your guide for accuracy:
- Did you miss any steps?
- Is the language consistent with what readers will see?
- For software guides, ensure that the instructions are accurate for all versions your readers might be using. Alternatively, specify the particular version covered and provide information on where to get help for other versions.
Having another person review your guide—especially someone unfamiliar with the process—is always a good idea. This person can test it for you as an actual new user might. If there are areas you are unsure are clear, highlight those for special attention from your reviewer.
This person can help ensure your documentation is not only accurate but easy to follow:
- Is the language clear and easy to follow?
- Are there overly complex steps that should be broken down further?
- Are the right images included to provide clarity and context?
Knowing someone might find mistakes or suggest improvements to your documentation can be uncomfortable. However, your readers are more likely to be successful if you fully leverage your team to spot potential problems.
If no one else can review the guide, go through it yourself for accuracy and usability. Wait a day or two from when you finish writing a how-to guide before you review it, assuming you aren’t on a deadline. This will help you approach the guide with a fresh perspective, as if you were a new user.
Make revisions based on feedback
And, of course, revise the guide as needed based on reviews. Be prepared to receive feedback from your audience and be open to iterating on your guide as needed.
Step 6: Publish and distribute your guide
Choose the right platform
When it’s time to publish your guide, consider the best location and method of distribution. Some things to consider:
- If this documentation is internal, making it easily findable can significantly improve productivity.
- If public-facing, does your guide need to be distributed? For example, emailed by sales teams or Customer Success Managers to new customers?
- Or, if placed on your website, how will your intended audiences find it?
- If you plan to share your guide widely, it’s better to send online links rather than using PDFs or posting in various places. Manage guides in a single location to facilitate updates and prevent outdated versions from circulating.
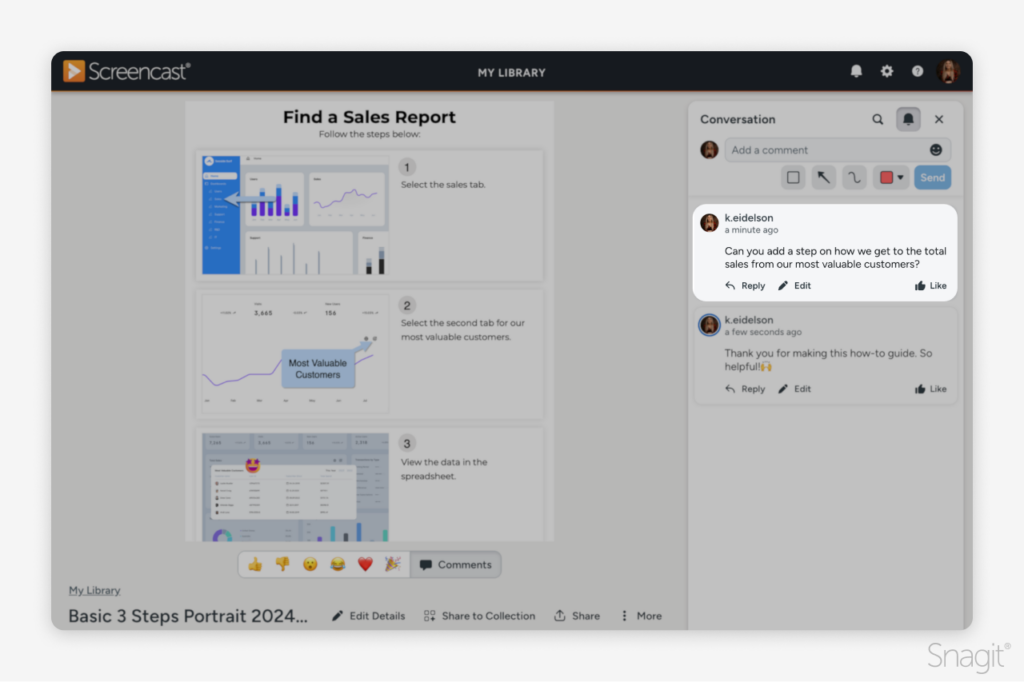
- Will some of your readers have questions, comments, or tips that are helpful to others? Consider posting your guide to a platform with built-in conversations, like Screencast.
Optimize for SEO
If posted publicly, how will your intended audience find your guide?
Ensure your instructions match the on-screen content. Your guide’s descriptive sections should mirror your readers’ language where feasible.
Researching your audience in Step 1 will give you insight into their language. Incorporate this into your guide to help people find it.
Consider using SEO optimization tools such as SEMrush or the Yoast plugin for WordPress. Improving SEO improves the ability to find your content when needed.
Best practices for writing a practical how-to guide
Use simple, direct language
The most crucial part of evaluating a practical how-to guide is determining if it is easy to follow. Use simple, direct language that your users can follow, no matter their skill level.
Include images to clarify each step
Help avoid confusion for your readers. Show what you mean with an annotated screenshot or photo for each step.
Update your guide regularly
Ensure your guide remains accurate by reviewing and updating it regularly. If available online, updates also help improve SEO and ranking.
The important part: Make it easy on yourself
Don’t let creating a how-to guide take longer than the training itself!
Use Snagit, the market leader in screen capture software. You’ll love using an all-in-one solution for screen capture, gif creation, annotations, templates, and flexible export options.
Stop repeat questions
Create clear videos and guides with Snagit so you only have to explain tasks once.
Try it Free
Share